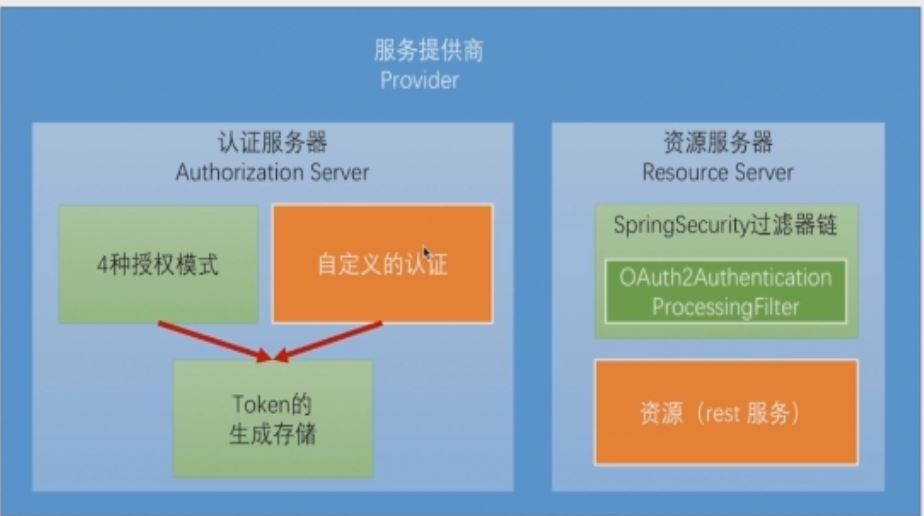
学习Spring Security OAuth认证(一)-授权码模式
一.环境
spring boot+spring security+idea+maven+mybatis
主要是spring security
二.依赖
    <dependency>

            <groupId>org.springframework.security.oauth</groupId>

            <artifactId>spring-security-oauth2</artifactId>

        </dependency>

        <dependency>

            <groupId>org.springframework.boot</groupId>

            <artifactId>spring-boot-starter-security</artifactId>

        </dependency>
不需要版本号,spring boot的pom中已经声明了合适的版本号
三.springsecurity登录配置
package com.haitian.security;

import com.haitian.service.security.CustomUserService;

import com.haitian.utils.PathUtils;

import org.springframework.beans.factory.annotation.Autowired;

import org.springframework.context.MessageSource;

import org.springframework.context.annotation.Bean;

import org.springframework.context.annotation.Configuration;

import org.springframework.context.support.ReloadableResourceBundleMessageSource;

import org.springframework.security.authentication.dao.DaoAuthenticationProvider;

import org.springframework.security.authentication.encoding.BasePasswordEncoder;

import org.springframework.security.authentication.encoding.Md5PasswordEncoder;

import org.springframework.security.config.annotation.web.builders.HttpSecurity;

import org.springframework.security.config.annotation.web.configuration.EnableWebSecurity;

import org.springframework.security.config.annotation.web.configuration.WebSecurityConfigurerAdapter;

import org.springframework.security.core.userdetails.UserDetailsService;

import org.springframework.security.crypto.bcrypt.BCryptPasswordEncoder;

import org.springframework.security.crypto.password.PasswordEncoder;

import org.springframework.security.web.authentication.AuthenticationFailureHandler;

import org.springframework.security.web.authentication.AuthenticationSuccessHandler;

import org.springframework.security.web.authentication.SimpleUrlAuthenticationFailureHandler;

import org.springframework.security.web.authentication.UsernamePasswordAuthenticationFilter;

import java.util.Locale;

/**

 * User:zhangweixiao

 * Description:

 */

@Configuration

@EnableWebSecurity

public class WebSecurityConfig extends WebSecurityConfigurerAdapter {

    @Autowired

    private AuthenticationFailureHandler authenticationFailureHandler;

    @Autowired

    private AuthenticationSuccessHandler authenticationSuccessHandler;

    @Autowired

    private  UserDetailsService userDetailsService;

    @Bean

    public BasePasswordEncoder getPasswordEncoder()

    {

        return new Md5PasswordEncoder();

    }

   @Bean

    public DaoAuthenticationProvider authProvider() {

        DaoAuthenticationProvider authProvider = new DaoAuthenticationProvider();

        authProvider.setPasswordEncoder(getPasswordEncoder());

        authProvider.setUserDetailsService(userDetailsService);

        return authProvider;

    }

    @Override

    protected void configure(HttpSecurity http) throws Exception {

        ValidateCodeFilter validateCodeFilter=new ValidateCodeFilter();

        validateCodeFilter.setAuthenticationFailureHandler(authenticationFailureHandler);

        http

                .authorizeRequests()

                .antMatchers("/**").permitAll()

                .and()

                .addFilterBefore(validateCodeFilter, UsernamePasswordAuthenticationFilter.class)

                .formLogin().loginPage("/login").loginProcessingUrl("/zshop_login")

                .failureHandler(authenticationFailureHandler)

                .successHandler(authenticationSuccessHandler)

                .and()

                .csrf().disable();

    }

}
/**

 * 前台登录的数据库桥梁

 */

@Service

public class CustomUserService implements UserDetailsService{

    @Autowired

    private UserService userService;

    /**

     * @param username

     * @return

     * @throws UsernameNotFoundException

     * @throws DataAccessException

     */

    public UserDetails loadUserByUsername(String username) throws UsernameNotFoundException, DataAccessException {

        User user = this.userService.getUserByUserName(username);

        if (user == null) {

            throw new UsernameNotFoundException("用户名不存在");

        }

        Set authorities = new HashSet();

        for (Role role : user.getRoles()) {

            GrantedAuthority grantedAuthority = new SimpleGrantedAuthority(role.getRoleCode());

            authorities.add(grantedAuthority);

        }

        user.setAuthorities(authorities);

        return user;

    }

}
数据库中User表对应的User类继承了UserDetails,这里就不发了.
加密算法最好用bcrypt,因为数据库存的是md5的,所以先用md5了.
了解加密:http://www.cnblogs.com/ptqueen/p/8448396.html
配置完成之后要保证能登录成功.
四.配置认证服务器

1.配置注解提供认证服务器
@Configuration

@EnableAuthorizationServer

public class AuthorizationServerConfig {

}
2配置client-id和secret.
security:

  oauth2:

    client:

      client-id: zshop

      client-secret: zshop_secret
client-id就是第三方申请认证的id,前后端分离中前端也就相当于第三方.
你的认证服务器就好比QQ的认证服务器,你的前端就好比需要QQ第三方登录的网站.
3启动当前模块
可以看到控制台中oath2包的为我们做的mapping
 Mapped "{[/oauth/authorize]}" onto public org.springframework.web.servlet.ModelAndView org.springframework.security.oauth2.provider.endpoint.AuthorizationEndpoint.authorize(java.util.Map<java.lang.String, java.lang.Object>,java.util.Map<java.lang.String, java.lang.String>,org.springframework.web.bind.support.SessionStatus,java.

 Mapped "{[/oauth/authorize],methods=[POST],params=[user_oauth_approval]}" onto public org.springframework.web.servlet.View org.springframework.security.oauth2.provider.endpoint.AuthorizationEndpoint.approveOrDeny(java.util.Map<java.lang.String, java.lang.String>,java.util.Map<java.lang.String, ?>,org.springframework.web.bind.support.SessionStatus,java.security.Principal)
4.用rest client插件测试
关于插件简单介绍请看:
http://www.cnblogs.com/ptqueen/p/8449046.html
关于oath2文档
https://tools.ietf.org/html/rfc6749#page-24
上面是oath2文档中需要认证的参数信息
先这样测试,http://localhost:8082/oauth/authorize?response_type=code&client_id=zshop&redirect_uri=https://cnblogs.com&scope=all
五.获取授权码code

关于授权码模式的流程请看:
http://www.cnblogs.com/ptqueen/p/8449150.html
成功的话会跳转到登录页面,这个登录页面相当于从某个论坛QQ登录跳转出来的登陆窗口
登录成功后出现这样一个
OAuth Approval
Do you authorize 'zshop' to access your protected resources?
如果是自己的前端登录成功之后应该会直接拿到所有权限,不显示此页面,然后继续换取令牌,
第三方QQ登录的 approval是和登录页面一起的.后面看看怎么配置.
同意授权之后会跳转到https://cnblogs.com,同时会携带一个code,这个code就是授权码.下一步需要通过授权码来换取令牌.
https://www.cnblogs.com/?code=D120US
六.发送授权码到认证服务器换取令牌
参照oauth2文档
https://tools.ietf.org/html/rfc6749#page-29
post的参数有
grant_tpye,值必须为authorization_code
code,第一篇中获得的授权码
redirect_uri,必须和第一篇相同
client_id,配置文件中定义的client_id
scope,获取授权码时定义的scope
请求的header中需要包含client-id和client-secret.

七.获得令牌
成功之后即可获取,令牌是有有效期的,必须在有效期之前进行刷新
{"access_token": "f035137f-def1-4bae-9adc-718a26e6c141","token_type": "bearer","refresh_token": "e7f65ace-6c5d-44a6-94fb-e7ca65ff12fd","expires_in": 43199,"scope": "all"}
学习Spring Security OAuth认证(一)-授权码模式的更多相关文章
- 阶段5 3.微服务项目【学成在线】_day16 Spring Security Oauth2_06-SpringSecurityOauth2研究-Oauth2授权码模式-申请令牌
3.3 Oauth2授权码模式 3.3.1 Oauth2授权模式 Oauth2有以下授权模式: 授权码模式(Authorization Code) 隐式授权模式(Implicit) 密码模式(Reso ...
- 阶段5 3.微服务项目【学成在线】_day16 Spring Security Oauth2_07-SpringSecurityOauth2研究-Oauth2授权码模式-资源服务授权测试
下面要完成 5.6两个步骤 3.3.4 资源服务授权 3.3.4.1 资源服务授权流程 资源服务拥有要访问的受保护资源,客户端携带令牌访问资源服务,如果令牌合法则可成功访问资源服务中的资 源,如下图 ...
- 单点登录 - OAuth 2.0 授权码模式(一)
OAuth 2.0定义了四种授权方式 授权码模式(authorization code) 简化模式(implicit) 密码模式(resource owner password credentials ...
- Spring Security OAuth2 Demo —— 授权码模式
本文可以转载,但请注明出处https://www.cnblogs.com/hellxz/p/oauth2_oauthcode_pattern.html 写在前边 在文章OAuth 2.0 概念及授权流 ...
- Oauth2.0认证---授权码模式
目录: 1.功能描述 2.客户端的授权模式 3.授权模式认证流程 4.代码实现 1.功能描述 OAuth在"客户端"与"服务提供商"之间,设置了一个授权层(au ...
- OAuth 2.0之授权码模式
转载自:http://www.ruanyifeng.com/blog/2014/05/oauth_2_0.html OAuth 2.0授权码模式 授权码模式(authorization code)是功 ...
- Spring Security OAuth2 授权码模式
背景: 由于业务实现中涉及到接入第三方系统(app接入有赞商城等),所以涉及到第三方系统需要获取用户信息(用户手机号.姓名等),为了保证用户信息的安全和接入方式的统一, 采用Oauth2四种模式之一 ...
- asp.net权限认证:OWIN实现OAuth 2.0 之授权码模式(Authorization Code)
asp.net权限认证系列 asp.net权限认证:Forms认证 asp.net权限认证:HTTP基本认证(http basic) asp.net权限认证:Windows认证 asp.net权限认证 ...
- Spring Security OAuth笔记
因为工作需要,系统权限安全方面可能要用到Spring Security OAuth2.0,所以,近几天了解了一下OAuth相关的东西.目前好像还没有系统的学习资料,学习主要是通过博客,内容都是大同小异 ...
随机推荐
- Latex: 减少图与文字之间的空白间隙
参考: Remove space after figure and before text Latex: 减少图与文字之间的空白间隙 论文中图与文字之间的空白间隙过大,导致排版不大美观.解决方法是在\ ...
- 《算法竞赛入门经典》刘汝佳 C语言部分(前四章)“注解与习题” 之思索 -<1>
此书我购于去年的十一月份,也是经前人推荐购买的一本比较有用的书籍,在寒假自学此书,其简洁清晰高效的示例代码令我印象深刻,于是我打算把这本书的前四章后面的注解与习题(未给出标准解答)认真的去思索和研究, ...
- Python深入:Distutils发布Python模块--转载
https://blog.csdn.net/gqtcgq/article/details/49255995 Distutils可以用来在Python环境中构建和安装额外的模块.新的模块可以是纯Pyth ...
- 【BZOJ】4011: [HNOI2015]落忆枫音
题目链接:http://blog.csdn.net/popoqqq/article/details/45194103 写代码的时候也没有很清晰....具体看这里吧 #include<iostre ...
- 解決 Android Studio 不停 Indexing 的問題(Updating Indices: Indexing paused due to batch update)
遇到這個問題通常是 IDE 更新後,或是反覆使用 Android Studio 開啟其他專案所導致,解決方法其實非常簡單喔! 点击 這個選項的功用是「清除 IDE 暫存並重啟」,沒錯,會出現上述情形的 ...
- python 操作剪切板
python3 在使用网上找到的一些使用剪切板的片段时发现存在写入剪切板后乱码的情况, 研究后发现python3不能使用SetClipboardData方法, 要使用SetClipboardText ...
- oracle的批量操作sql语句
1.批量删除/批量更新 mapper: <update id="updatePrjStateByFPrjId" parameterType="string" ...
- git 修改默认编辑器
vim,notepad(windows自带),notepad++ 当然要选notepad++ 1.首先下载notepad++ 2.将notepad++安装目录放到path中 3.git config ...
- LaTeX 交叉引用系统简介
目录 摘要 1. 简介 2. 指定标签或标记符 3. 标签的位置 4. 引用的生成和更新 5. 引用相关的警告信息 6. 扩展引用功能的宏包 6.1 varioref宏包 6.2 cleveref宏包 ...
- ArcFace 2.0 Demo [C++]
环境: win10(10.0.16299.0)+ VS2017 sdk版本:ArcFace v2.0 OPENCV3.43版本 x64平台Debug.Release配置都已通过编译 下载地址:http ...
