SpringBoot 整合文件上传 elment Ui 上传组件
SpringBoot 整合文件上传 elment Ui 上传组件
本文章记录 自己学习使用 侵权必删!
前端代码
博主最近在学 elment Ui 所以 前端使用 elmentUi 的 upload 组件实现
- 因为 elmentui 是基于 vue 的环境 使用的 所以我们 得引用 vue 的 js 文件
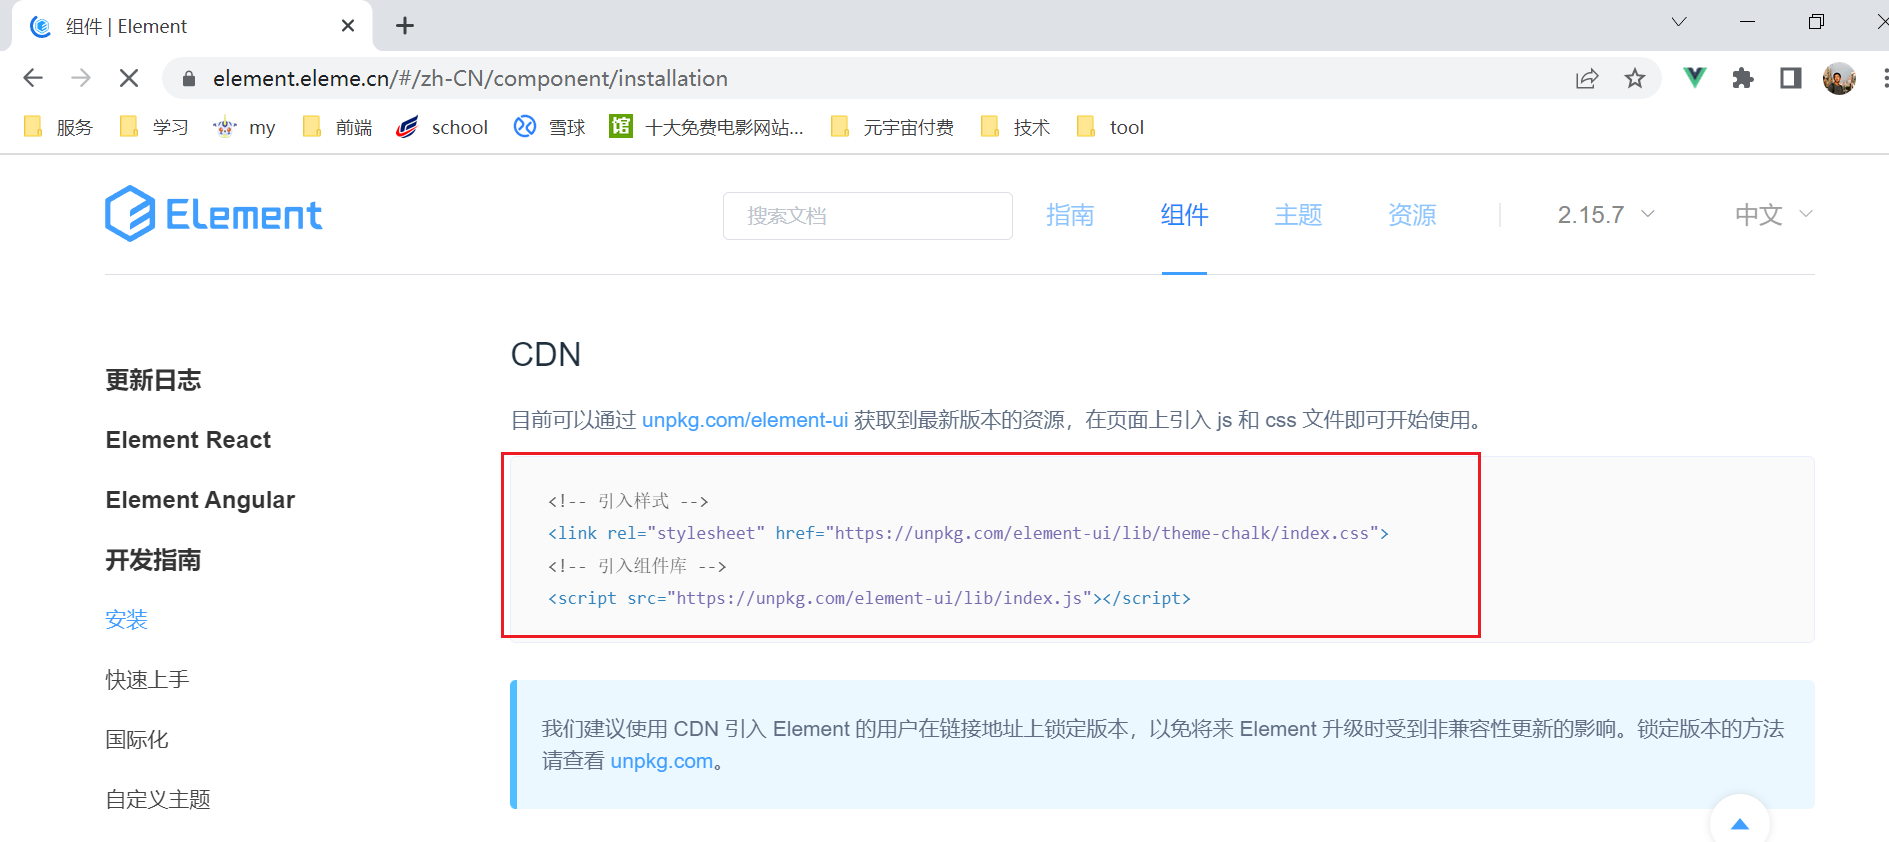
引入 elmentUi 的 css 和 js
我们采用官网的这种 cdn 的方式
- 本地的引入的方式 容易导致elementUI与 vue 版本不匹配
- 出现
Vue warn]: Injection “elForm” not found报错解决方法
<!-- 引入Vue -->

<script src="https://cdn.jsdelivr.net/npm/vue/dist/vue.js"></script>

<!-- 引入样式 -->

<link

  rel="stylesheet"

  href="https://unpkg.com/element-ui/lib/theme-chalk/index.css"

/>

<!-- 引入组件库 elementUi-->

<script src="https://unpkg.com/element-ui/lib/index.js"></script>
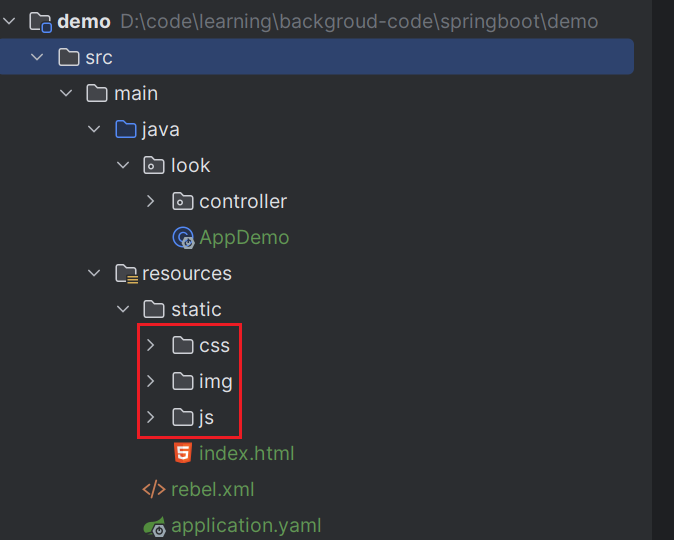
项目的目录结构:
搭建前端页面
页面效果
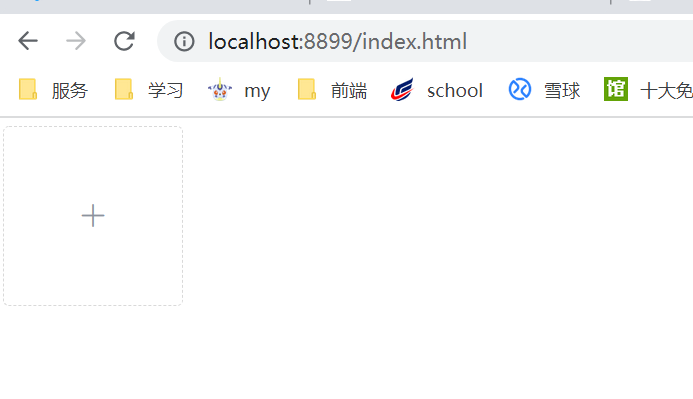
光光这些肯定不够 我们还需要前后端交互的页面
创建的文件名称:index.html
文件位置: /resources/static/index.html
<!DOCTYPE html>

<html lang="en">

  <head>

    <meta charset="UTF-8" />

    <title>测试文件上传</title>

    <!-- 引入Vue -->

    <script src="https://cdn.jsdelivr.net/npm/vue/dist/vue.js"></script>

    <!-- 引入样式 -->

    <link

      rel="stylesheet"

      href="https://unpkg.com/element-ui/lib/theme-chalk/index.css"

    />

    <!-- 引入组件库 elementUi-->

    <script src="https://unpkg.com/element-ui/lib/index.js"></script>

  </head>

  <body>

    <div id="app">

      <el-upload

        class="avatar-uploader"

        action="http://localhost:8899/upload"

        :show-file-list="false"

        :on-success="handleAvatarSuccess"

      >

        <img v-if="imageUrl" :src="data:imageUrl" class="avatar" />

        <i v-else class="el-icon-plus avatar-uploader-icon"></i>

      </el-upload>

    </div>

  </body>

  <script>

    new Vue({

      el: '#app',

      data: {

        // 图片的url

        imageUrl: '',

      },

      methods: {

        //上传成功

        handleAvatarSuccess(res) {

          // 上传的图片路径

          this.imageUrl = res

        },

      },

    })

  </script>

  <style>

    .avatar-uploader .el-upload {

      border: 1px dashed #d9d9d9;

      border-radius: 6px;

      cursor: pointer;

      position: relative;

      overflow: hidden;

    }

    .avatar-uploader .el-upload:hover {

      border-color: #409eff;

    }

    .avatar-uploader-icon {

      font-size: 28px;

      color: #8c939d;

      width: 178px;

      height: 178px;

      line-height: 178px;

      text-align: center;

    }

    .avatar {

      width: 178px;

      height: 178px;

      display: block;

    }

  </style>

</html>
所使用的依赖
找到 pom.xml
- 因为只用到了接口 我们导入 web 的依赖即可
<parent>

        <artifactId>spring-boot-starter-parent</artifactId>

        <groupId>org.springframework.boot</groupId>

        <version>2.5.0</version>

    </parent>

    <properties>

        <maven.compiler.source>8</maven.compiler.source>

        <maven.compiler.target>8</maven.compiler.target>

        <project.build.sourceEncoding>UTF-8</project.build.sourceEncoding>

    </properties>

	<!-- web的依赖-->

    <dependencies>

        <dependency>

            <groupId>org.springframework.boot</groupId>

            <artifactId>spring-boot-starter-web</artifactId>

        </dependency>

    </dependencies>
后端代码
controller
/**
* @author : look-word
* 2022-06-27 22:28
**/
@RestController
public class FileController {
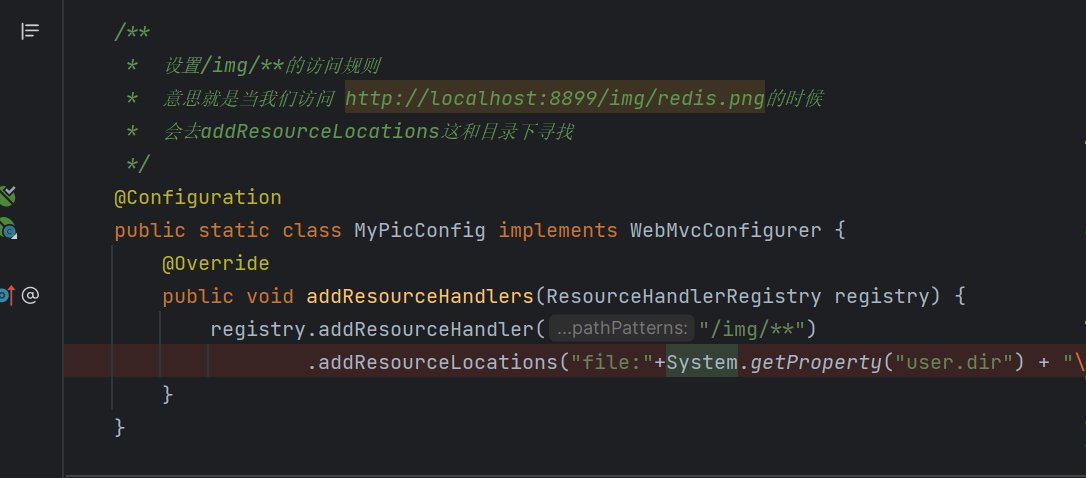
/**
* 设置/img/**的访问规则
* 意思就是当我们访问 http://localhost:8899/img/redis.png的时候
* 会去addResourceLocations这和目录下寻找
*/
@Configuration
public static class MyPicConfig implements WebMvcConfigurer {
@Override
public void addResourceHandlers(ResourceHandlerRegistry registry) {
registry.addResourceHandler("/img/**")
.addResourceLocations("file:"+System.getProperty("user.dir") + "\\src\\main\\resources\\static\\img\\");
}
}
/**
* 接收上传文件的接口
* @param urlFile 上传的文件
* @param request 请求
* @return
*/
@PostMapping("/upload")
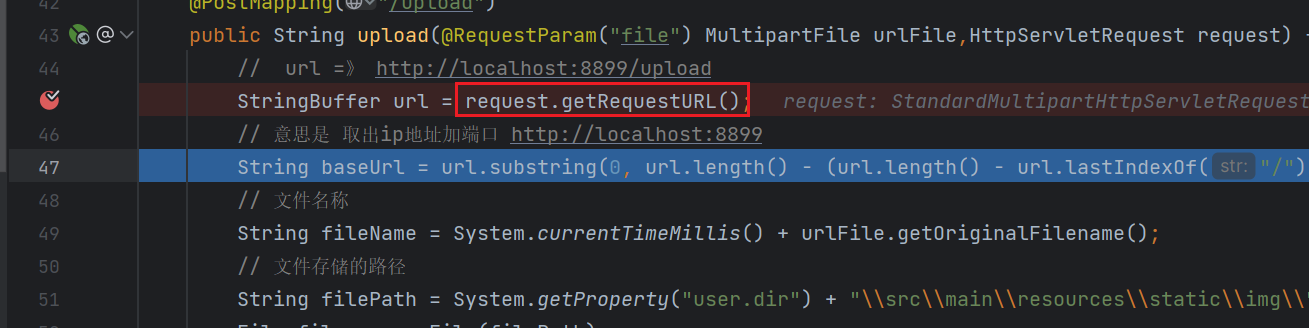
public String upload(@RequestParam("file") MultipartFile urlFile,HttpServletRequest request) {
// url =》 http://localhost:8899/upload
StringBuffer url = request.getRequestURL();
// 意思是 取出ip地址加端口 http://localhost:8899
String baseUrl = url.substring(0, url.length() - (url.length() - url.lastIndexOf("/")));
// 文件名称
String fileName = System.currentTimeMillis() + urlFile.getOriginalFilename();
// 文件存储的路径
String filePath = System.getProperty("user.dir") + "\\src\\main\\resources\\static\\img\\";
File file = new File(filePath);
// 当文件夹不存在 创建文件夹
if (!file.exists()) {
file.mkdir();
}
File dest = new File(filePath + fileName);
String storeUrlPath = "/img/" + fileName;
try {
// 写到文件夹中
urlFile.transferTo(dest);
System.out.println("上传成功");
} catch (IOException e) {
System.out.println("上传失败");
throw new RuntimeException(e);
}
return baseUrl+storeUrlPath;
}
}
解析代码
我们现在接收上传文件的接口 打上断点 下面一步一步解析里面的代码

- request.getRequestURL() 意思是 获取当前请求的地址
- http://localhost:8899/upload 是这种格式
- baseUrl: 是截取到http://localhost:8899这串字符
- 在返回到前端页面展示的时候需要用到
- fileName
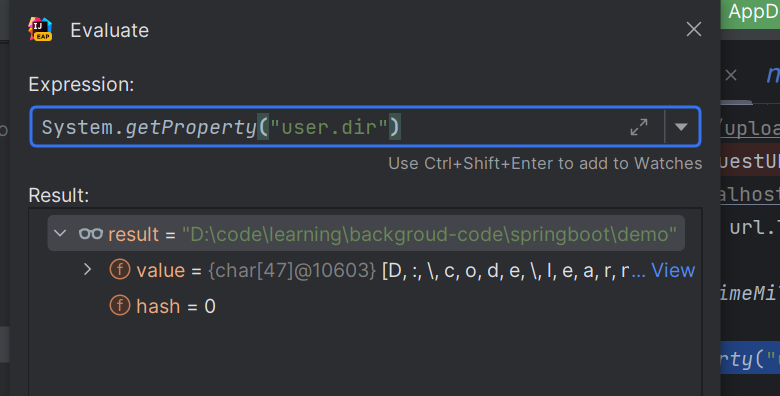
- System.getProperty("user.dir") 获取的时候 当前项目在磁盘的路径

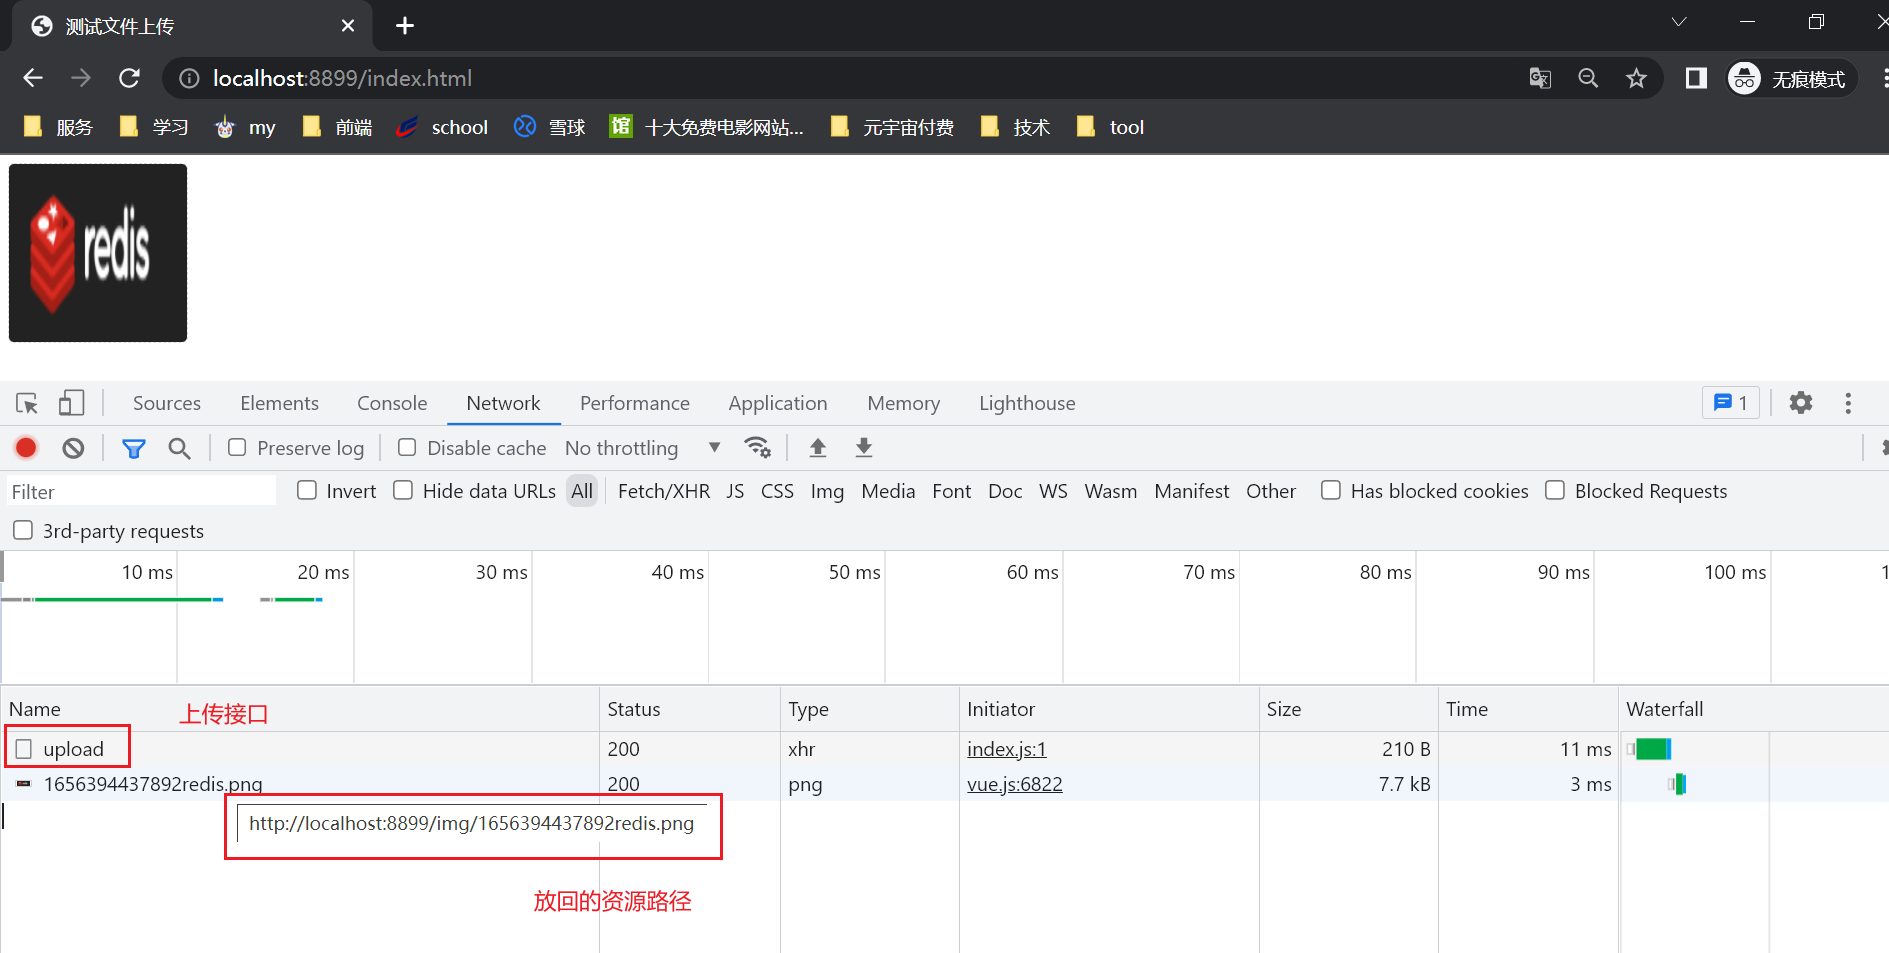
这样就上传成功啦 那么 我们该如何去访问这个图片呢?
来到这里 当我们访问的资源文件路径为/img开头的时候 会默认 去到"file:"+System.getProperty("user.dir") + "\src\main\resources\static\img\"来寻找 就是我们项目的静态资源文件夹的位置
- 这个位置可以是任意位置
页面效果
可以看到 当我们 上传成功后 资源成功的展示到了 我们的页面上
SpringBoot 整合文件上传 elment Ui 上传组件的更多相关文章
- 动态读取文件持续显示在UI上
private void DisplayLogInfo(FileInfo _LastFile) { if (_LastFile != null) { StreamReader sr = null; t ...
- springboot整合ueditor实现图片上传和文件上传功能
springboot整合ueditor实现图片上传和文件上传功能 写在前面: 在阅读本篇之前,请先按照我的这篇随笔完成对ueditor的前期配置工作: springboot+layui 整合百度富文本 ...
- SpringBoot整合阿里云OSS文件上传、下载、查看、删除
1. 开发前准备 1.1 前置知识 java基础以及SpringBoot简单基础知识即可. 1.2 环境参数 开发工具:IDEA 基础环境:Maven+JDK8 所用技术:SpringBoot.lom ...
- springboot整合web开发(整合servlet、filter、listener、访问静态、文件上传)
整合servlet 1.继承HttpServlet 2.添加@WebServlet注解 @WebServlet(name="FirstServlet",urlPatterns=&q ...
- springboot整合vue实现上传下载文件
https://blog.csdn.net/yhhyhhyhhyhh/article/details/89888953 文章目录 springboot整合vue实现上传下载文件 1上传下载文件api文 ...
- springboot 整合 tobato 的 fastdfs 实现文件上传和下载
添加项目所需要的依赖 <dependency> <groupId>org.springframework.boot</groupId> <artifactId ...
- SpringBoot整合SpringMVC完成文件上传
1.编写Controller /** * SPringBoot文件上传 */ //@Controller @RestController //表示该类下的方法的返回值会自动做json格式的转换 pub ...
- 使用SpringBoot实现文件的上传
使用SpringBoot实现文件的上传 springboot可以直接使用 org.springframework.web.multipart.MultipartFile 所以非常容易实现 一.首先是简 ...
- 分布式文件系统FastDFS简介、搭建、与SpringBoot整合实现图片上传
之前大学时搭建过一个FastDFS的图片服务器,当时只是抱着好奇的态度搭着玩一下,当时搭建采用了一台虚拟机,tracker和storage服务在一台机器上放着,最近翻之前的博客突然想着在两台机器上搭建 ...
随机推荐
- 安卓记账本开发学习day1
学习了一些简单的布局与界面设计
- 改造@vue/cli项目为服务端渲染-ServerSideRender
VUE SEO方案二 - SSR服务端渲染 在上一章中,我们分享了预渲染的方案来解决SEO问题,个人还是很中意此方案的,既简单又能解决大部分问题.但是也有着一定的缺陷,所以我们继续来看下一个方案--服 ...
- Codeforces Round #742 (Div. 2) B. MEXor Mixup
题目链接 Problem - B - Codeforces 题意: 给出MEX 和 XOR(分别表示1. 本串数不存在的最小非负数 2. 本串数所有数异或后的结果) 求出这串数最少有几个数, 1 ≤ ...
- Exception in thread "main" java.awt.AWTError: Assistive Technology not found: org.GNOME.Accessibilit
系统环境 Ubuntu 20.04 focal 问题分析 该异常出现的原因,从谷歌上可以得到答案 one of the more common causes of this exception is ...
- 【问题解决】'Access-Control-Allow-Origin' header contains multiple values '*, *', but only one is allowed.
问题复述 今天项目组有人找我说之前部署的程序在测试环境没问题,到生产环境出现了奇怪的问题,点按钮没反应. 我通过腾讯会议发现他们的浏览器控制台上打出了如下错误: Access to XMLHttpRe ...
- Git 使用心得 & 常见问题整理
开源Linux 回复"读书",挑选书籍资料~ Git 流程图 Workspace:工作区 Index / Stage:暂存区 Repository:仓库区(或本地仓库) Remot ...
- wlile、 for循环和基本数据类型及内置方法
while + else 1.while与else连用 当while没有被关键字break主动结束的情况下 正常结束循环体代码之后执行else的子代码 """ while ...
- RocketMq 完整部署
目录 RocketMq 部署 环境 物理机部署 自定义日志目录 自定义参数和数据存放位置 服务启动 启动name server 启动broker 关停服务 尝试发送消息 常见报错 部署 rockerm ...
- KLOOK客路旅行基于Apache Hudi的数据湖实践
1. 业务背景介绍 客路旅行(KLOOK)是一家专注于境外目的地旅游资源整合的在线旅行平台,提供景点门票.一日游.特色体验.当地交通与美食预订服务.覆盖全球100个国家及地区,支持12种语言和41种货 ...
- redis 2 主从和哨兵
主从: 概念:将一台redis服务器数据复制到其他redis服务器,前者是master,后者是slave.数据复制是单向,从主节点复制到从节点.master以写为主,slave以读为主一个zhu主节点 ...