配置MSTP功能示例
组网需求
在一个复杂的网络中,网络规划者由于冗余备份的需要,一般都倾向于在设备之间部署多条物理链路,其中一条作主用链路,其他链路作备份。这样就难免会形成环形网络,若网络中存在环路,可能会引起广播风暴和MAC桥表项被破坏。网络规划者规划好网络后,可以在网络中部署MSTP协议预防环路。MSTP可阻塞二层网络中的冗余链路,将网络修剪成树状,达到消除环路的目的。
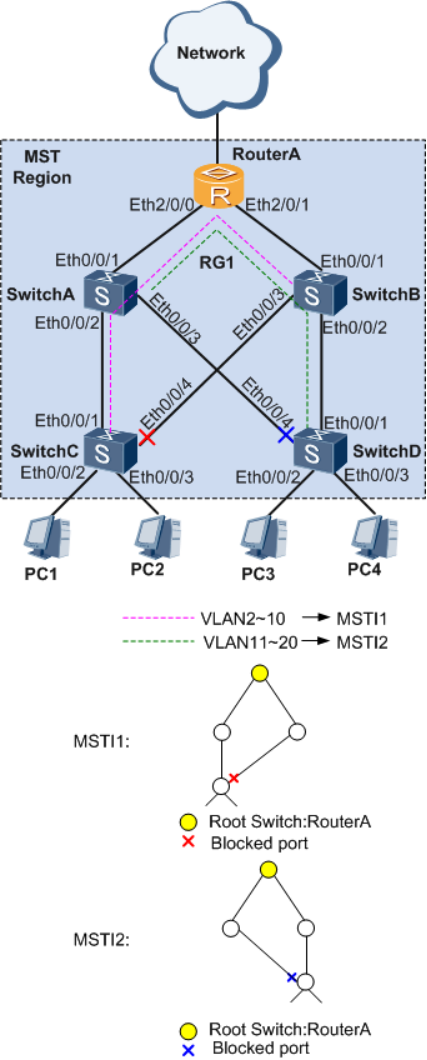
如图1所示,为实现VLAN2~VLAN10和VLAN11~VLAN20的流量负载分担,MSTP引入了多实例。MSTP可设置VLAN映射表,把VLAN和生成树实例联系起来。图1中RouterA、SwitchA、SwitchB、SwitchC和SwitchD都运行MSTP。
图1 配置MSTP功能组网图
配置思路
采用以下思路配置MSTP功能:
1. 在处于环形网络中的交换设备上配置MSTP基本功能,包括:
a. 配置环网中的设备生成树协议工作在MSTP模式。
b. 配置MST域并创建多实例,实现流量的负载分担。
c. 在MST域内,配置各实例的根桥与备份根桥。
d. 配置各实例中某端口的路径开销值,实现将该端口阻塞。
e. 使能MSTP,实现破除环路,包括:
设备全局使能MSTP。
与终端设备相连的端口,去使能MSTP,或者配置为边缘端口。
除与终端设备相连的端口外,其他端口使能MSTP。
说明:
与PC机相连的端口不用参与MSTP计算,建议将其去使能MSTP,或者配置为边缘端口。
2. 配置保护功能,实现对设备或链路的保护。例如:在各实例的根桥设备指定端口配置根保护功能。
3. 配置设备的二层转发功能。
操作步骤
1. 配置MSTP基本功能
a. 配置环网中的设备生成树协议工作在MSTP模式
# 配置RouterA的MSTP工作模式,MSTP为设备缺省工作模式。
<Huawei> system-view
[Huawei] sysname RouterA
[RouterA] stp mode mstp
# 配置交换设备SwitchA,SwitchB,SwitchC和SwitchD的MSTP工作模式。
b. 配置环网中的设备到域名为RG1的域内,创建实例MSTI1映射VLAN2~VLAN10,创建实例MSTI2映射VLAN11~VLAN20
# 配置RouterA的MST域。
[RouterA] stp region-configuration
[RouterA-mst-region] region-name RG1
[RouterA-mst-region] instance 1 vlan 2 to 10
[RouterA-mst-region] instance 2 vlan 11 to 20
[RouterA-mst-region] active region-configuration
[RouterA] quit
# 配置交换设备SwitchA、SwitchB、SwitchC和SwitchD的MST域。域名为RG1,创建实例MSTI1映射VLAN2~VLAN10,创建实例MSTI2映射VLAN11~VLAN20。
c. 在域RG1内,配置MSTI1与MSTI2的根桥与备份根桥
# 配置MSTI1的根桥为RouterA。
[RouterA] stp instance 1 root primary
# 配置MSTI1的备份根桥为SwitchA。
# 配置MSTI2的根桥为RouterA。
[RouterA] stp instance 2 root primary
# 配置MSTI2的备份根桥为SwitchB。
d. 配置实例MSTI1和MSTI2中需被阻塞的端口的路径开销值大于缺省值,实现将该端口阻塞
说明:
· 端口路径开销值取值范围由路径开销计算方法决定,这里选择使用华为私有计算方法为例,配置将被阻塞的端口的路径开销值为200000。
· 如实际场景中的交换机设备为非华为设备,请遵循“同一网络内所有交换设备的端口路径开销应使用相同计算方法”的原则进行配置。配置其他计算方法,请查阅STP路径开销列表。
# 配置RouterA的端口路径开销缺省值的计算方法为华为私有计算方法。
[RouterA] stp pathcost-standard legacy
# 配置SwitchA、SwitchB、SwitchC和SwitchD的端口路径开销缺省值的计算方法为华为的私有计算方法。
# 如图1,配置SwitchC的端口Eth0/0/4在实例1中的路径开销值为200000。
# 如图1,配置SwitchD的端口Eth0/0/4在实例2中的路径开销值为200000。
e. 使能MSTP,实现破除环路
将与PC终端相连的端口去使能MSTP
# 如图1,配置交换机设备SwitchC的端口,Eth0/0/2和Eth0/0/3,去使能MSTP或者配置为边缘端口。
# 如图1,配置交换机设备SwitchD的端口,Eth0/0/2和Eth0/0/3,去使能MSTP或者配置为边缘端口。

1.设备全局使能MSTP
# 设备RouterA全局使能MSTP。
[RouterA] stp enable
# 为交换机设备SwitchA,SwitchB,SwitchC和SwitchD全局使能MSTP。
除与PC终端相连的端口外,端口使能MSTP
# 设备RouterA端口Eth2/0/0和Eth2/0/1使能MSTP。
[RouterA] interface ethernet 2/0/0
[RouterA-Ethernet2/0/0] stp enable
[RouterA-Ethernet2/0/0] quit
[RouterA] interface ethernet 2/0/1
[RouterA-Ethernet2/0/1] stp enable
[RouterA-Ethernet2/0/1] quit
# 如图1,交换机设备SwitchA,SwitchB,SwitchC和SwitchD除与PC终端相连的端口外,其他端口使能MSTP。
2. 配置保护功能
# 在根桥RouterA的端口Eth2/0/0和Eth2/0/1上启动根保护。
[RouterA] interface ethernet 2/0/0
[RouterA-Ethernet2/0/0] stp root-protection
[RouterA-Ethernet2/0/0] quit
[RouterA] interface ethernet 2/0/1
[RouterA-Ethernet2/0/1] stp root-protection
[RouterA-Ethernet2/0/1] quit
3. 配置处于环网中的设备的二层转发功能
在交换设备RouterA、SwitchA、SwitchB、SwitchC和SwitchD上创建VLAN
# 在RouterA上创建VLAN2~VLAN20。
[RouterA] vlan batch 2 to 20
# 在交换机SwitchA和SwitchB上创建VLAN2~VLAN20。
# 在交换机SwitchC上创建VLAN2~VLAN10。
# 在交换机SwitchD上创建VLAN11~VLAN20。
将交换设备上接入环路中的端口加入VLAN
# 将RouterA的端口Eth2/0/0和Eth2/0/1加入VLAN2~VLAN20。
[RouterA] interface ethernet 2/0/0
[RouterA-Ethernet2/0/0] port link-type trunk
[RouterA-Ethernet2/0/0] port trunk allow-pass vlan 2 to 20
[RouterA-Ethernet2/0/0] quit
[RouterA] interface ethernet 2/0/1
[RouterA-Ethernet2/0/1] port link-type trunk
[RouterA-Ethernet2/0/1] port trunk allow-pass vlan 2 to 20
[RouterA-Ethernet2/0/1] quit
# 将SwitchA的端口Eth0/0/1、Eth0/0/2和Eth0/0/3加入VLAN2~VLAN20。
# 将SwitchB的端口Eth0/0/1、Eth0/0/2和Eth0/0/3加入VLAN2~VLAN20。
# 将SwitchC的端口Eth0/0/1、Eth0/0/2、Eth0/0/3、Eth0/0/4加入VLAN2~VLAN10。
# 将SwitchD的端口Eth0/0/1、Eth0/0/2、Eth0/0/3、Eth0/0/4加入VLAN11~VLAN20。
4. 验证配置结果
经过以上配置,在网络计算稳定后,执行以下操作,验证配置结果。
# 在RouterA上执行display stp brief命令,查看端口状态和端口的保护类型,结果如下:
[RouterA] display stp brief
MSTID Port Role STP State Protection
0 Ethernet2/0/0 DESI FORWARDING NONE
0 Ethernet2/0/1 DESI FORWARDING NONE
1 Ethernet2/0/0 DESI FORWARDING ROOT
1 Ethernet2/0/1 DESI FORWARDING ROOT
2 Ethernet2/0/0 DESI FORWARDING ROOT
2 Ethernet2/0/1 DESI FORWARDING ROOT
在MSTI1中,由于RouterA是根桥,RouterA的端口Eth2/0/0和Eth2/0/1成为指定端口。在MSTI2中,RouterA同样是根桥,RouterA的端口Eth2/0/0和Eth2/0/1是指定端口。
# 在SwitchA查看端口状态和端口的保护类型。在MSTI1中,端口Eth0/0/1成为根端口,端口Eth0/0/2和端口Eth0/0/3成为指定端口。在MSTI2中,端口Eth0/0/1成为根端口,端口Eth0/0/2和端口Eth0/0/3成为指定端口。
# 在SwitchB查看端口状态和端口的保护类型。在MSTI1中,端口Eth0/0/1成为根端口,端口Eth0/0/2和端口Eth0/0/3成为指定端口。在MSTI2中,端口Eth0/0/1成为根端口,端口Eth0/0/2和端口Eth0/0/3成为指定端口。
# 在SwitchC查看端口状态和端口的保护类型。在MSTI1中,端口Eth0/0/1成为根端口,端口Eth0/0/4被阻塞。在MSTI2中,端口Eth0/0/1成为根端口,端口Eth0/0/4成为指定端口。
# 在SwitchD查看端口状态和端口的保护类型。在MSTI1中,端口Eth0/0/1成为根端口,端口Eth0/0/4成为指定端口。在MSTI2中,端口Eth0/0/1成为根端口,端口Eth0/0/4被阻塞。
配置文件
RouterA的配置文件
#
sysname RouterA
#
vlan batch 2 to 20
#
stp instance 1 root primary
stp instance 2 root primary
stp pathcost-standard legacy
#
stp region-configuration
region-name RG1
instance 1 vlan 2 to 10
instance 2 vlan 11 to 20
active region-configuration
#
interface Ethernet2/0/0
port link-type trunk
port trunk allow-pass vlan 2 to 20
stp root-protection
#
interface Ethernet2/0/1
port link-type trunk
port trunk allow-pass vlan 2 to 20
stp root-protection
#
return
SwitchA的配置文件
#
sysname SwitchA
#
vlan batch 2 to 20
#
stp instance 1 root secondary
stp pathcost-standard legacy
#
stp region-configuration
region-name RG1
instance 1 vlan 2 to 10
instance 2 vlan 11 to 20
active region-configuration
#
interface Ethernet0/0/1
port link-type trunk
port trunk allow-pass vlan 2 to 20
#
interface Ethernet0/0/2
port link-type trunk
port trunk allow-pass vlan 2 to 20
#
interface Ethernet0/0/3
port link-type trunk
port trunk allow-pass vlan 2 to 20
#
return
SwitchB的配置文件
#
sysname SwitchB
#
vlan batch 2 to 20
#
stp instance 2 root secondary
stp pathcost-standard legacy
#
stp region-configuration
region-name RG1
instance 1 vlan 2 to 10
instance 2 vlan 11 to 20
active region-configuration
#
interface Ethernet0/0/1
port link-type trunk
port trunk allow-pass vlan 2 to 20
#
interface Ethernet0/0/2
port link-type trunk
port trunk allow-pass vlan 2 to 20
#
interface Ethernet0/0/3
port link-type trunk
port trunk allow-pass vlan 2 to 20
#
return
SwitchC的配置文件
#
sysname SwitchC
#
vlan batch 2 to 10
#
stp pathcost-standard legacy
#
stp region-configuration
region-name RG1
instance 1 vlan 2 to 10
instance 2 vlan 11 to 20
active region-configuration
#
interface Ethernet0/0/1
port link-type trunk
port trunk allow-pass vlan 2 to 10
#
interface Ethernet0/0/2
port link-type trunk
port trunk allow-pass vlan 2 to 10
stp disable
#
interface Ethernet0/0/3
port link-type trunk
port trunk allow-pass vlan 2 to 10
stp disable
#
interface Ethernet0/0/4
port link-type trunk
port trunk allow-pass vlan 2 to 10
stp instance 1 cost 200000
#
return
SwitchD的配置文件
#
sysname SwitchD
#
vlan batch 11 to 20
#
stp pathcost-standard legacy
#
stp region-configuration
region-name RG1
instance 1 vlan 2 to 10
instance 2 vlan 11 to 20
active region-configuration
#
interface Ethernet0/0/1
port link-type trunk
port trunk allow-pass vlan 11 to 20
#
interface Ethernet0/0/2
port link-type trunk
port trunk allow-pass vlan 11 to 20
stp disable
#
interface Ethernet0/0/3
port link-type trunk
port trunk allow-pass vlan 11 to 20
stp disable
#
interface Ethernet0/0/4
port link-type trunk
port trunk allow-pass vlan 11 to 20
stp instance 2 cost 200000
#
return
配置MSTP功能示例的更多相关文章
- springcloud(七):配置中心svn示例和refresh
上一篇springcloud(六):配置中心git示例留了一个小问题,当重新修改配置文件提交后,客户端获取的仍然是修改前的信息,这个问题我们先放下,待会再讲.国内很多公司都使用的svn来做代码的版本控 ...
- 分布式大数据多维分析(OLAP)引擎Apache Kylin安装配置及使用示例【转】
Kylin 麒麟官网:http://kylin.apache.org/cn/download/ 关键字:olap.Kylin Apache Kylin是一个开源的分布式分析引擎,提供Hadoop之上的 ...
- 企业网络拓扑MSTP功能实例(二)
组网图形 MSTP简介 以太网交换网络中为了进行链路备份,提高网络可靠性,通常会使用冗余链路.但是使用冗余链路会在交换网络上产生环路,引发广播风暴以及MAC地址表不稳定等故障现象,从而导致用户通信质量 ...
- 【java】org.apache.commons.lang3功能示例
org.apache.commons.lang3功能示例 package com.simple.test; import java.util.Date; import java.util.Iterat ...
- Linux下Apache配置HTTPS功能
Apache配置HTTPS功能 转 https://www.cnblogs.com/liaojiafa/p/6028816.html 一.yum 安装openssl和openssl-devel,ht ...
- 利用JavaScriptSOAPClient直接调用webService --完整的前后台配置与调用示例
JavaScriptSoapClient下载地址:https://archive.codeplex.com/?p=javascriptsoapclient JavaScriptSoapClient的D ...
- linux之vim配置及使用示例
作者:tongqingliu 转载请注明出处:http://www.cnblogs.com/liutongqing/p/7056193.html linux之vim配置及使用示例 vi的三种模式: 一 ...
- 5G RRC——为NAS层提供连接管理,消息传递等服务; 对接入网的底层协议实体提供参数配置的功能; 负责UE移动性管理相关的测量、控制等功能
from:http://www.cnblogs.com/kkdd-2013/p/3868676.html 1 RRC协议功能 为NAS层提供连接管理,消息传递等服务: 对接入网的底层协议实体提供参数配 ...
- Django-中间件-csrf扩展请求伪造拦截中间件-Django Auth模块使用-效仿 django 中间件配置实现功能插拔式效果-09
目录 昨日补充:将自己写的 login_auth 装饰装在 CBV 上 django 中间件 django 请求生命周期 ***** 默认中间件及其大概方法组成 中间件的执行顺序 自定义中间件探究不同 ...
- drf框架安装配置及其功能概述
0902自我总结 drf框架安装配置及其功能概述 一.安装 pip3 install djangorestframework 二.配置 # 注册drf app NSTALLED_APPS = [ # ...
随机推荐
- KingbbaseES V8R6集群维护案例之---集群之间数据迁移
案例说明: 生产环境是集群环境,测试环境是集群,现需要将生产环境的数据迁移到测试集群中运行,本文档详细介绍了从集群环境迁移数据的操作步骤,可以作为生产环境迁移数据的参考. 适用版本: Kingbase ...
- MySQL数据备份 mysqldump 详解
MySQL数据备份流程 1 打开cmd窗口 通过命令进行数据备份与恢复: 需要在Windows的命令行窗口中进行: l 开始菜单,在运行中输入cmd回车: l 或者win+R,然后输入cmd回车,即可 ...
- vue方法同步(顺序)执行:async/await使用
https://blog.csdn.net/qq_38591756/article/details/90173323 项目中有一个地方需要获取到接口返回值之后根据返回值确定之后执行的步骤,使用asyn ...
- Activiti 7 源码学习
1. 启动分析 源码是 7.1.0.M6 首先从 ProcessEngineAutoConfiguration 开始 ProcessEngineAutoConfiguration 是activiti ...
- 萌新码农的第一篇:MarkDown的使用方法
MarkDown的使用方法 使用的编辑软件Typora 1.标题的使用方法 输入''#''然后空格,输入标题名字即可生成标题. 随着''#''的增多,标题的大小会依次减小,最多到六级标题 2.排字 字 ...
- Kubernetes 日志:搭建 EFK 日志系统
Kubernetes 中比较流行的日志收集解决方案是 Elasticsearch.Fluentd 和 Kibana(EFK)技术栈,也是官方现在比较推荐的一种方案. Elasticsearch 是一个 ...
- 使用MinIO中暂未解决的问题
时间显示问题 web页面上创建桶的时间跟使用SDK获取的时间不一样,相差8个小时,但是mc命令行客户端获取的时间跟web上的一样
- 使用pip的方式安装docker-compose
# 国内开启pip 下载加速:http://mirrors.aliyun.com/help/pypi mkdir ~/.pip/ cat > ~/.pip/pip.conf <<'E ...
- td-agent的v2,v3,v4版本区别
官方地址:https://docs.fluentd.org/quickstart/td-agent-v2-vs-v3-vs-v4
- 玩转Google开源C++单元测试框架Google Test系列(gtest)之八 - 打造自己的单元测试框架
转载来源:https://www.cnblogs.com/coderzh/archive/2009/04/12/1434155.html 一.前言 上一篇我们分析了gtest的一些内部实现,总的来说整 ...