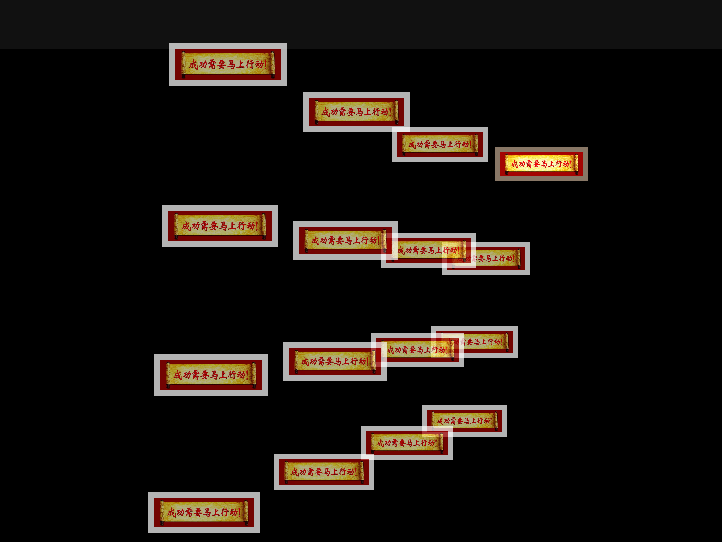
JavaScript特效之图片特效放大,缩小,旋转
效果图如下:

效果代码如下:
<!doctype html>

<html lang="en">

 <head>

  <meta charset="UTF-8">

  <meta name="Generator" content="EditPlus®">

  <meta name="Author" content="">

  <meta name="Keywords" content="">

  <meta name="Description" content="">

  <title>Document</title>

<style type="text/css">

    html {

        overflow: hidden;

    }

    body {

        position: absolute;

        margin: 0px;

        padding: 0px;

        background: #111;

        width: 100%;

        height: 100%;

    }

    #screen {

        position: absolute;

        left: 10%;

        top: 10%;

        width: 80%;

        height: 80%;

        background: #000;

    }

    #screen img {

        position: absolute;

        cursor: pointer;

        visibility: hidden;

        width: 0px;

        height: 0px;

    }

    #screen .tvover {

        border: solid #876;

        opacity: 1;

        filter: alpha(opacity=100);

    }

    #screen .tvout {

        border: solid #fff;

        opacity: 0.7;

    }

    #bankImages {

        display: none;

    }

</style>

<script type="text/javascript">

var Library = {};

Library.ease = function () {

    this.target = 0;

    this.position = 0;

    this.move = function (target, speed)

    {

        this.position += (target - this.position) * speed;

    }

}

var tv = {

    O : [],

    screen : {},

    grid : {

        size       : 4,

        borderSize : 6,

        zoomed     : false

    },

    angle : {

        x : new Library.ease(),

        y : new Library.ease()

    },

    camera : {

        x    : new Library.ease(),

        y    : new Library.ease(),

        zoom : new Library.ease(),

        focalLength : 750

    },

    init : function ()

    {

        this.screen.obj = document.getElementById('screen');

        var img = document.getElementById('bankImages').getElementsByTagName('img');

        this.screen.obj.onselectstart = function () { return false; }

        this.screen.obj.ondrag = function () { return false; }

        var ni = 0;

        var n = (tv.grid.size / 2) - .5;

        for (var y = -n; y <= n; y++)

        {

            for (var x = -n; x <= n; x++)

            {

                var o = document.createElement('img');

                var i = img[(ni++) % img.length];

                o.className = 'tvout';

                o.src = i.src;

                tv.screen.obj.appendChild(o);

                o.point3D = {

                    x  : x,

                    y  : y,

                    z  : new Library.ease()

                };

                o.point2D = {};

                o.ratioImage = 1;

                tv.O.push(o);

                o.onmouseover = function ()

                {

                    if (!tv.grid.zoomed)

                    {

                        if (tv.o)

                        {

                            tv.o.point3D.z.target = 0;

                            tv.o.className = 'tvout';

                        }

                        this.className = 'tvover';

                        this.point3D.z.target = -.5;

                        tv.o = this;

                    }

                }

                o.onclick = function ()

                {

                    if (!tv.grid.zoomed)

                    {

                        tv.camera.x.target = this.point3D.x;

                        tv.camera.y.target = this.point3D.y;

                        tv.camera.zoom.target = tv.screen.w * 1.25;

                        tv.grid.zoomed = this;

                    } else {

                        if (this == tv.grid.zoomed){

                            tv.camera.x.target = 0;

                            tv.camera.y.target = 0;

                            tv.camera.zoom.target = tv.screen.w / (tv.grid.size + .1);

                            tv.grid.zoomed = false;

                        }

                    }

                }

                o.calc = function ()

                {

                    this.point3D.z.move(this.point3D.z.target, .5);

                    var x = (this.point3D.x - tv.camera.x.position) * tv.camera.zoom.position;

                    var y = (this.point3D.y - tv.camera.y.position) * tv.camera.zoom.position;

                    var z = this.point3D.z.position * tv.camera.zoom.position;

                    var xy = tv.angle.cx * y  - tv.angle.sx * z;

                    var xz = tv.angle.sx * y  + tv.angle.cx * z;

                    var yz = tv.angle.cy * xz - tv.angle.sy * x;

                    var yx = tv.angle.sy * xz + tv.angle.cy * x;

                    this.point2D.scale = tv.camera.focalLength / (tv.camera.focalLength + yz);

                    this.point2D.x = yx * this.point2D.scale;

                    this.point2D.y = xy * this.point2D.scale;

                    this.point2D.w = Math.round(

                                       Math.max(

                                         0,

                                         this.point2D.scale * tv.camera.zoom.position * .8

                                       )

                                     );

                    if (this.ratioImage > 1)

                        this.point2D.h = Math.round(this.point2D.w / this.ratioImage);

                    else

                    {

                        this.point2D.h = this.point2D.w;

                        this.point2D.w = Math.round(this.point2D.h * this.ratioImage);

                    }

                }

                o.draw = function ()

                {

                    if (this.complete)

                    {

                        if (!this.loaded)

                        {

                            if (!this.img)

                            {

                                this.img = new Image();

                                this.img.src = this.src;

                            }

                            if (this.img.complete)

                            {

                                this.style.visibility = 'visible';

                                this.ratioImage = this.img.width / this.img.height;

                                this.loaded = true;

                                this.img = false;

                            }

                        }

                        this.style.left = Math.round(

                                            this.point2D.x * this.point2D.scale +

                                            tv.screen.w - this.point2D.w * .5

                                          ) + 'px';

                        this.style.top  = Math.round(

                                            this.point2D.y * this.point2D.scale +

                                            tv.screen.h - this.point2D.h * .5

                                          ) + 'px';

                        this.style.width  = this.point2D.w + 'px';

                        this.style.height = this.point2D.h + 'px';

                        this.style.borderWidth = Math.round(

                                                   Math.max(

                                                     this.point2D.w,

                                                     this.point2D.h

                                                   ) * tv.grid.borderSize * .01

                                                 ) + 'px';

                        this.style.zIndex = Math.floor(this.point2D.scale * 100);

                    }

                }

            }

        }

        tv.resize();

        mouse.y = tv.screen.y + tv.screen.h;

        mouse.x = tv.screen.x + tv.screen.w;

        tv.run();

    },

    resize : function ()

    {

        var o = tv.screen.obj;

        tv.screen.w = o.offsetWidth / 2;

        tv.screen.h = o.offsetHeight / 2;

        tv.camera.zoom.target = tv.screen.w / (tv.grid.size + .1);

        for (tv.screen.x = 0, tv.screen.y = 0; o != null; o = o.offsetParent)

        {

            tv.screen.x += o.offsetLeft;

            tv.screen.y += o.offsetTop;

        }

    },

    run : function ()

    {

        tv.angle.x.move(-(mouse.y - tv.screen.h - tv.screen.y) * .0025, .1);

        tv.angle.y.move( (mouse.x - tv.screen.w - tv.screen.x) * .0025, .1);

        tv.camera.x.move(tv.camera.x.target, tv.grid.zoomed ? .25 : .025);

        tv.camera.y.move(tv.camera.y.target, tv.grid.zoomed ? .25 : .025);

        tv.camera.zoom.move(tv.camera.zoom.target, .05);

        tv.angle.cx = Math.cos(tv.angle.x.position);

        tv.angle.sx = Math.sin(tv.angle.x.position);

        tv.angle.cy = Math.cos(tv.angle.y.position);

        tv.angle.sy = Math.sin(tv.angle.y.position);

        for (var i = 0, o; o = tv.O[i]; i++)

        {

            o.calc();

            o.draw();

        }

        setTimeout(tv.run, 32);

    }

}

var mouse = {

    x : 0,

    y : 0

}

document.onmousemove = function(e)

{

    if (window.event) e = window.event;

    mouse.x = e.clientX;

    mouse.y = e.clientY;

    return false;

}

</script>

</head>

<body>

<div id="screen"></div>

<div id="bankImages">

<!--这里为了演示速度多,只调用了两张图片,用时候你可以加上你的图片-->

<img src="D:/Documents/Pictures/神祗.jpg" width="830" height="242" border="0" alt="">

</div>

<script type="text/javascript">

    onresize = tv.resize;

    tv.init();

</script>

 </body>

</html>
JavaScript特效之图片特效放大,缩小,旋转的更多相关文章
- JS控制图片拖动 放大 缩小 旋转 支持滚轮放大缩小 IE有效
<html> <head> <title>图片拖动,放大,缩小,转向</title> <script type="text/ja ...
- Android DIY之路 (一) 指定区域多图片合成 放大 缩小 镜像 旋转 等(转)
惯例先看效果图 // 注意做类似这种模板功能时候 方位由后台数据提供,这里我们用假数据 4个点 或者xy 加区域来做示例 //一开始我们公司用的是透明盖住 操作图片 但发现 局限性较大.后来直接限定区 ...
- JS中图片的放大缩小没反应
这段代码无反应: 代码如下: <script type="text/javascript"> onload = function () { document.getEl ...
- jquery 实现点击图片居住放大缩小
该功能是基于jquery实现的,所以 第一步则是引入jquery jquery下载地址:https://jquery.com/download/ 或者使用此时调试的版本(3版本) /*! jQuery ...
- WPF多点触摸放大缩小旋转
原文:WPF多点触摸放大缩小旋转 版权声明:本文为博主原创文章,需要转载尽管转载. https://blog.csdn.net/z5976749/article/details/40118437 如果 ...
- Android 本地/网路下载图片实现放大缩小
Android 本地加载/网路下载图片实现放大缩小拖拉效果,自定义控件. package com.example.ImageViewCustom; import android.app.Activi ...
- Java界面程序实现图片的放大缩小
Java界面程序实现图片的放大缩小.这个程序简单地实现了图片的打开.保存.放大一倍.缩小一倍和固定缩放尺寸,但是并没有过多的涵盖对图片的细节处理,只是简单地实现了图片大小的放缩. 思维导图如下: 效果 ...
- 用css3实现图片的放大缩小
记录一个公用的css实现图片的放大缩小 @keyframes scaleDraw { /*定义关键帧.scaleDrew是需要绑定到选择器的关键帧名称*/ 0%{ transform: scale(1 ...
- [jQuery]地图浏览:如何实现图片的放大缩小和点击之后的位置居中
HTML代码: <!DOCTYPE html> <html> <head> <script src="http://ajax.googleapis. ...
- 猫猫学IOS(二)UI之button操作 点击变换 移动 放大缩小 旋转
不多说,先上图片看效果,猫猫分享.必须精品 原创文章.欢迎转载.转载请注明:翟乃玉的博客 地址:viewmode=contents">http://blog.csdn.net/u013 ...
随机推荐
- (蓝桥)2017C/C++A组第七题正则问题
#include<iostream> #include<memory.h> #include<stack> #include<string> using ...
- UCloud 的安全秘钥
UCloud 的安全秘钥(困难) 1200ms 262144K 每个 UCloud 用户会构造一个由数字序列组成的秘钥,用于对服务器进行各种操作.作为一家安全可信的云计算平台,秘钥的安全性至关重要.因 ...
- ubuntu 14.04 gcc/g++版本降低
Matlab 2014a支持的gcc/g++版本是4.7x,而ubuntu 14.04以及更高版本默认安装的版本都是4.8及以上,因此需要降低gcc/g++版本,方法如下: 1 安装 $ sudo a ...
- Likecloud-吃、吃、吃(洛谷 1508)
题目背景 问世间,青春期为何物? 答曰:“甲亢,甲亢,再甲亢:挨饿,挨饿,再挨饿!” 题目描述 正处在某一特定时期之中的李大水牛由于消化系统比较发达,最近一直处在饥饿的状态中.某日上课,正当他饿得头昏 ...
- CODEVS1079 回家 (最短路)
真是语死早,题目看了两遍才看懂. 按照题目要求建边,从'Z'开始跑最短路即可. Program CODEVS1079; ..,..] of longint; d:..] of longint; pd: ...
- Linux排查java程序占用cpu过高的线程代码
分几步骤: 1.通过top,查出占用CPU过高的java进程 ,比如: pid :6666 2.通过ps -mp 6666 -o THREAD,tid,time| sort -n -k1 -r 查看此 ...
- [Cocos2d-x v3.x]Mac OX 创建新的Cocos2d-x 3.0 项目
文章内容来自于: http://cocos2d-x.org/wiki/How_to_Start_A_New_Cocos2D-X_Game Mac OS X 10.9 Software Requirem ...
- LA 4329(树状数组)
算法竞赛入门经典 p197 题目大意: 一条大街上住着n个乒乓球爱好者.常常比赛切磋技术.每一个人都有一个不同的技能值a[i].每场比赛须要3个人:两名选手,一名裁判.他们有个奇怪的约定,裁判必须住在 ...
- 天了噜,我国4G用户超过2亿了!
近期,看到工信部一组统计数据,小编整个人都不好了,数据显示,2015年5月我国4G用户净增2281.6万,总数超过2亿户. 没错,卡是换成了4G卡,还是那句话,然并卵,用的还是3G手机.开的还是2G网 ...
- HDU 5347(MZL's chemistry-打表)
MZL's chemistry Time Limit: 2000/1000 MS (Java/Others) Memory Limit: 65536/65536 K (Java/Others) ...
