python项目开发:用RabbitMQ实现异步RPC
程序要求:
1. 用Rabbit MQ实现RPC
1. 可以异步地执行多条命令
2. 可以对一次性对多个机器执行命令
程序效果:
---》run dir host1 host2 。。。。
---》get task_id
---》taskId:xxxx host: xxxxxx
---》check task_id
--->打印结果
程序分析:
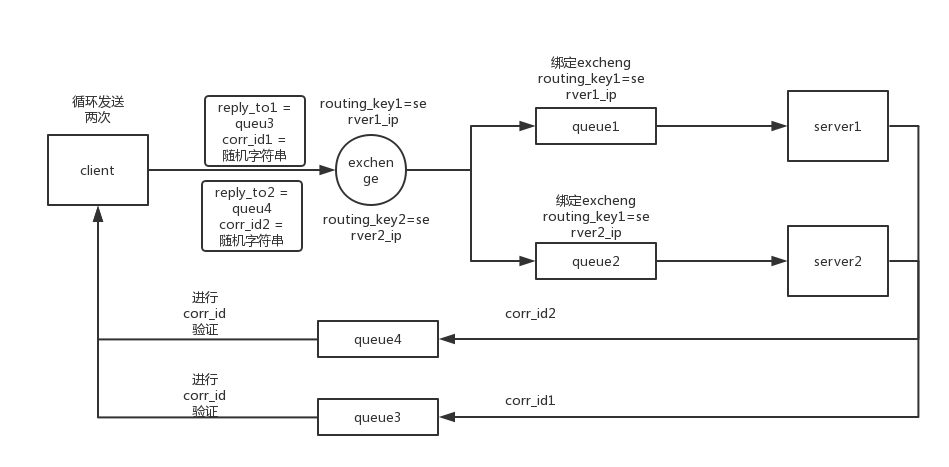
为了达到异步地效果,可以使用多线程或协程,即每执行一条命令就启动一条线程或协程。客户端发送命令到队列、从返回队列接收结果分离,不能写到一起。
业务逻辑:

代码实现:
README
#author:Wu zhiHao

#博客地址:https://www.cnblogs.com/BUPT-MrWu/p/10364619.html

#程序目录框架:

 |--RPC

  |--RPC_server #服务端

   |--bin

    |--start.py #程序入口

   |--core

    |--RpcServer.py #服务端主要逻辑

  |--RPC_client #客户端

   |--bin

    |--start.py #程序入口

   |--core

    |--main.py #程序主要逻辑

   |--modules

    |--RpcClient.py #客户端主要逻辑

   |--conf

    |--settings.py #配置文件

  |--READ_ME

#命令格式:

 1. run command host1 host2..... #执行命令

 2. all_task #获取全部task_id

 3. check task_id #获取命令结果
RPC_server\\bin\\start.py
import sys,os

BASE_dir = os.path.abspath(os.path.dirname(os.path.dirname(__file__)))

sys.path.append(BASE_dir)

from core import RpcServer

if __name__ == '__main__':

    obj = RpcServer.RpcServer()

    obj.channel.start_consuming()
RPC_server\\core\\RpcServer.py
import pika

import os

import socket

from conf import settings

class RpcServer(object):

    def __init__(self):

        self.credentials = pika.PlainCredentials(settings.RabbitMq_name,settings.RabbitMq_password) #RabbiMQ用户认证

        self.connection = pika.BlockingConnection(

            pika.ConnectionParameters(

                settings.RabbitMq_ip,settings.RabbitMq_port,"/",self.credentials,

            )

        )

        self.My_Ip = self.get_ip() #获取服务端IP地址

        self.channel = self.connection.channel()

        self.result = self.channel.queue_declare(exclusive=True)

        self.queue_name = self.result.method.queue

        self.channel.exchange_declare(

            exchange="Rpc",

            exchange_type="direct",

        )

        self.channel.queue_bind(

            exchange="Rpc",

            queue=self.queue_name,

            routing_key=self.My_Ip,

        )

        self.channel.basic_consume(

            self.on_response,

            queue=self.queue_name,

        )

    def on_response(self,ch,method,properties,body):

        command = body.decode()

        command_result = self.on_request(command)

        self.channel.basic_publish(

            exchange="",

            routing_key=properties.reply_to,

            properties=pika.BasicProperties(

                correlation_id=properties.correlation_id,

            ),

            body=command_result

        )

    def on_request(self,command):

        return os.popen(command).read()

    def get_ip(self):

        computer_name = socket.getfqdn(socket.gethostname(  ))

        computer_Ip = socket.gethostbyname(computer_name)

        return computer_Ip
RPC_client\\bin\\start.py
import sys,os

BASE_dir = os.path.abspath(os.path.dirname(os.path.dirname(__file__)))

sys.path.append(BASE_dir)

from core import main

if __name__ == '__main__':

    obj = main.run()

    obj.start()
RPC_client\\core\\main.py
import random

import threading

from modules import RpcClient

class run(object):

    def __init__(self):

        self.client = RpcClient.RpcClient()

        self.information = {}

    def start(self):

        while True:

            try:

                command = input("-->")

                if not command:continue

                t = threading.Thread(target=self.select,args=(command,))

                t.start()

            except Exception as e:

                print(e)

    def select(self,command):

        '''解析命令'''

        try:

            keyword = command.split()[0]

            func = getattr(self,keyword)

            func(command)

        except Exception as e:

            print(e)

    def run(self,command):

        '''执行命令'''

        try:

            task_id = str(random.randint(100,1000))

            self.information[task_id] = {}

            keyword = command.split()[1]

            for host in command.split()[2:]:

                result = self.client.on_request(host,keyword)

                self.information[task_id][host] = [result[0],result[1]]

        except Exception as e:

            print(e)

    def check(self,command):

        '''获取命令结果'''

        try:

            task_id = command.split()[1]

            for host in self.information[task_id]:

                corr_id = self.information[task_id][host][0]

                callback_queue = self.information[task_id][host][1]

                command_result = self.client.get_response(corr_id,callback_queue)

                print("%s:\n%s"%(host,command_result))

            self.information.pop(task_id) #删除task_id

        except Exception as e:

            print(e)

    def all_task(self,command):

        '''获取全部task_id'''

        try:

            for task_id in self.information:

                all_host = []

                for host in self.information[task_id]:

                    all_host.append(host)

                print("task_id: %s  host: %s\n"%(task_id,all_host))

        except Exception as e:

            print(e)
RPC_client\\conf\\settings.py
RabbitMq_name = "XXX" #RabbitMq用户名

RabbitMq_password = "XXX" #rabbitmq用户密码

RabbitMq_ip = "XXX" #RabbitMq端的IP地址

RabbitMq_port = 5672 #RabbitMq端的端口号
RPC_client\\mudules\\RpcClient.py
import pika

import uuid

from conf import settings

class RpcClient(object):

    def __init__(self):

        self.credentials = pika.PlainCredentials(settings.RabbitMq_name,settings.RabbitMq_password) #RabbiMQ用户认证

        self.connection = pika.BlockingConnection(

            pika.ConnectionParameters(

                settings.RabbitMq_ip,settings.RabbitMq_port,"/",self.credentials,

            )

        )

        self.channel = self.connection.channel()

    def get_response(self,corr_id,callback_queue):

        '''从队列里取值'''

        self.corr_id = corr_id

        self.response = None

        self.channel.basic_consume(

            self.on_response,

            queue=callback_queue,

        )

        while self.response is None:

            self.connection.process_data_events() #非阻塞版的start_consuming

        return self.response

    def on_response(self,ch,method,properties,body):

        '''当队列里有数据时执行'''

        if self.corr_id == properties.correlation_id:

            self.response = body.decode()

    def on_request(self,host,command):

        '''发送命令'''

        result = self.channel.queue_declare(exclusive=False) #生成另一个queue时,这个queue不会消失

        callback_queue = result.method.queue #返回queue

        corr_id = str(uuid.uuid4()) #验证码

        self.channel.exchange_declare(

            exchange="Rpc",

            exchange_type="direct"

        )

        self.channel.basic_publish(

            exchange="Rpc",

            routing_key=host,

            properties=pika.BasicProperties(

                correlation_id=corr_id,

                reply_to=callback_queue,

            ),

            body=command,

        )

        return corr_id,callback_queue #返回验证值和返回queue
程序执行实例:


python项目开发:用RabbitMQ实现异步RPC的更多相关文章
- python项目开发视频
精品Python项目开发学习视频 所属网站分类: 资源下载 > python视频教程 作者:乐天派 链接:http://www.pythonheidong.com/blog/article/44 ...
- IDEA 学习笔记之 Python项目开发
Python项目开发: 下载Python: https://www.python.org/downloads/release/python-363/ 安装Python: 配置环境变量(path): C ...
- python项目开发:学员管理系统
学员管理系统 #需求: 1.用户角色:讲师/学员,登陆后根据角色不同能做的事情不同 2.讲师视图 - 管理班级,可创建班级,根据学员qq号把学员加入班级 - 可创建指定班级的上课纪录,注意一节上课纪录 ...
- python项目开发:ftp server开发
程序要求: 1.用户加密认证 (对用户名密码进行MD5验证)2.允许同时多用户登陆 (使用socket server方法,为每个用户都创建一个信息文件)3.每个用户有自己的家目录,且只能访问自己的家目 ...
- Python项目开发公用方法--excel生成方法
在实际开发中,我们有时会遇到数据导出的需求.一般的,导出的文件格式为Excel形式. 那么,excel的生成就适合抽离出一个独立的公用方法来实现: def generate_excel(excel_n ...
- Python基础之模块:7、项目开发流程和项目需求分析及软件开发目录
一.项目开发流程 1.项目需求分析 明确项目具体功能: 明确到底要写什么东西,实现什么功能,在这个阶段的具体要询问项目经理和客户的需求 参与人员: 产品经理.架构师.开发经理 技术人员主要职责: 引导 ...
- 给缺少Python项目实战经验的人
我们在学习过程中最容易犯的一个错误就是:看的多动手的少,特别是对于一些项目的开发学习就更少了! 没有一个完整的项目开发过程,是不会对整个开发流程以及理论知识有牢固的认知的,对于怎样将所学的理论知识应用 ...
- 想使用gevent、mysql、sqlalchemy实现python项目协程异步达到并发的效果
如题,但是查看了很多资料,都说python这边的mysql不支持异步并发,只能阻塞进行,心塞30秒,暂时放弃这方面的研究 如果不操作数据库的化,比如请求url.操作文件,还是可以用gevent来异步实 ...
- Python之路,Day22 - 网站用户访问质量分析监测分析项目开发
Python之路,Day22 - 网站用户访问质量分析监测分析项目开发 做此项目前请先阅读 http://3060674.blog.51cto.com/3050674/1439129 项目实战之 ...
随机推荐
- 安装 KB2844286 导致SharePoint 2010 XSLT web part 显示出现错误
上周末给Windows 打完补丁后,周一在通过From SharePoint的方式插入图片时,出现了如下错误: Unable to display this Web Part. To troubles ...
- ant+jmeter中build.xml配置详解
- HDU5489 LIS变形
Removed Interval Problem Description Given a sequence of numbers A=a1,a2,…,aN , a subsequence b1,b2, ...
- Socket之shutdown()用法
通常来说,socket是双向的,即数据是双向通信的.但有些时候,你会想在socket上实现单向的socket,即数据往一个方向传输. 单向的socket便称为半开放Socket.要实现半开放式,需要用 ...
- 前缀和&&离散化
现在正在上课,但我还是要同步更新博文...\滑稽 先讲一个离散化,就是把几个离的特别远的数在不影响结果的情况下,变成相近的数.倒是没什么影响,但应用在数组下标的话可以节约空间.(貌似和hash有点像) ...
- bzoj 1059 [ ZJOI 2007 ] 矩阵游戏 —— 二分图匹配
题目:https://www.lydsy.com/JudgeOnline/problem.php?id=1059 每一列选出一个占据一行才可以: 挫败. 代码如下: #include<iostr ...
- Struts2标签库常用标签
转自:https://blog.csdn.net/q547550831/article/details/53326042
- thinkphp方便分页的page方法
page方法也是模型的连贯操作方法之一,是完全为分页查询而诞生的一个人性化操作方法. 用法 我们在前面已经了解了关于limit方法用于分页查询的情况,而page方法则是更人性化的进行分页查询的方法,例 ...
- C# 标准命名规范
笔者从事开发多年,有这样一种感觉,查看一些开源项目,如Spring.Apache Common等源码是一件赏心悦目的事情,究其原因,无外两点:1)代码质量非常高:2)命名特别规范(这可能跟老外的英语水 ...
- 2015 多校赛 第四场 1009 (hdu 5335)
Problem Description In an n∗m maze, the right-bottom corner is the exit (position (n,m) is the exit) ...
