使用create-react-app 搭建react + ts + antd框架
一、创建项目
使用npx create-react-app (项目名) --template typescript 创建项目
①如果App.tsx文件有如下报错: (没有报错的请忽略)
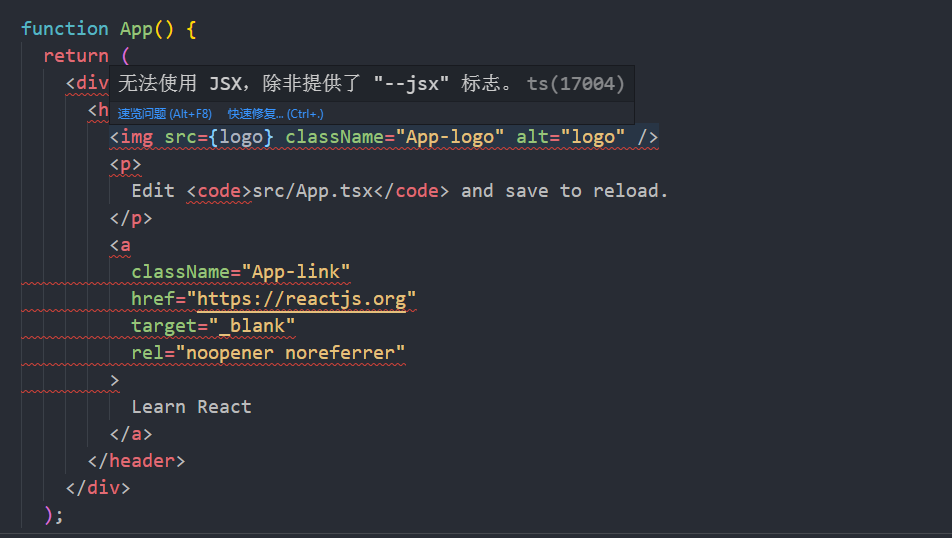
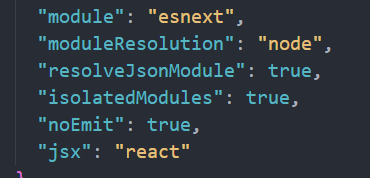
需要将tsconfig.json文件里的 "jsx": "react-jsx" 配置改为 "jsx": "react" 即可。
② 此时运行yarn start会报错
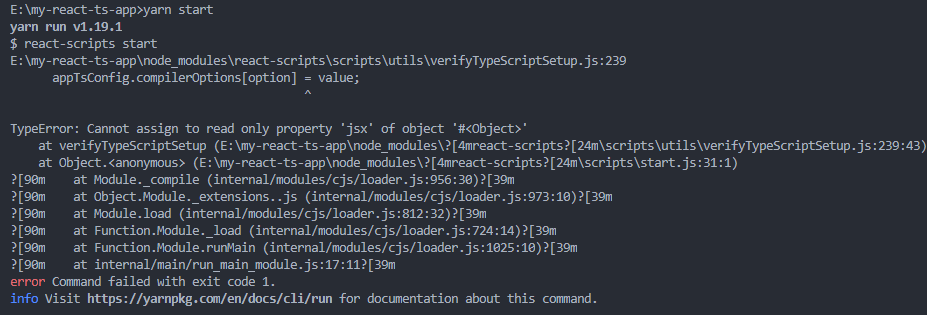
此时需要将react-scripts版本4.0.0降级为3.4.4 (参考: https://stackoverflow.com/questions/64593336/typeerror-cannot-assign-to-read-only-property-paths-of-object-for-compileropt)
③ 如遇到报错 : TypeScript 引入第三方包,报无法找到模块错误 (参考: https://www.cnblogs.com/xym4869/p/13323483.html)
二、安装ant-design 并配置自定义主题、按需加载(参考antd官网)、绝对路径的引用
yarn add antd @craco/craco craco-less
yarn add @babel/plugin-proposal-decorators babel-plugin-import --dev
①修改 package.json 里的 scripts 属性:
"scripts": {

    "start": "set PORT=3000 && craco start",

    "build": "set GENERATE_SOURCEMAP=false && craco build",

    "test": "craco test"

  },
② 在项目根目录创建一个 craco.config.js 用于修改默认配置 (参考: https://blog.csdn.net/qq_39223195/article/details/106287522)
const CracoLessPlugin = require('craco-less');

const path = require('path')

const pathResolve = pathUrl => path.join(__dirname, pathUrl)

module.exports = {

    webpack: {

        alias: {

            '@@': pathResolve('.'),

            '@': pathResolve('src'),

            '@common': pathResolve('src/common'),

            '@config': pathResolve('src/config'),

            '@components': pathResolve('src/components'),

        }

    },

    babel: {

        plugins: [

            ['import', { libraryName: 'antd', style: true }],

            ['@babel/plugin-proposal-decorators', { legacy: true }]

        ]

    },

    plugins: [

        {

            plugin: CracoLessPlugin,

            options: {

                lessLoaderOptions: {

                    lessOptions: {

                        modifyVars: { '@primary-color': 'red' },

                        javascriptEnabled: true,

                    },

                },

            },

        },

    ],

};
③在根目录创建 paths.json 文件
{

    "compilerOptions": {

        "baseUrl": "./",

        "paths": {

          "@@/*": ["./*"],

          "@/*": ["src/*"],

          "@common/*": ["src/common/*"],

          "@config/*": ["src/config/*"],

          "@components/*": ["src/components/*"]

        }

    }

  }
④修改tsconfig.json配置,添加上以下内容。将paths.json文件引入。直接在tsconfig.json文件里写会报错。 这样配置完之后引入文件的时候可以@/xxx/xxx并且会有提示。
"extends": "./paths.json",
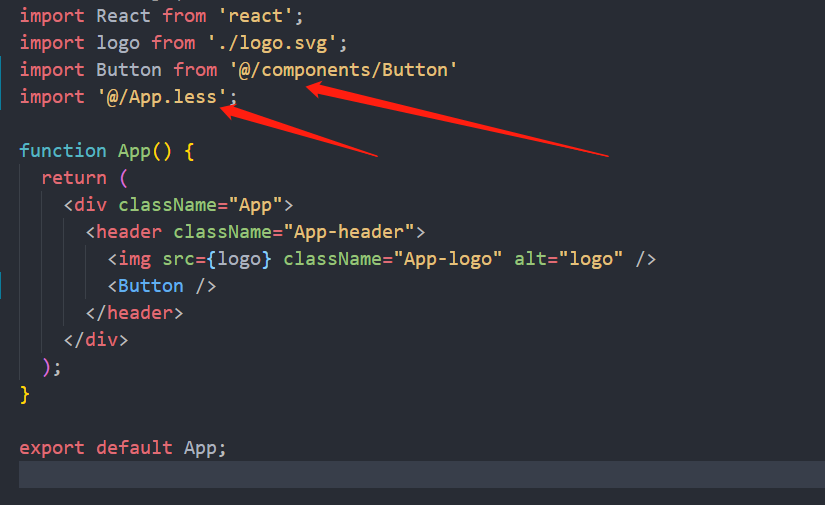
⑤ 将App.css和index.css改为App.less和index.less
⑥ demo
三、代码规范(eslint)的配置 (参考: https://www.npmjs.com/package/eslint)
./node_modules/.bin/eslint --init
如果是windows系统需要将‘/’换成 ‘\’, 然后按照自己的需求来选择配置即可。
使用create-react-app 搭建react + ts + antd框架的更多相关文章
- 从零搭建react+ts组件库(封装antd)
为什么会有这样一篇文章?因为网上的教程/示例只说了怎么做,没有系统详细的介绍引入这些依赖.为什么要这样配置,甚至有些文章还是错的!迫于技术洁癖,我希望更多的开发小伙伴能够真正的理解一个项目搭建各个方面 ...
- 【每天学一点-04】使用脚手架搭建 React+TypeScript+umi.js+Antd 项目
一.使用脚手架搭建项目框架 1.首先使用脚手架搭建React项目(React+TypeScript+Umi.js) 在控制台输入命令:yarn create @umijs/umi-app 2.引入An ...
- Create React App
Facebook开源了React前端框架(MIT Licence),也同时提供了React脚手架 - create-react-app. create-react-app遵循约定优于配置(Coc)的原 ...
- 深入 Create React App 核心概念
本文差点难产而死.因为总结的过程中,多次怀疑本文是对官方文档的直接翻译和简单诺列:同时官方文档很全面,全范围的介绍无疑加深了写作的心智负担.但在最终的梳理中,发现走出了一条与众不同的路,于是坚持分享出 ...
- tap news:week5 0.0 create react app
参考https://blog.csdn.net/qtfying/article/details/78665664 先创建文件夹 安装create react app 这个脚手架(facebook官方提 ...
- 使用create react app教程
This project was bootstrapped with Create React App. Below you will find some information on how to ...
- 如何扩展 Create React App 的 Webpack 配置
如何扩展 Create React App 的 Webpack 配置 原文地址https://zhaozhiming.github.io/blog/2018/01/08/create-react-a ...
- 在 .NET Core 5 中集成 Create React app
翻译自 Camilo Reyes 2021年2月22日的文章 <Integrate Create React app with .NET Core 5> [1] Camilo Reyes ...
- SAAS云平台搭建札记: (四) AntD For React使用react-router-dom路由接收不同参数页面不刷新的问题
在.net开发员眼里,如果使用MVC,根据路由匹配原则,可以通过各种方式接收参数,比如 /Post/List/1, /Post/List/2,或者 /Post/List?id=1,/Post/List ...
随机推荐
- Martyr2项目实现——Number部分的问题求解 (1) Find Pi to Nth Digit
Martyr2项目实现--Number部分的问题求解 (1) Find Pi to Nth Digit Find Pi to Nth Digit 问题描述: Find PI to the Nth Di ...
- php使用xpath爬取内容
<?php $html = file_get_contents('https://tieba.baidu.com/f?kw=%C9%EE%BB%A7&fr=ala0&loc=re ...
- linux(fedora30):安装/配置maven(maven3.6.1)
一,maven的用途 1,用途 Maven 是一个项目管理工具,主要用于项目构建,依赖管理,项目信息管理 maven可以用来: 帮用户下载jar包, 有依赖包时自动下载所需的依赖包 打包war包或ja ...
- centos8平台yum无法安装一些常用软件的解决,如:screen,iftop,nethogs
一,例如:安装screen时报错: [root@localhost liuhongdi]# yum install screen 上次元数据过期检查:17:39:58 前,执行于 2020年03月18 ...
- java-类和数组
java内存划分 Java的内存划分为5个部分: 1.栈 (Stack) : 存放的都是方法中的局部变量,方法的运行一定要在栈当中 局部变量: 方法的参数,或者是方法()内部的变量 作用域: 一旦超出 ...
- 【事件中心 Azure Event Hub】在Linux环境中(Ubuntu)安装Logstash的简易步骤及配置连接到Event Hub
在文章([事件中心 Azure Event Hub]使用Logstash消费EventHub中的event时遇见的几种异常(TimeoutException, ReceiverDisconnected ...
- Docker学习笔记之-通过Xshell连接 CentOS服务
上一节演示如何在虚拟机中安装 CentOS服务,Docker学习笔记之-在虚拟机VM上安装CentOS 7.8 本节主要演示如何通过 Xshell软件链接CentOS服务,本例以虚拟机作为演示,直接在 ...
- MongoDB添加认证
创建用户管理员 在admin数据库中,添加具有该userAdminAnyDatabase角色的用户 .根据需要为此用户添加其他角色. 注意:创建用户的数据库(在此示例中为 admin)是用户的身份验证 ...
- C++ 智能指针(一)
内存安全 在C++中,动态内存的管理是通过一对运算符来完成的:new,在动态内存中为对象分配空间并返回一个指向该对象的指针,我们可以选择对对象来进行初始化:delete,接收一个动态对象的指针,销毁该 ...
- npm 注册淘宝镜像
临时使用 npm --registry https://registry.npm.taobao.org install express 1 2.持久使用 npm config set registry ...