Git操作记录、腾讯工蜂
腾讯工蜂:
http://git.code.tencent.com
登录-->>创建项目-->>获取仓库路径
https://git.code.tencent.com/dangzhengtao/MyAppTest.git

Git官网下载: https://git-scm.com/downloads
Git是目前世界上最先进的分布式版本控制系统
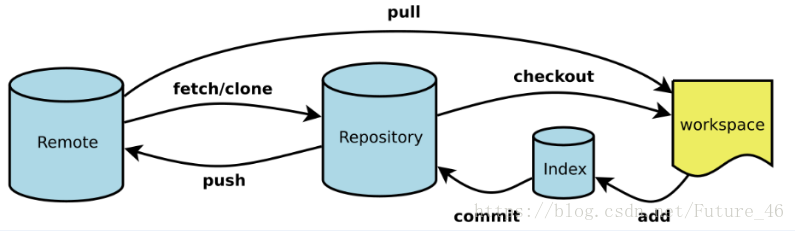
Workspace:工作区
Index / Stage:暂存区
Repository:仓库区(或本地仓库)
Remote:远程仓库
安装完成后打开Git Bash
git config --global user.name "用户名"
git config --global user.email "邮箱"
注意:git config --global 参数,有了这个参数,表示你这台机器上所有的Git仓库都会使用这个配置,当然你也可以对某个仓库指定的不同的用户名和邮箱。

输入:git init 初始化git仓库 本地目录文件夹下会生成.git文件夹
输入: git add.(命令里有个点)将当前目录所有文件标记为需要入库的新文件 (如果是更新单个文件 则需要输入文件名)
输入:git status 查看当前仓库状态
本地代码推送到远程git仓库。
输入:git remote add origin https://git.qcloud.com/cbuttonst/test.git 添加远程仓库地址。
如果add的url不小心输错了,可以使用:git remote set-url origin https://xxx 重新设置成新的url。
输入:git pull --rebase origin master 这时会提示你输入用户名(腾讯工蜂中的用户名),回车之后会弹出一个密码输入框(密码也是注册账号过程中你自己填写的)。这一步时将远程仓库文件拉到本地仓库,更新本地仓库。会出现下列信息。
输入命令:git push -u origin master 推送本地代码到远程git仓库,
初始化
# 在当前目录新建一个Git代码库

$ git init

# 新建一个目录,将其初始化为Git代码库

$ git init git_test

# 下载一个项目和它的整个代码历史

$ git clone http://git.code.oa.com/jaelintu/git_test
增加/删除文件
# 添加指定文件到暂存区

$ git add file1 file2...

# 添加指定目录到暂存区,包括子目录

$ git add dir

# 添加当前目录的所有文件到暂存区

$ git add .

# 添加每个变化前,都会要求确认

# 对于同一个文件的多处变化,可以实现分次提交

$ git add -p

# 删除工作区文件,并且将这次删除放入暂存区

$ git rm file1 file2 ...
代码提交
# 提交暂存区到仓库区

$ git commit -m "message"

# 提交暂存区的指定文件到仓库区

$ git commit file1 file2 ... -m "message"

# 提交工作区自上次commit之后的变化,直接到仓库区

$ git commit -a

# 提交时显示所有diff信息

$ git commit -v

# 使用一次新的commit,替代上一次提交

# 如果代码没有任何新变化,则用来改写上一次commit的提交信息

$ git commit --amend -m "message"

# 重做上一次commit,并包括指定文件的新变化

$ git commit --amend file1 file2 ...
分支
# 列出所有本地分支

$ git branch

# 列出所有远程分支

$ git branch -r

# 列出所有本地分支和远程分支

$ git branch -a

# 新建一个分支,但依然停留在当前分支

$ git branch name

# 新建一个分支,并切换到该分支

$ git checkout -b branch

# 新建一个分支,指向指定commit

$ git branch name commit_SHA

# 新建一个分支,与指定的远程分支建立追踪关系

$ git branch --track name orgin/name

# 切换到指定分支,并更新工作区

$ git checkout name

# 切换到上一个分支

$ git checkout -

# 建立追踪关系,在现有分支与指定的远程分支之间

$ git branch --set-upstream name origin/name

# 合并指定分支到当前分支

$ git merge branch-name

# 选择一个commit,合并进当前分支

$ git cherry-pick commit_SHA

# 删除分支

$ git branch -d branch-name

# 删除远程分支

$ git push origin --delete branch-name

$ git branch -dr remote/branch
tags
# 列出所有tag

$ git tag

# 新建一个tag在当前commit

$ git tag tag-name

# 新建一个tag在指定commit

$ git tag tag-name commit-SHA

# 删除本地tag

$ git tag -d tag-name

# 删除远程tag

$ git push origin :refs/tags/tag-Name

# 查看tag信息

$ git show tag-name

# 提交指定tag

$ git push origin tag-name

# 提交所有tag

$ git push origin --tags

# 新建一个分支,指向某个tag

$ git checkout -b branch-name tag-name
查看信息
# 显示有变更的文件

$ git status

# 显示当前分支的版本历史

$ git log

# 显示commit历史,以及每次commit发生变更的文件

$ git log --stat

# 搜索提交历史,根据关键词

$ git log -S [keyword]

# 显示某个commit之后的所有变动

$ git log (tag-name||commit-SHA) HEAD

# 显示某个文件的版本历史,包括文件改名

$ git log --follow file

$ git whatchanged file

# 显示指定文件相关的每一次diff

$ git log -p file

# 显示过去5次提交

$ git log -5 --pretty --oneline

# 显示所有提交过的用户,按提交次数排序

$ git shortlog -sn

# 显示指定文件是什么人在什么时间修改过

$ git blame file

# 显示暂存区和工作区的代码差异

$ git diff

# 显示暂存区和上一个commit的差异

$ git diff --cached file

# 显示工作区与当前分支最新commit之间的差异

$ git diff HEAD

# 显示两次提交之间的差异

$ git diff [first-branch]...[second-branch]

# 显示今天你写了多少行代码

$ git diff --shortstat "@{0 day ago}"

# 显示某次提交的元数据和内容变化

$ git show commit-SHA

# 显示某次提交发生变化的文件

$ git show --name-only commit-SHA

# 显示某次提交时,某个文件的内容

$ git show commit-SHA:filename

# 显示当前分支的最近几次提交

$ git reflog

# 从本地master拉取代码更新当前分支:branch 一般为master

$ git rebase branch-name
远程同步
# 下载远程仓库的所有变动

$ git fetch origin

# 显示所有远程仓库

$ git remote -v

# 显示某个远程仓库的信息

$ git remote show origin

# 增加一个新的远程仓库,并命名

$ git remote add shortname url

# 取回远程仓库的变化,并与本地分支合并

$ git pull origin branch-name

# 上传本地指定分支到远程仓库

$ git push origin branch-name

# 强行推送当前分支到远程仓库,即使有冲突

$ git push origin --force

# 推送所有分支到远程仓库

$ git push origin --all
撤销
# 恢复暂存区的指定文件到工作区

$ git checkout file

# 恢复某个commit的指定文件到暂存区和工作区

$ git checkout commit-SHA file

# 恢复暂存区的所有文件到工作区

$ git checkout .

# 重置暂存区的指定文件,与上一次commit保持一致,但工作区不变

$ git reset file

# 重置暂存区与工作区,与上一次commit保持一致

$ git reset --hard

# 重置当前分支的指针为指定commit,同时重置暂存区,但工作区不变

$ git reset commit-SHA

# 重置当前分支的HEAD为指定commit,同时重置暂存区和工作区,与指定commit一致

$ git reset --hard commit-SHA

# 重置当前HEAD为指定commit,但保持暂存区和工作区不变

$ git reset --keep commit-SHA

# 新建一个commit,用来撤销指定commit

# 后者的所有变化都将被前者抵消,并且应用到当前分支

$ git revert commit-SHA

# 暂时将未提交的变化移除,稍后再移入

$ git stash

$ git stash pop
冲突解决
rebase过程中,也许会出现冲突(conflict)
- git会停止rebase,需要解决冲突
- 解决完,使用
git add添加冲突的文件,更新暂存区 git rebase --continue继续剩下的rebasegit rebase --abort终止rebase行为,并且feature会回到rebase开始之前的状态
$ git rebase develop

CONFLICT (content): Rebase conflict in readme.txt

Automatic rebase failed; fix conflicts and then commit the result.

$ git status

On branch feature

You have unmerged paths.

  (fix conflicts and run "git rebase --continue")

  (use "git merge --abort" to abort the merge)

Unmerged paths:

  (use "git add <file>..." to mark resolution)

    both modified:   readme.txt

no changes added to commit (use "git add" and/or "git commit -a")
查看readme.md 内容
Git tracks changes of files.

<<<<<<< HEAD

Creating a new branch is quick & simple.

=======

Creating a new branch is quick AND simple.

>>>>>>> feature选择保留HEAD或者feature的版本
Git tracks changes of files.

Creating a new branch is quick AND simple.
在提交:
$ git add readme.md

$ git rebase --contine
推荐的Git GUI工具
1. Source Tree(号称最好用):特色支持git flow,一键创建工作流
- 免费功能
- 强大:无论你是新手还是重度用户,SourceTree 都会让你觉得很顺手。对于非常重度用户,Source Tree还支持自定义脚本的执行
- 同时支持 Windows 和 Mac 操作系统
- 同时支持 Git 和 Mercurial 两种 VCS
- 内置GitHub, BitBucket 和 Stash 的支持:直接绑定帐号即可操作远程repo
2. Tortoise git:文件的右键菜单很容易上手
- 免费
- 只支持Windows:与文件管理器良好集成
- 中文界面
- 与Tortoise SVN相同的体验
Git操作记录、腾讯工蜂的更多相关文章
- Git操作记录
记录一些用过的操作 增加远程推送分支 git remote add orgin http://xxxxx.git 直接新建本地分支,将远程分支提取出来. git checkout -t origin/ ...
- 个人常用Git操作记录
本地分支与远程分支建立联系 Git - 新建本地分支与远程分支关联问题 查看本地分支与远程分支关系: git branch -vv 当前分支与远程分支建立关系: git branch --set-up ...
- git操作记录(如何回退到某个历史版本,如何提交部分文件等方法)
当前项目使用git管理代码,在使用的过程中会遇到一些问题,这里记录下 1.合并代码后 在合并组员的代码后会出现下面的界面,开始的时候都会关闭,重新打开,乐此不疲到忍无可忍 解决方法: 出现这种界面是要 ...
- jenkins中通过git发版操作记录
之前说到的jenkins自动化构建发版是通过svn方式,今天这里介绍下通过git方式发本的操作记录. 一.不管是通过svn发版还是git发版,都要首先下载svn或git插件.登陆jenkins,依次点 ...
- 腾讯工蜂Git关联Jenkins Hooks
现在国内外Git平台非常多,最近维护的腾讯工蜂免费公网版本git.code.tencent.com,免注册(建议使用微信登录,舒服)即可使用私有仓库.对小型团队体验还不错,如果要关联Jenkins进行 ...
- centos下升级git版本的操作记录
在使用git pull.git push.git clone的时候,或者在使用jenkins发版的时候,可能会报类似如下的错误: error: The requested URL returned e ...
- centos6下升级git版本的操作记录
编译go_ethereum的时候出现了错误 然后发现是自己的git没有升级成功 因为编译需要高版本的git版本 所以会编译不成功 之后执行 root@uatjenkins01 ~]# git - ...
- git reflog查看所有操作记录
git reflog 可以查看所有分支的所有操作记录(包括(包括commit和reset的操作),包括已经被删除的commit记录,git log则不能察看已经删除了的commit记录 具体一个例子, ...
- 转:centos下升级git版本的操作记录
https://www.cnblogs.com/kevingrace/p/8252517.html 在使用git pull.git push.git clone的时候,或者在使用jenkins发版的时 ...
随机推荐
- linux基础第四周
天津SEO: 1.统计出/etc/passwd文件中默认shell为非/sbin/nologin的用户个数,并将用户都显示出来 [root@localhost ~]# awk -F: -v i=&qu ...
- [Cypress] install, configure, and script Cypress for JavaScript web applications -- part4
Load Data from Test Fixtures in Cypress When creating integration tests with Cypress, we’ll often wa ...
- transitionend事件 监听 fadeIn fadeOut 两个方法无效(动画结束时无法执行transitionend里面的代码)
//下面的例子证明 fadeIn() fadeOut() 不能使用transitionend事件进行监听. //说白了在fadeIn fadeOut 后面监听动画结束时,transitionend是不 ...
- Tcl在Vivado中的应用
转载: https://blog.csdn.net/avrmcu1/article/details/43446529?utm_source=blogxgwz6
- Java中static用来计数
搓搓的代码 import java.util.ArrayList; import java.util.Iterator; class Student{ private static int num; ...
- P5541 [USACO19FEB]Sleepy Cow Herding
ri,被黄题虐. 思路:贪心?? 提交:2次 错因:没有特判 题解: 先排序. 最小代价:固定区间长度为\(n\),我们扫一遍数组看区间最多包含几个数,设为 \(mx\) ,答案就是\(n-mx+1\ ...
- sql的九个常用语句是什么
一.基础1.说明:创建数据库CREATE DATABASE database-name2.说明:删除数据库drop database dbname3.说明:备份sql server--- 创建 备份数 ...
- vue报错 :NavigationDuplicated {_name: "NavigationDuplicated", name: "NavigationDuplicated"}
解决的几种办法 https://blog.csdn.net/weixin_43202608/article/details/98884620 这个适合所有vue的UI框架 在main.js下添加一下代 ...
- learning scala type alise
How to use type alias to name a Tuple2 pair into a domain type called CartItem type CartItem[Donut, ...
- [Python]闭包的理解和使用
闭包广泛使用在函数式编程语言中,虽然不是很容易理解,但是又不得不理解. 闭包是什么? 在一些语言中,在函数中可以(嵌套)定义另一个函数时,如果内部的函数引用了外部的函数的变量,则可能产生闭包.闭包可以 ...