php框架推荐
ThinkPHP, 国内开发的框架,特别容易入门,中文文档细致,表述准确。
Laravel, 国外框架,非常高级的一个框架,特别是前端比较模块化,但入门难一些,速度不高。
laravel在lampp下的安装方法:
1、先安装composer
安装地址:https://getcomposer.org/download/ 。
可以使用 /opt/lampp/bin/php composer-setup.php --install-dir=bin 将composer安装到你想要的位置。
安装好的 composer.phar 文件其实就是一个php文件,用php解析它就可以了。
2、通过 composer 安装 laravel
/opt/lampp/bin/php /opt/lampp/bin/composer.phar create-project --prefer-dist laravel/laravel blog
(上面这句等同于laravel的tutorial的 composer create-project --prefer-dist laravel/laravel blog 这句)
这句会安装根据laravel安装一个blog网站,放在当前目录下。若安装时找不到php命令,可以在命令行将 /opt/lampp/bin 临时加入环境变量 PATH。
3、也可以将 laravel 安装成全局的:
composer global require "laravel/installer"
4、laravel的入口是在网站目录的public目录,记得用apache的权限限制网站的大部分文件不能外部访问,laravel默认没有加入 apache 的这项配置。
laravel的例子: https://www.flynsarmy.com/2015/02/creating-a-basic-todo-application-in-laravel-5-part-1/
源码: https://github.com/Flynsarmy/laravel-5-todo-tutorial
Creating a Basic ToDo Application in Laravel 5 – Part 1
With the release of Laravel 5, there have been a bunch of backwards incompatible changes, new features added as well as the usual influx of new users so I thought I’d take the time to redo my basic to-do application with Laravel 5. The app covers a wide range of concepts, links to relevant learning material where possible and should make for a great introduction to the framework.
This tutorial is relatively long so I’ve broken it up into multiple posts.
- Part 1 – Installation, Database and Routes
- Part 2 – Listing Projects and Tasks
- Part 3 – Create/Edit/Delete
- Part 4 – Validation
The source for each part can also be found on GitHub.
Today will cover installation, configuration, artisan, migration, seeding and routes.
Before you Begin
Before you begin there are a few great resources you should check out.
You won’t get far in the Laravel world without hearing about Jeffrey Way. Jeffrey has perhaps done more for the Laravel community than any other non-core developer. He has produced high-quality, comprehensive video tutorials on almost every aspect of L5, many of which are free to view and aimed at beginners. I would highly recommend you check out the following pieces of his work:
- Laravel 5 Fundamentals – An absolute must-see series of free screencasts for new users of Laravel.
- What’s New in Laravel 5 – A great series by Matt Stauffer showing off some cool new stuff in Laravel.
- Laracasts – Mostly paid for videos of very high quality. New videos are regularly created and one a week is made free.
There are a few other places to find news and information:
- The Laravel Twitter feed – for the latest breaking news on L4 development.
- Taylor Otwell’s Twitter feed – the author of Laravel himself.
- Laravel.io – Weekly roundups that gather the latest news and tutorials from around the web. They also do a weekly podcast covering their thoughts/concerns relevant to the platform.
- Laravel Packages Registry – good place to go to find some of the best Laravel packages
- Code Bright – An e-book provided free of charge by framework author Dayle Rees
If you’re coming from Laravel 4 I also recommend checking out Directory structure and namespace by Matt Stauffer.
Project Aim
Our to-do application will consist of one or more projects, each with its own list of tasks. You will be able to create, list, modify and delete both tasks and projects.
In this lesson we will go through:
- Installing and setting up Laravel
- Installing extra packages that will make development easier
- Using migrations and seeds
- Learning how to use resourceful controllers
- Learning how to use views (including the blade templating language and content layouts)
- Handling model relations
Installation
Installing Laravel is extremely quick and painless thanks to Composer. I’ll blaze through this section as it’s really been covered to death by this point.
Composer
First you’ll need to install Composer if you haven’t already (you’ll only need to do this once):
1 |
curl -sS https://getcomposer.org/installer | php |
Laravel
Now for the laravel installer (you’ll only need to do this once):
1 |
composer global require "laravel/installer=~1.1" |
and finally our project:
1 |
laravel new l5todo |
Configuration
Laravel 5 uses a package called DotEnv that stores sensitive information in .env files which are loaded as PHP environment variables at runtime. Sounds complicated but it just means your sensitive credentials go into these files while the rest of your config remains in the standard config files.
Database
We need a database. Set one up for yourself in a DB of your choice then copy.env.example to .env and update accordingly:
1 |
DB_HOST=localhost |
Finally if you’re not using MySQL open /config/database.php and change the default line:
1 |
'default' => 'mysql', |
Remember to add your environment files to your .gitignore by adding a .env line!
Taking our First Steps
As mentioned above, our to-do application will comprise of one or more projects each with their own task list. We’re going to need Project and Taskmodels, controllers, views, migrations, seeds (optional but useful) and routes. You probably already understand what most/all of these are, however if you don’t you should check out the video M-V-Huh? and Basic Model/Controller/View Workflow.
Let’s make our way through them one at a time.
Migrations
We want to get our table schema set up in the database. It will look like the following:
Projects |
First a migration must be set up:
1 |
php artisan make:migration create_projects_and_tasks_tables --create="projects" |
We’re creating both tables in the one migration so that they can be removed in reverse order to avoid an integrity constraint violation. Open /database/migrations/<date>_create_projects_and_tasks_tables.php and set it up as follows:
1 |
<?php |
Perform the migration:
1 |
php artisan migrate |
If you check the database, your tables should now be all set up.
Seeds
We’ll seed some projects/tasks to have something to work with when we finally get to the browser. Create /database/seeds/ProjectsTableSeeder.phpand TasksTableSeeder.php like so:
1 |
// /database/migrations/seeds/ProjectsTableSeeder.php |
Also don’t forget to add your seed classes to/database/seeds/DatabaseSeeder.php:
1 |
use Illuminate\Database\Seeder; |
Now we seed:
1 |
composer dump-autoload |
then
1 |
php artisan db:seed |
Your database should now be seeded!
1 |
mysql> select * from projects; |
Models
To work with our projects and tasks tables we need equivalent Models so create them now:
1 |
php artisan make:model Project |
That was easy!
Artisan – Tinker
Now that we have information in the database it would be a great time to learn about one of artisan’s handy features – tinker. As explained in the informative article Tinkering with Tinker Like an Artisan, tinker provides a command line for interacting with your Laravel installation. As an example, let’s use it to retrieve the number of projects currently in the database:
$ php artisan tinker |
As you can see tinker has the potential to be quite useful. I’ll be referencing it a few times in this tutorial.
Controllers
We’ve gotten to the point now where we can start hitting the browser. To do that we need to set up some Controllers and Routes to point to them. First up the controllers:
1 |
php artisan make:controller ProjectsController |
Nested Resources
Begin by adding the Project and Task resources to /app/Http/routes.php:
1 |
Route::get('/', 'WelcomeController@index');
|
Let’s now look at a neat little artisan feature – route:list. In your command line enter the following:
1 |
php artisan route:list |
You’ll notice that both projects and tasks are top level urls. In our to-do app,tasks belong to projects though, so it makes sense for URLs to be nested more like /projects/1/tasks/3 instead of just /tasks/3. This can be accomplished using something called nested resources. As with most things in Laravel, the modification required is quick and simple. Open /app/Http/routes.php and make the following change:
1 |
// Route::resource('tasks', 'TasksController');
|
That’s it. Do another php artisan route:list and see what you have now:
1 |
php artisan route:list |
Setting Slug-based URLs
We’ve almost got our routes perfect however in their current state we’ll have URLs like /projects/1/tasks/2. It would be much better for our visitors if the model IDs were replaced with their respective slug fields instead. So we’d get for example /projects/my-first-project/tasks/buy-milk.
Open /app/Http/routes.php and drop the following in:
1 |
Route::bind('tasks', function($value, $route) {
|
the above will override the default behavior for the tasks andprojects wildcards in php artisan routes.
Conclusion
Today we:
- installed and configured Laravel
- created two resources
- set up our migrations
- added some data seeds
- configured our URL structure
We laid the groundwork for the next lesson by creating all the components required for the frontend to function. We now have data in our database and routes to hit. In the next lesson we’ll get started on the frontend of the site!
Creating a Basic ToDo Application in Laravel 5 – Part 2
Welcome back to my simple to-do application tutorial for Laravel 5. This tutorial is relatively long so I’ve broken it up into multiple posts.
- Part 1 – Installation, Database and Routes
- Part 2 – Listing Projects and Tasks
- Part 3 – Create/Edit/Delete
- Part 4 – Validation
The source for each part can also be found on GitHub.
So far we have a working database complete with seed data and a bunch of routes for displaying, editing and deleting our projects and tasks. In this second chapter I’ll cover controllers, models (with relationships), views (including the blade templating language and layouts) and route model binding.
Laravel Form Helpers
In Laravel 4 we had a HTML package but it was removed for 5 to cut down on cruft. Add it back in by following the instructions in my How to Install Illuminate/HTML In Laravel 5 tutorial. In addition to HTML and Form facades, this package provides some handy helper functions such as link_to_route()which we’ll be using later.
Controllers and Blade View Layouts
If you browse to /projects you’ll get an empty page. Why is that? Well let’s find out. Run php artisan route:list one more time and look at this line:
1 |
+--------+----------+----------------------------------------+------------------------+-------------------------------------------------+------------+ |
Looks like the /projects URL is loading ProjectsController’s index method. So open up /app/Http/controllers/ProjectsController.php and update the method to point to a view we’ll create:
1 |
public function index() |
We’re using Blade Templates in this tutorial so create a /resources/views/projects/index.blade.php file and enter some text in there. Hit /projects in your browser again. If everything is working correctly you should see the text you entered above. Do the same for the create controller method.
Showing the contents of a view is great, but if we have more than one page on our site we’ll want a consistent template across all pages. In other words, we need the view’s contents to sit inside a basic HTML template. This is done withcontroller layouts.
There are a few steps to implementing controller layouts:
- Create a layout view. Laravel actually ships with a pretty decent one called app.blade.php so we’ll save some time and just use that. Notice near the bottom the layout contains a @yield(‘content’) line. That’s the function that will load our actual content.
- Reference your layout in your view using @extends(‘app’) and wrap in a @section(‘content’) block like so:
1

2
3
4
5@extends('app')
@section('content')
This is my /resources/views/projects/index.blade.php file!
@endsection
In /resources/views/projects folder create a show.blade.php, index.blade.phpand create.blade.php view with the above markup replacing the filename as necessary. With these in place, refresh /projects in your browser. You should now see the app.blade.php skeleton around your view contents.
Route Model Binding
By default Laravel will provide an ID value to various resourceful controller methods such as show(), edit(), update() and destroy(). This is fine but it adds alot of extra boilerplate we need to write – grabbing the model instance, checking if it exists etc. Thankfully Laravel provides something called route model binding that helps with this issue. Instead of providing an $id variable, the method will be given the $project or $task object instance instead.
Open up /app/Http/routes.php and add the following two lines:
1 |
// Provide controller methods with object instead of ID |
and in your TasksController and ProjectsController replace every method definition’s $id reference with Task $task and Project $project like so:
// public function edit($id) |
Don’t forget to add use App\Task and App\Project at the top of your respective controllers now that we’re referencing those models!
At this point you can also pass the object to its respective view in each controllers show, edit and update methods like so as we’ll be using them later:
1 |
public function edit(Project $project) |
The TasksController will also need some minor modifications. Because we’re using nested resources, php artisan route:list will tell us that task routes all include a {projects} mask in addition to the {tasks} mask that some of them receive. As a result the controller methods will be passed a Project instance as their first argument. So update them accordingly remembering to update method docs and pass the new $project variable.
By this point your controllers should look like so:
1 |
// /app/Http/Controllers/ProjectsController.php |
If you refresh the url /projects/project-1 everything should still be working.
Displaying Our Models
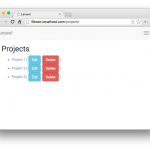
Project listing page
It’s time to start listing our projects and tasks. Open /projects in your browser. Based on php artisan route:list this is our project listing page. Open/resources/views/projects/index.blade.php and set it to the following:
1 |
@extends('app')
|
There are a few things going on above:
- I’m using the blade templating language’s if and foreach control-flow functions as well as its print function (the double curly braces).
- I’m checking if there are any projects to show. If not, display a message saying so. If there are, list them all
- I’m calling the route() helper with a named route (You can see a list of your named routes with php artisan route:list) to link to each projects details page.
You’ll also need to pass the $projects variable to this view or you’ll get an undefined variable error. Open /app/Http/controllers/ProjectsController.phpand update the index() method to:
1 |
public function index() |
Refresh and you’ll now see a listing of your projects.
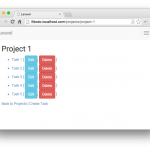
Model Relations – The Project Details page
On the project details page we need to display a list of the given projects tasks. To do that we need to define a one-to-many relationship in our Projectmodel allowing it to grab its tasks.
Open /app/Project.php and add a tasks() method like so:
1 |
public function tasks() |
Inversely we can also add a many-to-one relationship to our Task model:
1 |
public function project() |
To make sure it worked:
$ php artisan tinker |
Perfect! The view can now be updated (/resources/views/projects/show.blade.php):
1 |
@extends('app')
|
Click a project on the project listing page in your browser and your project will now display complete with its task listing.
Finally we have the task show page (/resources/views/tasks/show.blade.php). This one is very straightforward:
1 |
@extends('app')
|
Note: Be very careful when using model relationships. It’s easy to generate huge numbers of SQL queries if you’re not careful. This is called the N+1 problem. See the video below for details on what exactly the N+1 problem is, and how to protect against it.
Conclusion
Today we covered:
- Route Model Binding
- Models (with one-to-many relationships)
- Controllers (with route model binding)
- Views (with blade templating language and layouts)
We now have a working listing of projects and tasks. In the next lesson we’ll concentrate on editing, creating and deleting projects and tasks. Stay tuned!
Creating a Basic ToDo Application in Laravel 5 – Part 3
Welcome back to my simple to-do application tutorial for Laravel 5. This tutorial is relatively long so I’ve broken it up into multiple posts.
- Part 1 – Installation, Database and Routes
- Part 2 – Listing Projects and Tasks
- Part 3 – Create/Edit/Delete
- Part 4 – Validation
The source for each part can also be found on GitHub.
So far we’ve learned how to install and set up Laravel, set up some projectand task resources and displayed them to the user. In this chapter we’ll learn how to set up create, edit and delete pages/actions.
Before you Begin
If you’re a Laracasts member, watch the videos RESTful Forms, Create/Edit Forms and Form Requests & Controller Validation. These videos explain far better and in far more detail the concepts below. If you’re serious about learning Laravel I’d highly recommend you sign up.
Adding Navigation Links
Before we do anything it would make life a little easier to add create/edit/delete/back links to our projects and tasks pages.
1 |
<!-- /resources/views/projects/index.blade.php --> |
For the most part this should be pretty self explanatory. The only tricky concept is the delete link. Resource controllers require a HTTP DELETE method to be sent. This can’t be done with a standard link so a form submit to the given route is required. See Actions Handled by Resource Controller in the documentation for more information.
- Projects list
- Project details
Creating the Add and Edit pages
With the listing pages all set up, we need to be able to add and edit projects and tasks. The create and edit forms will be pretty much identical so instead of duplicating them, we will inherit from a single form partial for each model.
I’ll begin with the project create/edit views:
1 |
<!-- /resources/views/projects/create.blade.php --> |
Do the same for tasks but with updated routes:
1 |
<!-- /resources/views/tasks/create.blade.php --> |
Now the are a few new concepts here:
Including a Partial
Firstly you’ll notice my use of blades @include method. This includes the form view that we will define later (for now, just create the files/resources/views/projects/partials/_form.blade.php and/resources/views/tasks/partials/_form.blade.php). Because the same form will be used on both create and edit pages we need its submit button to have a ‘Create Form’ and ‘Edit Form’ message appropriately so a submit_text variable is passed to the view.
Form Model Binding
The forms require different HTML <form> tags so rather those were split out from the _form partial and placed directly in the views. The Add form is a simple POST request to the projects.store named route and the Edit form is a PATCH to projects.update. This may seem confusing but it’s just the way RESTful controllers work.
Also notice the use of Form::model(). This is called called form model binding and though this doesn’t do much now, it will be used to automatically populate the edit form later when we add the fields with using Form::input().
CSRF Protection
Form helpers provide alot of functionality for free. If you go to /projects/create and view page source you’ll see something like the following:
1 |
<form method="POST" action="http://l4todo.localhost.com/projects" accept-charset="UTF-8"> |
See the _token field? This is a CSRF token automatically generated by the {{ Form::model() }} call which prevents cross-site request forgery. Suffice to say it’s a good thing and we didn’t even have to do anything special to get it!
Create the Edit Forms
We need form markup for our projects and tasks. Thanks to form model binding, we can just use Laravel’s Form helpers to output all the fields we need.
1 |
<!-- /resources/views/projects/partials/_form.blade.php --> |
That’s about it. In your browser you should now be able to browse to your add and edit pages. How easy was that!
Making the Forms Work
We have project and task add and edit forms displaying and a pseudo-form for deleting them. Now to make everything work as advertised.
Firstly add to the top of your controllers:
1 |
use Input; |
Now for the store, update and destroy methods.
1 |
// ProjectsController |
Again the above is pretty much self explanatory and boilerplate-free thanks to route model binding and Laravel’s beautiful expressive syntax.
If you submitted one of the forms now, you’d likely see an errorMassAssignmentException: _token. A mass assignment is where you pass an array of data to Model::create() or Model::update() the way we’re doing in our controllers, instead of setting one field at a time. To fix this simply add an empty guarded property to each model.
1 |
class Project extends Model {
|
Flash Messages
One thing to note from the above is my use of the with() function. with()passes a flash (one time use) variable to the session which can then be read on the next page load. We now need to check for that message and display it to the user. Open /resources/views/app.blade.php and add the following:
1 |
... |
Try creating a project. The message will display as it should however refresh the page and it will be gone.
Conclusion
Today things got a little more interesting. We added create and edit forms and delete functionality, we learned about CSRF and Form Model Binding and even a few more blade and Eloquent functions.
With everything now working, have a play around. Create, edit and delete your resources. Remember you can always php artisan migrate:refresh –seed when you’re done and your database will be instantly reset.
In the next and final lesson we’ll put on the finishing touches including form validation and slug management. Stay tuned!
Creating a Basic ToDo Application in Laravel 5 – Part 4
Welcome back to my simple to-do application tutorial for Laravel 5. This tutorial is relatively long so I’ve broken it up into multiple posts.
- Part 1 – Installation, Database and Routes
- Part 2 – Listing Projects and Tasks
- Part 3 – Create/Edit/Delete
- Part 4 – Validation
The source for each part can also be found on GitHub.
So far we’ve learned how to install and set up Laravel, set up some project and task nested resources and display them to the user. Create, edit and delete functionality has also been implemented. In this chapter we’ll finish things off by adding form validation.
Server Side Form Validation
As it stands our create and edit forms work but they’re not validated. Let’s fix that.
There are multiple ways of handling form validation – some objectively better than others, however for such a small project as this I like to use the controllers validate() method with a Illuminate\Http\Request object like so:
1 |
// /app/Http/Controllers/ProjectsController.php |
We need a place to display any generated errors. Open/resources/views/app.blade.php and drop the following above @yield(‘content’):
1 |
<div class="content"> |
See Available Validation Rules for a complete list of rules available. Validation should now be working. If validation on a form fails, $this->validate() will redirect back to the current page along with an ErrorBag of errors which will then be displayed on the page.
Conclusion
Over the court of this tutorial we’ve learned how to install and configure Laravel 5, add extra packages, handle seeds and migrations, generate and display resources, add create/edit/display pages for those resources and finally today we set up form validation. Along the way we even picked up a few more advanced concepts such as route model binding and CSRF protection. Despite its seemingly simple appearance at first a to-do application generally makes for a great starter app for any new PHP framework and Laravel has made the process of creating ours painless and fun. Happy coding!
php框架推荐的更多相关文章
- 免费UI框架推荐--Charisma UI
基于Jquery.Bootstrap的后台管理免费UI框架推荐--Charisma UI 在项目设计和开发工作中,做过一些后台管理系统的设计和开发,用的很多都是比较传统的UI框架. 老是走在这个圈子里 ...
- 【推荐】HTML5 UI框架 推荐
笔者的男装网店:http://shop101289731.taobao.com .冬装,在寒冷的冬季温暖你.新品上市,环境选购 最近自己瞎搞一下web网页的东西.想开发先找资源. 整理了一下HTML5 ...
- C#/.NET/.NET Core优秀项目框架推荐
前言: 为.NET开源者提供的一个推荐自己优秀框架的地址,大家可以把自己的一些优秀的框架,或者项目链接地址存到在这里,提供给广大.NET开发者们学习(排名不分先后). Github项目仓库收集地址:h ...
- 5个强大的Java分布式缓存框架推荐
在开发中大型Java软件项目时,很多Java架构师都会遇到数据库读写瓶颈,如果你在系统架构时并没有将缓存策略考虑进去,或者并没有选择更优的 缓存策略,那么到时候重构起来将会是一个噩梦.本文主要是分享了 ...
- 消灭Bug!十款免费移动应用测试框架推荐
对于移动应用开发者而言,Bug往往是最让人头疼的一大问题.不同于时时刻刻可以修补的Web App,移动App中的Bug往往隐藏得很深,甚至有时候等到用户使用才显现出来,这么一来开发者搞不好就会赔了 ...
- 10个优秀的JavaScript Web UI库/框架推荐
在进行Web开发时,并非所有的库都适合你的项目,但你仍需要收藏一些Web UI设计相关的库或框架,以在你需要的时候,加快你的开发效率. 本文为你带来10款非常优秀的基于JavaScript的Web U ...
- 10 个顶级 JavaScript 动画框架推荐
使用JavaScript可以做出一些引人注目的动画效果,但通常不太容易实现.本文为你整理了10个非常优秀的JavaScript动画框架,使用它们你可以轻松实现动画效果.1. RaphaëlRaphaë ...
- android 开源框架推荐
同事整理的 android 开源框架,个个都堪称经典.32 个赞! 1.volley 项目地址 https://github.com/smanikandan14/Volley-demo (1) JS ...
- H5前端框架推荐合集
Ionic ionic 吧开发流程都帮你做好了,已经不再是单纯的UI框架,而是开发框架了,非常适合快速开发.基于angular2,丰富的UI组件,大大改进的编程模型, Semantic UI 中文官网 ...
随机推荐
- pl/sql programming 15 数据提取
数据提取 -- 游标 游标只是一个指向某个结果集的指针. 声明游标: cursor employee_cur IS select * from employees; 打开游标: open employ ...
- 在blade中定义一个可以被模版使用的变量
laravel的blade中的数据一般由控制器传入,但是有没有什么办法临时在blade模版中创建并且被blade所使用吗? 答案是肯定的,不过语法稍微复杂一点 {{-- */$variableAvai ...
- ffmpeg命令学习
1.组成 程序:ffmpeg.ffplay.ffprobe.ffserverffmpeg:转码程序ffplay:播放程序ffserver:服务器程序 库:libavcodec.libavdevice. ...
- Python [Leetcode 141]Linked List Cycle
题目描述: Given a linked list, determine if it has a cycle in it. 解题思路: 快的指针和慢的指针 代码如下: # Definition for ...
- erl0008 - unicode 和 utf-8之间的关系
转载:http://blog.jobbole.com/84903/ 原文出处: 卢钧轶 欢迎分享原创到伯乐头条 本文将简述字符集,字符编码的概念.以及在遭遇乱码时的一些常用诊断技巧. 背景:字符集 ...
- swun 1766 我的悲剧不可能那么好数
解题思路: 一向提交特别慎重的我,这题竟然PE了5发左右,放了几天,再回来写,直接1A, 相当的自豪,而且是最优解题者.这题千万要注意,化繁为简,文章只包括大小 写字母和数字,还有空行. #inc ...
- a标签包input引起的问题
最近公司中的一个项目中,有一个同事跟我说,他写的输入框不能选中输入内容了,并且光标也不能插入到已写好的文字其他位置. 简化了一下他的代码结构,如下: <a href="javascri ...
- ScrollView中嵌套ListView
scrollview中嵌入listview,要是直接把listview嵌进scrollview中,listview的高度是固定的不能进行滑动.默认情况下Android是禁止在ScrollView中放入 ...
- [Duilib] 交替背景色设置失败的原因
用列表显示一列数据时,相邻数据常用不同背景色来达到区别的作用.但是设置了Duilib相应属性之后交替背景色效果并未出现.逐一排除之后发现是item的enable属性设置为"false&quo ...
- asp.net下ajax.ajaxMethod使用方法(转)
使用AjaxMethod可以在客户端异步调用服务端方法,简单地说就是在JS里调用后台.cs文件里的方法,做一些JS无法做到的操作,如查询数据库 使用AjaxMethod要满足一下几点: 1.如 ...