自动化运维工具 ~puppet~
一、模板的应用
到目前为止,资源申报、定义类、声明类等所有功能都只能一个manifest文件中实现,但这却非有效的基于puppet管理IT资源架构的方式。实践 中,一般需要把manifest文件分解成易于理解的结构,例如将类文件、配置文件甚至包括后面讲提到的模板文件等分类存放,并且通过某种机制在必要时将 他们整合起来。这种机制即成为“模板”,它有助于结构化、层次化的方式使用puppet,而puppet则基于“模块自动装载器”完成模块装载
从另一个角度来说,模板实际上就是一个按约定的、预定义的机构存放了多个文件或子目录的目录,目录里的这些文件或子目录必须遵循其命名规范。 puppet会按照这种规范在特定位置查找所需的模块文件,不过,这些特定目录页可以通过puppet的配置参数modulepath定义
只要在某模块中定于了一个类,就可以在任何manifest文件中使用它,puppet会自动去查找并装载包含了这个类的定义的manifest文件任 意使用它们。于是,基于模块机制的puppet的主manifest文件就可以变得很小,也更易懂并能基于策略进行定制 注释:控制节点;master 与 slave 时间需要同步;
模块目录的结构
在puppet中,模块本身用一个目录来表示,其需要存放于puppet的modulepath参数所定义的目录中,如/etc/puppet/modules。模块目录名称必须与模块名称相同,需要遵循特定的组织结构
MODULE NAME
manifests
init.pp
files
templates
lib
tests
spec
MODULE NAME:模块名称,也即模块目录名称:模块只能以小写字母开头,可以包含小写字母、数字和下划线,但不能使用“main”和“settings”作为模块名
manifests目录:包含当前模块的所有manifest文件:每个manifest文件包含了一个类或一个定义的类型,此文件访问路径格式为“Modulename::[SubDirectoryName::]ManifestFileName”。
init.pp:只能包含一个单独的类定义,且类的名称必须与模块名称相同
files目录:包含了一组静态的文件,这些文件可被站点下载使用:每个文件的访问路径都遵循puppet:///modules/MODELE_NAME/filename路径格式
lib目录:插件目录,常用于自定义fact及自定义资源类型等
templates目录:存储了manifest用到的模板文件,其访问路径遵循template(‘ModulesName/TemplateName’)格式,后缀名应该为.erb,关于模板文件详细信息,后文有介绍
tests目录:当前模板的使用帮助或使用范例文件,类似如何声明当前模板中的类及定义的类型等
spec目录:类似于tests目录的功能,只不过,其是为lib目录定义的各插件提供使用范例的
[root@node1 ~]# mkdir -p /etc/puppet/modules/nginx/{manifests,files,templates,lib}

[root@node1 ~]# cd /etc/puppet/modules/nginx/

[root@node1 nginx]# cd manifests/

[root@node1 manifests]# vi init.pp

class nginx {

        package {'nginx':

                ensure => installed,

                name  => nginx,

        }

}

[root@node1 manifests]# vi web.pp

class nginx::web inherits nginx {

        service {'nginx':

                ensure => true,

                enable => true,

                name   => nginx,

                require => Package['nginx'],

        }

        file{'web.conf':

                ensure =>file,

                source => "puppet:///modules/nginx/web.conf",

                path   => '/etc/nginx/nginx.conf',

                notify => Service['nginx'],

                require => Package['nginx']

        }

}

[root@node1 manifests]# puppet apply -e 'include nginx::web'

notice: /Stage[main]/Nginx/Package[nginx]/ensure: created

notice: /Stage[main]/Nginx::Web/File[web.conf]/content: content changed '{md5}d9dfc198c249bb4ac341198a752b9458' to '{md5}33d2119b71f717ef4b981e9364530a39'

notice: /Stage[main]/Nginx::Web/Service[nginx]/ensure: ensure changed 'stopped' to 'running'

notice: Finished catalog run in 8.07 seconds

[root@node1 manifests]# grep work /etc/nginx/nginx.conf

worker_processes  ;
准备nginx配置文件,并有意修改nginx的配置文件
[root@node1 ~]# cp /etc/nginx/nginx.conf /etc/puppet/modules/nginx/files/web.conf

[root@node1 ~]# grep worker_processes /etc/puppet/modules/nginx/files/web.conf

worker_processes  ;
可以看到我们的配置执行成功
使用模板配置文件
语法:<%= Ruby Expression %>:替代为表达式的值,在使用表达式时应该使用@引用
<% ruby code %>:仅执行代码,不做任何替换,常用于条件判断或循环语句、设定变量以及在输出之前对数据进行处理
<%# commit %>:注释信息
<%%: 输出<%
%%>:输出%>
如上面的案例,在使用模板后
[root@node1 manifests]# cp /etc/puppet/modules/nginx/files/web.conf /etc/puppet/modules/nginx/templates/conf.erb

[root@node1 manifests]# grep work /etc/puppet/modules/nginx/templates/conf.erb

worker_processes  <%= @processorcount %>;

表示nginx的线程数按照cpu的个数来启动

类应该改为如下所示

class nginx::web inherits nginx {

        service {'nginx':

                ensure => true,

                enable => true,

                name   => nginx,

                require => Package['nginx'],

        }

        file{'web.conf':

                ensure =>file,

                content =>template('nginx/conf.erb'),

                path   => '/etc/nginx/nginx.conf',

                notify => Service['nginx'],

                require => Package['nginx']

        }

}

[root@node1 manifests]# puppet apply -e 'include nginx::web'

notice: /Stage[main]/Nginx/Package[nginx]/ensure: created

notice: /Stage[main]/Nginx::Web/Service[nginx]/ensure: ensure changed 'stopped' to 'running'

notice: Finished catalog run in 8.25 seconds

[root@node1 manifests]# grep work /etc/nginx/nginx.conf

worker_processes  ;

二、master/agent
应用场景:
统一资源管理软件
统一配置系统优化参数
定期检测服务器是否运行
主机上的软件配置合理的属性
1.安装
前提:配置实用epel的yum源,而后使用yum命令安装即可
环境规划
192.168.1.201 puppet-server端
192.168.1.202 puppet-agent端
安装部署puppet服务器端
[root@node1 manifests]# yum install puppet-server
安装部署puppet客户端
[root@node2 ~]# yum install puppet -y
2.解析双方主机
解析双方主机,可以使用DNS和hosts文件,由于本处实验的缘故,故使用的为/etc/hosts文件来解析双方主机
建议的主机命名方式:
角色名-运营商-机房名-机器ip.域名
[root@node1 manifests]# cat /etc/hosts

127.0.0.1   localhost localhost.localdomain localhost4 localhost4.localdomain4

::         localhost localhost.localdomain localhost6 localhost6.localdomain6

172.16.0.1  server.magelinux.com server

192.168.1.201 node1.firefox.com node1

192.168.1.202 node2.firefox.com node2

192.168.1.203 node3.firefox.com node3

192.168.1.204 node4.firefox.com node4
3.启动
1)启动puppet服务器端
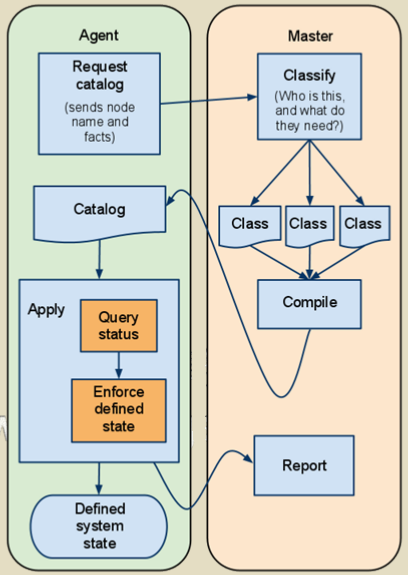
收起启动puppet守护进程时,其会自动进行运行环境的初始化,例如创建一个本地CA及服务器端相关的证书和密钥等。初始化操作完成后,puppet 就会监听指定的套接字并等待客户端的连接请求。默认情况下,其证书和密钥等文件位于/var/lib/puppet/ssl目录中
出于调试的目的,建议首次启动puppet服务进程可以以非守护进程方式进行,并让其输出详细信息以便于观察初始化过程,如下所示,其逐步展示了创建本 地主叫向CA申请证书、获得证书以及CA移除证书签署请求的过程等,而后启动服务进程并准备接受各agent端的连接请求
使用puppet master --genconfig可以查看服务器端的配置信息,建议将其输出到/etc/puppet/puppet.conf中
[root@node1 ~]# puppet master --genconfig >> /etc/puppet/puppet.conf
注意:如果此前曾以其主机名或各种原因启动过puppet客户端过程并完成过初始化,其证书文件将无法符合本次启动的需要:此时,需要先情况/var/lib/puppet/ssl目录方可完成后续的初始化操作
如上述的测试启动没有问题,可终止当前的启动后将其以守护进程方式启动
# 安装puppet-server程序包

yum localinstall facter-1.7.-.el6.x86_64.rpm puppet-2.7.-.el6.noarch.rpm puppet-server-2.7.-.el6.noarch.rpm

# 生成master配置文件:

puppet master --genconfig >> /etc/puppet/puppet.conf

# 启动puppetmaster服务

puppetmasterd -v -d --no-daemonize # 前台测试启动

service puppetmaster start # 正式启动服务

# 服务验证:ss -antupl |grep
2)启动puppet客户端
puppet agent在首次启动时,会想起指定的puppet server申请证书,并完成后续连接请求,同样的理由,处于测试的目的,接入当前puppet集群中的首个agent节点可以以非守护进程的方式运行,以观察其初始化过程
[root@node2 ~]# puppet agent --server=node1.firefox.com --no-daemonize --debug

info: Creating a new SSL key for node2.firefox.com

info: Caching certificate for ca

info: Creating a new SSL certificate request for node2.firefox.com

info: Certificate Request fingerprint (md5): BC:B2::9F:B5::CD::1E::9A:D5::DE:4B:
此时,在puppet服务器端使用puppet cert命令管理客户端的证书请求,其--list选项能够查看等待签署证书的客户端列表,而--sign选项可用于为指定节点签署证书,如果要一次性地多个节点证书申请进行签署可以使用--all选项
[root@node1 ~]# puppet cert --list

  "node2.firefox.com" (BC:B2::9F:B5::CD::1E::9A:D5::DE:4B:)

[root@node1 ~]# puppet cert --sign node2.firefox.com

notice: Signed certificate request for node2.firefox.com

notice: Removing file Puppet::SSL::CertificateRequest node2.firefox.com at '/var/lib/puppet/ssl/ca/requests/node2.firefox.com.pem
一旦agent节点收到签署过的证书,其将会显示如下信息
info: Caching certificate for node2.firefox.com

notice: Starting Puppet client version 2.7.
确保上述agent相关操作不存在问题后,便可以将--server选项指定的信息存储与agent的配置文件中,并以服务的方式启动puppet agent了。其配置文件为/etc/puppet/puppet.conf,配置完整既可以期待能够puppet
[root@node2 ~]# echo "server=node1.firefox.com" >> /etc/puppet/puppet.conf

[root@node2 ~]# service puppet start

Starting puppet:                                           [  OK  ]

[root@node2 ~]# chkconfig puppet on
agent配置
# 安装puppet程序包

yum localinstall facter-1.7.-.el6.x86_64.rpm puppet-2.7.-.el6.noarch.rpm

# 编辑配置文件

vi /ect/puppet/puppet.conf # 在[agent]段添加server=Puppetmaster_Hostname,如

    server = master.lamp.com

# 启动puppet服务

puppet agent --server mem.lamp.com -v -d --noop --test # 测试启动,不实际应用配置

service puppet start # 正式启动agent服务

chkconfig puppet on # 配置开启启动
master签署证书
# 手动签发:

puppet cert list # 显示待签发节点的证书请求

puppet cert sign Node_Name # 签署某一agent的请求

puppet cert sign --all # 一次性签署全部请求

# 自动签发:

cat > /etc/puppet/autosign.conf <<EOF

*.firefox.com

EOF # 会对所有来自firefox.com的主机请求都自动签发

# 注:master端的任何修改,都要重新装载puppetmaster服务,即执行如下命令即可

service puppetmaster reload
4.授权访问
在puppet服务器端的/etc/puppet/manifests/中创建site.pp,在master/agent时,所有节点清单文件入口文件为site.pp
[root@node1 manifests]# pwd
/etc/puppet/manifests
[root@node1 manifests]# ls
node2.mysql.com.pp site.pp
[root@node1 manifests]# cat node2.firefox.com.pp
node 'node2.firefox.com' {
include nginx::web
}
[root@node1 manifests]# cat site.pp
import "*.forefox.com.pp"
建议:一类节点使用一个清单文件,所有清单文件都在site.pp中使用improt包含进来,清单文件修改后应重启文件
5.自动签发证书
可以设置master自动签发所有的证书,我们只需要在/etc/puppet目录下创建autosign.conf文件即可
[root@node1 ~]# echo "*.firefox.com" > /etc/puppet/autosign.con
这样就会对所有来自magedu.conf的机器的请求自动签署证书
6.puppet kick功能实现
puppet客户端默认每30分钟很服务器通讯一次,但是有时,我们希望服务器能够给客户端紧急推送一些人物,于是就有了puppet kick(puppet 2.6以前叫puppetrun)
1)编辑客户端配置文件/etc/puppet/puppet.conf在[agent]端中添加如下
[root@node2 ~]# echo "listen=true" >> /etc/puppet/puppet.conf

[root@node2 puppet]# ss -tnl

State       Recv-Q Send-Q             Local Address:Port               Peer Address:Port

LISTEN                                          *:                          *:*
2)在客户端编辑或创建新文件/etc/puppet/namespaceauth.conf,包含下面内容
[puppetrunner]

allow *.firefox.com
3)在客户端编辑文件auth.conf,添加如下内容
path    /run

  method  save

  auth    any

  allow   *.firefox.com
4)推送方法,在服务器端运行命令
[root@node1 puppet]# puppet kick -p  node2.firefox.com

Triggering node2.firefox.com

Getting status

status is success

node2.firefox.com finished with exit code

Finished
查看node2
[root@node2 puppet]# rpm -q nginx

nginx-1.0.-.el6.x86_64

[root@node2 puppet]# grep work /etc/nginx/nginx.conf

worker_processes  ;
错误信息,惨痛的教训,客户端一致在报这个错误
err: Could not retrieve catalog from remote server: SSL_connect returned= errno= state=SSLv3 read server certificate B: certificate verify failed: [certificate is not yet valid for /CN=Puppet CA: node1.firefox.com]

warning: Not using cache on failed catalog

err: Could not retrieve catalog; skipping run

debug: report supports formats: b64_zlib_yaml pson raw yaml; using pson

err: Could not send report: SSL_connect returned= errno= state=SSLv3 read server certificate B: certificate verify failed: [certificate is not yet valid for /CN=Puppet CA: node1.firefox.com]
解决方法:
两台服务器需要时间同步
7.安装配置puppet-dashboard
1)安装
[root@node1 puppet]# rpm -ivh http://yum.puppetlabs.com/puppetlabs-release-el-6.noarch.rpm //安装官方通过的yum仓库

[root@node1 puppet]# yum install puppet-dashboard -y

[root@node1 puppet]# yum install mysql-server mysql -y
2)数据库授权
mysql> create database dashboard character set utf8;

Query OK,  row affected (0.00 sec)

mysql> grant all on dashboard.* to 'dbuser'@'192.168.1.%' identified by 'firefox';

Query OK,  rows affected (0.00 sec)

mysql> flush privileges;

Query OK,  rows affected (0.00 sec)
3)修改配置文件,dashboard的配置文件为/usr/share/puppet-dashboard/config/database.yml,修改如下参数
production:

  host:192.168.1.201

  database: dashboard

  username: dbuser

  password:firefox

  encoding: utf8

  adapter: mysql
为dashboard导入依赖的数据表
[root@node1 config]# gem install rake

[root@node1 puppet]# cd /usr/share/puppet-dashboard/config

[root@node1 config]# rake gems::refresh_specs

[root@node1 config]# rake RAILS_ENV=production db:migrate
启动服务
[root@node1 config]# service puppet-dashboard start

Starting Puppet Dashboard: => Booting WEBrick

=> Rails 2.3. application starting on http://0.0.0.0:3000

                                                           [  OK  ]
4)配置puppet服务器和客户端
服务器端配置
在puppetmaster的配置文件中添加如下内容
 reports = store, http

    reporturl = http://192.168.1.201:3000/reports/upload

在[master]中添加
客户端配置
report=true

在[agent]中添加
配置完成后重启puppet
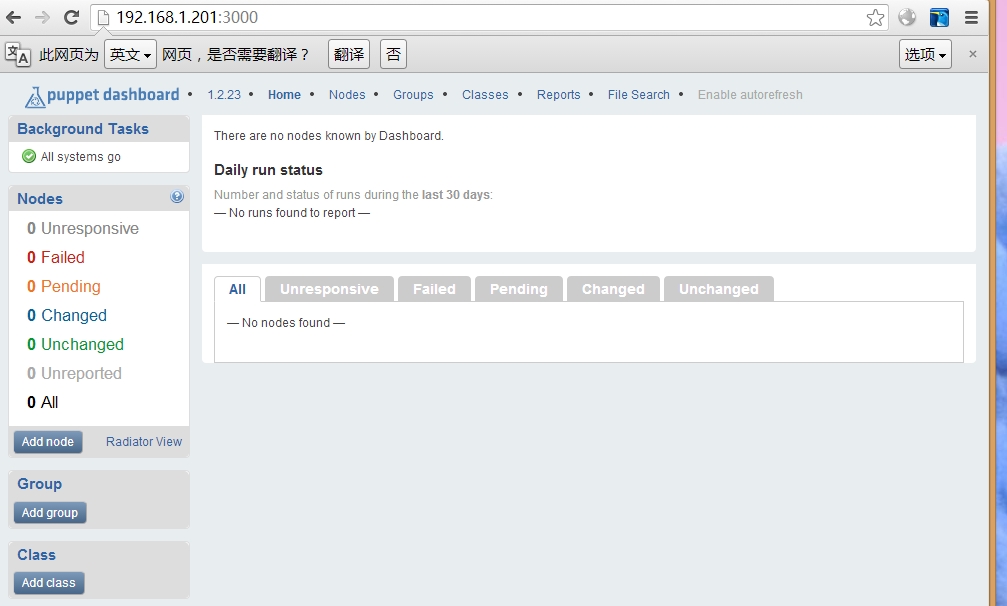
5)测试

还可以在页面中添加节点和类文件
终于完成了,一个时间不同步弄了2小时才找出错误。
自动化运维工具 ~puppet~的更多相关文章
- 企业级自动化运维工具---puppet详解
本文收录在Linux运维企业架构实战系列 1.认识puppet 1.1 引入 puppet是什么,咱们先不用专业的名词解释它,咱们先描述一些工作场景,看明白这些工作场景,自然会知道puppet是什么. ...
- 项目10.2-企业级自动化运维工具---puppet详解
1.认识puppet 1.1 引入 puppet是什么,咱们先不用专业的名词解释它,咱们先描述一些工作场景,看明白这些工作场景,自然会知道puppet是什么. (1)场景一: 管理员想要在100台服务 ...
- 自动化运维工具——puppet详解(二)
一.class 类 1)什么是类? 类是puppet中命名的代码模块,常用于定义一组通用目标的资源,可在puppet全局调用: 类可以被继承,也可以包含子类: 具体定义的语法如下: class NAM ...
- 自动化运维工具——puppet详解(一)
一.puppet 介绍 1.puppet是什么 puppet是一个IT基础设施自动化管理工具,它能够帮助系统管理员管理基础设施的整个生命周期: 供应(provisioning).配置(configur ...
- 自动化运维工具之Puppet基础入门
一.简介 puppet是什么?它能做什么? puppet是一个IT基础设施自动化运维工具,它能够帮助系统管理员管理基础设施的整个生命周期:比如,安装服务,提供配置文件,启动服务等等一系列操作:基于pu ...
- CheungSSH国产自动化运维工具开源Web界面
CheungSSH web2.0 发布文档 CheungSSH 简介 CheungSSH是一款国人自主研发的Linux运维自动化管理服务器软件,秉着为企业降低运营成本,解放管理员双手和自动化生产的理念 ...
- 自动化运维工具Ansible详细部署 (转载)
自动化运维工具Ansible详细部署 标签:ansible 原创作品,允许转载,转载时请务必以超链接形式标明文章 原始出处 .作者信息和本声明.否则将追究法律责任.http://sofar.blog. ...
- 自动化运维工具之ansible
自动化运维工具之ansible 一,ansible简介 ansible是新出现的自动化运维工具,基于Python开发,集合了众多运维工具(puppet.cfengine.chef.func.fab ...
- 自动化运维工具——ansible详解(一)
ansible 简介 ansible 是什么? ansible是新出现的自动化运维工具,基于Python开发,集合了众多运维工具(puppet.chef.func.fabric)的优点,实现了批量系统 ...
随机推荐
- Gradle详解
一.脚本文件(build.gradle) 项目与脚本文件 当我们执行gradle命令的时候,Gradle会在你执行命令的目录下寻找一个名为build.gradle的文件,这个文件就是Gradle的脚 ...
- Scrapy:创建爬虫程序的方式
Windows 10家庭中文版,Python 3.6.4,Scrapy 1.5.0, 在Scrapy中,建立爬虫程序或项目的方式有两种(在孤读过Scrapy的大部分文档后): 1.继承官方Spider ...
- qt 问题及处理
1. 包依赖问题 在windows平台时,通过microsoft process Explorer可以查看所以来的dll.并将这些dll复制到应用程序目录,加上qt.conf就可以使用了. [Path ...
- Django杂记
django 中 slice 和 truncatewords 不同用法 django中取一段字符串中的前 N 个字符,可以用 slice和truncatewords ,但是两者是有区别的. djang ...
- CVE-2013-1347Microsoft Internet Explorer 8 远程执行代码漏洞
[CNNVD]Microsoft Internet Explorer 8 远程执行代码漏洞(CNNVD-201305-092) Microsoft Internet Explorer是美国微软(Mic ...
- sublime text配置fcitx输入法
sublime text配置fcitx输入法 环境:Fedora20 输入法:fcitx sublime text:version 3 安装fcitx输入法 这个看前面教程 编译sublime-imf ...
- Zabbix监控实例
本节内容: zabbix web添加主机 定义Items 创建graph 创建template 一.zabbix web添加主机 1. 进入zabbix web界面,点击配置—>主机—>创 ...
- jquery省市区三级联动(数据来源国家统计局官网)内附源码下载
很久很久没有写博了. 今天更新了项目的省市区三级联动数据,更新后最新的海南三沙都有,分享给所有需要的小伙伴们... JQUERY + JSON,无数据库,纯JS代码,无加密,无压缩,可直接使用在任何项 ...
- 包装印刷行业裕同集团&易普优APS项目顺利验收!
裕同集团&易普优APS项目于2017年7月启动,2018年1月上线,2018年5月初项目顺利验收!历时十个月,龙岗作为裕同集团APS的先锋试点项目,同时也是业务最复杂的分公司,双方联合团队紧密 ...
- Ionic实战二:购物车
用户名密码都为空 此app功能主要有如下 1.首页轮播和商品列表展示 2.左侧侧滑页面分类展示 3.商品详情页面展示 以及购买 4.购物车 订单填写 支付等页面          
