33.2.NIO
4.1概述【理解】
BIO
Blocking IO,阻塞型IO
NIO
No Blocking IO,非阻塞型IO
阻塞IO的弊端
在等待的过程中,什么事也做不了
非阻塞IO的好处
不需要一直等待,当一切就绪了再去做
4.2NIO与BIO的区别【理解】
区别一
BIO是阻塞的,NIO是非阻塞的
区别二
BIO是面向流的,NIO是面向缓冲区的
BIO中数据传输是单向的,NIO中的缓冲区是双向的
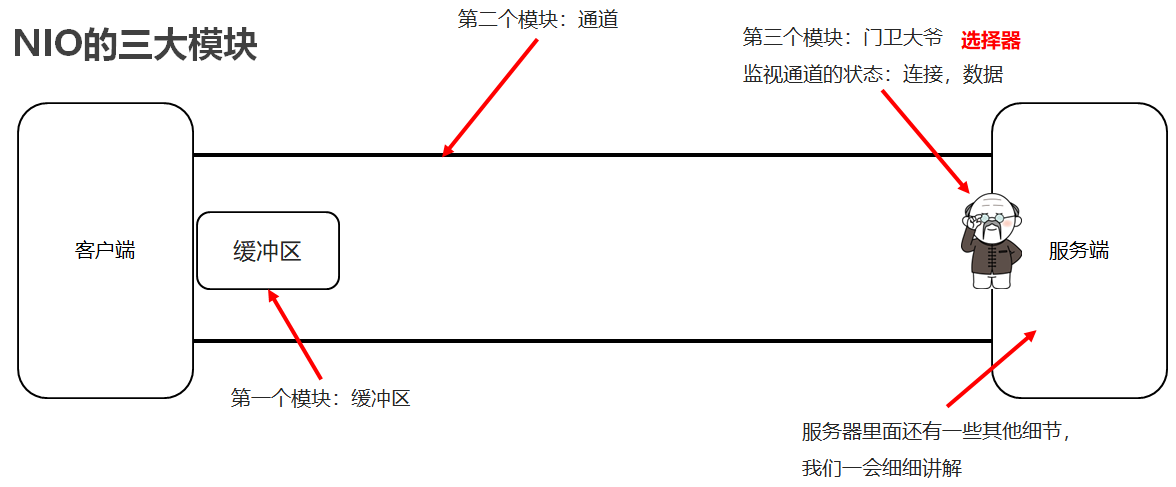
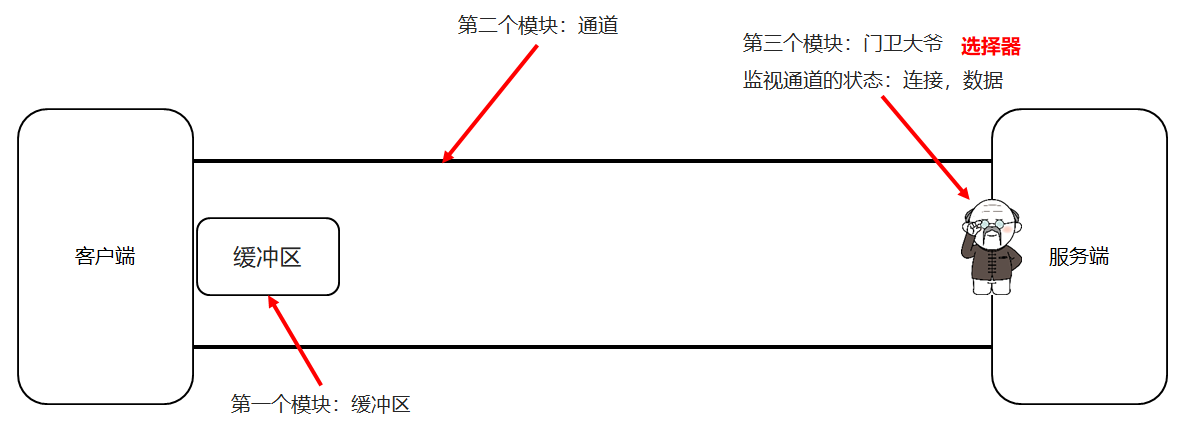
4.3NIO三大模块【理解】
缓冲区
用来存储数据
通道
用来建立连接和传输数据
选择器
监视通道状态
4.4NIO创建缓冲区对象【应用】
缓冲区其实就是一个数组
方法介绍
方法名 说明 static ByteBuffer allocate(长度) 创建byte类型的缓冲区 static ByteBuffer wrap(byte[] array) 创建一个有内容的byte类型缓冲区 代码示例
package com.itheima.mynio;

import java.nio.ByteBuffer;

public class CreateByteBufferDemo1 {

    public static void main(String[] args) {

        //method1();

        //method2();

        method3();

    }

    public static void method3() {

        ByteBuffer byteBuffer3 = ByteBuffer.wrap("aaa".getBytes());

        for (int i = 0; i < 3; i++) {

            System.out.println(byteBuffer3.get());

        }

    }

    public static void method2() {

        byte [] bytes={97,98,99};

        ByteBuffer byteBuffer2 = ByteBuffer.wrap(bytes);

        //缓冲区的长度3

        //缓冲区的内容就是字节数组的内容

        for (int i = 0; i < 3; i++) {

            System.out.println(byteBuffer2.get());

        }

    }

    public static void method1() {

        ByteBuffer byteBuffer1=ByteBuffer.allocate(5);

        //get

        for (int i = 0; i < 5; i++) {

            System.out.println(byteBuffer1.get());

        }

        System.out.println(byteBuffer1.get());

    }

}
4.5NIO缓冲区添加数据【应用】
缓冲区其实就是一个数组
两个功能:
读/写
问:我要把数据写到缓冲区中 使用缓冲读的功能
我要把缓冲区的数据读出来并打印 使用缓冲写的功能
- 如何用写?何时用读?
- 必须站在缓冲区的角度思考问题。
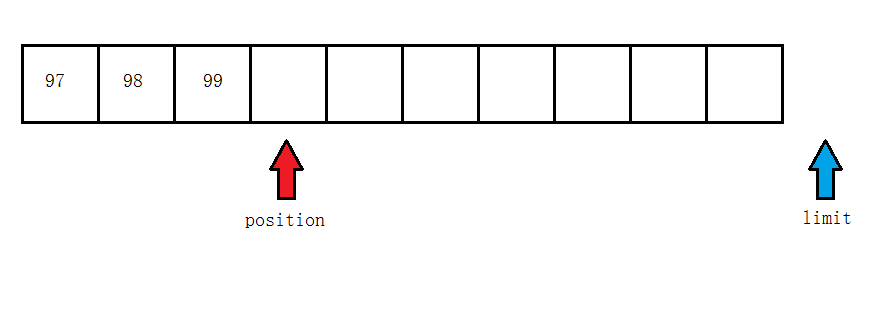
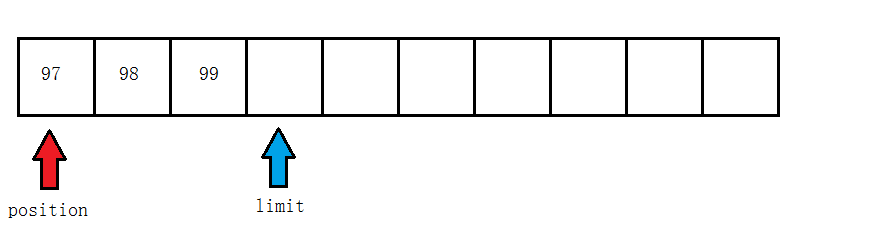
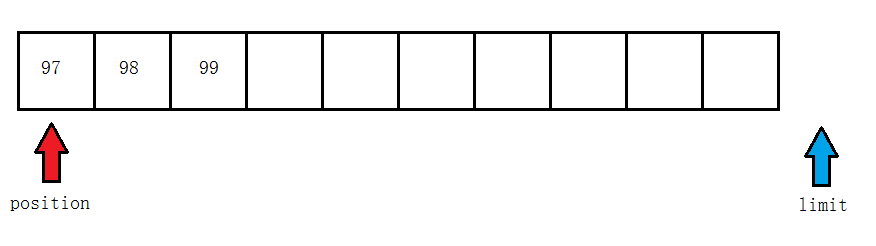
- capacity:容量(长度)
- limit:界限(最多能读/写到哪里)
- posotion:位置(读/写哪个索引)
存三个字节
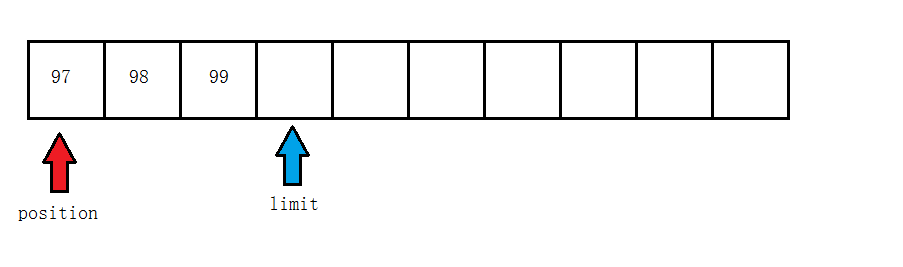
调用flip方法
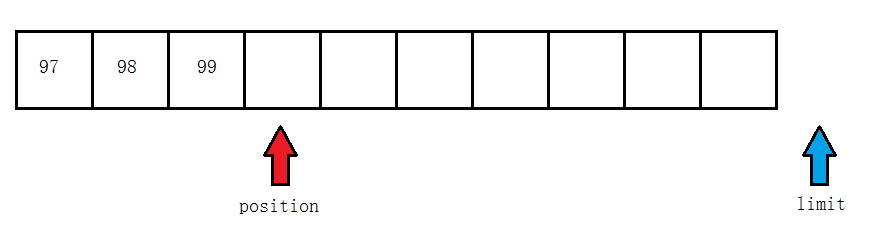
读一个字节后

读第一个数组后
调用rewind后
调用clear后
方法介绍
package com.itheima.mynio;
import java.nio.ByteBuffer;
public class ByteBufferDemo2 {
public static void main(String[] args) {
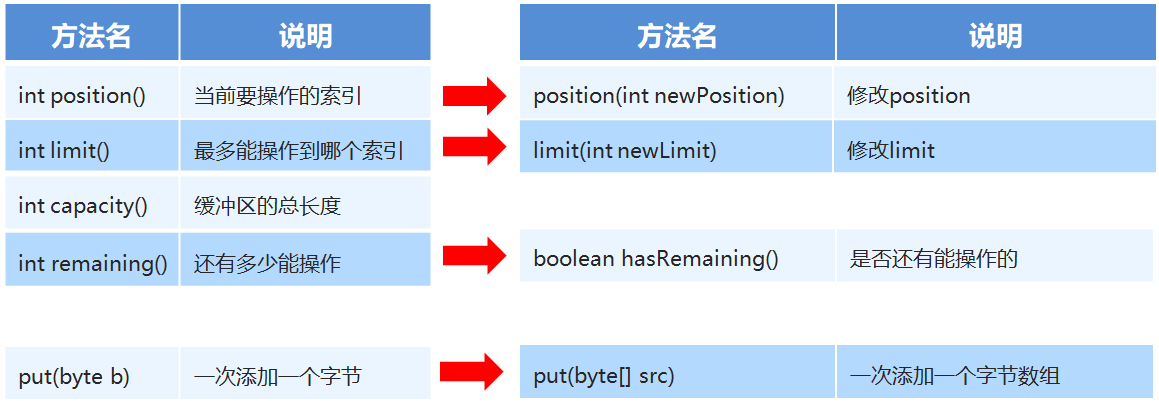
// int position() 当前要操作的索引
// int limit() 最多能操作到哪个索引
// int capacity() 缓冲区的总长度
ByteBuffer byteBuffer = ByteBuffer.allocate(10);
System.out.println(byteBuffer.position());
System.out.println(byteBuffer.limit());
System.out.println(byteBuffer.capacity());
// put(byte b) 一次添加一个字节
// byteBuffer.put((byte) 97);
// System.out.println(byteBuffer.position());
// System.out.println(byteBuffer.limit());
// System.out.println(byteBuffer.capacity());
// put(byte[] src) 一次添加一个字节数组
// byteBuffer.put("aaa".getBytes());
// System.out.println(byteBuffer.position());
// System.out.println(byteBuffer.limit());
// System.out.println(byteBuffer.capacity());
// position(int newPosition) 修改position
// byteBuffer.position(1);
// limit(int newLimit) 修改limit
// byteBuffer.limit(5);
// System.out.println(byteBuffer.position());
// System.out.println(byteBuffer.limit());
// System.out.println(byteBuffer.capacity());
// int remaining() 还有多少能操作
byteBuffer.put("0123456789".getBytes());
System.out.println(byteBuffer.remaining());//10
System.out.println(byteBuffer.hasRemaining());//true
// boolean hasRemaining() 是否还有能操作的
}
}
4.6NIO缓冲区获取数据【应用】
方法介绍
方法名 介绍 flip() 切换读写模式(写à读) get() 读一个字节 get(byte[] dst) 读多个字节 get(int index) 读指定索引的字节 rewind() 将position设置为0,可以重复读 clear() 数据读写完毕(读->写) array() 将缓冲区转换成字节数组返回 代码示例
package com.itheima.mynio;

import java.nio.ByteBuffer;

public class ByteBufferDemo3 {

    public static void main(String[] args) {

        ByteBuffer byteBuffer=ByteBuffer.allocate(10);

        byteBuffer.put("abc".getBytes());

        //flip()	切换读写模式(写->读)

        byteBuffer.flip();

        //get()	读一个字节

//        while(byteBuffer.position()!=byteBuffer.limit()){

//            System.out.println((char) byteBuffer.get());

//        }

        for (int i = 0; i < byteBuffer.limit(); i++) {

            System.out.println((char) byteBuffer.get());

        }

        //get(byte[] dst)	读多个字节

//        byte []bytes=new byte[byteBuffer.limit()];

//        byteBuffer.get(bytes);

//        System.out.println(new String(bytes));

//

//

//        //get(int index)	读指定索引的字节

//        System.out.println((char) byteBuffer.get(0));

        //rewind()	将position设置为0,可以重复读

//        byteBuffer.rewind();

//        for (int i = 0; i < byteBuffer.limit(); i++) {

//            System.out.println((char) byteBuffer.get());

//        }

        //clear()	数据读写完毕(读->写)

        byteBuffer.clear();

        byteBuffer.put("qqq".getBytes());

        //array()	将缓冲区转换成字节数组返回

        byte[] bytes = byteBuffer.array();

        System.out.println(new String(bytes));

    }

}
4.7小结【理解】
需求:我要把数据写到缓冲区中。
数据是从外面进入到缓冲区的,所以缓冲区在做读数据的操作。
需求:我要把数据从缓冲区中读出来。
数据是从缓冲区里面到外面的。所以缓冲区在做写数据的操作。
capacity:容量(长度) limit: 界限(最多能读/写到哪里) posotion:位置(读/写哪个索引)
获取缓冲区里面数据之前,需要调用flip方法
再次写数据之前,需要调用clear方法,
但是数据还未消失,等再次写入数据,被覆盖了才会消失。
1.NIO
1.1 NIO通道客户端【应用】
客户端通道----------连接服务端
------------传递缓冲区---------------传递数据
服务端通道-----------建立连接
客户端实现步骤
打开通道---------------SocketChannel
指定IP和端口号--------InetSocketAddress
写出数据-------------------------write
释放资源----------------------释放资源
示例代码
package com.itheima.mynio2;

import java.io.IOException;

import java.net.InetSocketAddress;

import java.nio.ByteBuffer;

import java.nio.channels.SocketChannel;

public class NIOClient {

    public static void main(String[] args) throws IOException {

        //1. 打开通道

        SocketChannel socketChannel = SocketChannel.open();

        //2. 指定IP和端口号

        socketChannel.connect(new InetSocketAddress("127.0.0.1",10000));

        //3. 写出数据

        ByteBuffer byteBuffer = ByteBuffer.wrap("hello".getBytes());

        socketChannel.write(byteBuffer);

        //4. 释放资源

        socketChannel.close();

    }

}
1.2 NIO通道服务端【应用】
NIO通道
服务端通道
只负责建立建立,不负责传递数据
客户端通道
建立建立并将数据传递给服务端
缓冲区
客户端发送的数据都在缓冲区中
服务端通道内部创建出来的客户端通道
相当于客户端通道的延伸用来传递数据
服务端实现步骤
打开一个服务端通道
绑定对应的端口号
通道默认是阻塞的,需要设置为非阻塞
此时没有门卫大爷,所以需要经常看一下有没有连接发过来没?
如果有客户端来连接了,则在服务端通道内部,再创建一个客户端通道,相当于是客户端通道的延伸
获取客户端传递过来的数据,并把数据放在byteBuffer1这个缓冲区中
- 服务端创建一个空的缓冲区装数据并输出
给客户端回写数据
释放资源
示例代码
package com.itheima.mynio2;

import java.io.IOException;

import java.net.InetSocketAddress;

import java.nio.ByteBuffer;

import java.nio.channels.SocketChannel;

public class NIOClient {

    public static void main(String[] args) throws IOException {

        //1. 打开通道

        SocketChannel socketChannel = SocketChannel.open();

        //2. 指定IP和端口号

        socketChannel.connect(new InetSocketAddress("127.0.0.1",10000));

        //3. 写出数据

        ByteBuffer byteBuffer = ByteBuffer.wrap("一点汗毛献辞".getBytes());

        socketChannel.write(byteBuffer);

        //4. 释放资源

        socketChannel.close();

    }

}
1.3 NIO通道练习【应用】
需求:利用NIO的非阻塞通道与缓冲区完成下面的需求
客户端发送数据给服务端
服务端接收后回写一个数据给客户端
客户端
实现步骤
打开通道
指定IP和端口号
写出数据
读取服务器写回的数据
释放资源
示例代码
Client
package com.itheima.mynio3; import java.io.IOException;
import java.net.InetSocketAddress;
import java.nio.ByteBuffer;
import java.nio.channels.SocketChannel; public class Client {
public static void main(String[] args) throws IOException {
SocketChannel socketChannel = SocketChannel.open(); socketChannel.connect(new InetSocketAddress("127.0.0.1",10001)); ByteBuffer byteBuffer1 = ByteBuffer.wrap("吃俺老孙一棒".getBytes());
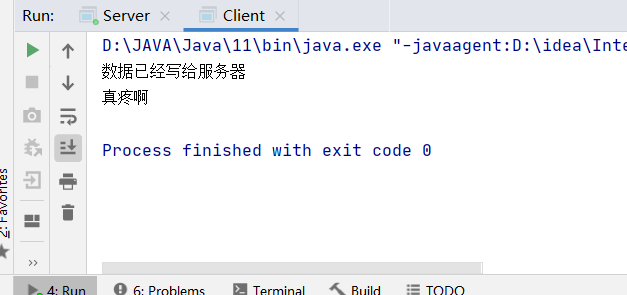
socketChannel.write(byteBuffer1); System.out.println("数据已经写给服务器");
socketChannel.shutdownOutput(); ByteBuffer byteBuffer2 = ByteBuffer.allocate(1024);
int len;
while((len=socketChannel.read(byteBuffer2))!=-1){
byteBuffer2.flip();
System.out.println(new String(byteBuffer2.array(),0,len));
byteBuffer2.clear();
}
socketChannel.close();
}
}
Server
package com.itheima.mynio3;

import java.io.IOException;

import java.net.InetSocketAddress;

import java.nio.ByteBuffer;

import java.nio.channels.ServerSocketChannel;

import java.nio.channels.SocketChannel;

public class Server {

    public static void main(String[] args) throws IOException {

        ServerSocketChannel serverSocketChannel=ServerSocketChannel.open();

        serverSocketChannel.bind(new InetSocketAddress(10001));

        serverSocketChannel.configureBlocking(false);

        while(true){

            SocketChannel socketChannel = serverSocketChannel.accept();

            if (socketChannel != null) {

                System.out.println("此时有客户端来连接了");

                //获取客户端传递过来的数据,并把数据放在byteBuffer1这个缓冲区

                ByteBuffer byteBuffer1 = ByteBuffer.allocate(1024);

                //socketChannel.read(byteBuffer1);

                int len;

                //针对于缓冲区来讲

                    //如果 从添加数据---->获取数据 flip

                    //如果 从获取数据---->添加数据 clear

                while((len=socketChannel.read(byteBuffer1))!=-1){

                    byteBuffer1.flip();

                    System.out.println(new String(byteBuffer1.array(),0,len));

                    byteBuffer1.clear();

                }

                System.out.println("接收数据完毕,准备开始往客户端回写数据");

                ByteBuffer byteBuffer2 = ByteBuffer.wrap("真疼啊".getBytes());

                socketChannel.write(byteBuffer2);

                socketChannel.close();

            }

        }

    }

}

1.4 NIO通道练习优化【应用】
存在问题
服务端内部获取的客户端通道在读取时,如果读取不到结束标记就会一直阻塞
解决方案
- 1.给一个结束标记
        //结束标记
//        socketChannel.shutdownOutput();
2.将服务端内部获取的客户端通道设置为非阻塞的
示例代码
Client
package com.itheima.mynio3;

import java.io.IOException;

import java.net.InetSocketAddress;

import java.nio.ByteBuffer;

import java.nio.channels.SocketChannel;

public class Client {

    public static void main(String[] args) throws IOException {

        SocketChannel socketChannel = SocketChannel.open();

        socketChannel.connect(new InetSocketAddress("127.0.0.1",10001));

        ByteBuffer byteBuffer1 = ByteBuffer.wrap("吃俺老孙一棒".getBytes());

        socketChannel.write(byteBuffer1);

        System.out.println("数据已经写给服务器");

        //结束标记

//        socketChannel.shutdownOutput();

        ByteBuffer byteBuffer2 = ByteBuffer.allocate(1024);

        int len;

        while((len=socketChannel.read(byteBuffer2))!=-1){

            System.out.println("客户端接收回写数据");

            byteBuffer2.flip();

            System.out.println(new String(byteBuffer2.array(),0,len));

            byteBuffer2.clear();

        }

        socketChannel.close();

    }

}
Server
package com.itheima.mynio3;

import java.io.IOException;

import java.net.InetSocketAddress;

import java.nio.ByteBuffer;

import java.nio.channels.ServerSocketChannel;

import java.nio.channels.SocketChannel;

public class Server {

    public static void main(String[] args) throws IOException {

        ServerSocketChannel serverSocketChannel=ServerSocketChannel.open();

        serverSocketChannel.bind(new InetSocketAddress(10001));

        serverSocketChannel.configureBlocking(false);

        while(true){

            SocketChannel socketChannel = serverSocketChannel.accept();

            if (socketChannel != null) {

                System.out.println("此时有客户端来连接了");

                //把延伸端的非阻塞关闭 !!!!!!

                socketChannel.configureBlocking(false);

                //获取客户端传递过来的数据,并把数据放在byteBuffer1这个缓冲区

                ByteBuffer byteBuffer1 = ByteBuffer.allocate(1024);

                //socketChannel.read(byteBuffer1);

                int len;

                //针对于缓冲区来讲

                    //如果 从添加数据---->获取数据 flip

                    //如果 从获取数据---->添加数据 clear

                while((len=socketChannel.read(byteBuffer1))>0){

                    System.out.println("服务端接收发送数据");

                    byteBuffer1.flip();

                    System.out.println(new String(byteBuffer1.array(),0,len));

                    byteBuffer1.clear();

                }

                System.out.println("接收数据完毕,准备开始往客户端回写数据");

                ByteBuffer byteBuffer2 = ByteBuffer.wrap("真疼啊".getBytes());

                socketChannel.write(byteBuffer2);

                socketChannel.close();

            }

        }

    }

}
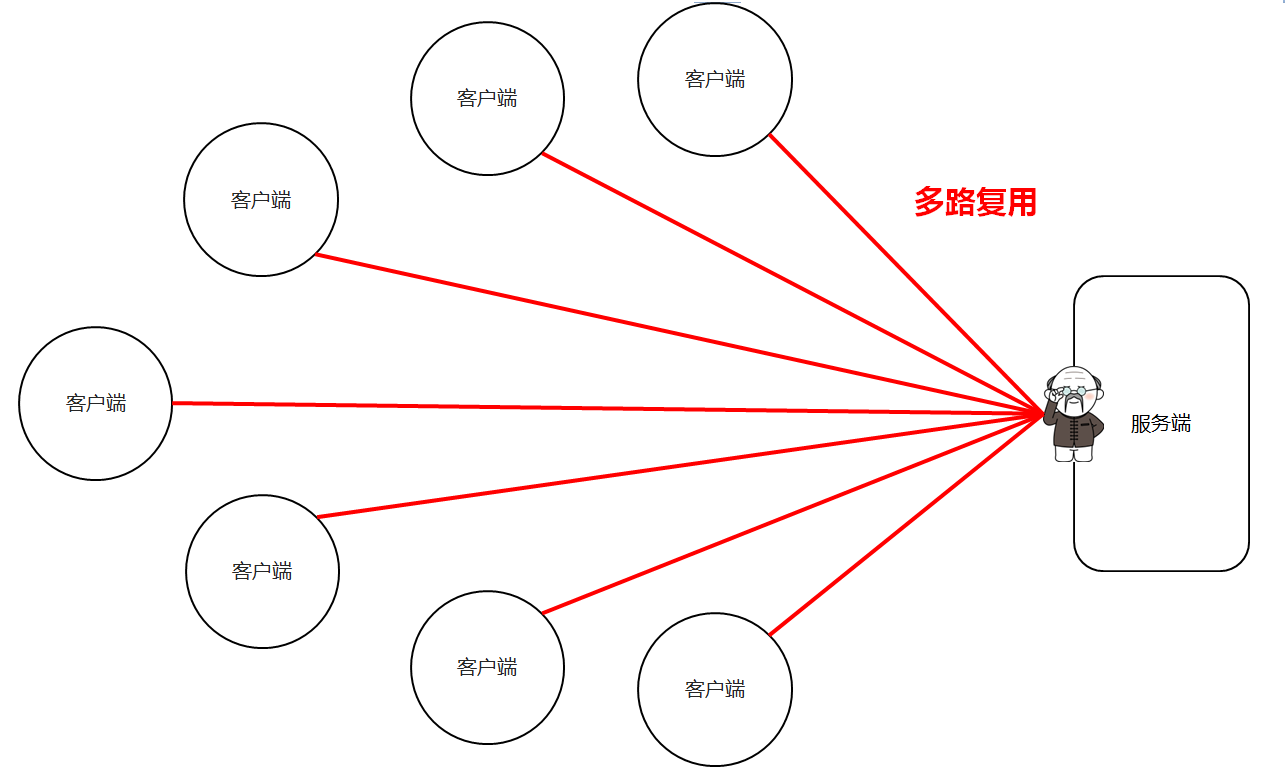
1.5NIO选择器【理解】
概述
选择器可以监视通道的状态,多路复用
选择器对象
Selector
选择器对象
SelectionKey
绑定的通道后返回的key
SelectableChannel
能使用选择器的通道
SocketChannel
ServerSocketChannel
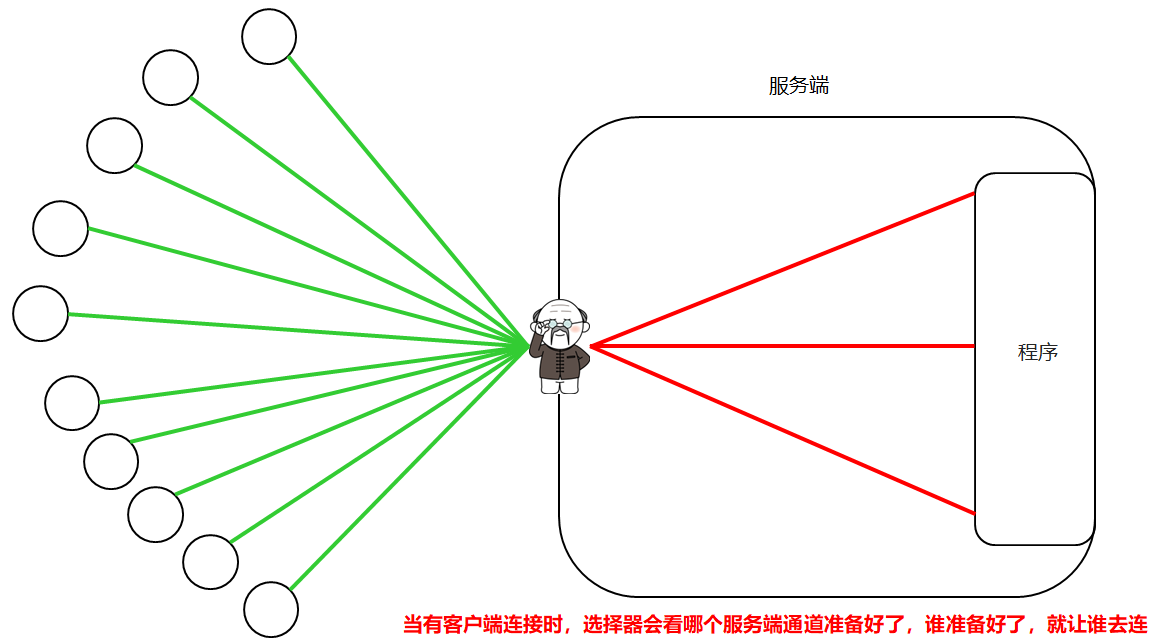
1.6NIO选择器改写服务端【应用】
当有客户端连接时,选择器会看哪个服务端通道准备好了,谁准备好了,就让谁去连
实现步骤
打开一个服务端通道(open)
绑定对应的端口号
通道默认是阻塞的,需要设置为非阻塞
打开一个选择器(门卫大爷) 以上步骤中,服务端通道和门卫大爷还没有任何关系
将选择器绑定服务端通道,并监视服务端是否准备好
如果有客户端来连接了,大爷会遍历所有的服务端通道,谁准备好了,就让谁来连接 连接后,在服务端通道内部,再创建一个客户端延伸通道
如果客户端把数据传递过来了,大爷会遍历所有的延伸通道,谁准备好了,谁去接收数据
选择器监视客户端通道
选择器监视服务端通道
选择器监视客户端延伸通道
Client
package com.itheima.mynio5;

import java.io.IOException;

import java.net.InetSocketAddress;

import java.nio.ByteBuffer;

import java.nio.channels.SocketChannel;

public class Client {

    public static void main(String[] args) throws IOException {

        SocketChannel socketChannel = SocketChannel.open();

        socketChannel.connect(new InetSocketAddress("127.0.0.1",10001));

        ByteBuffer byteBuffer1 = ByteBuffer.wrap("吃俺老孙一棒".getBytes());

        socketChannel.write(byteBuffer1);

        System.out.println("数据已经写给服务器");

        //结束标记

//        socketChannel.shutdownOutput();

        ByteBuffer byteBuffer2 = ByteBuffer.allocate(1024);

        int len;

        while((len=socketChannel.read(byteBuffer2))!=-1){

            System.out.println("客户端接收回写数据");

            byteBuffer2.flip();

            System.out.println(new String(byteBuffer2.array(),0,len));

            byteBuffer2.clear();

        }

        socketChannel.close();

    }

}
Server
package com.itheima.mynio5;

import jdk.swing.interop.SwingInterOpUtils;

import java.io.IOException;

import java.net.InetSocketAddress;

import java.nio.ByteBuffer;

import java.nio.channels.*;

import java.util.Iterator;

import java.util.Set;

public class Server {

    public static void main(String[] args) throws IOException {

        //1.打开服务端通道

        ServerSocketChannel serverSocketChannel=ServerSocketChannel.open();

        //2.让这个通道绑定一个端口

        serverSocketChannel.bind(new InetSocketAddress(10001));

        //3.设置通道为非阻塞状态

        serverSocketChannel.configureBlocking(false);

        //4.打开一个选择器

        //selector    ---选择器

        //SelectionKey  ----绑定通道后返回的令牌

        //SelectableChannel ---可以使用选择器的通道

        Selector selector = Selector.open();

        //5.绑定选择器和服务端通道

        serverSocketChannel.register(selector, SelectionKey.OP_ACCEPT);

        while(true){

            //6.选择器会监视客户端通道的状态

            //返回值就表示此时有多少个客户端来连接。

            int count = selector.select();

            if (count != 0) {

                System.out.println("有客户端来连接了");

                //7.会遍历所有的服务端通道,看谁准备好了,谁准备好了,就让谁去连接

                //获取所有服务端通道的令牌,并将它们放到一个集合中,将集合返回

                Set<SelectionKey> selectionKeys = selector.selectedKeys();

                Iterator<SelectionKey> iterator = selectionKeys.iterator();

                while (iterator.hasNext()){

                    //selectionKey 依次表示每一个服务端通道的令牌

                    SelectionKey selectionKey = iterator.next();

                    if (selectionKey.isAcceptable()) {

                        //可以通过令牌来获取到了一个已经就绪的服务器通道

                        ServerSocketChannel ssc = (ServerSocketChannel) selectionKey.channel();

                        //客户端的延伸通道

                        SocketChannel socketChannel = ssc.accept();

                        //将客户端的延伸通道设置为非阻塞

                        socketChannel.configureBlocking(false);

                        socketChannel.register(selector,SelectionKey.OP_READ);

                        //当客户端来连接的时候,所有的步骤已经全部执行完毕

                    }else if (selectionKey.isReadable()){

                        //当前通道已经做好了读取的准备(延伸通道)

                        SocketChannel socketChannel = (SocketChannel) selectionKey.channel();

                        ByteBuffer byteBuffer1 = ByteBuffer.allocate(1024);

                        int len;

                        while((len=socketChannel.read(byteBuffer1))>0){

                            byteBuffer1.flip();

                            System.out.println(new String(byteBuffer1.array(),0,len));

                            byteBuffer1.clear();

                        }

                        //给客户端的回写数据

                        socketChannel.write(ByteBuffer.wrap("好疼啊!".getBytes()));

                        socketChannel.close();

                    }

                    iterator.remove();

                }

            }

        }

    }

}
2.HTTP协议
非阻塞的HTTP服务器
非阻塞的服务器:就是刚刚写的NIO服务器
HTTP:互联网传输数据的一种规则
2.1概述【理解】
超文本传输协议(关于超文本的概念JavaWeb在进行学习),是建立在TCP/IP协议基础上,是网络应用层的协议。
由请求和响应构成,是一个标准的客户端和服务器模型
是互联网传输数据的一种规则
是基于TCP/IP协议
由请求和响应组成
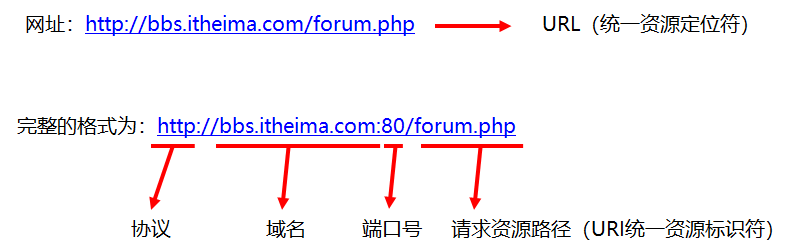
2.2URL【理解】
概述
统一资源定位符,常见的如http://bbs.itheima.com/forum.php
详解
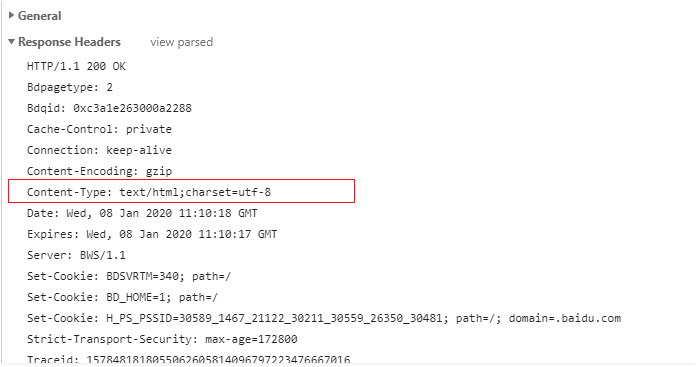
2.3抓包工具的使用【应用】
使用步骤
在谷歌浏览器网页中按F12 或者网页空白处右键,点击检查,可以调出工具
点击network,进入到查看网络相关信息界面
这时在浏览器中发起请求,进行访问,工具中就会显示出请求和响应相关的信息
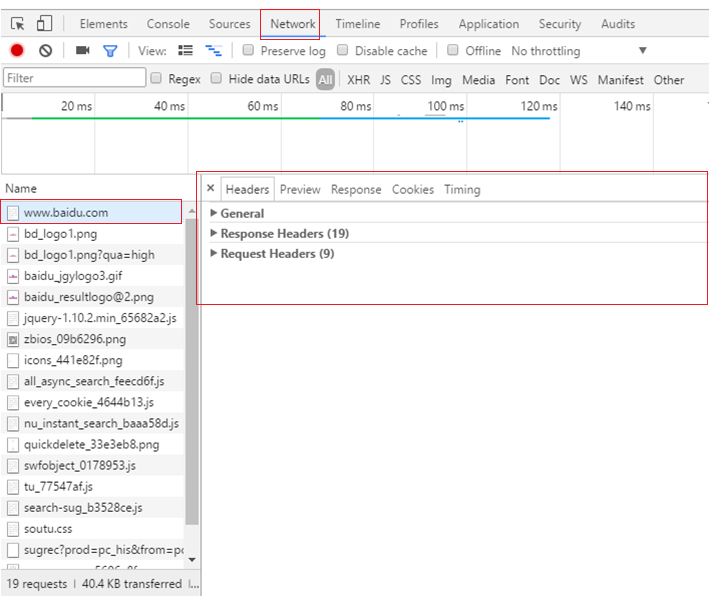
Request Headers 请求数据
Response Headers 响应数据
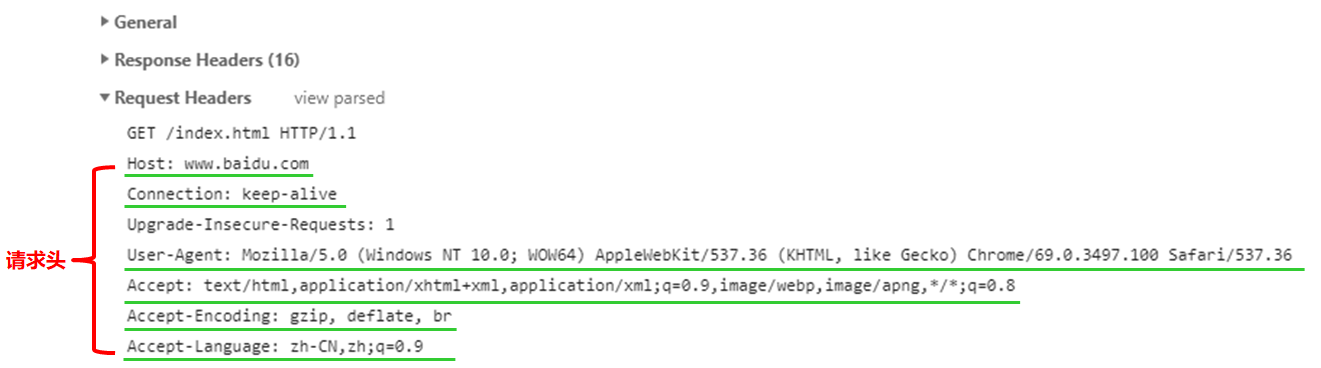
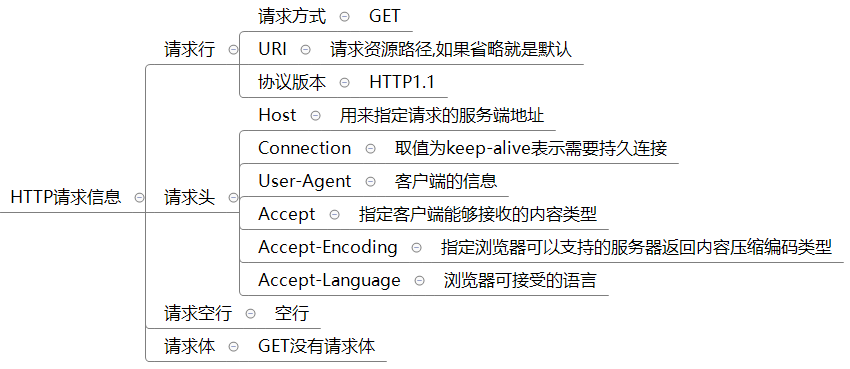
2.4请求信息【理解】
Request Headers 请求
组成
请求行
请求头
请求空行
请求体
请求行
格式

GET /index.html HTTP/1.1
使用GET方式请求数据是没有请求体的
请求方式
GET,POST,HEAD,PUT,DELETE,CONNECT,OPTIONS,TRACE,PATCH
其中用的比较多的是GET和POST
URI
请求资源路径,统一资源标识符
协议版本
HTTP1.0: 每次请求和响应都需要建立一个单独的连接
HTTP1.1:支持长连接
请求头
格式

请求头名称
Host: 用来指定请求的服务端地址
Connection: 取值为keep-alive表示需要持久连接
User-Agent: 客户端的信息
Accept: 指定客户端能够接收的内容类型
Accept-Encoding: 指定浏览器可以支持的服务器返回内容压缩编码类型
Accept-Language: 浏览器可接受的语言
小结
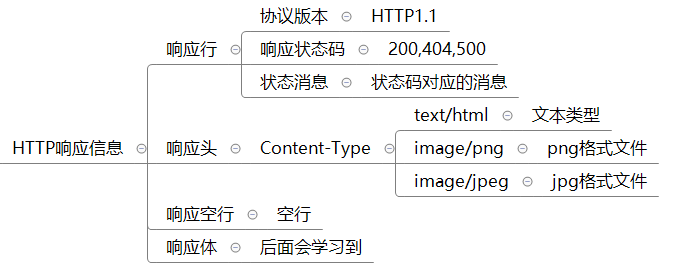
2.5响应信息【理解】
组成
响应行
响应头
响应空行
响应体
响应行
格式

Http/1.1 200 OK
协议版本
HTTP1.0: 每次请求和响应都需要建立一个单独的连接
HTTP1.1: 支持长连接
响应状态码
1xx: 指示信息(表示请求已接收,继续处理)
2xx: 成功(表示请求已被成功接收、理解、接受)
3xx: 请求重定向(要完成请求必须进行更进一步的操作)
4xx: 客户端错误(请求有语法错误或请求无法实现)
5xx: 服务器端错误(服务器未能实现合法的请求)
状态信息
200 ok
404 Not Found
500 Internal Server Error
响应头
- 响应头名称 冒号 空格 响应头值 回车符 换行符
响应头名称
Content-Type: 告诉客户端实际返回内容的网络媒体类型(互联网媒体类型,也叫做MIME类型)
响应头值
text/html ----> 文本类型
image/png ----> png格式文件
image/jpeg ----> jpg格式文件
小结
3.HTTP服务器
3.1需求【理解】
编写服务器端代码,实现可以解析浏览器的请求,给浏览器响应数据
3.2环境搭建【理解】
如何才能让这个服务器支持HTTP协议呢
可以解析出HTTP请求协议的内容
可以按照HTTP响应协议格式,给浏览器响应数据
实现步骤
编写HttpServer类,实现可以接收浏览器发出的请求
其中获取连接的代码可以单独抽取到一个类中
代码实现
服务端代码HttpServer
package com.itheima.mynio6;

import java.io.IOException;

import java.net.InetSocketAddress;

import java.nio.ByteBuffer;

import java.nio.channels.SelectionKey;

import java.nio.channels.Selector;

import java.nio.channels.ServerSocketChannel;

import java.nio.channels.SocketChannel;

import java.util.Iterator;

import java.util.Set;

public class HttpServer {

    public static void main(String[] args) throws IOException {

        //1.打开服务端通道

        ServerSocketChannel serverSocketChannel=ServerSocketChannel.open();

        //2.让这个通道绑定一个端口

        serverSocketChannel.bind(new InetSocketAddress(10001));

        //3.设置通道为非阻塞状态

        serverSocketChannel.configureBlocking(false);

        //4.打开一个选择器

        //selector    ---选择器

        //SelectionKey  ----绑定通道后返回的令牌

        //SelectableChannel ---可以使用选择器的通道

        Selector selector = Selector.open();

        //5.绑定选择器和服务端通道

        serverSocketChannel.register(selector, SelectionKey.OP_ACCEPT);

        while(true){

            //6.选择器会监视客户端通道的状态

            //返回值就表示此时有多少个客户端来连接。

            int count = selector.select();

            if (count != 0) {

                System.out.println("有客户端来连接了");

                //7.会遍历所有的服务端通道,看谁准备好了,谁准备好了,就让谁去连接

                //获取所有服务端通道的令牌,并将它们放到一个集合中,将集合返回

                Set<SelectionKey> selectionKeys = selector.selectedKeys();

                Iterator<SelectionKey> iterator = selectionKeys.iterator();

                while (iterator.hasNext()){

                    //selectionKey 依次表示每一个服务端通道的令牌

                    SelectionKey selectionKey = iterator.next();

                    if (selectionKey.isAcceptable()) {

                       //获取连接

                        AcceptHandler acceptHandler=new AcceptHandler();

                        acceptHandler.connSocketChannel(selectionKey);

                        //当客户端来连接的时候,所有的步骤已经全部执行完毕

                    }else if (selectionKey.isReadable()){

                        //当前通道已经做好了读取的准备(延伸通道)

                        SocketChannel socketChannel = (SocketChannel) selectionKey.channel();

                        StringBuilder sb=new StringBuilder();

                        //创建缓冲区

                        ByteBuffer byteBuffer1 = ByteBuffer.allocate(1024);

                        int len;

                        //循环读取

                        while((len=socketChannel.read(byteBuffer1))>0){

                            byteBuffer1.flip();

                            sb.append(new String(byteBuffer1.array(),0,len));

                            //System.out.println(new String(byteBuffer1.array(),0,len));

                            byteBuffer1.clear();

                        }

                        System.out.println(sb);

                        //给客户端的回写数据

                        socketChannel.write(ByteBuffer.wrap("好疼啊!".getBytes()));

                        socketChannel.close();

                    }

                    iterator.remove();

                }

            }

        }

    }

}
// 将获取连接的代码抽取到这个类中
package com.itheima.mynio6;

import java.io.IOException;

import java.nio.channels.SelectionKey;

import java.nio.channels.ServerSocketChannel;

import java.nio.channels.SocketChannel;

/*

* 接受连接的任务处理类

*

* */

public class AcceptHandler {

    public SocketChannel connSocketChannel(SelectionKey selectionKey){

        try {

            //可以通过令牌来获取到了一个已经就绪的服务器通道

            ServerSocketChannel ssc = (ServerSocketChannel) selectionKey.channel();

            //客户端的延伸通道

            SocketChannel socketChannel = ssc.accept();

            //将客户端的延伸通道设置为非阻塞

            socketChannel.configureBlocking(false);

            //把socketChannel注册到选择器上

            socketChannel.register(selectionKey.selector(), SelectionKey.OP_READ);

            return socketChannel;

        } catch (IOException e) {

            e.printStackTrace();

        }

        return null;

    }

}
3.3获取请求信息并解析【理解】
实现步骤
将请求信息封装到HttpRequest类中
在类中定义方法,实现获取请求信息并解析
代码实现
HttpRequest
package com.itheima.mynio6;

import javax.naming.ldap.PagedResultsControl;

import java.io.IOException;

import java.nio.ByteBuffer;

import java.nio.channels.SelectionKey;

import java.nio.channels.SocketChannel;

import java.util.HashMap;

import java.util.Hashtable;

/*

* 用来封装请求数据的类

* */

public class HttpRequest {

    private String method;//请求方式

    private String requestURI;//请求的URI

    private String version;//http的协议版本

    private HashMap<String,String> hm=new HashMap<>();//所有的请求头

    //parse ----获取请求数据,并解析

    public void parse(SelectionKey selectionKey){

        try {

            //当前通道已经做好了读取的准备(延伸通道)

            SocketChannel socketChannel = (SocketChannel) selectionKey.channel();

            StringBuilder sb=new StringBuilder();

            //创建缓冲区

            ByteBuffer byteBuffer1 = ByteBuffer.allocate(1024);

            int len;

            //循环读取

            while((len=socketChannel.read(byteBuffer1))>0){

                byteBuffer1.flip();

                sb.append(new String(byteBuffer1.array(),0,len));

                //System.out.println(new String(byteBuffer1.array(),0,len));

                byteBuffer1.clear();

            }

            //System.out.println(sb);

            parseHttpRequest(sb);

        } catch (IOException e) {

            e.printStackTrace();

        }

    }

    //解析http请求协议中的数据

    private void parseHttpRequest(StringBuilder sb) {

        //1.需要把StringBuilder先变成一个字符串

        String httpRequeststr=sb.toString();

        //2.获取每一行数据

        String[] split = httpRequeststr.split("\r\n");

        //3.获取请求行

        String httpRequestLine = split[0];//GET / HTTP/1.1

        //4.再按照空格进行切割,得到请求行中的三部分

        String[] httpRequestInfo = httpRequestLine.split(" ");

        this.method=httpRequestInfo[0];

        this.requestURI=httpRequestInfo[1];

        this.version=httpRequestInfo[2];

        //5.操作每一个请求头

        for (int i = 1; i < split.length; i++) {

            String httpRequestHeaderInfo = split[i];

            String[] httpRequestHeaderInfoArr = httpRequestHeaderInfo.split(": ");

            hm.put(httpRequestHeaderInfoArr[0],httpRequestHeaderInfoArr[1]);

        }

    }

    public String getMethod() {

        return method;

    }

    public void setMethod(String method) {

        this.method = method;

    }

    public String getRequestURI() {

        return requestURI;

    }

    public void setRequestURI(String requestURI) {

        this.requestURI = requestURI;

    }

    public String getVersion() {

        return version;

    }

    public void setVersion(String version) {

        this.version = version;

    }

    public HashMap<String, String> getHm() {

        return hm;

    }

    public void setHm(HashMap<String, String> hm) {

        this.hm = hm;

    }

    @Override

    public String toString() {

        return "HttpRequest{" +

                "method='" + method + '\'' +

                ", requestURI='" + requestURI + '\'' +

                ", version='" + version + '\'' +

                ", hm=" + hm +

                '}';

    }

}
3.4给浏览器响应数据【理解】
实现步骤
将响应信息封装HttpResponse类中
定义方法,封装响应信息,给浏览器响应数据
代码实现
package com.itheima.mynio6;

import java.io.IOException;

import java.net.Socket;

import java.nio.ByteBuffer;

import java.nio.channels.SelectableChannel;

import java.nio.channels.SelectionKey;

import java.nio.channels.SocketChannel;

import java.util.HashMap;

import java.util.Map;

import java.util.Set;

public class HttpResponse {

    private String version;//协议版本

    private String status;//响应状态码

    private String desc;//状态码的描述信息

    //响应头数据

    private HashMap<String,String> hm=new HashMap<>();

    private HttpRequest httpRequest;//我们后面要根据请求的信息,来进行一些判断

    //给浏览器响应数据的方法

    public  void sendstaticResource(SelectionKey selectionKey){

        //1.给相应行赋值

        this.version="HTTP/1.1";

        this.status="200";

        this.desc="ok";

        //2.将响应行拼接成一个单独的字符串 //HTTP/1.1 200 ok

        String responseLine=this.version+" "+this.status+" "+this.desc+"\r\n";

        //3.给响应头赋值

        hm.put("Content-Type","text/html;charset=UTF-8");

        //4.将所有的响应头拼接成一个单独的字符串

        StringBuilder sb=new StringBuilder();

        Set<Map.Entry<String, String>> entries = hm.entrySet();

        for (Map.Entry<String, String> entry : entries) {

            sb.append(entry.getKey()).append(": ").append(entry.getValue()).append("\r\n");

        }

        //5.响应空行

        String emptyLine="\r\n";

        //6.相应行,响应头,相应空行拼接成一个大的字符串

        String reponseLineStr=responseLine+sb.toString()+emptyLine;

        try {

            //7.将上面三个写给浏览器

            SocketChannel socketchannel = (SocketChannel)selectionKey.channel();

            ByteBuffer byteBuffer1 = ByteBuffer.wrap(reponseLineStr.getBytes());

            socketchannel.write(byteBuffer1);

            //8.单独操作响应体

            //因为在以后的响应体不一定是一个字符串

            //有可能是一个文件,所以单独操作

            String s="哎呀妈呀";

            ByteBuffer byteBuffer2=ByteBuffer.wrap(s.getBytes());

            socketchannel.write(byteBuffer2);

            //9.释放资源

            socketchannel.close();

        } catch (IOException e) {

            e.printStackTrace();

        }

    }

    public String getVersion() {

        return version;

    }

    public void setVersion(String version) {

        this.version = version;

    }

    public String getStatus() {

        return status;

    }

    public void setStatus(String status) {

        this.status = status;

    }

    public String getDesc() {

        return desc;

    }

    public void setDesc(String desc) {

        this.desc = desc;

    }

    public HashMap<String, String> getHm() {

        return hm;

    }

    public void setHm(HashMap<String, String> hm) {

        this.hm = hm;

    }

    public HttpRequest getHttpRequest() {

        return httpRequest;

    }

    public void setHttpRequest(HttpRequest httpRequest) {

        this.httpRequest = httpRequest;

    }

    @Override

    public String toString() {

        return "HttpResponse{" +

                "version='" + version + '\'' +

                ", status='" + status + '\'' +

                ", desc='" + desc + '\'' +

                ", hm=" + hm +

                ", httpRequest=" + httpRequest +

                '}';

    }

}
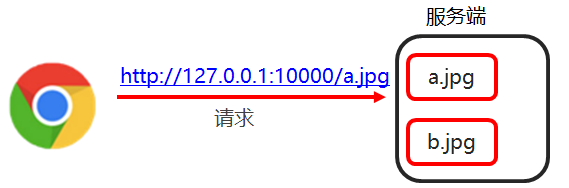
3.5代码优化【理解】
实现步骤
根据请求资源路径不同,响应不同的数据
服务端健壮性处理
访问不存在的资源处理
代码实现
/*
* 接受连接的任务处理类
*
package com.itheima.mynio9;

import java.io.IOException;

import java.nio.channels.SelectionKey;

import java.nio.channels.ServerSocketChannel;

import java.nio.channels.SocketChannel;

/*

* 接受连接的任务处理类

*

* */

public class AcceptHandler {

    public SocketChannel connSocketChannel(SelectionKey selectionKey){

        try {

            //可以通过令牌来获取到了一个已经就绪的服务器通道

            ServerSocketChannel ssc = (ServerSocketChannel) selectionKey.channel();

            //客户端的延伸通道

            SocketChannel socketChannel = ssc.accept();

            //将客户端的延伸通道设置为非阻塞

            socketChannel.configureBlocking(false);

            //把socketChannel注册到选择器上

            socketChannel.register(selectionKey.selector(), SelectionKey.OP_READ);

            return socketChannel;

        } catch (IOException e) {

            e.printStackTrace();

        }

        return null;

    }

}
HttpResponse
package com.itheima.mynio9;

import org.apache.commons.io.IOUtils;

import java.io.File;

import java.io.FileInputStream;

import java.io.IOException;

import java.nio.ByteBuffer;

import java.nio.channels.SelectionKey;

import java.nio.channels.SocketChannel;

import java.util.HashMap;

import java.util.Map;

import java.util.Set;

public class HttpResponse {

    private String version; //协议版本

    private String status;  //响应状态码

    private String desc;    //状态码的描述信息

    //响应头数据

    private HashMap<String, String> hm = new HashMap<>();

    private HttpRequest httpRequest;  //我们后面要根据请求的数据,来进行一些判断

    //给浏览器响应数据的方法

    public void sendStaticResource(SelectionKey selectionKey) {

        //1.给响应行赋值

        this.version = "HTTP/1.1";

        this.status = "200";

        this.desc = "ok";

        //3.给响应头赋值

        //先获取浏览器请求的URI

        String requestURI = this.getHttpRequest().getRequestURI();

        if(requestURI != null){

            File file = new File(WEB_APP_PATH + requestURI);

            //判断这个路径是否存在

            if(!file.exists()){

                this.status = "404";

                this.desc = "NOT FOUNG";

            }

            if("200".equals(this.status)){

                if("/".equals(requestURI)){

                    hm.put("Content-Type", "text/html;charset=UTF-8");

                }else if("/favicon.ico".equals(requestURI)){

                    hm.put("Content-Type", "image/x-icon");

                }else if("/a.txt".equals(requestURI)){

                    hm.put("Content-Type", "text/html;charset=UTF-8");

                }else if("/1.jpg".equals(requestURI)){

                    hm.put("Content-Type", "image/jpeg");

                }else if("/1.png".equals(requestURI)){

                    hm.put("Content-Type", "image/png");

                }

            }else{

                hm.put("Content-Type", "text/html;charset=UTF-8");

            }

        }

        //2.将响应行拼接成一个单独的字符串 // HTTP/1.1 200 ok

        String responseLine = this.version + " " + this.status + " " + this.desc + "\r\n";

        //4.将所有的响应头拼接成一个单独的字符串

        StringBuilder sb = new StringBuilder();

        Set<Map.Entry<String, String>> entries = hm.entrySet();

        for (Map.Entry<String, String> entry : entries) {

            sb.append(entry.getKey()).append(": ").append(entry.getValue()).append("\r\n");

        }

        //5.响应空行

        String emptyLine = "\r\n";

        //6.响应行,响应头,响应空行拼接成一个大字符串

        String responseLineStr = responseLine + sb.toString() + emptyLine;

        try {

            //7.将上面三个写给浏览器

            SocketChannel socketChannel = (SocketChannel) selectionKey.channel();

            ByteBuffer byteBuffer1 = ByteBuffer.wrap(responseLineStr.getBytes());

            socketChannel.write(byteBuffer1);

            //8.单独操作响应体

            //因为在以后响应体不一定是一个字符串

            //有可能是一个文件,所以单独操作

            // String s = "哎哟,妈呀,终于写完了.";

            byte [] bytes = getContent();

            ByteBuffer byteBuffer2 = ByteBuffer.wrap(bytes);

            socketChannel.write(byteBuffer2);

            //9.释放资源

            socketChannel.close();

        } catch (IOException e) {

            e.printStackTrace();

        }

    }

    public static final String WEB_APP_PATH = "internetmodel\\webapp";

    private byte[] getContent() {

        try {

            //1.获取浏览器请求的URI

            String requestURI = this.getHttpRequest().getRequestURI();

            if(requestURI != null){

                if("200".equals(this.status)){

                    //2.判断一下请求的URI,根据不同的URI来响应不同的东西

                    if("/".equals(requestURI)){

                        String s = "哎哟,妈呀,终于写完了.";

                        return s.getBytes();

                    }else/* if("/favicon.ico".equals(requestURI))*/{

                        //获取一个ico文件

                        FileInputStream fis = new FileInputStream(WEB_APP_PATH + requestURI);

                        //把ico文件变成一个字节数组返回

                        return IOUtils.toByteArray(fis);

                    }

                }else{

                    return "访问的资源不存在".getBytes();

                }

            }

        } catch (IOException e) {

            e.printStackTrace();

        }

        return new byte[0];

    }

    public String getVersion() {

        return version;

    }

    public void setVersion(String version) {

        this.version = version;

    }

    public String getStatus() {

        return status;

    }

    public void setStatus(String status) {

        this.status = status;

    }

    public String getDesc() {

        return desc;

    }

    public void setDesc(String desc) {

        this.desc = desc;

    }

    public HashMap<String, String> getHm() {

        return hm;

    }

    public void setHm(HashMap<String, String> hm) {

        this.hm = hm;

    }

    public HttpRequest getHttpRequest() {

        return httpRequest;

    }

    public void setHttpRequest(HttpRequest httpRequest) {

        this.httpRequest = httpRequest;

    }

    @Override

    public String toString() {

        return "HttpResponse{" +

                "version='" + version + '\'' +

                ", status='" + status + '\'' +

                ", desc='" + desc + '\'' +

                ", hm=" + hm +

                ", httpRequest=" + httpRequest +

                '}';

    }

}
HttpServer
package com.itheima.mynio9;

import java.io.IOException;

import java.net.InetSocketAddress;

import java.nio.channels.SelectionKey;

import java.nio.channels.Selector;

import java.nio.channels.ServerSocketChannel;

import java.util.Iterator;

import java.util.Set;

public class HttpServer {

    public static void main(String[] args) throws IOException {

        //1.打开服务端通道

        ServerSocketChannel serverSocketChannel = ServerSocketChannel.open();

        //2.让这个通道绑定一个端口

        serverSocketChannel.bind(new InetSocketAddress(10000));

        //3.设置通道为非阻塞

        serverSocketChannel.configureBlocking(false);

        //4.打开一个选择器

        Selector selector = Selector.open();

        //5.绑定选择器和服务端通道

        serverSocketChannel.register(selector,SelectionKey.OP_ACCEPT);

        while(true){

            //6.选择器会监视通道的状态.

            int count = selector.select();

            if(count != 0){

                //7.会遍历所有的服务端通道.看谁准备好了,谁准备好了,就让谁去连接.

                //获取所有服务端通道的令牌,并将它们都放到一个集合中,将集合返回.

                Set<SelectionKey> selectionKeys = selector.selectedKeys();

                Iterator<SelectionKey> iterator = selectionKeys.iterator();

                while(iterator.hasNext()){

                    //selectionKey 依次表示每一个服务端通道的令牌

                    SelectionKey selectionKey = iterator.next();

                    if(selectionKey.isAcceptable()){

                        //获取连接

                        AcceptHandler acceptHandler = new AcceptHandler();

                        acceptHandler.connSocketChannel(selectionKey);

                    }else if(selectionKey.isReadable()){

                        //读取数据

                        HttpRequest httpRequest = new HttpRequest();

                        httpRequest.parse(selectionKey);

                        System.out.println("http请求的数据为 ---->" + httpRequest);

                        if(httpRequest.getRequestURI() == null || "".equals(httpRequest.getRequestURI())){

                            selectionKey.channel();

                            continue;

                        }

                        System.out.println("...数据解析完毕,准备响应数据....");

                        //响应数据

                        HttpResponse httpResponse = new HttpResponse();

                        httpResponse.setHttpRequest(httpRequest);

                        httpResponse.sendStaticResource(selectionKey);

                    }

                    //任务处理完毕以后,将SelectionKey从集合中移除

                    iterator.remove();

                }

            }

        }

    }

}
------------恢复内容结束------------
33.2.NIO的更多相关文章
- JAVA NIO系列(二) Channel解读
Channel就是一个通道,用于传输数据,两端分别是缓冲区和实体(文件或者套接字),通道的特点(也是NIO的特点):通道中的数据总是要先读到一个缓冲区,或者总是要从一个缓冲区中读入. Channel的 ...
- nio加强服务端并发
究了一下Android推送,方式很多,比如用框架或者用第三方服务,在此并不讨论个中优劣.抱着学习的态度,本人不太喜欢用一些现成的东西,所以自己动手实现了一套简单的推送机制.使用TCP长连接,完成服务器 ...
- Java NIO 之缓冲区
缓冲区基础 所有的缓冲区都具有四个属性来 供关于其所包含的数据元素的信息. capacity(容量):缓冲区能够容纳数据的最大值,创建缓冲区后不能改变. limit(上界):缓冲区的第一个不能被读或写 ...
- java编解码技术,netty nio
对于java提供的对象输入输出流ObjectInputStream与ObjectOutputStream,可以直接把java对象作为可存储 的字节数组写入文件,也可以传输到网络上去.对与java开放人 ...
- Java NIO 网络编程基础
Java NIO提供了一套网络api,可以用来处理连接数很多的情况.他的基本思想就是用一个线程来处理多个channel. 123456789101112131415161718192021222324 ...
- Java NIO、NIO.2学习笔记
相关学习资料 http://www.molotang.com/articles/903.html http://www.ibm.com/developerworks/cn/education/java ...
- java的nio之:java的nio的服务器实现模型
[nio服务端序列图]
- socket的NIO操作
一.前言 Java中直接使用socket进行通信的场景应该不是很多,在公司的一个项目中有这种需求,所以根据自己的理解和相关资料的参考,基于NIO 实现了一组工具类库,具体的协议还未定义,后续再整理 二 ...
- Getting started with new I/O (NIO)--reference
The new input/output (NIO) library, introduced with JDK 1.4, provides high-speed, block-oriented I/O ...
随机推荐
- Spring Boot MVC 单张图片和多张图片上传 和通用文件下载
@Autowired private ServerConfig serverConfig; /** * 通用下载请求 * * @param fileName 文件名称 * @param delete ...
- PAT (Advanced Level) Practice 1035 Password (20 分) 凌宸1642
PAT (Advanced Level) Practice 1035 Password (20 分) 凌宸1642 题目描述: To prepare for PAT, the judge someti ...
- PAT (Advanced Level) Practice 1015 Reversible Primes (20 分) 凌宸1642
PAT (Advanced Level) Practice 1015 Reversible Primes (20 分) 凌宸1642 题目描述: A reversible prime in any n ...
- crx 文件安装 如何安装 Chrome插件
Chrome 67 版本(大概2018.06.06的更新包)开始,插件已经无法离线安装啦,也就是自己无法使用crx文件安装插件, 而只能从chrome.google.com/webst ...
- 更改当前目录--cd
pwd 显示当前所在的目录路径 cd ../ 回到上一层目录 cd ../../ 回到上上层目录 cd / 回到根目录 cd ~ 回到当前用户的根目录 c ...
- 使用Gensim库对文本进行词袋、TF-IDF和n-gram方法向量化处理
Gensim库简介 机器学习算法需要使用向量化后的数据进行预测,对于文本数据来说,因为算法执行的是关于矩形的数学运算,这意味着我们必须将字符串转换为向量.从数学的角度看,向量是具有大小和方向的几何对象 ...
- Qt信号槽源码剖析(二)
大家好,我是IT文艺男,来自一线大厂的一线程序员 上节视频给大家讲解了Qt信号槽的基本概念.元对象编译器.示例代码以及Qt宏:今天接着深入分析,进入Qt信号槽源码剖析系列的第二节视频. Qt信号槽的宏 ...
- OO_Unit4_Summary暨课程总结
初始oo,有被往届传言给吓到:oo进行中,也的确有时会被作业困扰(debug到差点放弃):而oo即将结束的此刻,却又格外感慨这段oo历程. 一.单元架构设计 本单元任务是设计一个UML解析器,能够支持 ...
- 三、python学习-常用模块
一.常用模块 1.math数学模块 在计算机中,所有数值在计算机底层都是约等于机制,并不是精确地 import math #ceil() 向上取整操作 math.ceil(3.1)=>4 #fl ...
- Pandas的loc,iloc与ix的用法及区别
1.先来谈一谈loc,loc这个方法就是你有啥我就用啥,你没有的我不用,pandas对象的index,columns有什么,pd.loc[index,column],index就是pd.index的其 ...