其他css属性和特性
其他css属性和特性
设置元素的颜色和透明度
下表列出了这些属性。
颜色相关属性
| 属 性 | 说 明 | 值 |
|---|---|---|
| color | 设置元素的前景色 | <颜色> |
| opacity | 设置颜色的透明度 | <数值> |
设置前景色
color属性设置元素的前景色。一般而言,元素对color属性之于它的意义可以有不同的解读,不过实际上,color属性一般用来设置文本的颜色。代码清单1展示了color属性的用法。
代码清单1 使用color属性
<!DOCTYPE HTML>

<html>

    <head>

        <title>黄子涵</title>

        <meta name="作者" content="黄子涵"/>

        <meta name="描述" content="黄子涵是帅哥"/>

        <meta http-equiv="Content-Type" content="text/html; charset=utf-8" />

        <link rel="shortcut icon" href="favicon.ico" type="image/x-icon"/>

        <style>

            @font-face {

                font-style: normal;

                font-weight: normal;

                font-family: '水果冰淇淋';

                src: url('http://120.77.46.246/HTML5权威指南/第22章 设置文本样式/水果冰淇淋.woff');

            }

            #huangzihan {

                padding: 5px;

                border: medium double black;

                background-color: lightgray;

                font-family: "水果冰淇淋";

                font-size: larger;

            }

            #黄子涵 {

                font-size: xx-large;

                border: medium solid white;

                background-color: green;

                color: rgba(255, 255, 255, 0.7);

                -webkit-animation-duration: 10000ms;

                -webkit-animation-iteration-count: infinite;

                -webkit-animation-direction: alternate;

                -webkit-animation-timing-function: linear;

                -webkit-animation-name: 'ColorSwap';

            }

            a:hover {

                -webkit-animation-duration: 10000ms;

                -webkit-animation-iteration-count: infinite;

                -webkit-animation-direction: alternate;

                -webkit-animation-timing-function: linear;

                -webkit-animation-name: 'huangzihan2';

            }

            @-webkit-keyframes huangzihan2 {

                from {

                    color: red;

                }

                14% {

                    color: orange;

                }

                42% {

                    color: yellow;

                }

                56% {

                    color: green;

                }

                70% {

                    color: cyan;

                }

                84% {

                    color: blue;

                }

                to {

                    color: purple;

                }

            }

            @-webkit-keyframes ColorSwap {

                from {

                    font-size: small;

                    background-color: red;

                }

                14% {

                    background-color: orange;

                    padding: 2px;

                }

                42% {

                    background-color: yellow;

                    padding: 3px;

                }

                56% {

                    background-color: green;

                    padding: 4px;

                }

                70% {

                    background-color: cyan;

                    padding: 5px;

                }

                84% {

                    background-color: blue;

                    padding: 6px;

                }

                to {

                    border: medium solid white;

                    background-color: purple;

                    color: white;

                }

            }

        </style>

    </head>

    <body>

        <p id="huangzihan">

            煤气灯不禁影照街里一对蚯蚓,照过以俩心相亲一对小情人

            沉默以拥吻抵抗一切的冰与冷,晚意借北风轻轻的飘起长长裙

            多温馨心里风中那笑声 淌泪,尝尽了失意的我将一切都褪去

            再到这风中心中竟仿似伤痕累累,然后再记忆起当晚跟你在这里

            相依相拥中交出的心早已失去<span id="黄子涵">黄子涵</span>失去已破碎不可以再追洒泪

            煤气灯不禁影照街里一对蚯蚓,照过以俩心相亲一对小情人

            多久了,我都没变,爱你这回事,整整六年

            有一个人能去爱,多珍贵。没关系你也不用给我机会

            反正我还有一生可以浪费

            <a href="https://baike.baidu.com/item/%E8%AE%B8%E9%AD%8F%E6%B4%B2/18762132?fr=aladdin">黄子涵是靓仔</a>

        </p>

        <p>

            <button>Running</button>

            <button>Paused</button>

        </p>

        <script>

            var buttons = document.getElementsByTagName("BUTTON");

            for(var i = 0; i < buttons.length; i++) {

                buttons[i].onclick = function(e) {

                    document.getElementById("黄子涵").style.webkitAnimationPlayState = e.target.innerHTML;

                }

            }

        </script>

    </body>

</html>
在这个例子中,我用了两次color属性:一次为span元素设置前景色和透明度,一次设置鼠标悬停在a元素上时链接的前景色。效果如下图所示。在印刷页面上可能不好辨认效果,要想看清楚可以在浏览器中显示示例HTML文档。
设置元素的透明度
请注意,我在前面的例子中使用了rgba函数设置span元素的颜色。通过提供一个小于1的alpha值可以让文本变透明。从上图中可能看不出来,但实际上透明意味着文本允许一小部分背景色透过。可以使用opacity属性让整个元素和文本内容透明。这个属性的取值范围是0到1,前者代表完全透明,后者代表完全不透明。代码清单2展示了opacity属性的用法。
代码清单2 使用opacity属性
<!DOCTYPE HTML>

<html>

    <head>

        <title>黄子涵</title>

        <meta name="作者" content="黄子涵"/>

        <meta name="描述" content="黄子涵是帅哥"/>

        <meta http-equiv="Content-Type" content="text/html; charset=utf-8" />

        <link rel="shortcut icon" href="favicon.ico" type="image/x-icon"/>

        <style>

            @font-face {

                font-style: normal;

                font-weight: normal;

                font-family: '水果冰淇淋';

                src: url('http://120.77.46.246/HTML5权威指南/第22章 设置文本样式/水果冰淇淋.woff');

            }

            #huangzihan {

                padding: 5px;

                border: medium double black;

                background-color: lightgray;

                font-family: "水果冰淇淋";

                font-size: larger;

            }

            #黄子涵 {

                font-size: xx-large;

                border: medium solid white;

                background-color: green;

                color: rgba(255, 255, 255, 0.7);

                -webkit-animation-duration: 10000ms;

                -webkit-animation-iteration-count: infinite;

                -webkit-animation-direction: alternate;

                -webkit-animation-timing-function: linear;

                -webkit-animation-name: 'ColorSwap';

            }

            a:hover {

                -webkit-animation-duration: 10000ms;

                -webkit-animation-iteration-count: infinite;

                -webkit-animation-direction: alternate;

                -webkit-animation-timing-function: linear;

                -webkit-animation-name: 'huangzihan2';

            }

            @-webkit-keyframes huangzihan2 {

                from {

                    color: red;

                }

                14% {

                    color: orange;

                }

                42% {

                    color: yellow;

                }

                56% {

                    color: green;

                }

                70% {

                    color: cyan;

                }

                84% {

                    color: blue;

                }

                to {

                    color: purple;

                }

            }

            @-webkit-keyframes ColorSwap {

                from {

                    font-size: small;

                    background-color: red;

                }

                14% {

                    background-color: orange;

                    padding: 2px;

                    opacity: 0.4;

                }

                42% {

                    background-color: yellow;

                    padding: 3px;

                }

                56% {

                    background-color: green;

                    padding: 4px;

                    opacity: 0.4;

                }

                70% {

                    background-color: cyan;

                    padding: 5px;

                }

                84% {

                    background-color: blue;

                    padding: 6px;

                    opacity: 0.4;

                }

                to {

                    border: medium solid white;

                    background-color: purple;

                    color: white;

                }

            }

        </style>

    </head>

    <body>

        <p id="huangzihan">

            煤气灯不禁影照街里一对蚯蚓,照过以俩心相亲一对小情人

            沉默以拥吻抵抗一切的冰与冷,晚意借北风轻轻的飘起长长裙

            多温馨心里风中那笑声 淌泪,尝尽了失意的我将一切都褪去

            再到这风中心中竟仿似伤痕累累,然后再记忆起当晚跟你在这里

            相依相拥中交出的心早已失去<span id="黄子涵">黄子涵</span>失去已破碎不可以再追洒泪

            煤气灯不禁影照街里一对蚯蚓,照过以俩心相亲一对小情人

            多久了,我都没变,爱你这回事,整整六年

            有一个人能去爱,多珍贵。没关系你也不用给我机会

            反正我还有一生可以浪费

            <a href="https://baike.baidu.com/item/%E8%AE%B8%E9%AD%8F%E6%B4%B2/18762132?fr=aladdin">黄子涵是靓仔</a>

        </p>

        <p>

            <button>Running</button>

            <button>Paused</button>

        </p>

        <script>

            var buttons = document.getElementsByTagName("BUTTON");

            for(var i = 0; i < buttons.length; i++) {

                buttons[i].onclick = function(e) {

                    document.getElementById("黄子涵").style.webkitAnimationPlayState = e.target.innerHTML;

                }

            }

        </script>

    </body>

</html>
在这个例子中,我将span元素的opacity属性的值设为0.4。效果如下图所示,不过印在纸上效果可能不是太明显。

设置表格样式
下表总结了为table元素设置独特样式的属性。
表格相关属性
| 属 性 | 说 明 | 值 |
|---|---|---|
border-collapse |
设置相邻单元格的边框处理样式 | collapse separate |
border-spacing |
设置相邻单元格边框的间距 | 1 ~ 2个长度值 |
caption-side |
设置表格标题的位置 | top bottom |
empty-cells |
设置空单元格是否显示边框 | hide show |
table-layout |
指定表格的布局样式 | auto fixed |
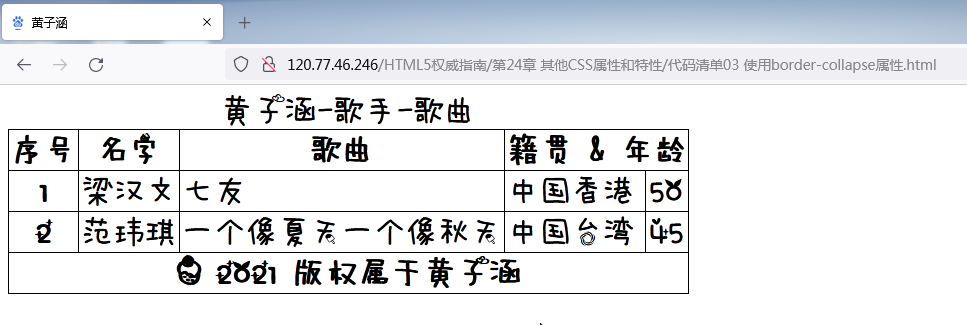
合并表格边框
border-collapse用来控制table元素相邻单元格边框的样式,下图显示的是默认处理样式。

浏览器为表格绘制了一个边框,同时还为每个单元格绘制了边框,显示出来就是双边框。使用
border-collapse属性可以改变这种效果,如代码清单3所示。
代码清单3 使用border-collapse属性
<!DOCTYPE HTML>
<html>
<head>
<title>黄子涵</title>
<meta name="作者" content="黄子涵"/>
<meta name="描述" content="黄子涵是帅哥!"/>
<meta http-equiv="Content-Type" content="text/html; charset=utf-8" />
<link rel="shortcut icon" href="favicon.ico" type="image/x-icon"/>
<style>
@font-face {
font-style: normal;
font-weight: normal;
font-family: '水果冰淇淋';
src: url('http://120.77.46.246/HTML5权威指南/第22章 设置文本样式/水果冰淇淋.woff');
}
table {
border-collapse: collapse;
font-family: '水果冰淇淋';
font-size: xx-large;
}
th, td {
padding: 2px;
}
</style>
</head>
<body>
<table border="1">
<caption>黄子涵-歌手-歌曲</caption>
<colgroup id="colgroup1">
<col id="col1And2" span="2"/>
<col id="col3"/>
</colgroup>
<colgroup id="colgroup2" span="2"/>
<thead>
<tr>
<th>序号</th><th>名字</th><th>歌曲</th>
<th colspan="2">籍贯 & 年龄</th>
</tr>
<tbody>
<tr>
<th>1</th><td>梁汉文</td><td>七友</td>
<td>中国香港</td><td>50</td>
</tr>
<tr>
<th>2</th><td>范玮琪</td><td>一个像夏天一个像秋天</td>
<td>中国台湾</td><td>45</td>
</tr>
</tbody>
<tfoot>
<tr>
<th colspan="5">© 2021 版权属于黄子涵</th>
</tr>
</tfoot>
</thead>
</table>
</body>
</html>
collapse值告诉浏览器不要为相邻元素绘制两个边框,效果如下图所示。
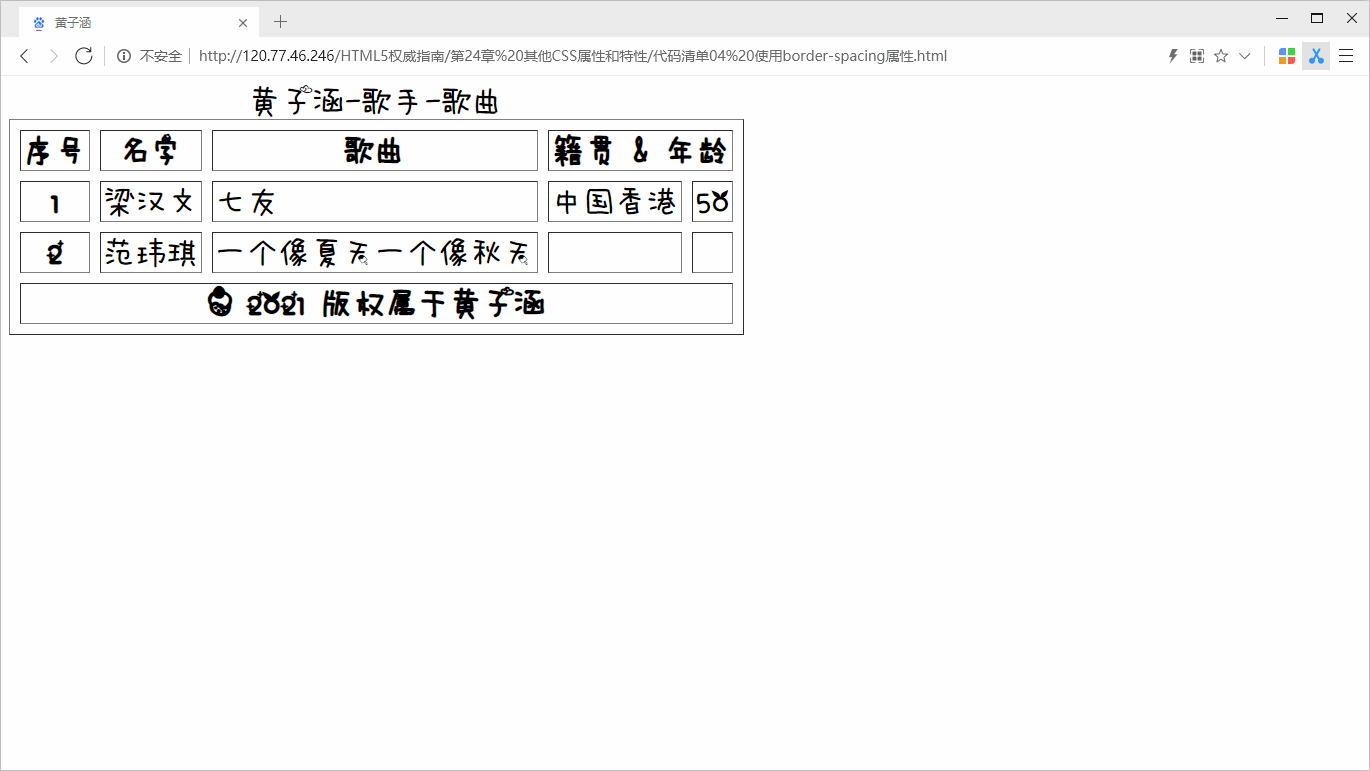
配置独立边框
如果你一定要为
border-collapse属性使用默认值separate,再加几个其他属性同样可以改善表格的外观。border-spacing属性定义相邻元素边框的间距,如代码清单4所示。
代码清单4 使用border-spacing属性
<!DOCTYPE HTML>
<html>
<head>
<title>黄子涵</title>
<meta name="作者" content="黄子涵"/>
<meta name="描述" content="黄子涵是帅哥!"/>
<meta http-equiv="Content-Type" content="text/html; charset=utf-8" />
<link rel="shortcut icon" href="favicon.ico" type="image/x-icon"/>
<style>
@font-face {
font-style: normal;
font-weight: normal;
font-family: '水果冰淇淋';
src: url('http://120.77.46.246/HTML5权威指南/第22章 设置文本样式/水果冰淇淋.woff');
}
table {
border-collapse: separate;
font-family: '水果冰淇淋';
font-size: xx-large;
border-spacing: 10px;
}
th, td {
padding: 2px;
}
</style>
</head>
<body>
<table border="1">
<caption>黄子涵-歌手-歌曲</caption>
<colgroup id="colgroup1">
<col id="col1And2" span="2"/>
<col id="col3"/>
</colgroup>
<colgroup id="colgroup2" span="2"/>
<thead>
<tr>
<th>序号</th><th>名字</th><th>歌曲</th>
<th colspan="2">籍贯 & 年龄</th>
</tr>
<tbody>
<tr>
<th>1</th><td>梁汉文</td><td>七友</td>
<td>中国香港</td><td>50</td>
</tr>
<tr>
<th>2</th><td>范玮琪</td><td>一个像夏天一个像秋天</td>
<td></td><td></td>
</tr>
</tbody>
<tfoot>
<tr>
<th colspan="5">© 2021 版权属于黄子涵</th>
</tr>
</tfoot>
</thead>
</table>
</body>
</html>
在这个例子中,我在边框之间指定了10像素的空白,效果如下图所示。
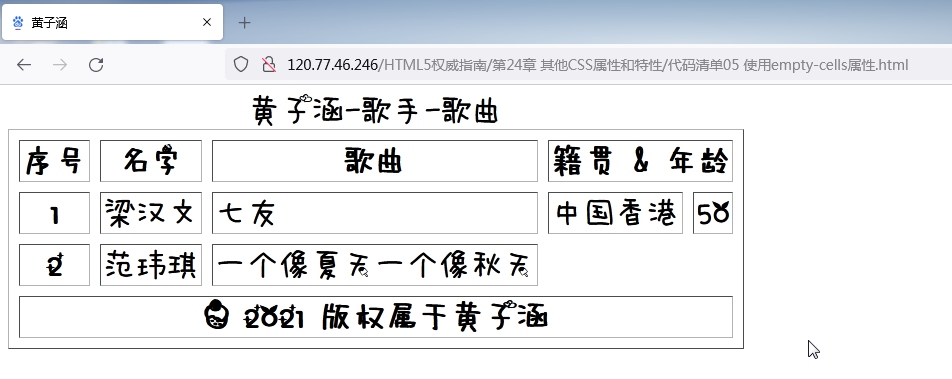
处理空单元格
我们也可以告诉浏览器如何处理空单元格。默认情况下,即使单元格为空,浏览器也会为单元格设置独立的边框,就像代码清单4的图中显示的那样。可以使用
empty-cells属性控制这种行为。empty-cells的默认值为show,创建的效果请回头看一下代码清单2的图。如果将该属性设置为hide,浏览器就不会绘制边框。代码清单24-5展示的是在前一个例子的style元素中添加empty-cells属性。
代码清单5 使用empty-cells属性
<!DOCTYPE HTML>
<html>
<head>
<title>黄子涵</title>
<meta name="作者" content="黄子涵"/>
<meta name="描述" content="黄子涵是帅哥!"/>
<meta http-equiv="Content-Type" content="text/html; charset=utf-8" />
<link rel="shortcut icon" href="favicon.ico" type="image/x-icon"/>
<style>
@font-face {
font-style: normal;
font-weight: normal;
font-family: '水果冰淇淋';
src: url('http://120.77.46.246/HTML5权威指南/第22章 设置文本样式/水果冰淇淋.woff');
src: url('http://192.168.1.102/HTML5权威指南/第22章 设置文本样式/水果冰淇淋.woff');
}
table {
border-collapse: separate;
font-family: '水果冰淇淋';
font-size: xx-large;
border-spacing: 10px;
empty-cells: hide;
}
th, td {
padding: 2px;
}
</style>
</head>
<body>
<table border="1">
<caption>黄子涵-歌手-歌曲</caption>
<colgroup id="colgroup1">
<col id="col1And2" span="2"/>
<col id="col3"/>
</colgroup>
<colgroup id="colgroup2" span="2"/>
<thead>
<tr>
<th>序号</th><th>名字</th><th>歌曲</th>
<th colspan="2">籍贯 & 年龄</th>
</tr>
<tbody>
<tr>
<th>1</th><td>梁汉文</td><td>七友</td>
<td>中国香港</td><td>50</td>
</tr>
<tr>
<th>2</th><td>范玮琪</td><td>一个像夏天一个像秋天</td>
<td></td><td></td>
</tr>
</tbody>
<tfoot>
<tr>
<th colspan="5">© 2021 版权属于黄子涵</th>
</tr>
</tfoot>
</thead>
</table>
</body>
</html>
加上这个属性后的改变如下图所示。
设置标题的位置
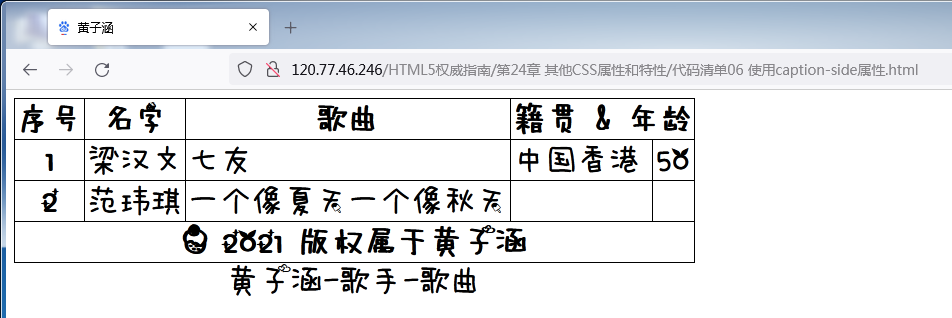
如果为table元素添加caption,标题会显示在表格的顶部。不过,我们 可以使用
caption-side属性改变这种默认行为。这个属性有两个值:top (默认值)和bottom。代码清单6展示了这个属性的用法。
代码清单6 使用
caption-side属性
<!DOCTYPE HTML>
<html>
<head>
<title>黄子涵</title>
<meta name="作者" content="黄子涵"/>
<meta name="描述" content="黄子涵是帅哥!"/>
<meta http-equiv="Content-Type" content="text/html; charset=utf-8" />
<link rel="shortcut icon" href="favicon.ico" type="image/x-icon"/>
<style>
@font-face {
font-style: normal;
font-weight: normal;
font-family: '水果冰淇淋';
src: url('http://120.77.46.246/HTML5权威指南/第22章 设置文本样式/水果冰淇淋.woff');
}
table {
border-collapse: collapse;
font-family: '水果冰淇淋';
font-size: xx-large;
border-spacing: 10px;
caption-side: bottom;
}
th, td {
padding: 2px;
}
</style>
</head>
<body>
<table border="1">
<caption>黄子涵-歌手-歌曲</caption>
<colgroup id="colgroup1">
<col id="col1And2" span="2"/>
<col id="col3"/>
</colgroup>
<colgroup id="colgroup2" span="2"/>
<thead>
<tr>
<th>序号</th><th>名字</th><th>歌曲</th>
<th colspan="2">籍贯 & 年龄</th>
</tr>
<tbody>
<tr>
<th>1</th><td>梁汉文</td><td>七友</td>
<td>中国香港</td><td>50</td>
</tr>
<tr>
<th>2</th><td>范玮琪</td><td>一个像夏天一个像秋天</td>
<td></td><td></td>
</tr>
</tbody>
<tfoot>
<tr>
<th colspan="5">© 2021 版权属于黄子涵</th>
</tr>
</tfoot>
</thead>
</table>
</body>
</html>
设置
caption-side属性的效果如下图所示。
指定表格布局
默认情况下,浏览器会根据表格每一列中最宽的单元格设置整列单元格的宽度。这意味着你不需要担心还要亲自解决单元格大小的问题,不过,这同时意味着在能够确定页面布局之前,浏览器必须获取所有的表格内容。
浏览器显示表格釆用的方法是由
table-layout属性决定的,之前说过,它的默认值是auto。使用另一个值fixed可以禁用自动布局。在fixed模式中,表格的大小是由表格自身和单独每列的width值设定的。如果没有列宽值可用,浏览器会设置等距离的列宽。
因此,只要获取了一行的表格数据,浏览器就可以确定列宽。其他行内的数据会自动换行以适应列宽(可能导致行高比auto模式下略高)。
代码清单7展示了
table-layout属性的用法。
代码清单7 使用table-layout属性
<!DOCTYPE HTML>
<html>
<head>
<title>黄子涵</title>
<meta name="作者" content="黄子涵"/>
<meta name="描述" content="黄子涵是帅哥!"/>
<meta http-equiv="Content-Type" content="text/html; charset=utf-8" />
<link rel="shortcut icon" href="favicon.ico" type="image/x-icon"/>
<style>
@font-face {
font-style: normal;
font-weight: normal;
font-family: '水果冰淇淋';
src: url('http://120.77.46.246/HTML5权威指南/第22章 设置文本样式/水果冰淇淋.woff');
src: url('http://192.168.1.102/HTML5权威指南/第22章 设置文本样式/水果冰淇淋.woff');
}
table {
border-collapse: collapse;
font-family: '水果冰淇淋';
font-size: xx-large;
border-spacing: 10px;
caption-side: bottom;
table-layout: fixed;
width: 100%;
}
th, td {
padding: 2px;
}
</style>
</head>
<body>
<table border="1">
<caption>黄子涵-歌手-歌曲</caption>
<colgroup id="colgroup1">
<col id="col1And2" span="2"/>
<col id="col3"/>
</colgroup>
<colgroup id="colgroup2" span="2"/>
<thead>
<tr>
<th>序号</th><th>名字</th><th>歌曲</th>
<th colspan="2">籍贯 & 年龄</th>
</tr>
<tbody>
<tr>
<th>这里有个very very 长的句子</th><td>梁汉文</td><td>七友</td>
<td>中国香港</td><td>50</td>
</tr>
<tr>
<th>2</th><td>范玮琪</td><td>一个像夏天一个像秋天</td>
<td></td><td></td>
</tr>
</tbody>
<tfoot>
<tr>
<th colspan="5">© 2021 版权属于黄子涵</th>
</tr>
</tfoot>
</thead>
</table>
</body>
</html>
在这个例子中,我设置了table元素的width属性占据100%的可用空间,将表格的布局样式设为fixed。我还改变了第二行中一个单元格的内容,以展示布局效果,如下图所示。

注意页面可用空间是如何在表格的五列之间均匀分配,以及第二行中的长标题如何断行来适应列宽的,断行导致了第二行比其他行高。
设置列表样式
有许多属性是专门用来设置列表样式的,下表总结了这些属性。
列表相关属性
| 属 性 | 说 明 | 值 |
|---|---|---|
list-style-type |
指定列表中使用的标记的类型 | |
list-style-image |
指定图像作为列表标记 | <图像> |
list-style-position |
指定标记相对于列表项目盒子的位置 | inside outside |
list-style |
设置所有列表特征的简写属性 |
list-style简写属性的格式如下所示:
list-style: <list-style-type> <list-style-position> <list-style-image>
设置列表标记类型
list-style-type属性用来设置标记(有时候也称为项目符号)的样式,这个属性允许的值如下表所示。
list-style-type属性的值
| 值 | 说明 |
|---|---|
| none | 没有标记 |
| box check circle diamond disc dash square | 使用指定形状的标记,注意并不是所有的浏览器都支持每一种形状 |
| decimal | 使用十进制数字作为标记 |
| binary | 使用二进制数作为标记 |
lower-alpha |
使用小写字母字符作为标记 |
upper-alpha |
使用大写字母字符作为标记 |
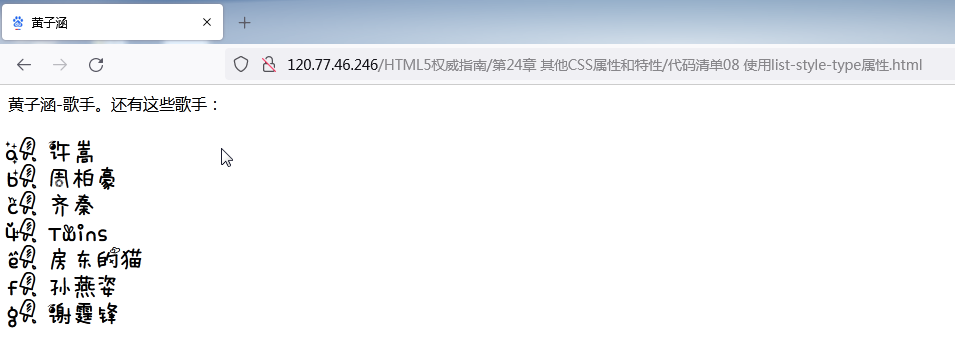
上表只是展示了一部分可用的样式。除了这里列岀的,列表标记还有很多样式,比如不同的字母字符、不同的符号样式,以及数字约定。www.w3.org/TR/css3-lists 列出了完整的列表样式。代码清单8展示了
list-style-type属性的用法。
代码清单8 使用list-style-type属性
<!DOCTYPE HTML>

<html>

    <head>

        <title>黄子涵</title>

        <meta name="作者" content="黄子涵"/>

        <meta name="描述" content="黄子涵是帅哥!"/>

        <meta http-equiv="Content-Type" content="text/html; charset=utf-8" />

        <link rel="shortcut icon" href="favicon.ico" type="image/x-icon"/>

        <style>

            @font-face {

                font-style: normal;

                font-weight: normal;

                font-family: '水果冰淇淋';

                src: url('http://120.77.46.246/HTML5权威指南/第22章 设置文本样式/水果冰淇淋.woff');

            }

            ol {

                list-style-type: lower-alpha;

                font-family: '水果冰淇淋';

                font-size: x-large;

            }

        </style>

    </head>

    <body>

        黄子涵-歌手。

        还有这些歌手:

        <ol>

            <li>许嵩</li>

            <li>周柏豪</li>

            <li>齐秦</li>

            <li style="list-style-type: decimal">Twins</li>

            <li>房东的猫</li>

            <li>孙燕姿</li>

            <li>谢霆锋</li>

        </ol>

    </body>
可以将这个属性应用到整个列表或者单独的列表项。这个例子中两种方法我都用上了(不过,最终的结果可能让读者有点迷糊),效果请见下图。
使用图像作为列表标记
list-style-image属性可以将图像用做列表标记。代码清单9展示了这个属性的用法。
代码清单9 使用图像作为列表标记
<!DOCTYPE HTML>

<html>

    <head>

        <title>黄子涵</title>

        <meta name="作者" content="黄子涵"/>

        <meta name="描述" content="黄子涵是帅哥!"/>

        <meta http-equiv="Content-Type" content="text/html; charset=utf-8" />

        <link rel="shortcut icon" href="favicon.ico" type="image/x-icon"/>

        <style>

            @font-face {

                font-style: normal;

                font-weight: normal;

                font-family: '水果冰淇淋';

                src: url('http://120.77.46.246/HTML5权威指南/第22章 设置文本样式/水果冰淇淋.woff');

            }

            ol {

                font-family: '水果冰淇淋';

                font-size: x-large;

                list-style-image: url('http://120.77.46.246/HTML5权威指南/第24章 其他CSS属性和特性/huangzihan1.jpeg');

            }

        </style>

    </head>

    <body>

        黄子涵-歌手。

        还有这些歌手:

        <ol>

            <li>许嵩</li>

            <li>周柏豪</li>

            <li>齐秦</li>

            <li>Twins</li>

            <li>房东的猫</li>

            <li>孙燕姿</li>

            <li>谢霆锋</li>

        </ol>

    </body>
应用这个属性后的效果如下图所示。

设置列表标记的位置
可以使用
list-style-position属性指定标记相对于li元素内容框的位置。这个属性有两个值:inside和outside,前者定义标记位于内容框内部,后者定义标记位于内容框外部。代码清单10展示了list-style-position属性和它的值的用法。
代码清单10 指定标记的位置
<!DOCTYPE HTML>

<html>

    <head>

        <title>黄子涵</title>

        <meta name="作者" content="黄子涵"/>

        <meta name="描述" content="黄子涵是帅哥!"/>

        <meta http-equiv="Content-Type" content="text/html; charset=utf-8" />

        <link rel="shortcut icon" href="favicon.ico" type="image/x-icon"/>

        <style>

            @font-face {

                font-style: normal;

                font-weight: normal;

                font-family: '水果冰淇淋';

                src: url('http://120.77.46.246/HTML5权威指南/第22章 设置文本样式/水果冰淇淋.woff');

            }

            ul {

                font-family: '水果冰淇淋';

                font-size: x-large;

                list-style-image: url('http://120.77.46.246/HTML5权威指南/第24章 其他CSS属性和特性/huangzihan1.jpeg');

            }

            li.inside {

                list-style-position: inside;

            }

            li.outside {

                list-style-position: outside;

            }

            li {

                background-color: lightgray;

            }

        </style>

    </head>

    <body>

        黄子涵-歌手。

        还有这些歌手:

        <ul>

            这里是inside:

            <li class="inside">许嵩</li>

            <li class="inside">周柏豪</li>

            <li class="inside">齐秦</li>

            <li class="inside">Twins</li>

            这里是outside:

            <li class="outside">房东的猫</li>

            <li class="outside">孙燕姿</li>

            <li class="outside">谢霆锋</li>

            <li class="outside">陈奕迅</li>

        </ul>

    </body>
我将li的项分成了两类,分别为它们的
list-style-position属性应用了不同的值,效果如下图所示。
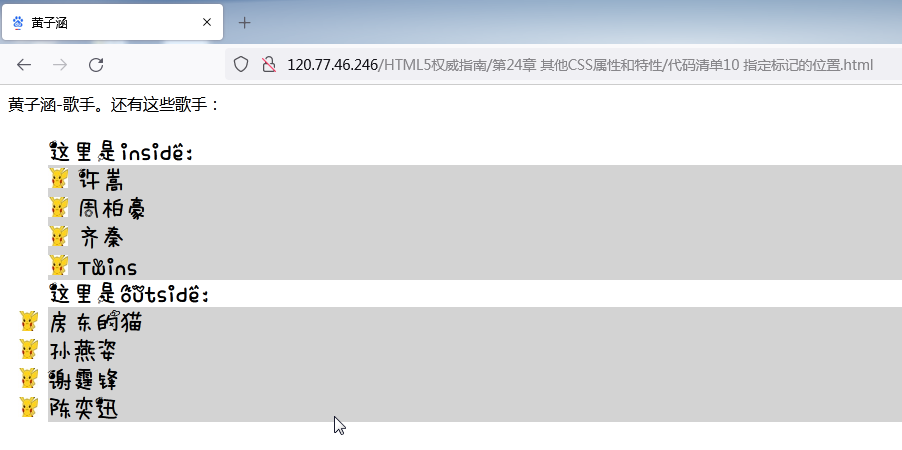
在上图中,我为所有的H元素设置了
background-color属性,这样方便大家看清楚list-style-position属性不同值的效果。
设置光标样式
cursor属性用来改变光标的外形。下表总结了该属性的值。
cursor属性的值
| 属性 | 说 明 | 值 |
|---|---|---|
| cursor | 设置光标的样式 | auto、crosshair、default、help、move、pointer、progress、text、wait、n-resize、s-resize、e-resize、w-resize、ne-resize、nw-resize、se-resize、sw-resize |
当鼠标划过被设置样式的元素时,cursor属性的不同取值告诉浏览器显示不同的光标形状。cursor属性的用法如代码清单11所示。
代码清单11 使用cursor属性
<!DOCTYPE HTML>

<html>

    <head>

        <title>黄子涵</title>

        <meta name="作者" content="黄子涵"/>

        <meta name="描述" content="黄子涵是帅哥!"/>

        <meta http-equiv="Content-Type" content="text/html; charset=utf-8" />

        <link rel="shortcut icon" href="favicon.ico" type="image/x-icon"/>

        <style>

            @font-face {

                font-style: normal;

                font-weight: normal;

                font-family: '水果冰淇淋';

                src: url('http://120.77.46.246/HTML5权威指南/第22章 设置文本样式/水果冰淇淋.woff');

            }

            p {

                padding: 5px;

                border: medium double black;

                background-color: lightgray;

                font-family: '水果冰淇淋';

                font-size: x-large;

            }

            #黄子涵 {

                font-size: xx-large;

                border: medium solid white;

                background-color: blue;

                color: rgba(255, 255, 255, 0.7);

                cursor: progress;

                -webkit-animation-duration: 10000ms;

                -webkit-animation-iteration-count: infinite;

                -webkit-animation-direction: alternate;

                -webkit-animation-timing-function: linear;

                -webkit-animation-name: 'ColorSwap';

            }

            ul {

                font-family: '水果冰淇淋';

                font-size: x-large;

                list-style-image: url('http://120.77.46.246/HTML5权威指南/第24章 其他CSS属性和特性/huangzihan1.jpeg');

            }

            li.inside {

                list-style-position: inside;

            }

            li.outside {

                list-style-position: outside;

            }

            li {

                background-color: lightgray;

            }

            @-webkit-keyframes ColorSwap {

                from {

                    background-color: red;

                }

                14% {

                    background-color: orange;

                }

                42% {

                    background-color: yellow;

                }

                56% {

                    background-color: green;

                }

                70% {

                    background-color: cyan;

                }

                84% {

                    background-color: blue;

                }

                to {

                    background-color: purple;

                }

            }

            a:hover {

                -webkit-animation-duration: 10000ms;

                -webkit-animation-iteration-count: infinite;

                -webkit-animation-direction: alternate;

                -webkit-animation-timing-function: linear;

                -webkit-animation-name: 'huangzihan2';

            }

            @-webkit-keyframes huangzihan2 {

                from {

                    color: red;

                }

                14% {

                    color: orange;

                }

                42% {

                    color: yellow;

                }

                56% {

                    color: green;

                }

                70% {

                    color: cyan;

                }

                84% {

                    color: blue;

                }

                to {

                    color: purple;

                }

            }

        </style>

    </head>

    <body>

        黄子涵-歌手。

        还有这些歌手:

        <ul>

            这里是inside:

            <li class="inside">许嵩</li>

            <li class="inside">周柏豪</li>

            <li class="inside">齐秦</li>

            <li class="inside">Twins</li>

            这里是outside:

            <li class="outside">房东的猫</li>

            <li class="outside">孙燕姿</li>

            <li class="outside">谢霆锋</li>

            <li class="outside">陈奕迅</li>

        </ul>

        <p>

            煤气灯不禁影照街里一对蚯蚓,照过以俩心相亲一对小情人

            沉默以拥吻抵抗一切的冰与冷,晚意借北风轻轻的飘起长长裙

            多温馨心里风中那笑声 淌泪,尝尽了失意的我将一切都褪去

            再到这风中心中竟仿似伤痕累累,然后再记忆起当晚跟你在这里

            相依相拥中交出的心早已失去<span id="黄子涵">黄子涵</span>失去已破碎不可以再追洒泪

            煤气灯不禁影照街里一对蚯蚓,照过以俩心相亲一对小情人

            多久了,我都没变,爱你这回事,整整六年

            有一个人能去爱,多珍贵。没关系你也不用给我机会

            反正我还有一生可以浪费

            <a href="https://baike.baidu.com/item/%E8%AE%B8%E9%AD%8F%E6%B4%B2/18762132?fr=aladdin">黄子涵是靓仔</a>

        </p>

    </body>
设置效果如下图所示。当我将鼠标移过span元素时,光标变成了Windows 7的等待光标,为了让你看清楚,我把等待光标放大了。
其他css属性和特性的更多相关文章
- 【CSS】其他CSS属性和特性
1. 设置元素的颜色和透明度 前面有介绍CSS颜色的各种用法,如 background-color属性.boder-color属性等.还有另外两个与颜色有关的属性. 1.1 设置前景色 color属性 ...
- CSS中浏览器开发商特定的CSS属性
浏览器制造商(像Microsoft.Mozilla等,还有WebKit的后台人员等)通常会为他们的浏览器增加新的功能来测试新的特性, 或者实现一直在考虑但还没有得到标准组织批准的CSS扩展.在这些情况 ...
- CSS属性之float学习心得
全文参考:http://www.linzenews.com/program/net/2331.html 我们来看看CSS重要属性--float. 以下内容分为如下小节: 1:float属性 2:flo ...
- IE7浏览器下CSS属性选择器二三事
一.为何专门说起IE7 以前,或者说数年前,我们从事桌面端网页开发的时候,基本上都还要兼顾IE6浏览器, 即使有些特性,IE7支持,我们也会忽略之.于是,我们会不自然地把IE6和IE7浏览器归为一路货 ...
- css属性之@media
Base Browsers: IE6.0+, Firefox2.0+, Chrome4.0+, Safari6.0+, Opera15.0+ <expression>:指定媒体查询使用的媒 ...
- web前端(9)—— CSS属性
属性 终于到css属性,前面就零零散散的用了什么color,font-size之类,本篇博文就专项的介绍它了 字体属性 font-family 此属性是设置字体样式的,比如微软雅黑,方正书体,华文宋体 ...
- {前端CSS} 语法 Css的几种引入方式 css选择器 选择器的优先级 CSS属性相关 背景属性 边框 CSS盒子模型 清除浮动 overflow溢出属性 定位(position)z-index
前端CSS CSS介绍 CSS(Cascading Style Sheet,层叠样式表)定义如何显示HTML元素,给HTML设置样式,让它更加美观. 当浏览器读到一个样式表,它就会按照这个样式表来对文 ...
- CSS的未来:一些试验性CSS属性
尽管现代浏览器已经支持了众多的CSS3属性,但是大部分设计师和开发人员貌似依然在关注于一些很“主流”的属性,如border-radius.box-shadow或者transform等.它们有良好的文档 ...
- css css3新特性
css css3新特性 一.css3是什么? 我不喜欢把已有的概念从一个地方抄到另一个地方,还是喜欢如下方式. 参考百度百科: http://baike.baidu.com/link?url=z2V ...
随机推荐
- springboot中redis取缓存类型转换异常
异常如下: [dispatcherServlet] in context with path [] threw exception [Request processing failed; nested ...
- Robot framework随机文件
*** Variables *** @{Example} One Two Three *** Test Cases *** Example ${value}= Evaluate random.choi ...
- IO流学习笔记(二)之BufferedWriter与BufferedReader及实例Demo
在之前的学习笔记(http://blog.csdn.net/megustas_jjc/article/details/72853059)中,FileWriter与FileReader的Demo使用的中 ...
- 二、安装部署指定的docker版本
1.部署指定的docker版本 1.移除源有版本的docker [root@localhost ~]# yum remove docker docker-common docker-selinux d ...
- 用XPath定位Web页面元素时,如何快速验证XPath语句是否正确?
在使用Selenium做Web UI自动化测试的过程中,XPath是一种定位页面元素的常用方式.然而,面对某些元素的XPath路径过于复杂,我们想快速验证拼凑的Xpath语句是否正确时,该怎么办呢?这 ...
- 20210715 noip16
考场 乍一看 T1 像是二分答案,手玩样例发现可以 \(O(k^2)\) 枚举点对,贪心地更新答案,完了?有点不信,先跳了 T2 的形式有点像逆序对,但没啥想法 T3 的式子完全不知道如何处理,一看就 ...
- Qt 程序发布以及打包成exe安装包
一.简述 Qt 项目开发完成之后,需要打包发布程序,而因为用户电脑上没有 Qt 配置环境,所以需要将 release 生成的 exe 文件和所依赖的 dll 文件复制到一个文件夹中,然后再用 Inno ...
- SVN无法查看最近日志和提交记录
现象: 使用SVN查看最近的提交记录日志时,最近总是无法显示出全部的日志内容,只能显示到几天之前的日志.就算是自己刚提交的代码也是无法没有记录的. 解决方式:右键选择TortoiseSVN中的&quo ...
- squid缓存代理
目录: 一.Squid 代理服务器 二.Squid 代理安装 三.搭建传统代理 四.搭建透明代理 五.ACL访问控制 六.Squid日志分析 七.反向代理 一.Squid 代理服务器Squid 主要提 ...
- Docker修改容器中的时间
Docker修改容器中的时间 前言 在公司开发时使用 Docker 创建数据库(SQL Server)的实例十分方便,还原数据库也只要设置好共享文件夹,在 SQL Server Management ...