CentOS 6.5本地yum源、局域网离线yum仓库(断网情况下轻松安装各种依赖包)
在工作中, 公司的服务器大部分都禁止连接外网的,初始化系统,测试某些产品时,往往缺一些软件或依赖包,一个个上传到机器,如此浪费时间,浪费金钱,en...yum能够自动查找并解决rpm包之间的依赖关系,需要有一个包含各种rpm软件包的repository(软件仓库),提供软件仓库的服务器习惯上成为“源”服务器,网络上有大量的源服务器,但是,由于受到网络连接速度、带宽的限制,导致软件安装耗时过长甚至失败,特别是当有大量服务器大量软件包需要升级时,更新的缓慢程序令人难以忍受,相比较而言,本地YUM源服务器最大优点在局域网的快速网络连接和稳定性,有了局域网中的yum源服务器,即便在网络连接中断的情况下,也不会影响软件升级和安装。
一、挂载本地ISO镜像方式:
1、下载yum源的DVD镜像,镜像名如下:
CentOS-6.5-x86_64-bin-DVD1
2、将其宿主机的镜像挂载到linux中去:
- 因iso文件是宿在主机上,所有,通过vmware的文件共享,将宿主机上的iso文件挂载到/mnt/hgfs/目录下
- VM--Settings--选项--共享文件夹--勾选“总是启用”点击“添加”选取本地iso文件的目录,添加后如下:

3、安装VMware Tools

[root@Web-A ~]# ll /media/VMware/Tools/

总用量

-rw-r--r--  root root  8月    : VMwareTools-9.9.-.tar.gz

[root@Web-A ~]# cd  /media/VMware/Tools/

[root@Web-A Tools]# tar xf VMwareTools-9.9.4-3193940.tar.gz

[root@Web-A Tools]# ll

总用量

-rw-r--r--  root root  8月    : VMwareTools-9.9.-.tar.gz

drwxr-xr-x  root root      10月   vmware-tools-distrib

[root@Web-A Tools]# cd vmware-tools-distrib/

[root@Web-A vmware-tools-distrib]# ls

bin  doc  etc  FILES  INSTALL  installer  lib  vmware-install.pl

[root@Web-A vmware-tools-distrib]# ./vmware-install.pl                       #安装VMware,一路回车+yes

Creating a new VMware Tools installer database using the tar4 format.

Installing VMware Tools.

In which directory do you want to install the binary files?

[/usr/bin]

What is the directory that contains the init directories (rc0.d/ to rc6.d/)?

[/etc/rc.d]

What is the directory that contains the init scripts?

[/etc/rc.d/init.d]

In which directory do you want to install the daemon files?

[/usr/sbin]

In which directory do you want to install the library files?

[/usr/lib/vmware-tools]

The path "/usr/lib/vmware-tools" does not exist currently. This program is

going to create it, including needed parent directories. Is this what you want?

[yes] yes

......此处省略

To enable advanced X features (e.g., guest resolution fit, drag and drop, and

file and text copy/paste), you will need to do one (or more) of the following:

. Manually start /usr/bin/vmware-user

. Log out and log back into your desktop session; and,

. Restart your X session.

Enjoy,  #出现这个表示安装成功。

--the VMware team
4、接下来我们在//mnt/hgfs下看是否有共享的文件:
[root@Web-A vmware-tools-distrib]# ll /mnt/hgfs/

总用量

drwxrwxrwx  root root  8月    : ISO

[root@Web-A vmware-tools-distrib]# cd /mnt/hgfs/ISO/

[root@Web-A ISO]# ll

总用量

-rwxrwxrwx  root root  3月   : CentOS-6.5-x86_64-bin-DVD1.iso

-rwxrwxrwx  root root  6月   : CentOS-7.0--x86_64-DVD.iso
5、将该镜像挂载到 /media/Centos/
[root@Web-A ISO]# mount -o loop /mnt/hgfs/ISO/CentOS-6.5-x86_64-bin-DVD1.iso /media/Centos/

[root@Web-A ISO]# ll /media/Centos/

总用量

-r--r--r--  root root      11月   CentOS_BuildTag

dr-xr-xr-x  root root    11月   EFI

-r--r--r--  root root     11月   EULA

-r--r--r--  root root   11月   GPL

dr-xr-xr-x  root root    11月   images

dr-xr-xr-x  root root    11月   isolinux

dr-xr-xr-x  root root  11月   Packages    #rpm包

-r--r--r--  root root    11月   RELEASE-NOTES-en-US.html

dr-xr-xr-x  root root    11月   repodata

-r--r--r--  root root    11月   RPM-GPG-KEY-CentOS-

-r--r--r--  root root    11月   RPM-GPG-KEY-CentOS-Debug-

-r--r--r--  root root    11月   RPM-GPG-KEY-CentOS-Security-

-r--r--r--  root root    11月   RPM-GPG-KEY-CentOS-Testing-

-r--r--r--  root root    11月   TRANS.TBL
注:这样挂载下次关机就失效了了,将所有rpm文件拷贝到一个文件夹中,cp -rv /media/共享的文件或光盘/Packs/* /新建的文件夹
通过rpm命令手动安装createrepo命令创建yum仓库rpm -ivh createrepo
运行命令:createrepo -v /rpm-directory,如果有分组信息,则在运行命令的时候使用-g参数置顶分组文件。
安装createrepo软件包:
[root@Web-A Packages]# rpm -ivh createrepo-0.9.-.el6.noarch.rpm

error: Failed dependencies:

    python-deltarpm is needed by createrepo-0.9.-.el6.noarch

[root@Web-A Packages]# rpm -ivh python-deltarpm-3.5-0.5.20090913git.el6.x86_64.rpm

error: Failed dependencies:

    deltarpm = 3.5-0.5.20090913git.el6 is needed by python-deltarpm-3.5-0.5.20090913git.el6.x86_64

[root@Web-A Packages]#  rpm -ivh deltarpm-3.5-0.5.20090913git.el6.x86_64.rpm

Preparing...                ########################################### [%]

   :deltarpm               ########################################### [%]

[root@Web-A Packages]# rpm -ivh python-deltarpm-3.5-0.5.20090913git.el6.x86_64.rpm

Preparing...                ########################################### [%]

   :python-deltarpm        ########################################### [%]

[root@Web-A Packages]# rpm -ivh createrepo-0.9.-.el6.noarch.rpm

Preparing...                ########################################### [%]

   :createrepo             ########################################### [%]
[root@Web-A Packages]# createrepo ./
Spawning worker 0 with 4023 pkgs
Workers Finished
Gathering worker results
Saving Primary metadata
Saving file lists metadata
Saving other metadata
Generating sqlite DBs
Sqlite DBs complete
6、编辑本地yum配置文件:
yum默认使用网络/etc/yum.repos.d/CentOS-Base.repo配置文件,所有需要将其三个文件配置文件失效,将本地yum源文件启用,配置如下:
备份:
[root@Web-A ISO]# ll /etc/yum.repos.d/

总用量 1

-rw-r--r--.  root root   6月    CentOS-Base.repo-rw-r--r--.  root root    11月   CentOS-Debuginfo.repo

-rw-r--r--.  root root    11月   CentOS-Media.repo

-rw-r--r--.  root root   11月   CentOS-Vault.repo

[root@Web-A ISO]# mv /etc/yum.repos.d/CentOS-Base.repo /etc/yum.repos.d/CentOS-Base.repo.BAK

[root@Web-A ISO]# mv /etc/yum.repos.d/CentOS-Debuginfo.repo /etc/yum.repos.d/CentOS-Debuginfo.repo.BAK

[root@Web-A ISO]# mv /etc/yum.repos.d/CentOS-Vault.repo /etc/yum.repos.d/CentOS-Vault.repo.BAK

[root@Web-A ISO]# ll /etc/yum.repos.d/

总用量 1-rw-r--r--.  root root   6月    CentOS-Base.repo.BAK

-rw-r--r--.  root root    11月   CentOS-Debuginfo.repo.BAK

-rw-r--r--.  root root    11月   CentOS-Media.repo

-rw-r--r--.  root root   11月   CentOS-Vault.repo.BAK
配置本地yum源:
[root@Web-A ISO]# vim /etc/yum.repos.d/CentOS-Media.repo

# CentOS-Media.repo

#

#  This repo can be used with mounted DVD media, verify the mount point for

#  CentOS-.  You can use this repo and yum to install items directly off the

#  DVD ISO that we release.

#

# To use this repo, put in your DVD and use it with the other repos too:

#  yum --enablerepo=c6-media [command]

#

# or for ONLY the media repo, do this:

#

#  yum --disablerepo=\* --enablerepo=c6-media [command]

[c6-media]                         #仓库名(不要用特殊符号)

name=CentOS-$releasever - Media    #仓库描述

baseurl=file:///media/Centos/      #指定仓库的路径

#        file:///media/cdrom/      #/mnt/cdrom(即为光盘挂载点)

#        file:///media/cdrecorder/

gpgcheck=1                          #启用仓库,1代表启用,0代表关闭

enabled=1                           #不要检验软件包的数字前面

gpgkey=file:///etc/pki/rpm-gpg/RPM-GPG-KEY-CentOS-6

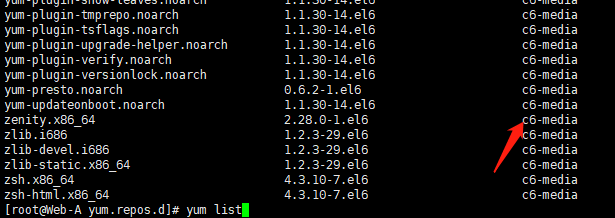
7、再使用yum list 来查询时,有如下信息表示yum源制作成功,可以看到包的yum源文件名字都变成了c6-media,再按照感受一下速度。
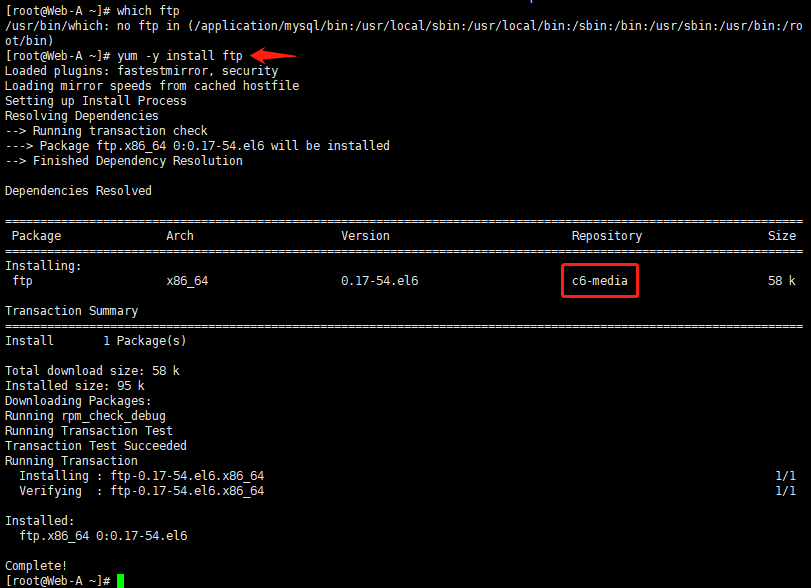
8、测试安装软件ftp
二、自定义局域网离线yum仓库
1、创建yum仓库目录
[root@fenfa /]# mkdir -p /app/yum/centos6./x86_64
2、安装createrepo、Downloadonly工具
[root@fenfa Packages]# rpm -ivh createrepo-0.9.-.el6.noarch.rpm

error: Failed dependencies:

    python-deltarpm is needed by createrepo-0.9.-.el6.noarch

[root@fenfa Packages]# rpm -ivh python-deltarpm-3.5-0.5.20090913git.el6.x86_64.rpm

error: Failed dependencies:

    deltarpm = 3.5-0.5.20090913git.el6 is needed by python-deltarpm-3.5-0.5.20090913git.el6.x86_64

[root@fenfa Packages]#  rpm -ivh deltarpm-3.5-0.5.20090913git.el6.x86_64.rpm

Preparing...                ########################################### [%]

   :deltarpm               ########################################### [%]

[root@fenfa Packages]# rpm -ivh python-deltarpm-3.5-0.5.20090913git.el6.x86_64.rpm

Preparing...                ########################################### [%]

   :python-deltarpm        ########################################### [%]

[root@fenfa Packages]# rpm -ivh createrepo-0.9.-.el6.noarch.rpm

Preparing...                ########################################### [%]

   :createrepo             ########################################### [%]

[root@fenfa Packages]# yum install yum-plugin-downloadonly -y
3、初始化repodata索引文件
[root@fenfa /]# createrepo -pdo /app/yum/centos6./x86_64 /app/yum/centos6./x86_64

Saving Primary metadata

Saving file lists metadata

Saving other metadata

Generating sqlite DBs

Sqlite DBs complete
4、提供yum服务,下载新的rpm包
[root@fenfa /]# cd /app/yum/centos6./x86_64

[root@fenfa x86_64]# python -m SimpleHTTPServer  &>/dev/null & # 可以用Apache或nginx提供web服务,但用Python的http模块更简单,适用于内网环境

[]

[root@fenfa x86_64]# yum install --downloadonly --downloaddir=/app/yum/centos6.6/x86_64  pcre pcre-devel make zlib zlib-devel gcc-c++ libtool install openssl openssl-devel #只下载软件不安装

[root@fenfa x86_64]# ll

总用量 32784

-rw-r--r--. 1 root root  3929020 8月  14 23:02 cpp-4.4.7-23.el6.x86_64.rpm

-rw-r--r--. 1 root root   567508 8月  14 23:02 e2fsprogs-1.41.12-24.el6.x86_64.rpm

-rw-r--r--. 1 root root   124360 8月  14 23:02 e2fsprogs-libs-1.41.12-24.el6.x86_64.rpm

-rw-r--r--. 1 root root 10603660 8月  14 23:02 gcc-4.4.7-23.el6.x86_64.rpm

-rw-r--r--. 1 root root  4971176 8月  14 23:02 gcc-c++-4.4.7-23.el6.x86_64.rpm

-rw-r--r--. 1 root root  4960920 8月  14 23:02 gcc-gfortran-4.4.7-23.el6.x86_64.rpm

-rw-r--r--. 1 root root    20684 8月  14 23:02 keyutils-libs-1.4-5.el6.x86_64.rpm

-rw-r--r--. 1 root root    29456 8月  14 23:02 keyutils-libs-devel-1.4-5.el6.x86_64.rpm

-rw-r--r--. 1 root root   516132 8月  14 23:02 krb5-devel-1.10.3-65.el6.x86_64.rpm

-rw-r--r--. 1 root root   691188 8月  14 23:02 krb5-libs-1.10.3-65.el6.x86_64.rpm

-rw-r--r--. 1 root root    38712 8月  14 23:02 libcom_err-1.41.12-24.el6.x86_64.rpm

-rw-r--r--. 1 root root    33852 8月  14 23:02 libcom_err-devel-1.41.12-24.el6.x86_64.rpm

-rw-r--r--. 1 root root   117980 8月  14 23:02 libgcc-4.4.7-23.el6.i686.rpm

-rw-r--r--. 1 root root   106320 8月  14 23:02 libgcc-4.4.7-23.el6.x86_64.rpm

-rw-r--r--. 1 root root   274880 8月  14 23:02 libgfortran-4.4.7-23.el6.x86_64.rpm

-rw-r--r--. 1 root root   138008 8月  14 23:02 libgomp-4.4.7-23.el6.x86_64.rpm

-rw-r--r--. 1 root root   146500 8月  14 23:02 libkadm5-1.10.3-65.el6.x86_64.rpm

-rw-r--r--. 1 root root   111508 8月  14 23:02 libselinux-2.0.94-7.el6.x86_64.rpm

-rw-r--r--. 1 root root   140160 8月  14 23:02 libselinux-devel-2.0.94-7.el6.x86_64.rpm

-rw-r--r--. 1 root root    84072 8月  14 23:02 libselinux-utils-2.0.94-7.el6.x86_64.rpm

-rw-r--r--. 1 root root    65484 8月  14 23:02 libsepol-devel-2.0.41-4.el6.x86_64.rpm

-rw-r--r--. 1 root root    43092 8月  14 23:02 libss-1.41.12-24.el6.x86_64.rpm

-rw-r--r--. 1 root root   303024 8月  14 23:02 libstdc++-4.4.7-23.el6.x86_64.rpm

-rw-r--r--. 1 root root  1677328 8月  14 23:02 libstdc++-devel-4.4.7-23.el6.x86_64.rpm

-rw-r--r--. 1 root root   398552 8月  14 23:02 make-3.81-23.el6.x86_64.rpm

-rw-r--r--. 1 root root  1600772 8月  14 23:02 openssl-1.0.1e-57.el6.x86_64.rpm

-rw-r--r--. 1 root root  1227684 8月  14 23:02 openssl-devel-1.0.1e-57.el6.x86_64.rpm

-rw-r--r--. 1 root root   200564 8月  14 23:02 pcre-7.8-7.el6.x86_64.rpm

-rw-r--r--. 1 root root   327960 8月  14 23:02 pcre-devel-7.8-7.el6.x86_64.rpm

-rw-r--r--. 1 root root    44984 8月  14 23:02 zlib-devel-1.2.3-29.el6.x86_64.rpm

[root@fenfa x86_64]# createrepo --update /app/yum/centos6.6/x86_64/  #每加入一个rpm包就要更新一下

Spawning worker 0 with 78 pkgs

Workers Finished

Gathering worker results

Saving Primary metadata

Saving file lists metadata

Saving other metadata

Generating sqlite DBs

Sqlite DBs complete
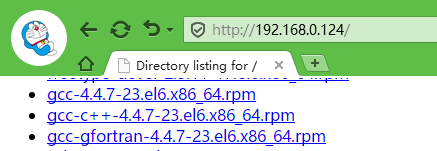
5、可以通过浏览器输入本机IP查看
6、client端配置如下:
[root@web1 ~]# cat /etc/yum.repos.d/CentOS-Media.repo

[bqh]

name=server

baseurl=http://192.168.0.124

enable=

gpgcheck=

[root@web1 ~]# yum clean all

Loaded plugins: fastestmirror, security

Cleaning repos: bqh

Cleaning up Everything

Cleaning up list of fastest mirrors

[root@web1 ~]# yum makecache

Loaded plugins: fastestmirror, security

Determining fastest mirrors

bqh                                                                                                        | 2.9 kB     :

bqh/filelists_db                                                                                           |   kB     :

bqh/primary_db                                                                                             |   kB     :

bqh/other_db                                                                                               |   kB     :

Metadata Cache Created

[root@web1 ~]# yum repolist

Loaded plugins: fastestmirror, security

Loading mirror speeds from cached hostfile

repo id                                                       repo name                                                     status

bqh                                                           server

repolist: 30
7、下面我们安装nginx服务
[root@web1 nginx-1.6.]# yum -y install make zlib zlib-devel gcc-c++ libtool  openssl openssl-devel

Loaded plugins: fastestmirror, security

Loading mirror speeds from cached hostfile

Setting up Install Process

Resolving Dependencies

--> Running transaction check

---> Package gcc-c++.x86_64 :4.4.-.el6 will be updated

---> Package gcc-c++.x86_64 :4.4.-.el6 will be an update

--> Processing Dependency: libstdc++-devel = 4.4.-.el6 for package: gcc-c++-4.4.-.el6.x86_64

--> Processing Dependency: libstdc++ = 4.4.-.el6 for package: gcc-c++-4.4.-.el6.x86_64

--> Processing Dependency: gcc = 4.4.-.el6 for package: gcc-c++-4.4.-.el6.x86_64

---> Package make.x86_64 :3.81-.el6 will be updated

...此处省略

[root@web1 nginx-1.6.]# rpm -qa make zlib zlib-devel gcc-c++ libtool  openssl openssl-devel pcre pcre-devel

gcc-c++-4.4.-.el6.x86_64

pcre-devel-7.8-.el6.x86_64

make-3.81-.el6.x86_64

zlib-devel-1.2.-.el6.x86_64

zlib-1.2.-.el6.x86_64

openssl-1.0.1e-.el6.x86_64

openssl-devel-1.0.1e-.el6.x86_64

pcre-7.8-.el6.x86_64

libtool-2.2.-15.5.el6.x86_64

[root@web1 nginx-1.6.]# ./configure --prefix=/application/nginx-1.6. --user=nginx --group=nginx --with-http_ssl_module --with-ht

tp_stub_status_modulechecking for OS

 + Linux 2.6.-.el6.x86_64 x86_64

checking for C compiler ... found

 + using GNU C compiler

 + gcc version: 4.4.  (Red Hat 4.4.-) (GCC)

checking for gcc -pipe switch ... found

checking for gcc builtin atomic operations ... found

checking for C99 variadic macros ... found

checking for gcc variadic macros ... found

checking for unistd.h ... found

checking for inttypes.h ... found

checking for limits.h ... found

checking for sys/filio.h ... not found

checking for sys/param.h ... found

checking for sys/mount.h ... found

checking for sys/statvfs.h ... found

checking for crypt.h ... found

此处省略......

Configuration summary

  + using system PCRE library

  + using system OpenSSL library

  + md5: using OpenSSL library

  + sha1: using OpenSSL library

  + using system zlib library

  nginx path prefix: "/application/nginx-1.6.3"

  nginx binary file: "/application/nginx-1.6.3/sbin/nginx"

  nginx configuration prefix: "/application/nginx-1.6.3/conf"

  nginx configuration file: "/application/nginx-1.6.3/conf/nginx.conf"

  nginx pid file: "/application/nginx-1.6.3/logs/nginx.pid"

  nginx error log file: "/application/nginx-1.6.3/logs/error.log"

  nginx http access log file: "/application/nginx-1.6.3/logs/access.log"

  nginx http client request body temporary files: "client_body_temp"

  nginx http proxy temporary files: "proxy_temp"

  nginx http fastcgi temporary files: "fastcgi_temp"

  nginx http uwsgi temporary files: "uwsgi_temp"

  nginx http scgi temporary files: "scgi_temp"

[root@web1 nginx-1.6.]# make && make install

make -f objs/Makefile

make[]: Entering directory `/server/tools/nginx-1.6.'

cc -c -pipe  -O -W -Wall -Wpointer-arith -Wno-unused-parameter -Werror -g  -I src/core -I src/event -I src/event/modules -I src/os

/unix -I objs \        -o objs/src/core/nginx.o \

        src/core/nginx.c

cc -c -pipe  -O -W -Wall -Wpointer-arith -Wno-unused-parameter -Werror -g  -I src/core -I src/event -I src/event/modules -I src/os

/unix -I objs \        -o objs/src/core/ngx_log.o \

        src/core/ngx_log.c

此处省略......

test -d '/application/nginx-1.6.3/logs'         || mkdir -p '/application/nginx-1.6.3/logs'

test -d '/application/nginx-1.6.3/logs' ||         mkdir -p '/application/nginx-1.6.3/logs'

test -d '/application/nginx-1.6.3/html'         || cp -R html '/application/nginx-1.6.3'

test -d '/application/nginx-1.6.3/logs' ||         mkdir -p '/application/nginx-1.6.3/logs'

make[]: Leaving directory `/server/tools/nginx-1.6.'

[root@web1 nginx-1.6.]# echo $?

[root@web1 nginx-1.6.]# lsof -i:

[root@web1 nginx-1.6.]# /application/nginx-1.6./sbin/nginx -t

nginx: the configuration file /application/nginx-1.6./conf/nginx.conf syntax is ok

nginx: configuration file /application/nginx-1.6./conf/nginx.conf test is successful

[root@web1 nginx-1.6.]# /application/nginx-1.6./sbin/nginx

[root@web1 nginx-1.6.]# lsof -i:

COMMAND  PID  USER   FD   TYPE DEVICE SIZE/OFF NODE NAME

nginx     root    6u  IPv4        0t0  TCP *:http (LISTEN)

nginx    nginx    6u  IPv4        0t0  TCP *:http (LISTEN)

[root@web1 nginx-1.6.]# curl 127.0.0.1

<!DOCTYPE html>

<html>

<head>

<title>Welcome to nginx!</title>

<style>

    body {

        width: 35em;

        margin:  auto;

        font-family: Tahoma, Verdana, Arial, sans-serif;

    }

</style>

</head>

<body>

<h1>Welcome to nginx!</h1>

<p>If you see this page, the nginx web server is successfully installed and

working. Further configuration is required.</p>

<p>For online documentation and support please refer to

<a href="http://nginx.org/">nginx.org</a>.<br/>

Commercial support is available at

<a href="http://nginx.com/">nginx.com</a>.</p>

<p><em>Thank you for using nginx.</em></p>

</body>

</html>
ok本地yum源、局域网离线yum仓库制作到此为止,安装你的软件包,如果需要依赖,系统会自动到yum源中寻找相关依赖包自行安装。非常方便,当然还有其它方法实现的。
CentOS 6.5本地yum源、局域网离线yum仓库(断网情况下轻松安装各种依赖包)的更多相关文章
- Python离线断网情况下安装numpy、pandas和matplotlib等常用第三方包
联网情况下在命令终端CMD中输入“pip install numpy”即可自动安装,pandas和matplotlib同理一样方法进行自动安装. 工作的电脑不能上外网,所以不能通过直接输入pip命令来 ...
- CentOS配置本地yum源/阿里云yum源/163yuan源,并配置yum源的优先级
一.用Centos镜像搭建本地yum源 由于安装centos后的默认yum源为centos的官方地址,所以在国内使用很慢甚至无法访问,所以一般的做法都是把默认的yum源替换成aliyun的yum源或者 ...
- centos yum源配置 与yum配置文件
参考博客 http://www.cnblogs.com/mchina/archive/2013/01/04/2842275.html 1.centos . yum配置文件在目录 /etc/yum.re ...
- 修改CentOS默认yum源为国内yum镜像源
CentOS默认的yum源不是国内的yum源,在通过yum安装一些软件的时候,会出现这样那样的错误,以及在下载安装的速度上也是非常慢的. 所以这个时候就需要将yum源替换成国内的yum源,国内主要开源 ...
- CentOS修改默认yum源为国内yum镜像源
修改CentOS默认yum源为mirrors.163.com 1.首先备份系统自带yum源配置文件/etc/yum.repos.d/CentOS-Base.repomv /etc/yum.repos. ...
- 基于VSFTP的本地YUM源及光盘YUM源搭建
基于VSFTP的本地YUM源及光盘YUM源搭建 一.yum环境的本地源搭建(基于VSFTP): 1)安装vsftp; *********************************** ...
- Linux下更换默认yum源为网易yum源的操作记录
废话不多说,下面记录了centos下更换系统默认yum源为网易yum源的操作过程:1)备份原有的默认yum源[root@bastion-IDC ~]# cp /etc/yum.repos.d/Cent ...
- 阿里yum源与华为yum源的配置
如何使用华为云提供的CentOS镜像源(x86_64)? 更新时间: 2019/08/16 11:17 查看PDF 分享 微博 分享文档到微博 微信 扫码分享文档 ...
- keeplived离线安装openssl-devel依赖包
转载自素文宅博客:https://blog.yoodb.com/yoodb/article/detail/1434 由于公司业务并发比较高需要高可用使用LVS keeplived.在linux系统ce ...
随机推荐
- /etc/bashrc
[ "$PS1" = "\\s-\\v\\\$ " ] && PS1="[\[\e[34;1m\]\u@\[\e[0m\]\[\e[3 ...
- c++ stl bind函数介绍
/* stl::bind 使用 */ #include <iostream> #include <string> #include <functional> /* ...
- 001-mac搭建Python开发环境、Anaconda、zsh兼容
一.概述 mac下搭建python环境推荐使用Anaconda+Pycharm. 1.1.Anaconda Anaconda是一个免费开源的Python和R语言的发行版本,用于计算科学(数据科学.机器 ...
- Qt开发经验小技巧11-20
获取类的属性 const QMetaObject *metaobject = object->metaObject(); int count = metaobject->propertyC ...
- Nginx - 代理后端通过域名访问
目录- 前言- Nginx 根据域名反向代理- Nginx proxy_pass 关于 '/' 的作用 1. 前言 接到一个需求,通过nginx 代理互联网上某一个页面,刚开始的时候觉得很简单的,直接 ...
- ubuntu samba 服务器搭建
最近总是在搭建 samba 环境,写在笔记上记录下以备后用,长时间不操作了肯定会忘记. Linux 版本:Ubuntu 18.04 具体的操作命令: 1. 安装: sudo apt-get insta ...
- python实践项目五:操作剪贴板-pyperclip模块
描述:读取剪贴板的内容,修改该内容,再将修改后的内容重新写进剪贴板 注意:执行程序代码前需保证剪贴板有内容,可复制以下内容来测试: Lists of animals Lists of aquarium ...
- mysql 控制流函数
MySQL有4个函数是用来进行条件操作的,这些函数可以实现SQL的条件逻辑,允许开发者将一些应用程序业务逻辑转换到数据库后台. MySQL控制流函数: CASE WHEN[test1] THEN [r ...
- windows10 ubuntu子系统运行docker出现的问题
前一篇笔记记录了安装的过程及错误处理办法,但是在正式使用docker时,却又出现新的问题: “docker: Cannot connect to the Docker daemon at unix:/ ...
- GhostScript说明
关于ghostscript(以下简称gs).Gs是一个地下工作者,一般用户不熟悉它,因为它上不和用户直接打交道,下不直接接触打印机.但是在打印工作中它却扮演了极为重要的解色. 一般从用户常见文件如图片 ...