本文使用QT的网络模块来创建一个网络聊天室程序,主要包括以下功能:

1、基于TCP的可靠连接(QTcpServer、QTcpSocket)

2、一个服务器,多个客户端

3、服务器接收到某个客户端的请求以及发送信息,经该信息重定向发给其它客户端

最终实现一个共享聊天内容的聊天室!

开发测试环境:QT5.12.0 + Qt Creator 4.8.0 + MinGW7.3

代码如下:

1、服务器 QtInstantMessagingServer

基于Console的应用程序,因为这里不需要界面。

QT += core network
QT -= gui

 Server.h
1
2
3
4
5
6
7
8
9
10
11
12
13
14
15
16
17
18
19
20
21
22
23
24
25
26
27
28
29
30
31
32
33
 
#ifndef SERVER_H
#define SERVER_H

#include <QObject>
#include <QTcpServer>
#include <QTcpSocket>
#include <QDebug>
#include <QVector>

class Server : public QObject
{
    Q_OBJECT
public:
    explicit Server(QObject *parent = nullptr);

void startServer();
    void sendMessageToClients(QString message);

signals:

public slots:
    void newClientConnection();
    void socketDisconnected();
    void socketReadyRead();
    void socketStateChanged(QAbstractSocket::SocketState state);

private:
    QTcpServer*             chatServer;
    QVector<QTcpSocket*>*   allClients;
};

#endif // SERVER_H

 Server.cpp
1
2
3
4
5
6
7
8
9
10
11
12
13
14
15
16
17
18
19
20
21
22
23
24
25
26
27
28
29
30
31
32
33
34
35
36
37
38
39
40
41
42
43
44
45
46
47
48
49
50
51
52
53
54
55
56
57
58
59
60
61
62
63
64
65
66
67
68
69
70
71
72
73
74
75
76
77
78
79
80
81
82
83
84
85
86
87
88
89
90
91
92
93
94
95
96
97
98
99
100
101
102
103
104
105
106
107
108
109
110
111
112
113
114
115
116
 
#include "Server.h"

Server::Server(QObject *parent) : QObject(parent)
{

}

void Server::startServer()
{
    // store all the connected clients
    allClients = new QVector<QTcpSocket*>;
    // created a QTcpServer object called chatServer
    chatServer = new QTcpServer();
    // limit the maximum pending connections to 10 clients.
);
    // The chatServer will trigger the newConnection() signal whenever a client has connected to the server.
    connect(chatServer, SIGNAL(newConnection()), this, SLOT(newClientConnection()));
    // made it constantly listen to port 8001.
))
    {
        qDebug() << "Server has started. Listening to port 8001.";
    }
    else
    {
        qDebug() << "Server failed to start. Error: " + chatServer->errorString();
    }

}

void Server::sendMessageToClients(QString message)
{
    )
    {
        // we simply loop through the allClients array and pass the message data to all the connected clients.
; i < allClients->size(); i++)
        {
            if (allClients->at(i)->isOpen() && allClients->at(i)->isWritable())
            {
                allClients->at(i)->write(message.toUtf8());
            }
        }
    }

}

void Server::newClientConnection()
{
    // Every new client connected to the server is a QTcpSocket object,
    // which can be obtained from the QTcpServer object by calling nextPendingConnection().
    QTcpSocket* client = chatServer->nextPendingConnection();
    // You can obtain information about the client
    // such as its IP address and port number by calling peerAddress() and peerPort(), respectively.
    QString ipAddress = client->peerAddress().toString();
    int port = client->peerPort();
    // connect the client's disconnected(),readyRead() and stateChanged() signals to its respective slot function.
    // 1、When a client is disconnected from the server, the disconnected() signal will be triggered
    connect(client, &QTcpSocket::disconnected, this, &Server::socketDisconnected);
    // 2、whenever a client is sending in a message to the server, the readyRead() signal will be triggered.
    connect(client, &QTcpSocket::readyRead, this, &Server::socketReadyRead);
    // 3、 connected another signal called stateChanged() to the socketStateChanged() slot function.
    connect(client, &QTcpSocket::stateChanged, this, &Server::socketStateChanged);
    // store each new client into the allClients array for future use.
    allClients->push_back(client);
    qDebug() << "Socket connected from " + ipAddress + ":" + QString::number(port);
}

// When a client is disconnected from the server, the disconnected() signal will be triggered
void Server::socketDisconnected()
{
    // displaying the message on the server console whenever it happens, and nothing more.
    QTcpSocket* client = qobject_cast<QTcpSocket*>(QObject::sender());
    QString socketIpAddress = client->peerAddress().toString();
    int port = client->peerPort();
    qDebug() << "Socket disconnected from " + socketIpAddress + ":" + QString::number(port);
}

// whenever a client is sending in a message to the server, the readyRead() signal will be triggered.
void Server::socketReadyRead()
{
    // use QObject::sender() to get the pointer of the object that emitted the readyRead signal
    // and convert it to the QTcpSocket class so that we can access its readAll() function.
    QTcpSocket* client = qobject_cast<QTcpSocket*>(QObject::sender());
    QString socketIpAddress = client->peerAddress().toString();
    int port = client->peerPort();
    QString data = QString(client->readAll());
    qDebug() << "Message: " + data + " (" + socketIpAddress + ":" + QString::number(port) + ")";
    // redirect the message, just passing the message to all connected clients.
    sendMessageToClients(data);
}

// This function gets triggered whenever a client's network state has changed,
// such as connected, disconnected, listening, and so on.
void Server::socketStateChanged(QAbstractSocket::SocketState state)
{
    QTcpSocket* client = qobject_cast<QTcpSocket*>(QObject::sender());
    QString socketIpAddress = client->peerAddress().toString();
    int port = client->peerPort();
    QString desc;
    // simply print out a relevant message according to its new state
    if (state == QAbstractSocket::UnconnectedState)
        desc = "The socket is not connected.";
    else if (state == QAbstractSocket::HostLookupState)
        desc = "The socket is performing a host name lookup.";
    else if (state == QAbstractSocket::ConnectingState)
        desc = "The socket has started establishing a connection.";
    else if (state == QAbstractSocket::ConnectedState)
        desc = "A connection is established.";
    else if (state == QAbstractSocket::BoundState)
        desc = "The socket is bound to an address and port.";
    else if (state == QAbstractSocket::ClosingState)
        desc = "The socket is about to close (data may still be waiting to be written).";
    else if (state == QAbstractSocket::ListeningState)
        desc = "For internal use only.";
    qDebug() << "Socket state changed (" + socketIpAddress + ":" + QString::number(port) + "): " + desc;
}

Main.cpp
1
2
3
4
5
6
7
8
9
10
11
12
13
 
#include <QCoreApplication>
#include "Server.h"

int main(int argc, char *argv[])
{
    QCoreApplication a(argc, argv);

Server* myServer = new Server();
    myServer->startServer();

return a.exec();
}

2、客户端QtInstantMessagingClient

基于Widget的应用程序,客户端需要一个友好的界面,父类QMainWindow,MainWindow.ui定义界面如下:
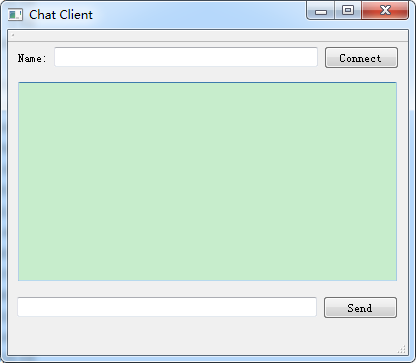
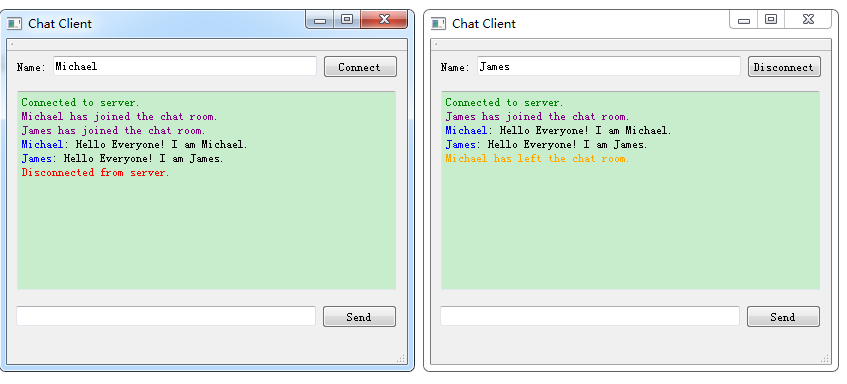
可以给不同的客户端取个名字,如“Michael”、“James”等等,点击“Connect”按钮连接服务端,此时Label变为“Disconnect”。

QT       += core gui network

 MainWindow.h
1
2
3
4
5
6
7
8
9
10
11
12
13
14
15
16
17
18
19
20
21
22
23
24
25
26
27
28
29
30
31
32
33
34
35
36
37
 
#ifndef MAINWINDOW_H
#define MAINWINDOW_H

#include <QMainWindow>
#include <QDebug>
#include <QTcpSocket>

namespace Ui {
class MainWindow;
}

class MainWindow : public QMainWindow
{
    Q_OBJECT

public:
    explicit MainWindow(QWidget *parent = nullptr);
    ~MainWindow();

private slots:
    void on_connectButton_clicked();
    void socketConnected();
    void socketDisconnected();
    void socketReadyRead();

void on_sendButton_clicked();

private:
    Ui::MainWindow* ui;
    bool            connectedToHost;
    QTcpSocket*     socket;

void printMessage(QString message);
};

#endif // MAINWINDOW_H

 MainWindow.cpp
1
2
3
4
5
6
7
8
9
10
11
12
13
14
15
16
17
18
19
20
21
22
23
24
25
26
27
28
29
30
31
32
33
34
35
36
37
38
39
40
41
42
43
44
45
46
47
48
49
50
51
52
53
54
55
56
57
58
59
60
61
62
63
64
65
66
67
68
69
70
71
72
73
74
75
76
77
78
79
 
#include "MainWindow.h"
#include "ui_MainWindow.h"

MainWindow::MainWindow(QWidget *parent) :
    QMainWindow(parent),
    ui(new Ui::MainWindow)
{
    ui->setupUi(this);
    connectedToHost = false;
}

MainWindow::~MainWindow()
{
    delete ui;
}

void MainWindow::on_connectButton_clicked()
{
    if (!connectedToHost)
    {
        // create a QTcpSocket object called socket and make it connect to a host at 127.0.0.1 on port 8801.
        socket = new QTcpSocket();
        // connected the socket object to its respective slot functions when connected(),disconnected(), and readReady() signals were triggered.
        // This is exactly the same as the server code
        connect(socket, SIGNAL(connected()), this, SLOT(socketConnected()));
        connect(socket, SIGNAL(disconnected()), this, SLOT(socketDisconnected()));
        connect(socket, SIGNAL(readyRead()), this, SLOT(socketReadyRead()));
        // Since this is only for testing purposes, we will connect the client to our test server,
        // which is located on the same computer.
        // If you're running the server on another computer,
        // you may change the IP address to a LAN or WAN address, depending on your need.
);
    }
    else
    {
        QString name = ui->nameInput->text();
        socket->write("<font color=\"Orange\">" + name.toUtf8() + " has left the chat room.</font>");
        socket->disconnectFromHost();
    }

}

void MainWindow::socketConnected()
{
    qDebug() << "Connected to server.";
    printMessage("<font color=\"Green\">Connected to server.</font>");
    QString name = ui->nameInput->text();
    socket->write("<font color=\"Purple\">" + name.toUtf8() + " has joined the chat room.</font>");
    ui->connectButton->setText("Disconnect");
    connectedToHost = true;
}

void MainWindow::socketDisconnected()
{
    qDebug() << "Disconnected from server.";
    printMessage("<font color=\"Red\">Disconnected from server.</font>");
    ui->connectButton->setText("Connect");
    connectedToHost = false;
}

void MainWindow::socketReadyRead()
{
    ui->chatDisplay->append(socket->readAll());
}

void MainWindow::printMessage(QString message)
{
    ui->chatDisplay->append(message);
}

void MainWindow::on_sendButton_clicked()
{
    QString name = ui->nameInput->text();
    QString message = ui->messageInput->text();
    socket->write("<font color=\"Blue\">" + name.toUtf8() + "</font>: " + message.toUtf8());
    ui->messageInput->clear();
}

 Main.cpp
1
2
3
4
5
6
7
8
9
10
11
12
13
 
#include "MainWindow.h"
#include <QApplication>

int main(int argc, char *argv[])
{
    QApplication a(argc, argv);
    
    MainWindow w;
    w.show();

return a.exec();
}

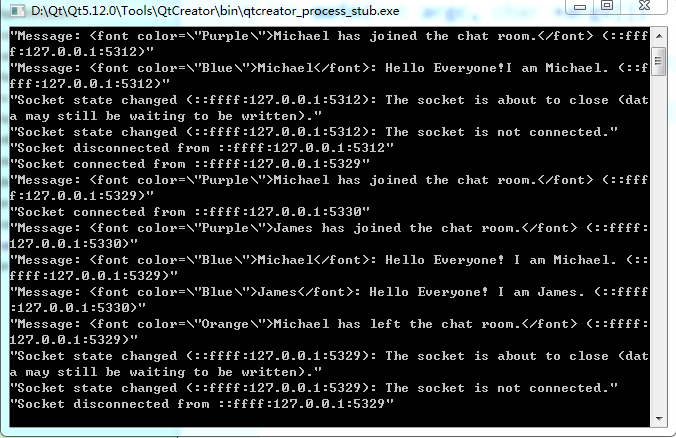
构建成功后,将生成的QtInstantMessagingServer.exe以及QtInstantMessagingClient.exe置于.\Qt\Qt5.12.0\5.12.0\mingw73_64\bin目录下(该目录下可以双击exe直接运行!)
Qt NetWork即时通讯网络聊天室(基于TCP)的更多相关文章

  1. php网易云信im即时通讯和聊天室

    话不多说 直接上代码 <?php/** * Created by PhpStorm. * User: lhl * Date: 2019/4/10 * Time: 17:38 */ namespa ...

  2. 简单即时通讯、聊天室--java NIO版本

    实现的功能: 运行一个服务端,运行多个客户端.在客户端1,发送消息,其余客户端都能收到客户端1发送的消息. 重点: 1.ByteBuffer在使用时,注意flip()方法的调用,否则读取不到消息. 服 ...

  3. 基于Linux的TCP网络聊天室

    1.实验项目名称:基于Linux的TCP网络聊天室 2.实验目的:通过TCP完成多用户群聊和私聊功能. 3.实验过程: 通过socket建立用户连接并传送用户输入的信息,分别来写客户端和服务器端,利用 ...

  4. php websocket-网页实时聊天之PHP实现websocket(ajax长轮询和websocket都可以时间网络聊天室)

    php websocket-网页实时聊天之PHP实现websocket(ajax长轮询和websocket都可以时间网络聊天室) 一.总结 1.ajax长轮询和websocket都可以时间网络聊天室 ...

  5. Python3 网络通信 网络聊天室 文件传输

    Python3 网络通信 网络聊天室 文件传输 功能描述 该项目将实现一个文字和文件传输的客户端和服务器程序通信应用程序.它将传输和接收视频文件. 文本消息必须通过TCP与服务器通信,而客户端自己用U ...

  6. python模拟QQ聊天室(tcp加多线程)

    python模拟QQ聊天室(tcp加多线程) 服务器代码: from socket import * from threading import * s = socket(AF_INET,SOCK_S ...

  7. TCP/IP网络编程之基于TCP的服务端/客户端(二)

    回声客户端问题 上一章TCP/IP网络编程之基于TCP的服务端/客户端(一)中,我们解释了回声客户端所存在的问题,那么单单是客户端的问题,服务端没有任何问题?是的,服务端没有问题,现在先让我们回顾下服 ...

  8. Python网络编程02 /基于TCP、UDP协议的socket简单的通信、字符串转bytes类型

    Python网络编程02 /基于TCP.UDP协议的socket简单的通信.字符串转bytes类型 目录 Python网络编程02 /基于TCP.UDP协议的socket简单的通信.字符串转bytes ...

  9. Qt实现网络聊天室(客户端,服务端)

    1. 效果演示 客户端 服务器 连接成功之后 2. 预备知识 如果不知道网络编程的可以去看我的上一篇文章C++网络编程 在Qt中,实现网络编程的方式比用C++或C实现要方便简单许多,因为Qt已经替我们 ...

随机推荐

  1. 重新学习Spring注解——AOP

    面向切面编程——思想:在一个地方定义通用功能,但是可以通过声明的方式定义这个功能要以何种方式在何处运用,而无须修改受影响的类. 切面:横切关注点可以被模块化为特殊的类. 优点: 1.每个关注点都集中在 ...

  2. 浅谈JSON与与JS相关的JSON函数

    本文内容主要引用在微信公众号上看到的一片文章,因为自己对Json了解不是很深入,所以就整理出这篇博文与大家分享! 一. JSON是一种格式,基于文本,优于轻量,用于交换数据 1.一种数据格式 数据的传 ...

  3. springMVC学习2

    参数绑定 默认支持的参数类型 @Override public Item queryItemById(int id) { Item item = this.itemMapper.selectByPri ...

  4. Super Fish

        Super fish is a common fun and leisure game. It's a game that tests your intelligence and memory ...

  5. proc介绍,free命令查看内存

    proc介绍 https://www.cnblogs.com/dongzhuangdian/p/11366910.html https://blog.csdn.net/majianting/artic ...

  6. ESA2GJK1DH1K升级篇: 远程升级准备工作: 使用TCP客户端连接Web服务器实现http下载数据

    一,根目录建一个文件 二,使用浏览器访问 http://47.92.31.46:80/1.txt     或者  http://47.92.31.46/1.txt 三,使用TCP客户端访问文件内容 3 ...

  7. [RN] React Native 头部 滑动吸顶效果的实现

    React Native 头部 滑动吸顶效果的实现 效果如下图所示: 实现方法: 一.吸顶组件封装 StickyHeader .js import * as React from 'react'; i ...

  8. kafka如何保证数据可靠性和数据一致性

    数据可靠性 Kafka 作为一个商业级消息中间件,消息可靠性的重要性可想而知.本文从 Producter 往 Broker 发送消息.Topic 分区副本以及 Leader 选举几个角度介绍数据的可靠 ...

  9. R包的安装 卸载 加载 移除等

    R包的安装 1)使用 Rstudio 手动安装 Rstudio的窗口默认为四个,在右下角的窗口的 packages 下会显示所有安装的 R 包 点击 Install -> 输入R 包名 -> ...

  10. Java 并发系列之四:java 多线程

    1. 线程简介 2. 启动和终止线程 3. 对象及变量的并发访问 4. 线程间通信 5. 线程池技术 6. Timer定时器 7. 单例模式 8. SimpleDateFormat 9. txt ja ...