VMXNET3 vs E1000E and E1000
VMXNET3 vs E1000E and E1000
用户为什么要从E1000调整为VMXNET3,理由如下:
- E1000是千兆网路卡,而VMXNET3是万兆网路卡;
- E1000的性能相对较低,而VMXNET3的性能相对较高;
- VMXNET3支持TCP/IP Offload Engine,E1000不支持;
- VMXNET3可以直接和vmkernel通讯,执行内部数据处理;
eg. VMXNET3 will show the bandwidth as 10 GBps. However, the actual bandwidth will depend on your uplink speed. A physical CentOS or a Windows installation might show it as 40 GBps but, not the VMs. You will have to perform a bandwidth test to see how much you are getting in actual.
来源 http://blog.51cto.com/shipyard/1930183
Network performance with VMXNET3 compared to E1000E and E1000. This article explains the difference between the virtual network adapters and part 2 will demonstrate how much network performance could be gained by selecting the paravirtualized adapter.
The VMware administrator has several different virtual network adapters available to attach to the virtual machines. The virtual adapters belong to either of two groups:

Emulated:
These are virtual hardware who emulates real existing physical network adapters. (Note that the physical network cards in the physical ESXi host is totally unrelated.) The VMkernel will present something that to the guest operating system will look exactly as some specific real world hardware and the guest could detect them through plug and play and use a native device driver.
Examples for the emulated devices are:
E1000 – which will emulate a 1 Gbit Intel 82545EM card, and is available for most operating systems since the generation of Windows Server 2003. This card is the default when creating almost all virtual machines and is by that widely used.
E1000E – emulates a newer real network adapter, the 1 Gbit Intel 82574, and is available for Windows 2012 and later. The E1000E needs VM hardware version 8 or later.
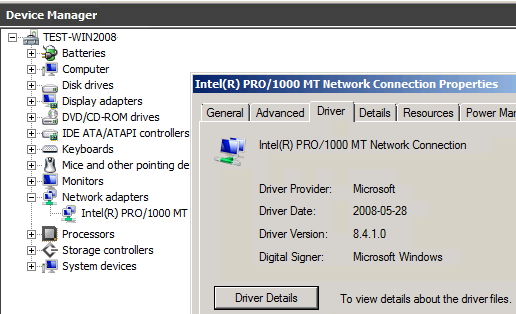
Above in Windows 2008 R2 with an emulated E1000 adapter the native guest operating system device driver is in use.
The positive side of the emulated network adapters are that they work “out of the box” and need no external code from VMware. It could be used to even (if needed) install the guest operating system by PXE since the E1000 device is available already from the BIOS start up.
The negative side is when using the default emulated adapters extra work is needed for every frame being sent or received from the guest operating system (which could be many thousands each second).
The VMkernel has to in “real time” emulate the exact behavior of the specific Intel 82545EM or 82574 cards, which will cost time and CPU cycles.
Paravirtualized:
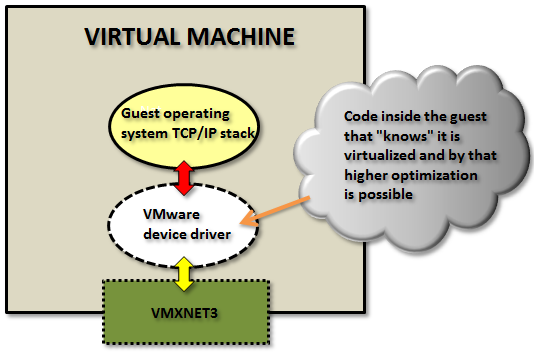
The other type of virtual network adapters are the “paravirtualized”. The most recent one is calledVMXNET3.
The paravirtualized network card does not exist as a physical NIC, but is a device “made up” entirely by VMware. For the guest operating system this will mean that it typically during the OS installation phase only senses that an unknown device is located in a PCI slot on the (virtual) motherboard, but it has no driver to actually use it.
(Note: some Linux distributions do even have the VMXNET3 driver pre-installed.)

For Windows Server, when a device driver is supplied, typically through the installation of VMware Tools, the guest operating system will perceive this as a real NIC from some network card manufacturer called “VMware” and use it as an ordinary network adapter. It has no reason to believe anything else than this is a NIC just as any other NIC around.
To the guest operating system the VMXNET3 card looks like a 10 Gbit physical device.
Note: there are also two obsolete paravirtualized adapters called VMXNET and VMXNET2 (sometimes the “Enhanced VMXNET”), however as long as the virtual machine has at least hardware version 7 only the VMXNET3 adapter should be used.
Since VMware with the VMXNET3 card owns much more of the network components even inside the VM there are many performance enhancements that could done. With the emulated E1000/E1000E the kernel has to mimic the exact behavior of existing adapters to the guest but with the VMXNET3 it could create a “perfect” virtual adapter optimized to be used in a virtual environment.
In the first article the general difference between the adapter types was explained.
In this article we will test the network throughput in the two most common Windows operating systems today: Windows 2008 R2 and Windows 2012 R2, and see the performance of the VMXNET3 vs the E1000 and the E1000E.
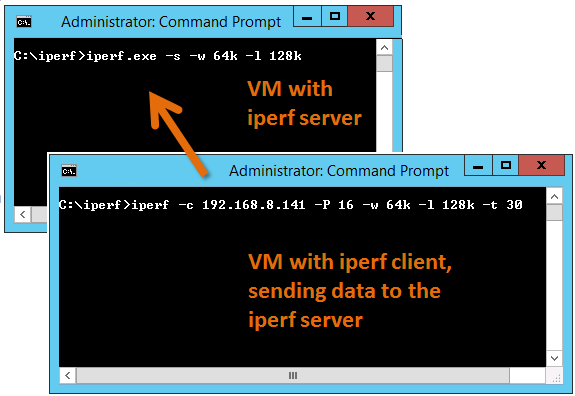
To generate large amounts of network traffic I used the iperf tool running on two virtual machines, one iperf “client” and the other as “server”. I have found that the following iperf settings generates the best combination for network throughput tests on Windows Server:
Server: iperf -s -w 64k -l 128k
Client: iperf -c <SERVER-IP> -P 16 -w 64k -l 128k -t 30
The test was done on HP Proliant Bl460c Gen8 with the virtual machines were running on the same physical host to be able to see the network performance regardless of the physical network connection between physical hosts/blades.
All settings on the E1000, E1000E and VMXNET3 was default. More on possible tweakings of the VMXNET3 card settings will be explained in a later article.
(It shall of course be noted that the following results are just observations from tests on one specific hardware and ESXi configuration, and is not in any way a “scientific” study.)
Test 1: Windows 2008 R2 with the default E1000 adapter
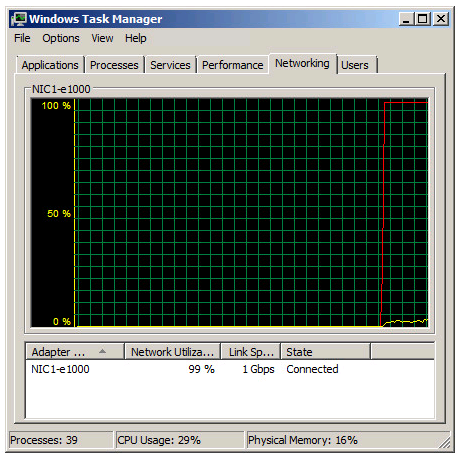
Two Windows 2008 R2 virtual machines, one as iperf server and the other as client, with the test running in 30 seconds.
As noted in the Task Manager view the 1 Gbit link speed was maxed out. A somewhat interesting fact is that even with the emulated E1000 adapter it is possible to use more than what “should” be possible on a 1 Gbit link.
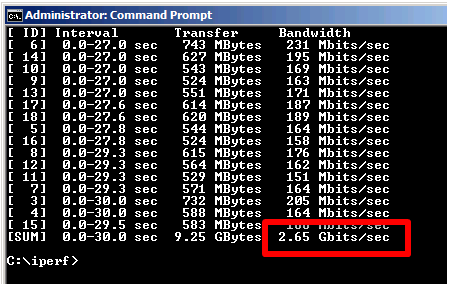
From the iperf client output we can see that we reach a total throughput of 2.65 Gbit per second with the default E1000 virtual adapter.
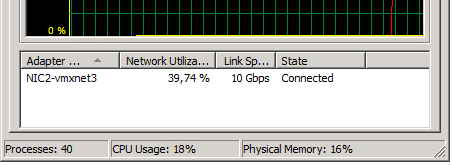
Test 2: Windows 2008 R2 with the VMXNET3 adapter
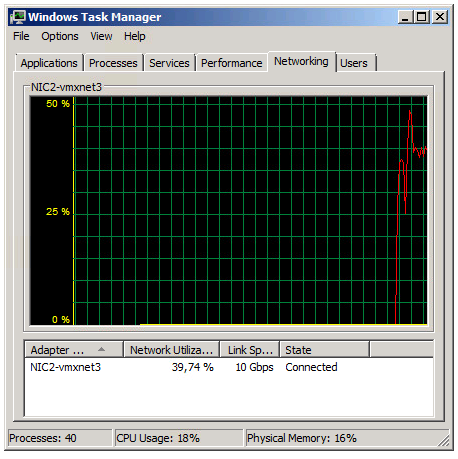
The Task Manager view reports utilization around 39% of the 10 Gbit link in the Iperf client VM.
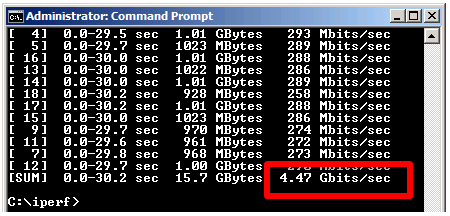
The iperf output shows a total throughput for VMXNET3 of 4.47 Gbit / second over the time the test was conducted.
The VMXNET3 adapter demonstrates almost 70 % better network throughput than the E1000 card on Windows 2008 R2.
Test 3: Windows 2012 R2 with the E1000E adapter
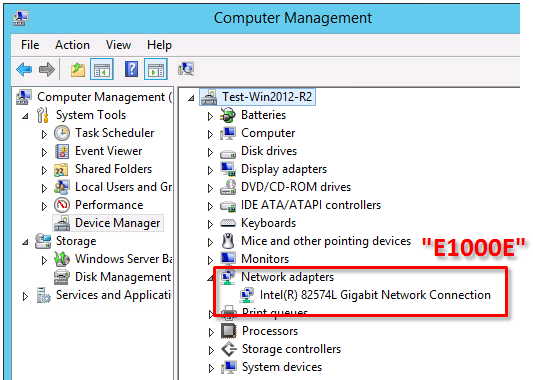
The E1000E is a newer, and more “enhanced” version of the E1000. To the guest operating system it looks like the physical adapter Intel 82547 network interface card.
However, even if it is a newer adapter it did actually deliver lower throughput than the E1000 adapter.
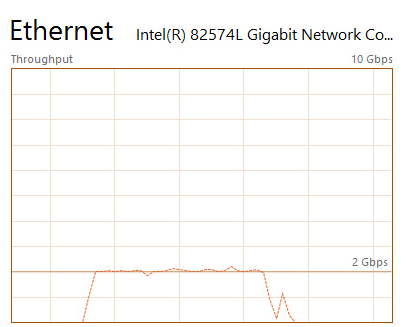
Two virtual machines running Windows 2012 R2 with the iperf tool running as client and server.
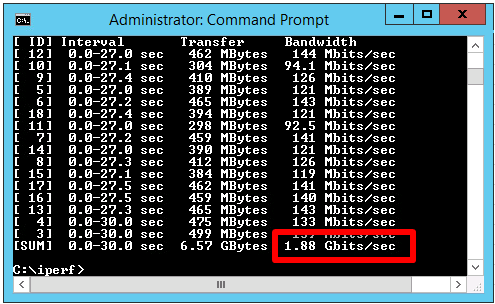
E1000E got 1.88 Gbit / sec, which is considerable lower than the 2.65 Gbit/s for the original E1000 on Windows 2008 R2.
Test 4: Windows 2012 R2 with the VMXNET3 adapter
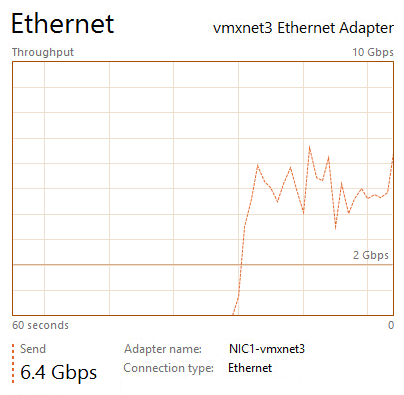
The two Windows 2012 R2 virtual machines now running with VMXNET3 adapter got the following iperf results:
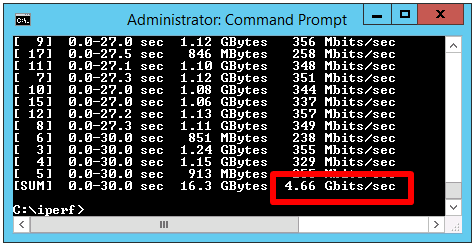
The throughput was 4.66 Gbit/sec, which is very close to the result of VMXNET3 on Windows 2008 R2, but almost 150 % better than the new E1000E.
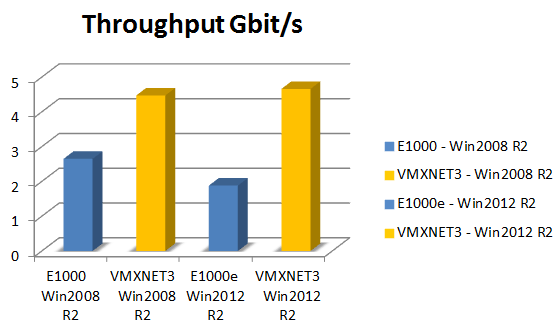
In summary the VMXNET3 adapter delivers greatly more network throughput performance than both E1000 and E1000E. Also, in at least this test setup the newer E1000E performed actually lower than the older E1000.
The test was done on Windows Server virtual machines and the top throughput of around 4.6 Gbit/sec for the VMXNET3 adapter could be the result of limitations in the TCP implementations. Other operating systems with other TCP stacks might achieve even higher numbers. It shall be noted also that these test was just for the network throughput, but there are of course other factors as well, which might be further discussed in later articles.
=============== End
VMXNET3 vs E1000E and E1000的更多相关文章
- 2.Kali安装VMware tools(详细+异常处理)
dnt@MT:~$ cd /media/cdrom0 进入光驱内 dnt@MT:/media/cdrom0$ ls 查看当前目录下有哪些内容manifest.txt run_upgrader.sh V ...
- 如何在VMware ubuntu linux虚拟机中安装VMware tools
VMware Tools可以实现在主机<->虚拟机之间拷贝文字.文件等功能.本文讲述如何在VMware ubuntu linux虚拟机中安装VMware tools. 测试环境: VMwa ...
- How to Install VMware Tools on RHEL 7/CentOS 7
The original address Mware Tools is one of important components for virtual machine (VM) in order ge ...
- 体验vSphere 6之1-安装VMware ESXi 6 RC版(转载)
体验vSphere 6之1-安装VMware ESXi 6 RC版 在2015年,各个公司都会发布一系列新的产品,例如Microsoft会发布Windows 10,VMware会发布vSphere 6 ...
- Linux 虚拟机网络适配器从E1000改为VMXNET3
我们知道VMware的网络适配器类型有多种,例如E1000.VMXNET.VMXNET 2 (Enhanced).VMXNET3等,就性能而言,一般VMXNET3要优于E1000,下面介绍如果将Lin ...
- vmware 10 e1000e e1000e_cyclecounter_read 挂机解法
http://ehc.ac/p/e1000/mailman/message/34100875/In the e1000e_cyclecounter_read function, if incvalue ...
- Linux e1000e网卡驱动
目录 识别网卡 命令行参数 附加配置 技术支持 一.识别网卡e1000e驱动支持Intel所有的GbE PCIe网卡,除了82575,82576,基于82580系列的网卡.提示:Intel(R) PR ...
- 网络数据包收发流程(三):e1000网卡和DMA
一.硬件布局每个网卡(MAC)都有自己的专用DMA Engine,如上图的 TSEC 和 e1000 网卡intel82546.上图中的红色线就是以太网数据流,DMA与DDR打交道需要其他模块的协助, ...
- Centos6.5更新e1000网卡驱动
导读 在工作过程中经常遇到linux的操作系统网络不正常的情况,以前没有注意到,今天查看系统日志发现原来是网络驱动的问题.索性直接更新系统,更新网卡 问题:linux系统经常出现断网的情况,重启之后系 ...
随机推荐
- day39
今日内容: 1.对于表,库,记录的基本操作 2.数据库引擎的了解 3.表的详细 4.数据类型的掌握 1.回顾昨日对于表,库,记录的基本操作 库 增: create database mydb2; 删: ...
- php操作oracle查询时中文乱码
putenv("LD_LIBRARY_PATH=/usr/lib/oracle/12.1/client64/lib"); putenv("ORACLE_HOME=/usr ...
- 2017-2018-2 20155231《网络对抗技术》实验八: WEB基础实验
2017-2018-2 20155231<网络对抗技术>实验八:Web基础 实验要求: Web前端HTML(0.5分) 能正常安装.启停Apache.理解HTML,理解表单,理解GET与P ...
- 20155308『网络对抗技术』Exp5 MSF基础应用
20155308『网络对抗技术』Exp5 MSF基础应用 一.原理与实践说明 实践内容 本实践目标是掌握metasploit的基本应用方式,重点常用的三种攻击方式的思路.具体需要完成: 一个主动攻击实 ...
- Android开发——RecyclerView特性以及基本使用方法(二)
0. 前言 随着Android的发展,虽然ListView依旧重要,但RecyclerView确实越来越多的被大家使用.但显然并不能说RecyclerView就一定优于ListView,而是应该根据 ...
- [Oracle]OpenVMS 运行 Oracle 时的推荐值
PQL Parameters ORACLE Account ------------------ ------------------------- PQL_M ...
- ajax传参data里面的键是一个变量的解决方法
直接用这种方式来传参,比如bean中有字段 username password,则是 data[username] = "用户名"; data[password] = " ...
- In-Memory:内存优化表的DMV
SQL Server 在执行查询时,自动将活动的相关信息保存在内存中,这些活动信息称作DMV(Dynamic Management View),DMV记录SQL Server实例级别上的活动信息.由于 ...
- jenkins+maven+svn+npm自动发布部署实践
一.系统版本centos7.6 二.根据jenkins官方安装方法yum安装jenkins 1.进入jenkins官网下载页面https://jenkins.io/download/,选择Red Ha ...
- win10安装tensorflow-gpu
1.安装anaconda (最好使用清华源下载) 2.打开cmd conda create -n tensorflow pip python=3.6 activate tensorflow pip i ...