Masonry基本语法
equalTo <=======> NSLayoutRelationEqual 等于
lessThanOrEqualTo <======> NSLayoutRelationLessThanOrEqual 小于或等于
greaterThanOrEqualTo <=======> NSLayoutRelationGreaterThanOrEqual 大于或等于
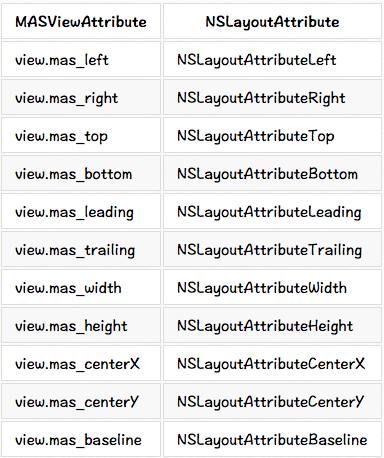
MASViewAttribute:视图约束属性
make.width.greaterThanOrEqualTo(@200);

make.width.lessThanOrEqualTo(@400)
<2>//creates view.left = view.superview.left + 10
make.left.lessThanOrEqualTo(@10)
代替NSNumber,使用原始的数据或者结构体设置约束数据
make.top.mas_equalTo(42);

make.height.mas_equalTo(20);

make.size.mas_equalTo(CGSizeMake(50, 100));

make.edges.mas_equalTo(UIEdgeInsetsMake(10, 0, 10, 0));

make.left.mas_equalTo(view).mas_offset(UIEdgeInsetsMake(10, 0, 10, 0));
使用数组NSArray设置约束
make.height.equalTo(@[view1.mas_height, view2.mas_height]);

make.height.equalTo(@[view1, view2]);

make.left.equalTo(@[view1, @100, view3.right]);
.priorityHigh <======> UILayoutPriorityDefaultHigh 高优先级
.priorityMedium <========> between high and low 介于高/低之间
.priorityLow <=========> UILayoutPriorityDefaultLow 低优先级
make.left.greaterThanOrEqualTo(label.mas_left).with.priorityLow();

make.top.equalTo(label.mas_top).with.priority(600);
// make top, left, bottom, right equal view2

    make.edges.equalTo(view2);

// make top = superview.top + 5, left = superview.left + 10,

// bottom = superview.bottom - 15, right = superview.right - 20

    make.edges.equalTo(superview).insets(UIEdgeInsetsMake(5, 10, 15, 20))
// All edges but the top should equal those of the superview

make.left.right.and.bottom.equalTo(superview);

make.top.equalTo(otherView);
// make width and height greater than or equal to titleLabel

    make.size.greaterThanOrEqualTo(titleLabel)

// make width = superview.width + 100, height = superview.height - 50

    make.size.equalTo(superview).sizeOffset(CGSizeMake(100, -50))
// make centerX and centerY = button1

    make.center.equalTo(button1)

// make centerX = superview.centerX - 5, centerY = superview.centerY + 10

    make.center.equalTo(superview).centerOffset(CGPointMake(-5, 10))
// in public/private interface

@property (nonatomic, strong) MASConstraint *topConstraint;

...

// when making constraints

[view1 mas_makeConstraints:^(MASConstraintMaker *make) {

    self.topConstraint = make.top.equalTo(superview.mas_top).with.offset(padding.top);

    make.left.equalTo(superview.mas_left).with.offset(padding.left);

}];

...

// then later you can call

[self.topConstraint uninstall];
2.更新约束 mas_updateConstraints
- (void)updateConstraints {

    [self.growingButton mas_updateConstraints:^(MASConstraintMaker *make) {

        make.center.equalTo(self);

        make.width.equalTo(@(self.buttonSize.width)).priorityLow();

        make.height.equalTo(@(self.buttonSize.height)).priorityLow();

        make.width.lessThanOrEqualTo(self);

        make.height.lessThanOrEqualTo(self);

    }];

    //according to apple super should be called at end of method

    [super updateConstraints];

}
3.重新设置mas_remakeConstraints
- (void)changeButtonPosition {
    [self.button mas_remakeConstraints:^(MASConstraintMaker *make) {

        make.size.equalTo(self.buttonSize);

        if (topLeft) {

            make.top.and.left.offset(10);

        } else {

            make.bottom.and.right.offset(-10);

        }

    }];

}
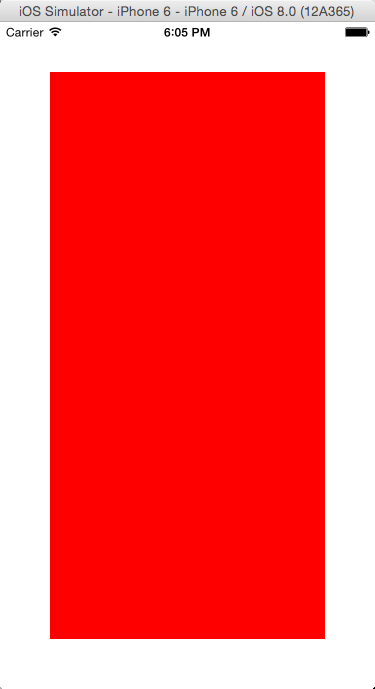
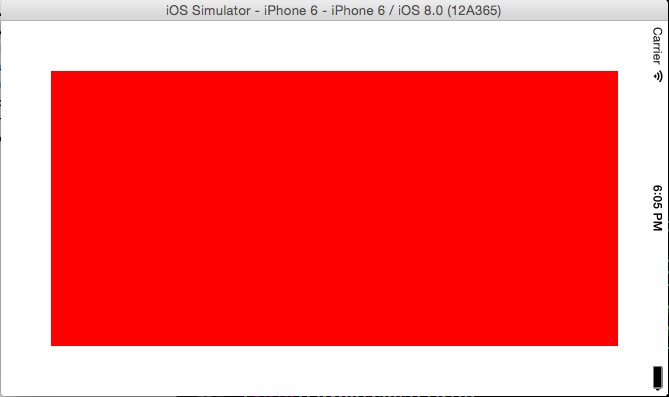
具体的实例如下:设置view1举例父视图的四周距离均为50

/**

方式一:使用NSLayoutConstraint实现手动布局

 ----------------------------

 设置UIEdgeInsets

 ----------------------------

 @interface UIView (UIConstraintBasedLayoutInstallingConstraints)

 - (NSArray *)constraints NS_AVAILABLE_IOS(6_0);

 - (void)addConstraint:(NSLayoutConstraint *)constraint NS_AVAILABLE_IOS(6_0);

 - (void)addConstraints:(NSArray *)constraints NS_AVAILABLE_IOS(6_0);

 - (void)removeConstraint:(NSLayoutConstraint *)constraint

 - (void)removeConstraints:(NSArray *)constraints NS_AVAILABLE_IOS(6_0);

*/

-(void)LayoutConstraint

{

    UIView *superView = self.view;

    UIView *view1 = [[UIView alloc]init];

    view1 .translatesAutoresizingMaskIntoConstraints = NO;

    view1.backgroundColor = [UIColor redColor];

    [superView addSubview:view1];

    //设置距离父视图边界距离

    UIEdgeInsets pading = UIEdgeInsetsMake(50, 50, 50, 50);

    //添加给view1约束

    [superView addConstraints:@[

        [NSLayoutConstraint constraintWithItem:view1 attribute:NSLayoutAttributeTop relatedBy:NSLayoutRelationEqual toItem:superView attribute:NSLayoutAttributeTop multiplier:1.0 constant:pading.top],

        [NSLayoutConstraint constraintWithItem:view1 attribute:NSLayoutAttributeLeft relatedBy:NSLayoutRelationEqual toItem:superView attribute:NSLayoutAttributeLeft multiplier:1.0 constant:pading.left],

        [NSLayoutConstraint constraintWithItem:view1 attribute:NSLayoutAttributeBottom relatedBy:NSLayoutRelationEqual toItem:superView attribute:NSLayoutAttributeBottom multiplier:1.0 constant:-pading.bottom],

        [NSLayoutConstraint constraintWithItem:view1 attribute:NSLayoutAttributeRight relatedBy:NSLayoutRelationEqual toItem:superView attribute:NSLayoutAttributeRight multiplier:1.0 constant:-pading.right],

    ]];

}
/**

方法二:使用block  @implementation MAS_VIEW (MASAdditions)

----------------------------

 设置offset偏移 或者 边缘edges

----------------------------

- (NSArray *)mas_makeConstraints:(void(^)(MASConstraintMaker *))block

- (NSArray *)mas_updateConstraints:(void(^)(MASConstraintMaker *))block

- (NSArray *)mas_remakeConstraints:(void(^)(MASConstraintMaker *make))block

*/

-(void)LayoutForMASConstraintMaker

{

    UIView *superView = self.view;

    UIView *view1 = [[UIView alloc]init];

    view1.backgroundColor = [UIColor redColor];

    [superView addSubview:view1];

    //设置距离父视图边界距离

    UIEdgeInsets pading = UIEdgeInsetsMake(50, 50, 50, 50);

    //添加给view1约束

    [view1 mas_makeConstraints:^(MASConstraintMaker *make) {

        make.top.equalTo(superView.mas_top).with.offset(pading.top);

        make.left.equalTo(superView.mas_left).with.offset(pading.left);

        make.bottom.equalTo(superView.mas_bottom).with.offset(-pading.bottom);

        make.right.equalTo(superView.mas_right).with.offset(-pading.right);

        //设置代码可以更简单(效果与上面的是一样的)

        //make.edges.equalTo(superView).with.insets(pading);

    }];

}
/**

方式三:使用block  @implementation MAS_VIEW (MASAdditions)

 ----------------------------

 设置margin距离

 ----------------------------

 - (NSArray *)mas_makeConstraints:(void(^)(MASConstraintMaker *))block

 - (NSArray *)mas_updateConstraints:(void(^)(MASConstraintMaker *))block

 - (NSArray *)mas_remakeConstraints:(void(^)(MASConstraintMaker *make))block

*/

-(void)LayoutForMASConstraintMakerWithMargin

{

    UIView *superView = self.view;

    UIView *view1 = [[UIView alloc]init];

    view1.backgroundColor = [UIColor redColor];

    [superView addSubview:view1];

    //添加给view1约束

    [view1 mas_makeConstraints:^(MASConstraintMaker *make) {

        make.topMargin.equalTo(superView.mas_top).with.offset(50);

        make.leftMargin.equalTo(superView.mas_left).with.offset(50);

        make.bottomMargin.equalTo(superView.mas_bottom).with.offset(-50);

        make.rightMargin.equalTo(superView.mas_right).with.offset(-50);

    }];

}
/**

 方式四:使用block  @implementation MAS_VIEW (MASAdditions)

 ----------------------------

 设置center和size

 ----------------------------

 - (NSArray *)mas_makeConstraints:(void(^)(MASConstraintMaker *))block

 - (NSArray *)mas_updateConstraints:(void(^)(MASConstraintMaker *))block

 - (NSArray *)mas_remakeConstraints:(void(^)(MASConstraintMaker *make))block

 */

-(void)LayoutForMASConstraintMakerWithCenterWidthHeight

{

    UIView *superView = self.view;

    UIView *view1 = [[UIView alloc]init];

    view1.backgroundColor = [UIColor redColor];

    [superView addSubview:view1];

    //添加给view1约束

    [view1 mas_makeConstraints:^(MASConstraintMaker *make) {

        make.centerX.equalTo(superView);

        make.centerY.equalTo(superView);

        make.size.equalTo(superView).sizeOffset(CGSizeMake(-100,-100));

    }];

}
Masonry基本语法的更多相关文章
- ios的链式编程笔记
1.Masonry的语法为啥能连续的使用点语法? >> 底层使用的是:用block当函数的返回参数 > 链式编程思想 2. 使用block当函数的返回参数 // 之前开发中比较习惯 ...
- MyLinerLayout--推荐
苹果系统的自动布局需要在布局的过程中建立各种各样的依赖,虽然后续使用masonry还算比较便捷. 有一天朋友推荐给我的这个,看了一下demo和这个库的作者的博客,了解到这个库并不是基于苹果的自动布局作 ...
- Masonry介绍与使用实践:快速上手Autolayout
1 MagicNumber -> autoresizingMask -> autolayout 以上是纯手写代码所经历的关于页面布局的三个时期 在iphone1-iphone3gs时代 w ...
- Coding源码学习第四部分(Masonry介绍与使用(一))
Masonry GitHub:https://github.com/SnapKit/Masonry Masonry是一个轻量级的布局框架,拥有自己的描述语法,采用更优雅的链式语法封装自动布局,简洁明了 ...
- iOS常用库之Masonry
简单介绍 Masonry 源码地址:https://github.com/Masonry/Masonry Masonry是一个轻量级的布局框架 拥有自己的描述语法 采用更优雅的链式语法封装自动布局 简 ...
- Masonry -- 使用纯代码进行iOS应用的autolayout自适应布局
简介 简化iOS应用使用纯代码机型自适应布局的工作,使用一种简洁高效的语法替代NSLayoutConstraints. 项目主页: Masonry 最新示例: 点击下载 项目简议: 如果再看到关于纯代 ...
- 使用Masonry搭建特殊布局时与xib的对比
之前只有比较浅的接触过Masonry.项目中大多数的布局还是用xib中的AutoLayout与手码的frame计算相结合,相信也会有很多项目和我一样是这两种布局的组合.其实xib各方面用的感觉都挺好, ...
- [转载]Masonry介绍与使用实践(快速上手Autolayout)
原博地址 http://adad184.com/2014/09/28/use-masonry-to-quick-solve-autolayout/ 前言 1 MagicNumber -> aut ...
- PureLayout和Masonry比较
一年前那时我做iOS开发,为了自动布局适配多种屏幕,我一般使用Masonry,后来偶然地在一个视频教程中发现老师使用了UIView+Autolayout(现在作者改名为PureLayout)自动布局, ...
随机推荐
- Revit API 操作共享参数和项目参数
1.获取共享参数 private string GetSharInfo(Autodesk.Revit.ApplicationServices.Application revitApp) { Strin ...
- windbg 如何再内核模式调试用户空间的程序
1:使用!process 0 0 获取用户空间的所有的进程的信息 !process 0 0 **** NT ACTIVE PROCESS DUMP **** PROCESS 80a02a60 ...
- ML: 降维算法-LE
PCA的降维原则是最小化投影损失,或者是最大化保留投影后数据的方差.LDA降维需要知道降维前数据分别属于哪一类,而且还要知道数据完整的高维信息.拉普拉斯特征映射 (Laplacian Eigenmap ...
- ML: 聚类算法R包-层次聚类
层次聚类 stats::hclust stats::dist R使用dist()函数来计算距离,Usage: dist(x, method = "euclidean", di ...
- java集合之List源码解析
List是java重要的数据结构之一,我们经常接触到的有ArrayList.Vector和LinkedList三种,他们都继承来自java.util.Collection接口,类图如下 接下来,我们对 ...
- MTP 设备不显示
win7 资源管理器(我的电脑)中不显示,但应用宝,豌豆荚工具能访问文件. 环境:WIN7 64位,手机HTC U11+ . 解决: 在设备管理器,计算机名称上右键-扫描检测硬件改动,等安装完手机驱动 ...
- Winfrom DataGridView中使用Tooltip
第一步:添加DataGridView.Tooltip控件,略 第二步:设置ToolTip 相关属性,略,参考下图 第三步:DataGridView 添加 CellMouseEnter.CellMous ...
- oracle--合并行数据
select to_char(wmsys.wm_concat(patname)) as WaitPatientName from (SELECT * FROM (SELECT ROW_NUMBER() ...
- 我的less学习之路
less注释 可以在代码中使用块样式(/* */)和行内注释(//),但是当编译LESS代码时,单行注释不会显示在CSS文件中.开发中主要维护的是less文件,所以可以使用行内注释,最终编译的css文 ...
- [蓝桥杯]ALGO-86.算法训练_矩阵乘法
问题描述 输入两个矩阵,分别是m*s,s*n大小.输出两个矩阵相乘的结果. 输入格式 第一行,空格隔开的三个正整数m,s,n(均不超过200). 接下来m行,每行s个空格隔开的整数,表示矩阵A(i,j ...