TB3_Autorace之交通杆检测
利用blob检测算法识别交通杆,控制TB3机器人完成对交通杆的起停动作!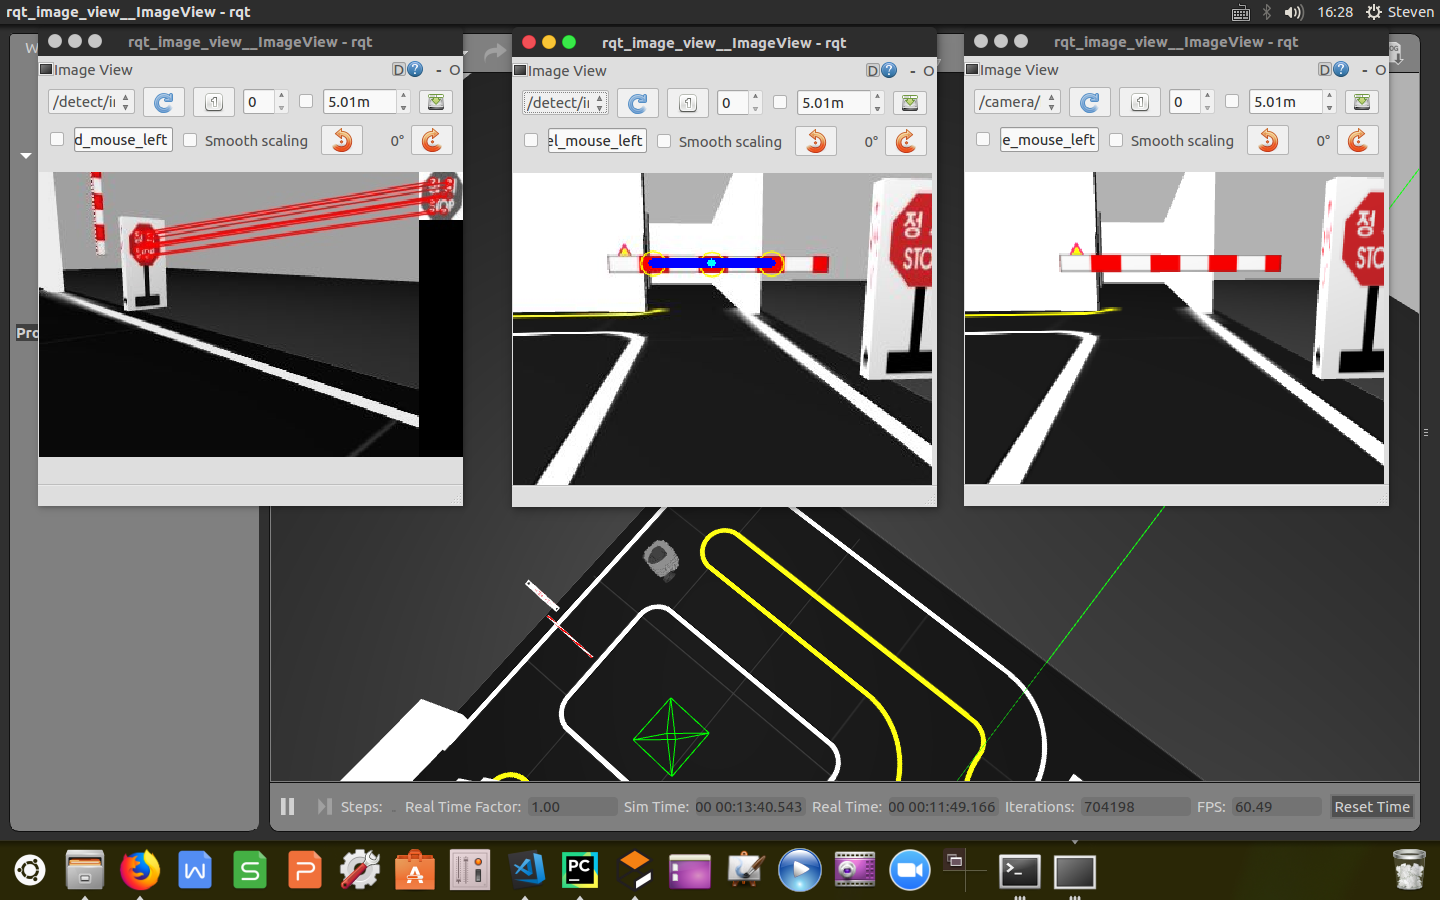
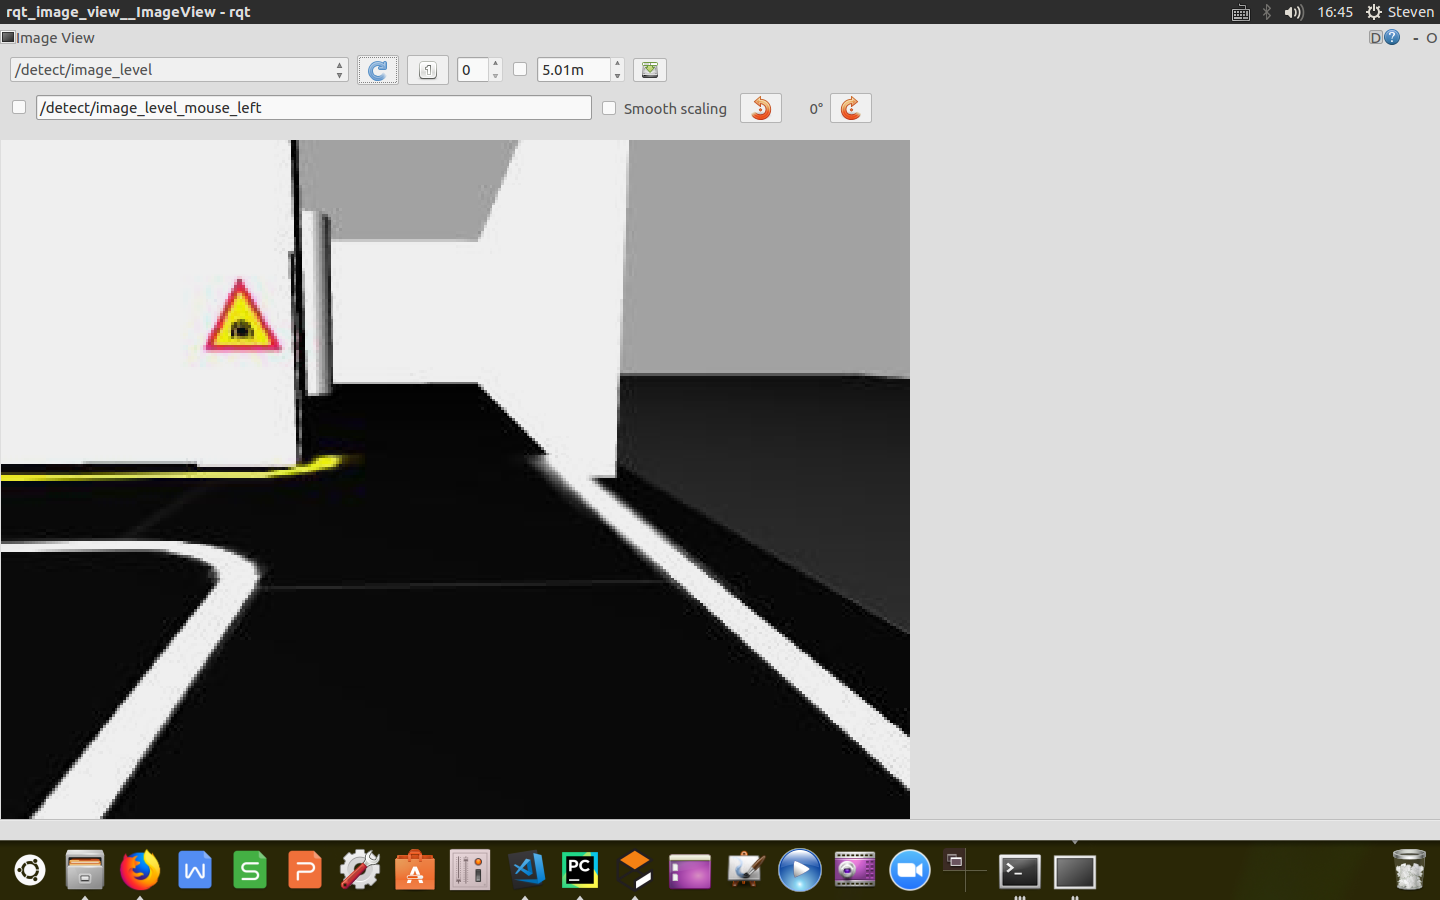
上一篇博文中《TB3_Autorace之路标检测》订阅了原始图像信息,经过SIFT检测识别出道路交通标志,这里我们同样订阅树莓派摄像头的原始图像信息对交通杆进行识别,同时我们还订阅了交通杆的状态信息以及任务完成信息,实现杆落即停,杆起即过的功能。
1
2
3
4
5
6
7
8
9
10
11
12
13
14
self.sub_image_type = "raw"
self.pub_image_type = "raw"

if self.sub_image_type == "compressed":

    self.sub_image_original = rospy.Subscriber('/detect/image_input/compressed', CompressedImage,
                                               self.cbGetImage, queue_size=1)
elif self.sub_image_type == "raw":

    self.sub_image_original = rospy.Subscriber('/detect/image_input', Image, self.cbGetImage, queue_size=1)
self.sub_level_crossing_order = rospy.Subscriber('/detect/level_crossing_order', UInt8,
                                                 self.cbLevelCrossingOrder, queue_size=1)
self.sub_level_crossing_finished = rospy.Subscriber('/control/level_crossing_finished', UInt8,
                                                    self.cbLevelCrossingFinished, queue_size=1)
发布话题
发布图像信息,交通杆的状态信息/detect/level_crossing_stamped、任务开始信息/control/level_crossing_start以及速度控制信息/control/max_vel。
1 |
if self.pub_image_type == "compressed": |
设定检测状态
这里我们利用python的枚举操作将路标检测封装为几个不同状态,包括识别标志、检测交通杆、识别交通杆、停车、通过等状态。根据不同的识别状态执行相应的控制命令。
1
2
3
4
5
6
self.StepOfLevelCrossing = Enum('StepOfLevelCrossing',
'searching_stop_sign '
'searching_level '
'watching_level '
'stop '
'pass_level')
距离计算
计算点到直线的距离,代码封装如下:
1
2
distance = abs(x0 * a + y0 * b + c) / math.sqrt(a * a + b * b)
return distance
计算点到点的距离(欧式),代码封装如下:
1
2
distance = math.sqrt((x2 - x1) * (x2 - x1) + (y2 - y1) * (y2 - y1))
return distance
线性判断
利用blob算法检测出的红色块,得出色块的坐标对,根据三点呈一线的原理,计算直线方程并判断检测出的点是否呈线性,代码封装如下:
1
2
3
4
5
6
7
8
9
10
11
12
13
14
15
16
17
def (point1, point2, point3):
# 判断是否呈线性
threshold_linearity = 50
x1, y1 = point1
x2, y2 = point3
if x2 - x1 != 0:
a = (y2 - y1) / (x2 - x1)
else:
a = 1000
b = -1
c = y1 - a * x1
err = fnCalcDistanceDot2Line(a, b, c, point2[0], point2[1])
if err < threshold_linearity:
return True
else:
return False
距离判断
利用blob算法检测出的三个红色块,得出三个色块的坐标对并计算相互之间的距离,判断距离是否相等,代码封装如下:
1
2
3
4
5
6
7
8
9
10
11
def (point1, point2, point3):
# 判断距离是否相等
threshold_distance_equality = 3
distance1 = fnCalcDistanceDot2Dot(point1[0], point1[1], point2[0], point2[1])
distance2 = fnCalcDistanceDot2Dot(point2[0], point2[1], point3[0], point3[1])
std = np.std([distance1, distance2])
if std < threshold_distance_equality:
return True
else:
return False
格式转换
设定合适的帧率,将订阅到的原始图像信息格式转换成OpenCV库能够处理的信息格式,代码封装如下:
1
2
3
4
5
6
7
8
9
10
11
12
def cbGetImage(self, image_msg):
if self.counter % 3 != 0:
self.counter += 1
return
else:
self.counter = 1
if self.sub_image_type == "compressed":
np_arr = np.fromstring(image_msg.data, np.uint8)
self.cv_image = cv2.imdecode(np_arr, cv2.IMREAD_COLOR)
else:
self.cv_image = self.cvBridge.imgmsg_to_cv2(image_msg, "bgr8")
注:根据计算机处理能力设定帧率,这里设置成10fps,不合适的帧率设置容易产生掉帧的现象,会影响最终的检测。
提取色块
利用掩膜操作,设定颜色阈值,将RGB图像转换成HSV格式图像,根据颜色阈值提取出交通杆上的红色色块,返回掩膜后的0-1图像。代码封装如下:
1
2
3
4
5
6
7
8
9
10
11
12
13
14
15
16
17
18
19
20
21
22
23
24
25
26
27
28
def fnMaskRedOfLevel(self):
image = np.copy(self.cv_image)
# Convert BGR to HSV
hsv = cv2.cvtColor(image, cv2.COLOR_BGR2HSV)
Hue_l = self.hue_red_l
Hue_h = self.hue_red_h
Saturation_l = self.saturation_red_l
Saturation_h = self.saturation_red_h
Lightness_l = self.lightness_red_l
Lightness_h = self.lightness_red_h
# define range of red color in HSV
lower_red = np.array([Hue_l, Saturation_l, Lightness_l])
upper_red = np.array([Hue_h, Saturation_h, Lightness_h])
# Threshold the HSV image to get only red colors
mask = cv2.inRange(hsv, lower_red, upper_red)
if self.is_calibration_mode == True:
if self.pub_image_type == "compressed":
self.pub_image_color_filtered.publish(self.cvBridge.cv2_to_compressed_imgmsg(mask, "jpg"))
elif self.pub_image_type == "raw":
self.pub_image_color_filtered.publish(self.cvBridge.cv2_to_imgmsg(mask, "mono8"))
mask = cv2.bitwise_not(mask)
return mask
速度控制
根据订阅到的交通杆状态信息/detect/level_crossing_order,实时发布目前的检测状态以及速度命令控制小车由减速到停车再到启动的全过程。代码封装如下:
1
2
3
4
5
6
7
8
9
10
11
12
13
14
15
16
17
18
19
20
21
22
23
24
25
26
27
28
29
30
31
32
33
34
35
36
37
38
大专栏 TB3_Autorace之交通杆检测e">39
40
41
42
43
44
45
46
47
48
49
50
51
52
53
54
55
56
57
58
59
60
61
62
63
64
65
66
67
68
69
70
71
def cbLevelCrossingOrder(self, order):
    pub_level_crossing_return = UInt8()

    if order.data == self.StepOfLevelCrossing.searching_stop_sign.value:
        rospy.loginfo("Now lane_following")

        pub_level_crossing_return.data = self.StepOfLevelCrossing.searching_stop_sign.value

    elif order.data == self.StepOfLevelCrossing.searching_level.value:
        rospy.loginfo("Now searching_level")

        msg_pub_max_vel = Float64()
        msg_pub_max_vel.data = 0.10
        self.pub_max_vel.publish(msg_pub_max_vel)

        while True:
            is_level_detected, _, _ = self.fnFindLevel()
            if is_level_detected == True:
                break
            else:
                pass

        rospy.loginfo("SLOWDOWN!!")

        msg_pub_max_vel.data = 0.04
        self.pub_max_vel.publish(msg_pub_max_vel)

        pub_level_crossing_return.data = self.StepOfLevelCrossing.searching_level.value

    elif order.data == self.StepOfLevelCrossing.watching_level.value:
        rospy.loginfo("Now watching_level")

        while True:
            _, is_level_close, _ = self.fnFindLevel()
            if is_level_close == True:
                break
            else:
                pass

        rospy.loginfo("STOP~~")

        msg_pub_max_vel = Float64()
        msg_pub_max_vel.data = 0.0
        self.pub_max_vel.publish(msg_pub_max_vel)

        pub_level_crossing_return.data = self.StepOfLevelCrossing.watching_level.value

    elif order.data == self.StepOfLevelCrossing.stop.value:
        rospy.loginfo("Now stop")

        while True:
            _, _, is_level_opened = self.fnFindLevel()
            if is_level_opened == True:
                break
            else:
                pass

        rospy.loginfo("GO~~")

        msg_pub_max_vel = Float64()
        msg_pub_max_vel.data = 0.04
        self.pub_max_vel.publish(msg_pub_max_vel)

        pub_level_crossing_return.data = self.StepOfLevelCrossing.stop.value

    elif order.data == self.StepOfLevelCrossing.pass_level.value:
        rospy.loginfo("Now pass_level")

        pub_level_crossing_return.data = self.StepOfLevelCrossing.pass_level.value

    self.pub_level_crossing_return.publish(pub_level_crossing_return)
交通杆检测
这里主要利用blob斑点检测算法,在上一篇文章中《TB3_Autorace之路标检测》提到的通过设定几个检测指标对掩膜后的图像进行关键点检测,将识别出的色块用黄色圆标识。当检测到3个红色矩形框时,计算关键点的平均坐标以及关键点到平均点的距离列表,通过计算三个红色块之间的距离以及校验三个色块的线性情况判断是否检测到交通杆,将斑点用蓝色线连接标识,计算交通杆的斜率,根据斜率值的大小说明到拦路杆的距离,判断拦路杆的状态;通过计算self.stop_bar_count的值判断交通杆已经收起,小车可以通过,返回交通杆的三个状态(小车减速,停车,通过),代码封装如下:
1 |
def fnFindRectOfLevel(self, mask): |
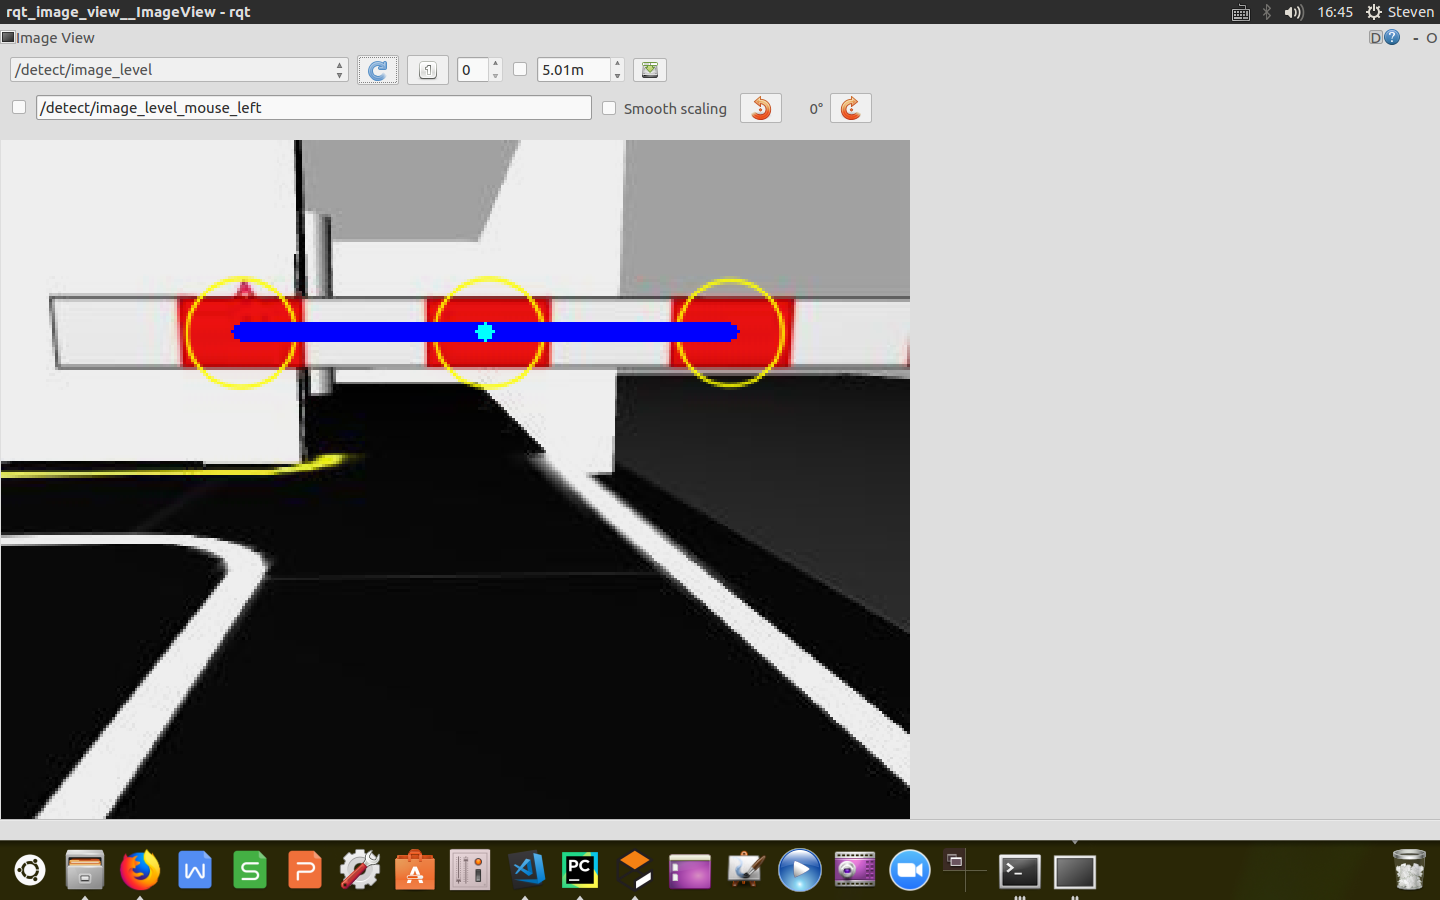
至此,已经完成对交通杆的检测工作,根据交通杆下放过程中实时计算的杆子斜率指标给小车发布速度控制命令,实现了减速,停车,通过全过程。
附
完整进程源代码:https://github.com/sun-coke/TB3_Autorace
TB3_Autorace之交通杆检测的更多相关文章
- TSR交通标志检测与识别
TSR交通标志检测与识别 说明: 传统图像处理算法的TSR集成在在ARM+DSP上运行,深度学习开发的TSR集成到FPGA上运行. 输入输出接口 Input: (1)图像视频分辨率(整型int) (2 ...
- SCNN车道线检测--(SCNN)Spatial As Deep: Spatial CNN for Traffic Scene Understanding(论文解读)
Spatial As Deep: Spatial CNN for Traffic Scene Understanding 收录:AAAI2018 (AAAI Conference on Artific ...
- 迅为IMX6Q开发板在道路交通信号控制系统解决方案中的应用
智能交通综合管控平台是为交通指挥系统服务的统一信息平台,以信息技术为主导,以计算机通信网络和智能化指挥控制管理为基础,建成集高新技术应用为一体的智能化指挥调度集成平台,实现信息交换与共享.快速反应决策 ...
- AI佳作解读系列(五) - 目标检测二十年技术综述
计算机视觉中的目标检测,因其在真实世界的大量应用需求,比如自动驾驶.视频监控.机器人视觉等,而被研究学者广泛关注. 上周四,arXiv新出一篇目标检测文献<Object Detection ...
- Yolo车辆检测+LaneNet车道检测
Yolo车辆检测+LaneNet车道检测 源代码:https://github.com/Dalaska/Driving-Scene-Understanding/blob/master/README.m ...
- ITS智能交通监控系统技术解析
ITS智能交通监控系统技术解析 红灯,逆行,变 车辆抓拍和车速检测 非法停车和交通流量检测 交叉路口违法检测 发生碰撞的交叉口是智能交通管理. 机动执法 当你需要一个可以移动的系统时,会跟着你移动.移 ...
- 点云配准的端到端深度神经网络:ICCV2019论文解读
点云配准的端到端深度神经网络:ICCV2019论文解读 DeepVCP: An End-to-End Deep Neural Network for Point Cloud Registration ...
- WIN 下的超动态菜单(三)代码
WIN 下的超动态菜单(一)简介 WIN 下的超动态菜单(二)用法 WIN 下的超动态菜单(三)代码 作者:黄山松,发表于博客园:http://www.cnblogs.com/tomview/ 超动态 ...
- 国内外从事CV相关的企业
提示:本文为笔者原创,转载请注明出处:blog.csdn.net/carson2005 经常碰到朋友问我国内从事计算机视觉(CV)领域的公司的发展情况,产品情况,甚至找工作等问题,这里,我给出自己收集 ...
随机推荐
- NOIP 骗分技巧
目录 第1章 绪论 第2章 从无解出发 \hookrightarrow↪ 2.1 无解情况 \hookrightarrow↪ 2.2 样例——白送的分数 第3章 “艰苦朴素永不忘” \hookrigh ...
- Python说文解字_详解元类
1.深入理解一切接对象: 1.1 什么是类和对象? 首先明白元类之前要明白什么叫做类.类是面向对象object oriented programming的重要概念.在面向对象中类和对象是最基本的两个概 ...
- 第37章 socket编程 之练习:实现简单的web服务器
一.参考网址 1.linux C学习之实现简单的web服务器 2.C语言实现简单Web服务器(一)
- nodejs服务后台持续运行三种方法
一.利用 forever forever是一个nodejs守护进程,完全由命令行操控.forever会监控nodejs服务,并在服务挂掉后进行重启. 1.安装 forever npm install ...
- mongodb 批量改变某一列类型 比如 String改为double,insert into select 批量插入 批量修改
//type:2代表String 1.String变Double db.集合.find({"列":{$type:2}}).forEach(function(x){ x.列=pars ...
- Python笔记_第四篇_高阶编程_GUI编程之Tkinter_5.鼠标事件
1. 鼠标点击事件: 图示: 实例: import tkinter from tkinter import ttk # 创建主窗口__编程头部 win = tkinter.Tk() # 设置标题 wi ...
- 十大经典排序算法(Javascript实现)
前言 总括: 本文结合动图详细讲述了十大经典排序算法用Javascript实现的过程. 原文博客地址:十大经典排序算法 公众号:「菜鸟学前端」,回复「666」,获取一揽子前端技术书籍 人生有情泪沾衣, ...
- Djang_框架
- 使用pythonnet调用halcon脚本
最近的项目中遇到了使用python程序结合不同部分,其中包括使用halcon处理拍摄到的图像. halcon本身提供了c++与.NET的开发库,但无python库,网上有pyhalcon之类的库,但功 ...
- 论文翻译——Recursive Deep Models for Semantic Compositionality Over a Sentiment Treebank
Abstract Semantic word spaces have been very useful but cannot express the meaning of longer phrases ...