WPF Dashboard仪表盘控件的实现

1、确定控件应该继承的基类
2、设置Dashboard的样式
<Style TargetType="{x:Type local:Dashboard}">

	<Setter Property="BorderBrush" Value="Black" />

	<Setter Property="BorderThickness" Value="1" />

	<Setter Property="Background" Value="Transparent" />

	<Setter Property="SnapsToDevicePixels" Value="True" />

	<Setter Property="UseLayoutRounding" Value="True" />

	<Setter Property="HorizontalContentAlignment" Value="Left" />

	<Setter Property="VerticalContentAlignment" Value="Center" />

	<Setter Property="Template">

		<Setter.Value>

			<ControlTemplate TargetType="{x:Type local:Dashboard}">

				<Grid>

				</Grid>

			</ControlTemplate>

		</Setter.Value>

	</Setter>

</Style>
主要注意的是,因为我们还不知道Dashboard内部到底有哪些东西,因此这里先放置了一个Grid,后面所有的代码将在<Grid></Grid>中编写
3、确定控件的内部基本构造
该表盘控件从表面上看去,共由三个部分组成
- 有文字显示的刻度
- 有进度展示的圆弧(红色与灰色部分的圆弧)
- 中间偏下的内容展示区域
3.1、PathListBox
xmlns:ec="http://schemas.microsoft.com/expression/2010/controls"
②、具体用法
<Path x:Name="path" Data="M0,0 500,0" Stroke="Black" StrokeThickness="1" />
然后放置PathListBox,在PathListBox的LayoutPath中去设置PathListBox应该按照哪个路径去排列,在ItemsTemplate中设置每个Item子项应该呈现成什么效果,最后在后台设置PathListBox的ItemsSource,设置PathListBox一共有几个Item子项。完整代码如下:
<Grid VerticalAlignment="Center">

	<Path x:Name="path" Data="M0,0 500,0" Stroke="Black" StrokeThickness="1" />

	<ec:PathListBox x:Name="pathListBox">

		<ec:PathListBox.ItemTemplate>

			<DataTemplate>

				<Border Width="3" Height="10" Background="Black" SnapsToDevicePixels="True"

						UseLayoutRounding="True" />

			</DataTemplate>

		</ec:PathListBox.ItemTemplate>

		<ec:PathListBox.LayoutPaths>

			<ec:LayoutPath Distribution="Even" Orientation="OrientToPath"

						   SourceElement="{Binding ElementName=path}" />

		</ec:PathListBox.LayoutPaths>

	</ec:PathListBox>

</Grid>
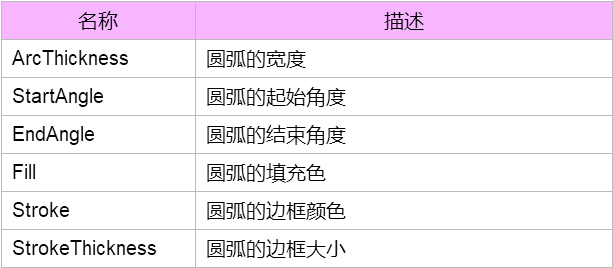
其中Distributeion与Orientation是关键属性,SourceElement指向的就是PathListBox的排列路径。最终效果如下图所示:

3.2、Arc
xmlns:ec="http://schemas.microsoft.com/expression/2010/controls"
②、具体用法
<ed:Arc x:Name="DoubleCircle" ArcThickness="8" ArcThicknessUnit="Pixel"

		EndAngle="120" StartAngle="-120"

		Width="200" Height="200" Fill="Red"

		Stretch="None" Stroke="Yellow" StrokeThickness="1" />
其中关键属性描述如下:
4、正式构建控件
4.1、刻度部分
4.1.1、长刻度部分
<!--  刻度盘完整圆弧  -->

<ed:Arc x:Name="LongTickPath" Margin="0" ArcThickness="0" ArcThicknessUnit="Pixel"

		EndAngle="120" StartAngle="-120" Stretch="None" Stroke="Black"

		StrokeThickness="1" />

<!--  长刻度  -->

<ec:PathListBox x:Name="LongTick" IsHitTestVisible="False">

	<ec:PathListBox.ItemTemplate>

		<DataTemplate>

			<Border Width="1" Height="13"

					Background="Black"

					SnapsToDevicePixels="True" UseLayoutRounding="False" />

		</DataTemplate>

	</ec:PathListBox.ItemTemplate>

	<ec:PathListBox.LayoutPaths>

		<ec:LayoutPath Distribution="Even" Orientation="OrientToPath"

					   SourceElement="{Binding ElementName=LongTickPath}" />

	</ec:PathListBox.LayoutPaths>

</ec:PathListBox>
但是这样只能看到圆弧,并没有看到PathListBox的刻度效果,因为PathListBox没有设置ItemsSource。而且由于我们是在自定义控件,因此为了设置PathListBox的ItemsSource的值,我们需要在Dashboard定义一个依赖属性LongTicksInternal,由于我们并不希望用户能够在外面能够设置LongTicksInternal的值,因此在依赖属性的set的时候,设置其访问权限,设置成private,这样就只能在样式里面访问该依赖属性,用户在外面使用的时候是看不到这个依赖属性的。
#region LongTicksInternal 长刻度集合

public IList<object> LongTicksInternal

{

	get { return (IList<object>)GetValue(LongTicksInternalProperty); }

	private set { SetValue(LongTicksInternalProperty, value); }

}

public static readonly DependencyProperty LongTicksInternalProperty =

	DependencyProperty.Register("LongTicksInternal", typeof(IList<object>), typeof(Dashboard));

#endregion
定义了该依赖属性之后,将该依赖属性给绑定到PathListBox的ItemsSource上面去
ItemsSource="{TemplateBinding ShortTicks}"
绑定了依赖属性之后还是不能显示,因为LongTicksInternal目前是空的一个集合,还需要给LongTicksInternal赋值。
public Dashboard()

{

	this.LongTicksInternal = new List<object>();

	for (int i = 0; i < 10; i++)

	{

		this.LongTicksInternal.Add(i);

	}

}
效果如下:
#region LongTickCount 长刻度个数

public int LongTickCount

{

	get { return (int)GetValue(LongTickCountProperty); }

	set { SetValue(LongTickCountProperty, value); }

}

public static readonly DependencyProperty LongTickCountProperty =

	DependencyProperty.Register("LongTickCount", typeof(int), typeof(Dashboard), new PropertyMetadata(5));

#endregion
改动下上面的for循环代码,这样就可以灵活的设置长刻度的个数了。
for (int i = 0; i < this.LongTickCount; i++)

{

	this.LongTicksInternal.Add(i);

}
4.1.2、短刻度部分
再次定义一个Path与一个PathListBox,并新增一个依赖属性,用来设置PathListBox的ItemsSource
<!--  刻度盘完整圆弧  -->

<ed:Arc x:Name="ShortTickPath" Margin="0" ArcThickness="0" ArcThicknessUnit="Pixel"

		EndAngle="120" StartAngle="-120" Stretch="None" Stroke="Black"

		StrokeThickness="1" />

<!--  长刻度  -->

<ec:PathListBox x:Name="ShortTick" IsHitTestVisible="False"

				ItemsSource="{TemplateBinding ShortTicksInternal}">

	<ec:PathListBox.ItemTemplate>

		<DataTemplate>

			<Border Width="1" Height="8"

					Background="Black"

					SnapsToDevicePixels="True" UseLayoutRounding="False" />

		</DataTemplate>

	</ec:PathListBox.ItemTemplate>

	<ec:PathListBox.LayoutPaths>

		<ec:LayoutPath Distribution="Even" Orientation="OrientToPath"

					   SourceElement="{Binding ElementName=ShortTickPath}" />

	</ec:PathListBox.LayoutPaths>

</ec:PathListBox>
短刻度个数的依赖属性
#region ShortTicksInternal 短刻度集合

public IList<object> ShortTicksInternal

{

	get { return (IList<object>)GetValue(ShortTicksInternalProperty); }

	set { SetValue(ShortTicksInternalProperty, value); }

}

public static readonly DependencyProperty ShortTicksInternalProperty =

	DependencyProperty.Register("ShortTicksInternal", typeof(IList<object>), typeof(Dashboard));

#endregion
但由于短刻度会有很多,不可能去细数表盘一共有多少个短刻度,而且如果手动设置所有的短刻度个数,会有一个问题就是短刻度和长刻度不会重合,导致宽的宽,窄的窄。我们不知道所有的短刻度个数,但是我们可以知道2个长刻度之间有多少个短刻度,因此定义一个ShortTickCount,用来设置2个长刻度间的短刻度的个数
#region ShortTickCount 短刻度个数

public int ShortTickCount

{

	get { return (int)GetValue(ShortTickCountProperty); }

	set { SetValue(ShortTickCountProperty, value); }

}

public static readonly DependencyProperty ShortTickCountProperty =

	DependencyProperty.Register("ShortTickCount", typeof(int), typeof(Dashboard), new PropertyMetadata(5));

#endregion
根据LongTickCount与ShortTickCount,生成ShortTicksInternal
this.ShortTicksInternal = new List<object>();

for (int i = 0; i < (this.LongTickCount - 1) * (this.ShortTickCount + 1) + 1; i++)

{

	this.ShortTicksInternal.Add(new object());

}

<!--  刻度盘完整圆弧  -->

<ed:Arc x:Name="LongTickPath" Margin="0" ArcThickness="0" ArcThicknessUnit="Pixel"

		EndAngle="120" StartAngle="-120" Stretch="None" Stroke="Black"

		StrokeThickness="0" />

<!--  长刻度  -->

<ec:PathListBox x:Name="LongTick" IsHitTestVisible="False"

				ItemsSource="{TemplateBinding LongTicksInternal}">

	<ec:PathListBox.ItemTemplate>

		<DataTemplate>

			<Border Width="1" Height="13"

					Background="Black" VerticalAlignment="Bottom"

					SnapsToDevicePixels="True" UseLayoutRounding="False" />

		</DataTemplate>

	</ec:PathListBox.ItemTemplate>

	<ec:PathListBox.LayoutPaths>

		<ec:LayoutPath Distribution="Even" Orientation="OrientToPath"

					   SourceElement="{Binding ElementName=LongTickPath}" />

	</ec:PathListBox.LayoutPaths>

</ec:PathListBox>

<!--  刻度盘完整圆弧  -->

<ed:Arc x:Name="ShortTickPath" Margin="5" ArcThickness="0" ArcThicknessUnit="Pixel"

		EndAngle="120" StartAngle="-120" Stretch="None" Stroke="Black"

		StrokeThickness="0" />

<!--  长刻度  -->

<ec:PathListBox x:Name="ShortTick" IsHitTestVisible="False"

				ItemsSource="{TemplateBinding ShortTicksInternal}">

	<ec:PathListBox.ItemTemplate>

		<DataTemplate>

			<Border Width="1" Height="8"

					Background="Black" VerticalAlignment="Bottom"

					SnapsToDevicePixels="True" UseLayoutRounding="False" />

		</DataTemplate>

	</ec:PathListBox.ItemTemplate>

	<ec:PathListBox.LayoutPaths>

		<ec:LayoutPath Distribution="Even" Orientation="OrientToPath"

					   SourceElement="{Binding ElementName=ShortTickPath}" />

	</ec:PathListBox.LayoutPaths>

</ec:PathListBox>
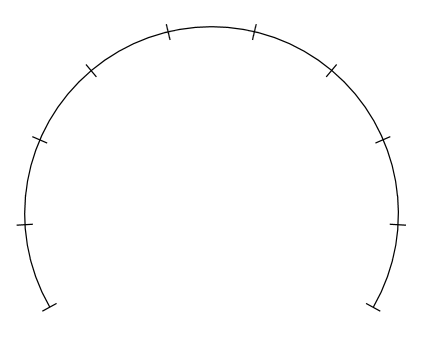
终于,刻度的效果出来了
4.1.3、文字部分
上一节已经将刻度做出来了,还差一个文字部分。文字部分与刻度部分同理,只不过不显示成刻度了,需将每个Item的样式设置成TextBlock
<ed:Arc x:Name="NumberPath" Margin="20" ArcThickness="0" ArcThicknessUnit="Pixel"

		EndAngle="120" StartAngle="-120" Stretch="None" />

<!--  刻度上显示的数字  -->

<ec:PathListBox x:Name="Number" IsHitTestVisible="False"

				ItemsSource="{TemplateBinding NumberListInternal}">

	<ec:PathListBox.ItemTemplate>

		<DataTemplate>

			<TextBlock Text="{Binding}" />

		</DataTemplate>

	</ec:PathListBox.ItemTemplate>

	<ec:PathListBox.LayoutPaths>

		<ec:LayoutPath Distribution="Even" Orientation="OrientToPath"

					   SourceElement="{Binding ElementName=NumberPath}" />

	</ec:PathListBox.LayoutPaths>

</ec:PathListBox>
#region NumberListInternal 数字集合

public IList<object> NumberListInternal

{

	get { return (IList<object>)GetValue(NumberListInternalProperty); }

	set { SetValue(NumberListInternalProperty, value); }

}

public static readonly DependencyProperty NumberListInternalProperty =

	DependencyProperty.Register("NumberListInternal", typeof(IList<object>), typeof(Dashboard));

#endregion
由于表盘上面显示的数字会有不同,因此应该让其可以设置,因此定义一个最大值与最小值的依赖属性,表盘上面的文字应该根据这两个属性来自动生成
#region Minimum 最小值

/// <summary>

/// 最小值依赖属性,用于Binding

/// </summary>

public static readonly DependencyProperty MinimumProperty =

	DependencyProperty.Register(

		"Minimum",

		typeof(double),

		typeof(Dashboard),

		new PropertyMetadata(0.0));

/// <summary>

/// 获取或设置最小值.

/// </summary>

/// <value>最小值.</value>

public double Minimum

{

	get { return (double)GetValue(MinimumProperty); }

	set { SetValue(MinimumProperty, value); }

}

#endregion

#region Maximum 最大值

/// <summary>

/// 最大值依赖属性,用于Binding

/// </summary>

public static readonly DependencyProperty MaximumProperty =

	DependencyProperty.Register(

		"Maximum",

		typeof(double),

		typeof(Dashboard),

		new PropertyMetadata(100.0));

/// <summary>

/// 获取或设置最大值.

/// </summary>

/// <value>最大值.</value>

public double Maximum

{

	get { return (double)GetValue(MaximumProperty); }

	set { SetValue(MaximumProperty, value); }

}

#endregion
由于文字只在长刻度下面显示,因此在设置Long的for循环中设置的值
this.NumberListInternal = new List<object>();

for (int i = 0; i < this.LongTickCount; i++)

{

	this.NumberListInternal.Add(Math.Round(this.Minimum + (this.Maximum - this.Minimum) / (this.LongTickCount - 1) * i));

	this.LongTicksInternal.Add(i);

}
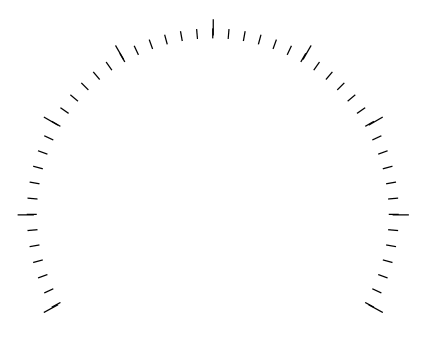
算法解析:上面已经说到,我们将表盘刻度分成了8份,那么 (this.Maximum - this.Minimum) / (this.LongTickCount - 1) 可以得到每一份所代表的值,每一份乘以i,就表示接下来的每份的值,但是表盘不可能永远都是从0开始的,我们会给它设置最小值,因此得加上Minimum,最后得出来的结果有可能会有小数点,为了省去这个小数点,使用了Math.Round()函数来取整。至此,刻度与数字部分完成了。

4.2、进度(当前值)部分

这段圆弧一共由两个圆弧组成,红色表示当前值,灰色只是作为底色展示用的,并无太大作用
<!--  刻度盘完整圆弧  -->

<ed:Arc x:Name="DoubleCircle" Margin="50" ArcThickness="1" ArcThicknessUnit="Pixel"

		EndAngle="120"

		SnapsToDevicePixels="True"

		StartAngle="-120"

		Stretch="None" Stroke="#746E7A" StrokeThickness="1" UseLayoutRounding="True" />

<!--  刻度盘当前值对应的圆弧  -->

<ed:Arc x:Name="PART_IncreaseCircle" Margin="50" ArcThickness="1" ArcThicknessUnit="Pixel"

		RenderTransformOrigin="0.5,0.5"

		StartAngle="-120" EndAngle="10"

		Stretch="None" Stroke="Yellow" StrokeThickness="1" />
效果如下:
#region Value 当前值

/// <summary>

/// 最大值依赖属性,用于Binding

/// </summary>

public static readonly DependencyProperty ValueProperty =

	DependencyProperty.Register(

		"Value",

		typeof(double),

		typeof(Dashboard),

		new PropertyMetadata(0.0, new PropertyChangedCallback(OnValuePropertyChanged)));

/// <summary>

/// 获取或设置当前值

/// </summary>

public double Value

{

	get { return (double)GetValue(ValueProperty); }

	set { SetValue(ValueProperty, value); }

}

private static void OnValuePropertyChanged(DependencyObject d, DependencyPropertyChangedEventArgs e)

{

	//Dashboard dashboard = d as Dashboard;

	//dashboard.OldAngle = dashboard.Angle;

	//dashboard.SetAngle();

	//dashboard.TransformAngle();

}

#endregion
之外为了设置圆弧的角度,还需要新增一个Angle依赖属性
#region Angle

public double Angle

{

	get { return (double)GetValue(AngleProperty); }

	set { SetValue(AngleProperty, value); }

}

public static readonly DependencyProperty AngleProperty =

	DependencyProperty.Register("Angle", typeof(double), typeof(Dashboard), new PropertyMetadata(0d));

#endregion
在代码中,根据Value的值,自动设置Angle
private void SetAngle()

{

	var diff = this.Maximum - this.Minimum;

	var valueDiff = this.Value - this.Minimum;

	this.Angle = -120 + (120 - (-120)) / diff * valueDiff;

}
算法解析:结束角度-起始角度可以得出圆弧总共经过的角度值,除以最大值与最小值的差值,得到1°对应的数值,乘以当前值与最小值的差值就可以得到差值所对应的角度总和了。由于起始角度不固定,因此最终的角度值应该是:起始角度+差值角度和

这里面有一个不足的地方就是起始角度和结束角度硬编码成-120和120了,为了灵活性,可以将其设置为2个依赖属性,这个就自己去弄吧,这里就不贴出代码了。
代码下载:https://github.com/zhidanfeng/WPF.UI
WPF Dashboard仪表盘控件的实现的更多相关文章
- WPF自定义仪表盘控件
闲来无事,分享一个仪表盘 源码: 直接复制代码即可运行,=.=! <Window x:Class="TGP.InstrumentationDemo.MainWindow" x ...
- WPF中Ribbon控件的使用
这篇博客将分享如何在WPF程序中使用Ribbon控件.Ribbon可以很大的提高软件的便捷性. 上面截图使Outlook 2010的界面,在Home标签页中,将所属的Menu都平铺的布局,非常容易的可 ...
- WPF 调用WinForm控件
WPF可以使用WindowsFormsHost控件做为容器去显示WinForm控件,类似的用法网上到处都是,就是拖一个WindowsFormsHost控件winHost1到WPF页面上,让后设置win ...
- InteropBitmap指定内存,绑定WPF的Imag控件时刷新问题。
1.InteropBitmap指定内存,绑定WPF的Imag控件的Source属性 创建InteropBitmap的时候,像素的格式必须为PixelFormats.Bgr32, 如果不是的话在绑定到I ...
- 在WPF程序中将控件所呈现的内容保存成图像(转载)
在WPF程序中将控件所呈现的内容保存成图像 转自:http://www.cnblogs.com/TianFang/archive/2012/10/07/2714140.html 有的时候,我们需要将控 ...
- 【WPF】监听WPF的WebBrowser控件弹出新窗口的事件
原文:[WPF]监听WPF的WebBrowser控件弹出新窗口的事件 WPF中自带一个WebBrowser控件,当我们使用它打开一个网页,例如百度,然后点击它其中的链接时,如果这个链接是会弹出一个新窗 ...
- 在WPF的WebBrowser控件中抑制脚本错误
原文:在WPF的WebBrowser控件中抑制脚本错误 今天用WPF的WebBrowser控件的时候,发现其竟然没有ScriptErrorsSuppressed属性,导致其到处乱弹脚本错误的对话框,在 ...
- 浅尝辄止WPF自定义用户控件(实现颜色调制器)
主要利用用户控件实现一个自定义的颜色调制控件,实现一个小小的功能,具体实现界面如下. 首先自己新建一个wpf的用户控件类,我就放在我的wpf项目的一个文件夹下面,因为是一个很小的东西,所以就没有用mv ...
- WPF 滚动文字控件MarqueeControl
原文:WPF 滚动文字控件MarqueeControl WPF使用的滚动文字控件,支持上下左右滚动方式,支持设置滚动速度 XAML部分: <UserControl x:Class="U ...
随机推荐
- centos GUI界面与命令行的切换
Linux 系统任何时候都运行在一个指定的运行级上,并且不同的运行级的程序和服务都不同,所要完成的工作和所要达到的目的都不同.Centos设置了如下表所示的运行级,并且系统可以在这些运行级别之间进行切 ...
- sdkman安装
软件开发工具管理包(Software Development Kit Manager,简称SDKMAN) 用来管理多个版本的开发环境的工具.提供命令行来安装.切换.删除.列出候选版本. 官网地址:ht ...
- Python标准模块—Regular Expressions
作者:zhbzz2007 出处:http://www.cnblogs.com/zhbzz2007 欢迎转载,也请保留这段声明.谢谢! 1 模块简介 正则表达式是一门小语言,你可以在Python中或者其 ...
- Docker - 从零开始到操作
从零开始 介绍Docker的基本概念和命令,并给出简单使用示例和参考信息. Docker - 基础讲义 http://www.cnblogs.com/anliven/p/6281373.html Do ...
- javascript 中 with 的使用
1)简要说明 with 语句可以方便地用来引用某个特定对象中已有的属性,但是不能用来给对象添加属性.要给对象创建新的属性,必须明确地引用该对象. 2)语法格式 with(object ...
- 转:Redis 配置为 Service 系统服务
在Linux中,将程序配置为服务后,就可以使用service命令对系统服务进行管理,如:start(启动).stop(停止).restart(重启)等.Redis安装后默认不会配置为系统服务,本文将介 ...
- 搭建struct环境
昨天学习了struts,发现struts并不是struts2同一框架的升级,完全是属于两个框架.struts2是在freework的基础上进行封装的. 1.struts的环境搭载 (1)创建web ...
- Js之on与addEventListener的使用与两者的不同
Js之on和addEventListener的使用与不同 一.首先介绍两者的用法: 1.on的用法:以onclick为例 第一种: obj.onclick = function(){ //do som ...
- 关于String的问题
String是在代码中非常常见的一种数据类型.它能直接像基本类型一样直接赋值(String str = "test"),也能像引用类型一样创建一个实例(String str = n ...
- MySql学习笔记(一) —— 正则表达式的使用
前面介绍利用一些关键字搭配相应的SQL语句进行数据库查找过滤,但随着过滤条件的复杂性的增加,where 子句本身的复杂性也会增加.这时我们就可以利用正则表达式来进行匹配查找. 1.基本字符匹配 ' o ...