C++实例讲解Binder通信
binder是android里面的通信机制,这就不说它如何如何好了,Goog已经说过了,这里不多说。binder是一个面向对象的编程方法,大量使用虚函数类。最近研究binder看到一网友写的,就借鉴一下。这个例子很好的解释里binder通信关系。原文:http://blog.csdn.net/new_abc/article/details/8097775 例子不错不过就是没运行起来,不过这都不是问题,关键是很容易理解。
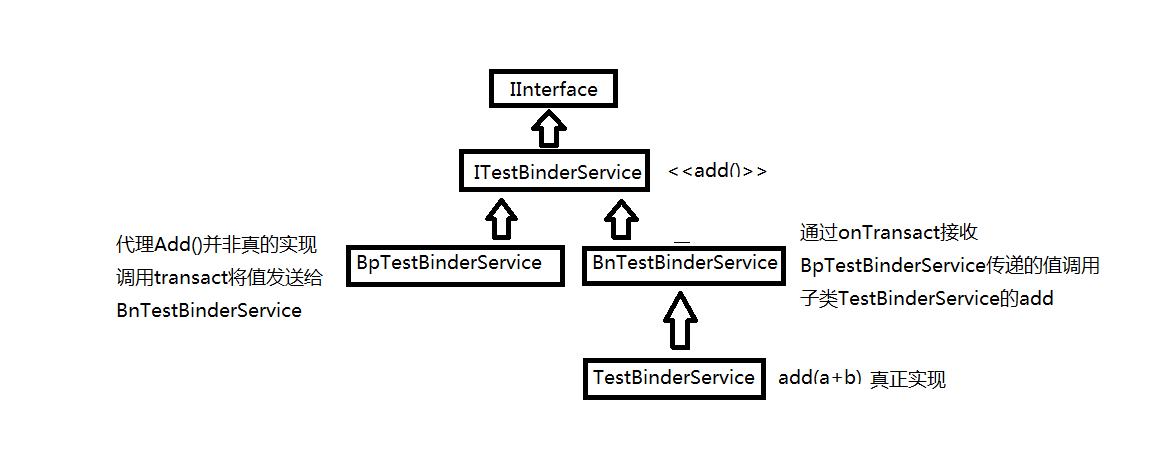
我将他的源码整理类图看看,不过这个是简单的继承关系。

基本上使用binder就这个关系,从中间一分为二,左边客户端使用,右边服务端。不管是客户端还是服务端都继承子IXXXService这个类,这个类可以裂解为客户端和服务端的“爷爷”,而“爷爷”继承IInterface,所有自定义的binder都必须继承这个类,这个是android强指针实现计数的方法。先看看源码后再理解这个图。
首先看下目录结构:
TestBinderClient目录: Android.mk ITestBinderService.cpp
TestBinderServer目录: Android.mk ITestBinderService.h main_testBinder.cpp testBinder.cpp TestBinderService.cpp TestBinderService.h
TestBinderClient下面是Binder的客户端,TestBinderServer是binder的服务端
我们先来看下biner服务端代码
1、ITestBinderService.h
     #ifndef ANDROID_ITESTBINDERSERVICE_H_

     #define ANDROID_ITESTBINDERSERVICE_H_

     #include <utils/RefBase.h>

     #include <binder/IInterface.h>

     #include <binder/Parcel.h>

     namespace android {

     class Parcel;

     class ITestBinderService: public IInterface {

     public:

         DECLARE_META_INTERFACE(TestBinderService);

         virtual int add(int a, int b) = ;

     };

     class BnTestBinderService: public BnInterface<ITestBinderService> {

     public:

         virtual status_t onTransact(uint32_t code, const Parcel& data,

                 Parcel* reply, uint32_t flags = );

     };

     }

     #endif /* ANDROID_ITESTBINDERSERVICE_H_ */
ITestBinderService.h
这里主要是定义了两个类ITestBinderService 和 BnTestBinderService,ITestBinderService 是TestBinderService 的基类,这里主要是DECLARE_META_INTERFACE 这个宏,定义在frameworks\base\include\binder\IInterface.h文件中。
 #define DECLARE_META_INTERFACE(INTERFACE)                               \

     static const android::String16 descriptor;                          \

     static android::sp<I##INTERFACE> asInterface(                       \

             const android::sp<android::IBinder>& obj);                  \

     virtual const android::String16& getInterfaceDescriptor() const;    \

     I##INTERFACE();                                                     \

     virtual ~I##INTERFACE();
DECLARE_META_INTERFACE 宏
把TestBinderService代入进去
 #define DECLARE_META_INTERFACE(TestBinderService)                               \

     static const android::String16 descriptor;                          \

     static android::sp<ITestBinderService> asInterface(                       \

             const android::sp<android::IBinder>& obj);                  \

     virtual const android::String16& getInterfaceDescriptor() const;    \

     ITestBinderService();                                                     \

     virtual ~I##TestBinderService();
带入宏后
其中封装了实现binder所需要的一些类成员变量和成员函数,通过这些成员函数可以为一个binder实现创建proxy(代理)
2、TestBinderService.h
     #ifndef ANDROID_TESTBINDERSERVICE_H_

     #define ANDROID_TESTBINDERSERVICE_H_

     #include <utils/KeyedVector.h>

     #include "ITestBinderService.h"

     namespace android {

     class TestBinderService: public BnTestBinderService {

     public:

         static void instantiate();

         int add(int a,int b);

     private:

         TestBinderService();

         virtual ~TestBinderService();

     };

     }

     #endif /* ANDROID_TESTBINDERSERVICE_H_ */
TestBinderService.h
这个文件比较简单,主要就是定义了一个类TestBinderService,继承于前面 的BnTestBinderService,并定义了一个方法add函数和instantiate
3、TestBinderService.cpp
     #define LOG_TAG "TestBinderService"

     #include <utils/Log.h>

     #include <binder/IServiceManager.h>

     #include <binder/IPCThreadState.h>

     #include "TestBinderService.h"

     static int debug_flag = ;

     namespace android {

     void TestBinderService::instantiate() {

         LOGI("Enter TestBinderService::instantiate");

         status_t st = defaultServiceManager()->addService(

                 String16("my.test.binder"), new TestBinderService());

         LOGD("ServiceManager addService ret=%d", st);

         LOGD("instantiate> end");

     }

     TestBinderService::TestBinderService() {

         LOGD(" TestBinderServicet");

     }

     TestBinderService::~TestBinderService() {

         LOGD("TestBinderService destroyed,never destroy normally");

     }

     int TestBinderService::add(int a,int b) {

         LOGI("TestBinderService::add a = %d, b = %d.", a , b);

         return a+b;

     }

  }
TestBinderService.cpp
在instantiate函数中,将TestBinderService注册到系统的binder service列表中,这样以后就可以使用这个service提供的方法,该service提供了一个add 方法,返回两个数的和。
再来看下clinet端 的代码
1、ITestBinderService.cpp
     #define LOG_TAG "ITeeveePlayerService"

     #include <utils/Log.h>

     #include "../TestBinderServer/ITestBinderService.h"

     namespace android {

     enum {

         TEST_ADD = IBinder::FIRST_CALL_TRANSACTION,

     };

     class BpTestBinderService: public BpInterface<ITestBinderService> {

     public:

         BpTestBinderService(const sp<IBinder>& impl) :

             BpInterface<ITestBinderService> (impl) {

         }

         int add(int a, int b) {

             Parcel data, reply;

             LOGI("Enter BpTestBinderService add,a = %d , b = %d", a, b);

             data.writeInterfaceToken(ITestBinderService::getInterfaceDescriptor());

             data.writeInt32(a);

             data.writeInt32(b);

             remote()->transact(TEST_ADD, data, &reply);

             int sum = reply.readInt32();

             LOGI("BpTestBinderService sum = %d", sum);

             return sum;

         }

     };

     IMPLEMENT_META_INTERFACE(TestBinderService, "android.test.ITestBinderService");

     // ----------------------------------------------------------------------

     status_t BnTestBinderService::onTransact(uint32_t code, const Parcel& data,

             Parcel* reply, uint32_t flags) {

         switch (code) {

         case TEST_ADD: {

             CHECK_INTERFACE(ITestBinderService, data, reply);

             int a = data.readInt32();

             int b = data.readInt32();

             LOGI("Enter BnTestBinderService add,a = %d , b = %d", a, b);

             int sum = ;

             sum  = add(a, b);

             LOGI("BnTestBinderService sum = %d", sum);

              reply->writeInt32(sum);

             return sum;

         }

         default:

             return BBinder::onTransact(code, data, reply, flags);

         }

     }

     }
ITestBinderService.cpp
定义了一个类BpTestBinderService,提供add方法,该方法通过调用远端的binder service提供的服务返回两个数的和重载了BnTestBinderService的onTransact方法,使其在TEST_ADD时调用add方法
这个文件里面也使用了一个宏IMPLEMENT_META_INTERFACE,也是定义在frameworks\base\include\binder\IInterface.h文件中
     #define IMPLEMENT_META_INTERFACE(INTERFACE, NAME)                       \

         const android::String16 I##INTERFACE::descriptor(NAME);             \

         const android::String16&                                            \

                 I##INTERFACE::getInterfaceDescriptor() const {              \

             return I##INTERFACE::descriptor;                                \

         }                                                                   \

         android::sp<I##INTERFACE> I##INTERFACE::asInterface(                \

                 const android::sp<android::IBinder>& obj)                   \

         {                                                                   \

             android::sp<I##INTERFACE> intr;                                 \

             if (obj != NULL) {                                              \

                 intr = static_cast<I##INTERFACE*>(                          \

                     obj->queryLocalInterface(                               \

                             I##INTERFACE::descriptor).get());               \

                 if (intr == NULL) {                                         \

                     intr = new Bp##INTERFACE(obj);                          \

                 }                                                           \

             }                                                               \

             return intr;                                                    \

         }                                                                   \

         I##INTERFACE::I##INTERFACE() { }                                    \

         I##INTERFACE::~I##INTERFACE() { }
IMPLEMENT_META_INTERFACE宏
代入展开后:
 #define IMPLEMENT_META_INTERFACE(TestBinderService, "android.test.ITestBinderService")                       \

     const android::String16 ITestBinderService::descriptor("android.test.ITestBinderService");             \

     const android::String16&                                            \

             ITestBinderService::getInterfaceDescriptor() const {              \

         return ITestBinderService::descriptor;                                \

     }                                                                   \

     android::sp<ITestBinderService> ITestBinderService::asInterface(                \

             const android::sp<android::IBinder>& obj)                   \

     {                                                                   \

         android::sp<ITestBinderService> intr;                                 \

         if (obj != NULL) {                                              \

             intr = static_cast<ITestBinderService*>(                          \

                 obj->queryLocalInterface(                               \

                         ITestBinderService::descriptor).get());               \

             if (intr == NULL) {                                         \

                 intr = new BpTestBinderService(obj);                          \

             }                                                           \

         }                                                               \

         return intr;                                                    \

     }                                                                   \

     ITestBinderService::ITestBinderService() { }                                    \

     ITestBinderService::~ITestBinderService() { }
带入到宏后
这样,server和client端的binder代码主写好了,接着就需要把binder service加入到binder中
这里有两种方法:
1、在system_init.cpp中添加
TestBinderService::instantiate();
如果是在这里加的话可以去掉TestBinderService中实现的instantiate方法,同时将TestBinderService继
承自BinderService,因为在BinderService实现了这一方法,同时将其添加到binder service
2、以单独的程序启动
main_testBinder.cpp
     #include <binder/IPCThreadState.h>

     #include <binder/ProcessState.h>

     #include <binder/IServiceManager.h>

     #include <utils/Log.h>

     #include "TestBinderService.h"

     using namespace android;

     int main(int argc, char** argv)

      {

         sp<ProcessState> proc(ProcessState::self());

         sp<IServiceManager> sm = defaultServiceManager();

         LOGI("TestBinderService before");

         TestBinderService::instantiate();

         LOGI("TestBinderService End");

         ProcessState::self()->startThreadPool();

         IPCThreadState::self()->joinThreadPool();

         return ;

     }
将server添加到servermanage里面
这里调用的是TestBinderService自己的instantiate来添加的
再来看下测试testBinder.cpp
     #define LOG_TAG "TestBinserService"

     #include <utils/Log.h>

     #include <nativehelper/jni.h>

     #include <nativehelper/JNIHelp.h>

     #include <android_runtime/AndroidRuntime.h>

     #include <binder/IServiceManager.h>

     #include "../TestBinderServer/ITestBinderService.h"

     #include "TestBinderService.h"

     using namespace android;

     int main(int argc, char** argv)

      {

         int sum = ;

         sp<ITestBinderService> mTestBinserService;

         if (mTestBinserService.get() == ) {

             sp<IServiceManager> sm = defaultServiceManager();

             sp<IBinder> binder;

             do {

                 binder = sm->getService(String16("my.test.binder"));

                 if (binder != )

                     break;

                     LOGI("getService fail");

                 usleep(); // 0.5 s

             } while (true);

             mTestBinserService = interface_cast<ITestBinderService> (binder);

             LOGE_IF(mTestBinserService == , "no ITestBinserService!?");

         }

         sum = mTestBinserService->add(, );

         LOGI("sum = %d", sum);

         return ;

     }
testBinder.cpp
以上就是测试代码。
C++实例讲解Binder通信的更多相关文章
- 基于pythonselect.select模块通信的实例讲解
基于python select.select模块通信的实例讲解 要理解select.select模块其实主要就是要理解它的参数, 以及其三个返回值. select()方法接收并监控3个通信列表, 第一 ...
- 笔记:Binder通信机制
TODO: 待修正 Binder简介 Binder是android系统中实现的一种高效的IPC机制,平常接触到的各种XxxManager,以及绑定Service时都在使用它进行跨进程操作. 它的实现基 ...
- android的Binder通信机制java层浅谈-android学习之旅(88)
1.Service Manager的Java代理对象 在Java层中,Service Manager的代理对象类型为ServiceManagerProxy.它继承并且实现了IServiceManage ...
- TCP入门与实例讲解
内容简介 TCP是TCP/IP协议栈的核心组成之一,对开发者来说,学习.掌握TCP非常重要. 本文主要内容包括:什么是TCP,为什么要学习TCP,TCP协议格式,通过实例讲解TCP的生命周期(建立连接 ...
- 从AIDL开始谈Android进程间Binder通信机制
转自: http://tech.cnnetsec.com/585.html 本文首先概述了Android的进程间通信的Binder机制,然后结合一个AIDL的例子,对Binder机制进行了解析. 概述 ...
- Python多线程、多进程和协程的实例讲解
线程.进程和协程是什么 线程.进程和协程的详细概念解释和原理剖析不是本文的重点,本文重点讲述在Python中怎样实际使用这三种东西 参考: 进程.线程.协程之概念理解 进程(Process)是计算机中 ...
- float实例讲解
float实例讲解 float是个强大的属性,在实际前端开发过程中,人们经常拿它来进行布局,但有时,使用的不好,也麻烦多多啊. 比如,现在我们要实现一个两列布局,左边的列,宽度固定:右边的列,宽度自动 ...
- S3C2440上RTC时钟驱动开发实例讲解(转载)
嵌入式Linux之我行,主要讲述和总结了本人在学习嵌入式linux中的每个步骤.一为总结经验,二希望能给想入门嵌入式Linux的朋友提供方便.如有错误之处,谢请指正. 共享资源,欢迎转载:http:/ ...
- 实例讲解Oracle数据库设置默认表空间问题
实例讲解Oracle数据库设置默认表空间问题 实例讲解Oracle数据库设置默认表空间问题,阅读实例讲解Oracle数据库设置默认表空间问题,DBA们经常会遇到一个这样令人头疼的问题:不知道谁在O ...
随机推荐
- 修改linux的hosts 后提示“无效的参数”
碰到个问题,修改linux的主机名问题. vim /etc/hosts 192.168.154.129 129192.168.154.132 132192.168.154.133 133 本地ip是1 ...
- XSS原理
跨站脚本攻击(Cross-Site Scripting),是一种网站应用程序的安全漏洞,是代码注入攻击的一种. XSS的种类: 反射型XSS: 非持久型XSS(需要自行触发,输入-输出). ...
- Bootstrap3系列:输入框组
1. 基本实例 通过在文本输入框 <input> 前面.后面或是两边加上文字或按钮,实现对表单控件的扩展. .input-group包含.input-group-addon给 .form- ...
- .NET Core采用的全新配置系统[3]: “Options模式”下的配置是如何绑定为Options对象
配置的原子结构就是单纯的键值对,并且键和值都是字符串,但是在真正的项目开发中我们一般不会单纯地以键值对的形式来使用配置.值得推荐的做法就是采用<.NET Core采用的全新配置系统[1]: 读取 ...
- C#多线程之基础篇1
在多线程这一系列文章中,我们将讲述C#语言中多线程的相关知识,在多线程(基础篇)中我们将学习以下知识点: 创建线程 中止线程 线程等待 终止线程 确定线程的状态 线程优先级 前台线程和后台线程 向线程 ...
- Ajax 提交KindEditor的数据
这次我是在EasyUI中使用了KindEditor的编辑器,按照官方给的代码,总是无法获取编辑器里面的值(内容),如下: KindEditor.ready(function (K) { ...
- 【分布式】Zookeeper客户端
一.前言 前篇博客分析了Zookeeper的序列化和通信协议,接着继续学习客户端,客户端是开发人员使用Zookeeper最主要的途径,很有必要弄懂客户端是如何与服务端通信的. 二.客户端 2.1 客户 ...
- C# WCF服务端搭建和客户端调用
1) 打开Visual Studio 2012,在菜单上点击文件->新建->项目->WCF服务应用程序.在弹出界面的"名称"对应的文本框中输入"WcfS ...
- 虚拟机安装CentOS6.4
1 概述 虚拟机(Virtual Machine)指通过软件模拟的具有完整硬件系统功能的.运行在一个完全隔离环境中的完整计算机系统,运行在主机上,完全独立,虚拟机里面的所有操作不会影响主机,即使虚拟 ...
- Servlet的生命周期及工作原理
Servlet生命周期分为三个阶段: 1,初始化阶段 调用init()方法 2,响应客户请求阶段 调用service()方法 3,终止阶段 调用destroy()方法 Servlet初始化阶段: 在 ...
