WPF2D绘制图形方法
我们先看看效果如何: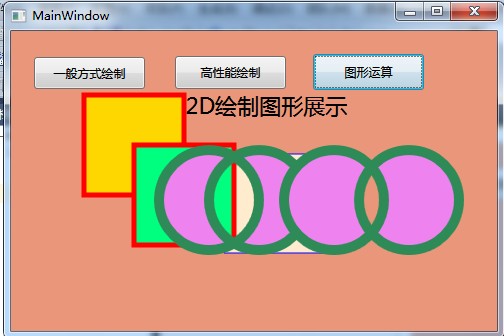
xaml文件:
<Window x:Class="WPF2D绘制图形方法.MainWindow"

        xmlns="http://schemas.microsoft.com/winfx/2006/xaml/presentation"

        xmlns:x="http://schemas.microsoft.com/winfx/2006/xaml"

        Title="MainWindow" Height="" Width="" Background="DarkSalmon">

    <Grid Name="Grid1" Height="" Width="">

        <Button Content="一般方式绘制" Height="" HorizontalAlignment="Right" Margin="0,12,329,0" Name="button1" VerticalAlignment="Top" Width="" />

        <Button Content="高性能绘制" Height="" HorizontalAlignment="Left" Margin="141,11,0,0" Name="button2" VerticalAlignment="Top" Width="" />

        <Button Content="图形运算" Height="" HorizontalAlignment="Left" Margin="279,9,0,0" Name="button3" VerticalAlignment="Top" Width="" />

        <Label Content="WPF2D绘制图形展示" Height="" HorizontalAlignment="Left" Margin="99,41,0,0" Name="label1" VerticalAlignment="Top" FontSize="" Width="" />

    </Grid>

</Window>
我们具体看看代码:
using System;

using System.Collections.Generic;

using System.Linq;

using System.Text;

using System.Windows;

using System.Windows.Controls;

using System.Windows.Data;

using System.Windows.Documents;

using System.Windows.Input;

using System.Windows.Media;

using System.Windows.Media.Imaging;

using System.Windows.Navigation;

using System.Windows.Shapes;

namespace WPF2D绘制图形方法

{

    /// <summary>

    /// MainWindow.xaml 的交互逻辑

    /// </summary>

    public partial class MainWindow : Window

    {

        public MainWindow()

        {

            InitializeComponent();

            this.button1.Click += new RoutedEventHandler(button1_Click);

            this.button2.Click += new RoutedEventHandler(button2_Click);

            this.button3.Click += new RoutedEventHandler(button3_Click);

        }

        void button1_Click(object sender, RoutedEventArgs e)

        {

            //绘制一个简单的矩形,System.Windows.Shapes 基类

            //http://msdn.microsoft.com/zh-cn/library/vstudio/system.windows.shapes(v=vs.100).aspx

            Rectangle MyRectangle = new Rectangle();

            MyRectangle.Margin = new Thickness(, , , );

            MyRectangle.Width = ;

            MyRectangle.Height = ;

            MyRectangle.Fill = Brushes.BlanchedAlmond;

            MyRectangle.Stroke = Brushes.Blue;

            Grid1.Children.Add(MyRectangle);

        }

        void button2_Click(object sender, RoutedEventArgs e)

        {

            //绘制一个简单的矩形,Geometry 类

            //http://msdn.microsoft.com/zh-cn/library/vstudio/system.windows.media.geometry.aspx

            RectangleGeometry myRectangleGeometry1 = new RectangleGeometry(new Rect(new Size(, )));

            Path myPath1 = new Path();

            myPath1.Margin = new Thickness(, , , );

            myPath1.Stroke = Brushes.Red;

            myPath1.Fill = Brushes.Gold;

            myPath1.StrokeThickness = ;

            myPath1.Data = myRectangleGeometry1;

            Grid1.Children.Add(myPath1);

            RectangleGeometry myRectangleGeometry2 = new RectangleGeometry(new Rect(new Size(, )));

            Path myPath2 = new Path();

            myPath2.Margin = new Thickness(, , , );

            myPath2.Stroke = Brushes.Red;

            myPath2.Fill = Brushes.SpringGreen;

            myPath2.StrokeThickness = ;

            myPath2.Data = myRectangleGeometry2;

            Grid1.Children.Add(myPath2);

        }

        void button3_Click(object sender, RoutedEventArgs e)

        {

            //绘制圆

            EllipseGeometry eg1 = new EllipseGeometry(new Point(, ), , );

            EllipseGeometry eg2 = new EllipseGeometry(new Point(, ), , );

            EllipseGeometry eg3 = new EllipseGeometry(new Point(, ), , );

            EllipseGeometry eg4 = new EllipseGeometry(new Point(, ), , );

            //区域进行合并,可以求交集,并集....其它等;

            CombinedGeometry cg1 = new CombinedGeometry(GeometryCombineMode.Xor, eg1, eg2);

            CombinedGeometry cg2 = new CombinedGeometry(GeometryCombineMode.Xor, eg3, eg4);

            //绘制

            Path myPath = new Path();

            myPath.Margin = new Thickness(, , , );

            myPath.Stroke = Brushes.SeaGreen;

            myPath.Fill = Brushes.Violet;

            myPath.StrokeThickness = ;

            myPath.Data = cg1;

            Grid1.Children.Add(myPath);

            Path myPath1 = new Path();

            myPath1.Margin = new Thickness(, , , );

            myPath1.Stroke = Brushes.SeaGreen;

            myPath1.Fill = Brushes.Violet;

            myPath1.StrokeThickness = ;

            myPath1.Data = cg2;

            Grid1.Children.Add(myPath1);

        }

    }

}
上面的实例也简单的展示了效果,更多的运用我们可以从msdn上,上面有详细的说明,以及运用方法
demo示例:http://files.cnblogs.com/BABLOVE/WPF2D%E7%BB%98%E5%88%B6%E5%9B%BE%E5%BD%A2%E6%96%B9%E6%B3%95.rar
WPF2D绘制图形方法的更多相关文章
- PCB ODB++(Gerber)图形绘制实现方法
这里讲解一下用net解析PCB图形绘制实现方法 一.解析PCB图形绘制实现 解析PCB图形,说简单也非常简单,先说一下,PCB Gerber图形由:点,线,弧,铜皮,文字 5类元素组成,通常简写为:P ...
- html5 Canvas绘制图形入门详解
html5,这个应该就不需要多作介绍了,只要是开发人员应该都不会陌生.html5是「新兴」的网页技术标准,目前,除IE8及其以下版本的IE浏览器之外,几乎所有主流浏览器(FireFox.Chrome. ...
- 11-UIKit(Storyboard、View的基本概念、绘制图形、UIBezierPath)
目录: 1. Storyboard 2. Views 3. View的基本概念介绍 4. 绘制图形 5. UIBezierPath 回到顶部 1. Storyboard 1.1 静态表视图 1)Sec ...
- HTML5—canvas绘制图形(1)
1.canvas基础知识 canvas元素是HTML5中新增的一个重要的元素,专门用来绘制图形,不过canvas本身不具备画图的能力,在页面中放置了canvas元素,就相当于在页面中放置了一块矩形的“ ...
- 【canvas学习笔记二】绘制图形
上一篇我们已经讲述了canvas的基本用法,学会了构建canvas环境.现在我们就来学习绘制一些基本图形. 坐标 canvas的坐标原点在左上角,从左到右X轴坐标增加,从上到下Y轴坐标增加.坐标的一个 ...
- HTML5使用Canvas来绘制图形
一.Canvas标签: 1.HTML5<canvas>元素用于图形的绘制,通过脚本(通常是javascript)来完成. 2.<canvas>标签只是图形容器,必须使用脚本来绘 ...
- Java 在PPT中绘制图形
Microsoft PowerPoint可支持在幻灯片中插入各种类型的图形并且可设置图形填充.线条颜色.图形大小.位置等.下面将通过Java编程来演示在PPT中绘制图形的方法. 工具:Free Spi ...
- Java 在PDF文档中绘制图形
本篇文档将介绍通过Java编程在PDF文档中绘制图形的方法.包括绘制矩形.椭圆形.不规则多边形.线条.弧线.曲线.扇形等等.针对方法中提供的思路,也可以自行变换图形设计思路,如菱形.梯形或者组合图形等 ...
- 实现绘制图形的ToolBar
给地图添加绘制图形的ToolBar还是有必要的,比较人性化的功能.图形的样式可以自己定制,也提供了朴实的默认样式.对 dojo 不太懂,出现了许许多多问题,真是蛋疼的一天啊.令人惊喜的是 ArcGis ...
随机推荐
- linux下网络配置 命令
一.IP的配置: 不直接修改文件方式: 设置网卡eth0的IP地址和子网掩码: sudo ifconfig eth0 192.168.2.1 netmask 255.255.255.0 将IP地址改为 ...
- Solr配置与简单Demo[转]
Solr配置与简单Demo 简介: solr是基于Lucene Java搜索库的企业级全文搜索引擎,目前是apache的一个项目.它的官方网址在http://lucene.apache.org/sol ...
- Android中应用程序如何获得系统签名权限
有些库的使用条件比较苛刻,要求同一签名的程序才可以获得访问权.此时即便是在AndroidManifest.xml中添加了相应的permission,依旧会得到没有xx访问权限的问题.比如android ...
- 移动測试技术保护源码!解码全球首款移动端白盒測试工具ThreadingTest (文章转自己主动点科技)
作者 智晓锋 - 2014/07/14 自从斯诺登曝光美监听丑闻事件之后,我国政府就将信息安全问题上升到了国家安全的高度.基于此.国内的一家创业公司推出了智能型Android真机白盒測试以及开发辅助类 ...
- innodb_support_xa
从官方解释来看,innodb_support_xa的作用是分两类: 第一,支持多实例分布式事务(外部xa事务),这个一般在分布式数据库环境中用得较多. 第二,支持内部xa事务,说白了也就是说支持bin ...
- Java基础知识强化之集合框架笔记56:Map集合之HashMap集合(HashMap<String,Student>)的案例
1. HashMap集合(HashMap<String,Student>)的案例 HashMap是最常用的Map集合,它的键值对在存储时要根据键的哈希码来确定值放在哪里. HashMap的 ...
- android 5.0 创建多用户 双开多开应用(1)
Andriod5.0多用户 双开应用 android多用户是5.0之后有的,类似windows的账户系统 不过官方还没有完全确认,API大都是hide状态 我这里提供一种方式并不适用所有的,由于我们有 ...
- sublime 2如何进入vim模式
点击菜单栏[Preferences]——[Settings - Defaults] 查找: "ignored_packages": ["Vintage"] 改为 ...
- 如何用js检测判断时间日期的间距
<!DOCTYPE html> <html> <head> <meta charset="utf-8" /> <title&g ...
- php面向对象设计模式
为什么学习设计模式: 1,更深入的了解面向对象的思想 2,有利于开发出扩展性强的东西 什么是设计模式:经常出现的典型场景的典型解决方案,就是设计模式.举个例子生活中的设计模式:比如泡妞思路,象棋招数等 ...