(7/18)重学Standford_iOS7开发_视图、绘制、手势识别_课程笔记
第七课:
1、View
一般来说,视图是一个构造块,代表屏幕上一块矩形区域,定义了一个坐标空间,并在其中绘制及添加触控事件等。
①视图的层级关系
一个视图只能有一个父视图,可以有多个子视图
- (void)addSubview:(UIView *)aView; // 父视图添加子视图 - (void)removeFromSuperview; // 子视图从父视图移除自己
②UIWindow
UIView的顶级视图:一般情况下,iOS应用程序中只有一个UIWindow,指当前显示的屏幕内容。
③UIView的初始化
a.从storyboard中初始化:awakeFromNib
b.代码初始化:alloc initWithFrame:
- (void)setup { ... }

- (void)awakeFromNib { [self setup]; }

- (id)initWithFrame:(CGRect)aRect

{

    self = [super initWithFrame:aRect];

    [self setup];

    return self;

}
④与视图相关的类
a.CGFloat
b.CGPoint:(CGFloat)x,(CGFloat)y
c.CGSize:(CGFloat)width,(CGFloat)height
d.CGRect:(CGPoint)origin,(CGSize)size
⑤坐标系统
a.像素与点的概念:每个View都有一个只读属性contentScaleFactor,用以标识一个点包含多少像素
b.坐标系统属性:(CGRect)bounds,(CGPoint)center,(CGRect)frame
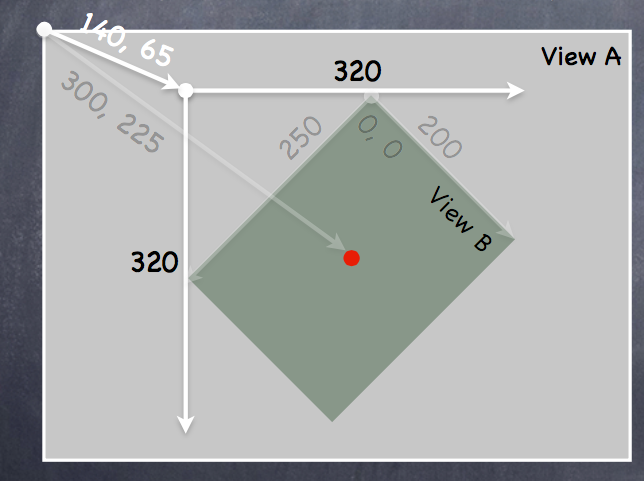
对于View B: bounds = ((0,0),(200,250))
frame = ((140,65),(320,320))
center = (300,225)
此处理解视图可以在父视图中旋转的概念。
⑥视图的创建
storyboard:drag
code:alloc initWithFrame (直接使用init默认初始化为frame = CGRectZero)
 CGRect labelRect = CGRectMake(, , , );

 UILabel *label = [[UILabel alloc] initWithFrame:labelRect];

 label.text = @”Hello!”;

 [self.view addSubview:label];
⑦自定义视图
通过实现- (void)drawRect:(CGRect)aRect; 方法绘制内容,aRect指需要优化绘制的区域,与视图最终性能有关(此处不作要求)
注意:drawRect:方法不能主动调用,若需要重绘,可以调用- (void)setNeedsDisplay;或者- (void)setNeedsDisplayInRect:(CGRect)aRect;,系统会在合适的时间调用drawRect:
a.drawRect的实现过程
使用CoreGraphics: *获取绘制内容的上下文
*创建绘制路径(UIBezierPath)
*设置绘制属性(color,font,textures,lineWidth,linecaps)
*描边(strok),填充(fill)等
b.UIBezierPath的使用
UIBezierPath封装好了上下文内容(上下文:指绘制的位置,内容等信息)
UIKit调用DrawRect之前会处理好上下文内容,需要获取当前上下文内容时使用:CGContextRef context = UIGraphicsGetCurrentContext();
UIBezierPath *path = [[UIBezierPath alloc] init];//创建

//绘制路径

[path moveToPoint:CGPointMake(, )];

[path addLineToPoint:CGPointMake(, )];

[path addLineToPoint:CGPointMake(, ]);

//闭合路径

[path closePath];

//设置描边和填充

[[UIColor greenColor] setFill];

[[UIColor redColor] setStroke];

//描边和填充

[path fill];

[path stroke];
//其他用法

 path.lineWidth = 2.0;//设置绘制路径宽度

UIBezierPath *roundedRect = [UIBezierPath bezierPathWithRoundedRect:(CGRect)bounds cornerRadius:(CGFloat)radius];//绘制圆角矩形

//绘制椭圆

UIBezierPath *oval = [UIBezierPath bezierPathWithOvalInRect:(CGRect)bounds];

//剪裁视图

[roundedRect addClip];//剪裁后的视图只能在其路径区域内绘制,超出部分不会绘制
c.透明度相关
*UIColor:属性alpha(0.0-1.0)
*UIView:(BOOL)opaque(不透明),alpha(0.0-1.0),hidden(隐藏视图)
区别请看:http://blog.csdn.net/martin_liang/article/details/40739845
d.子视图与父视图转换时上下文内容变化的问题
压入(push),取出(pop)状态
- (void)drawGreenCircle:(CGContextRef)ctxt

{

    CGContextSaveGState(ctxt);//保存当前上下文

    [[UIColor greenColor] setFill];

    // draw my circle

    CGContextRestoreGState(ctxt);//恢复保存的上下文

}

- (void)drawRect:(CGRect)aRect

{

    CGContextRef context = UIGraphicsGetCurrentContext();

    [[UIColor redColor] setFill];

    // do some stuff

    [self drawGreenCircle:context];

    // do more stuff and expect fill color to be red

}
e.绘制文本
使用NSAttributeString
NSAttributedString *text = ...;//创建绘制内容

CGSize textSize = [text size];//获取文本尺寸大小

[text drawAtPoint:(CGPoint)p];//将文本绘制到指定位置(左上角),或者使用drawInRect也可以
f.绘制图片
UIImage *image = [UIImage imageNamed:@“foo.jpg”];

//UIImage *image = [[UIImage alloc] initWithContentsOfFile:(NSString *)fullPath];

//UIImage *image = [[UIImage alloc] initWithData:(NSData *)imageData];

//使用上下文绘制

UIGraphicsBeginImageContext(CGSize);

// draw with CGContext functions

UIImage *myImage = UIGraphicsGetImageFromCurrentContext();

UIGraphicsEndImageContext();

//标准绘制

[image drawAtPoint:(CGPoint)p];

//[image drawInRect:(CGRect)r];

//[image drawAsPatternInRect:(CGRect)patRect;
g.bounds变化时视图的重绘
UIView属性:@property (nonatomic) UIViewContentMode contentMode;
//位置重绘

UIViewContentMode{Left,Right,Top,Right,BottomLeft,BottomRight,TopLeft,TopRight}

//缩放重绘

UIViewContentModeScale{ToFill,AspectFill,AspectFit} // bit stretching/shrinking

//bounds变化时调用drawRect重绘

UIViewContentModeRedraw // it is quite often that this is what you want
2、手势识别
步骤:a.创建手势识别器,添加到视图
b.实现手势触发时的调用方法
①UIGestureRecognizer
抽象超类,所有具体手势类的父类
②添加手势控制
- (void)setPannableView:(UIView *)pannableView // maybe this is a setter in a Controller

{

          _pannableView = pannableView;

          UIPanGestureRecognizer *pangr =

              [[UIPanGestureRecognizer alloc] initWithTarget:pannableView action:@selector(pan:)];//target也可是视图控制器,pan为触发时的调用方法,由target类实现

          [pannableView addGestureRecognizer:pangr];//讲手势添加到视图

}
③pan手势的例子
- (CGPoint)translationInView:(UIView *)aView;//触摸移动的距离

- (CGPoint)velocityInView:(UIView *)aView;//移动速度

- (void)setTranslation:(CGPoint)translation inView:(UIView *)aView;
④抽象超类提供的state属性
//UIGestureRecognizerStateBegin  连续手势开始

//UIGestureRecognizerStateChanged  移动

//UIGestureRecognizerStateEnded

//UIGestureRecognizerStateCancelled

//UIGestureRecognizerStateFailed

//UIGestureRecognizerStateRecognized     识别到手势

//使用举例

- (void)pan:(UIPanGestureRecognizer *)recognizer

{

    if ((recognizer.state == UIGestureRecognizerStateChanged) ||

        (recognizer.state == UIGestureRecognizerStateEnded))

     {

        CGPoint translation = [recognizer translationInView:self];

        // move something in myself (I’m a UIView) by translation.x and translation.y

        // for example, if I were a graph and my origin was set by an @property called

        origin self.origin = CGPointMake(self.origin.x+translation.x,     self.origin.y+translation.y);

        [recognizer setTranslation:CGPointZero inView:self];//恢复手势移动距离,为下次手势识别调用初始化

    }

}
⑤其他手势属性
//UIPinchGestureRecognizer 捏合手势

@property CGFloat scale; // 缩放比例

@property (readonly) CGFloat velocity; //速度(readonly)

UIRotationGestureRecognizer  旋转手势

@property CGFloat rotation; // 旋转弧度

@property (readonly) CGFloat velocity; //速度(readonly)

UISwipeGestureRecognizer  滑动手势

@property UISwipeGestureRecognizerDirection direction; //方向(4)

@property NSUInteger numberOfTouchesRequired; // 触控数量

UITapGestureRecognizer  点击手势

@property NSUInteger numberOfTapsRequired; // 点击次数

@property NSUInteger numberOfTouchesRequired; //触控数量
3、其他
#pragma mark - example
编译器标记,对方法进行分组,结果如下
5、demo
SuperCard:https://github.com/NSLogMeng/Stanford_iOS7_Study/commit/1505f50229e875776c323fcd08d4b80e04cfcff0
课程视频地址:网易公开课:http://open.163.com/movie/2014/1/2/A/M9H7S9F1H_M9H80ED2A.html
或者iTunes U搜索standford课程
(7/18)重学Standford_iOS7开发_视图、绘制、手势识别_课程笔记的更多相关文章
- (1/18)重学Standford_iOS7开发_iOS概述_课程笔记
写在前面:上次学习课程对iOS还是一知半解,由于缺乏实践,看公开课的视频有时不能很好地领会知识.带着问题去学习永远是最好的方法,接触一段时间iOS开发以后再来看斯坦福iOS公开课,又会有许多新的发现, ...
- (5/18)重学Standford_iOS7开发_视图控制器生命周期_课程笔记
第五课: 1.UITextView @property (nonatomic, readonly) NSTextStorage *textStorage;//注意为只读属性,因此不能直接更改内容,NS ...
- (6/18)重学Standford_iOS7开发_控制器多态性、导航控制器、选项卡栏控制器_课程笔记
终于有时间跟新了,两周时间复(yu)习(xi)了5门考试累觉不爱...... ------------------------------------------------------------- ...
- (8/18)重学Standford_iOS7开发_协议、block、动画_课程笔记
第八课: 1.协议 另一种安全处理id类型的方式如:id <MyProtocol> obj a.声明 //协议一般放于.h文件中或者在类的.h文件中 @protocol Foo <X ...
- (9/18)重学Standford_iOS7开发_动画、自动布局_课程笔记
最近开始实习,没多少时间更新了=_= 第九课: 1.上节课demo:Dropit完整实现 https://github.com/NSLogMeng/Stanford_iOS7_Study/commit ...
- (4/18)重学Standford_iOS7开发_框架和带属性字符串_课程笔记
第四课(干货课): (最近要复习考试,有点略跟不上节奏,这节课的内容还是比较重要的,仔细理解掌握对今后的编程会有很大影响) 本节课主要涉及到Foundation和UIKit框架,基本都是概念与API知 ...
- (3/18)重学Standford_iOS7开发_Objective-C_课程笔记
第三课: 本节课主要是游戏实现的demo,因此我将把课程中简单的几个编程技巧提取出来,重点介绍如何自己实现作业中的要求. 纸牌游戏实现: ①游戏的进行是模型的一部分(理解什么是模型:Model = W ...
- (2/18)重学Standford_iOS7开发_Xcode_课程笔记
第二课: 1.惰性初始化 -(ObjectType *)example { f(!_example) example =[[ObjectType alloc] init]; return _examp ...
- 重学 Java 设计模式:实战外观模式「基于SpringBoot开发门面模式中间件,统一控制接口白名单场景」
作者:小傅哥 博客:https://bugstack.cn 沉淀.分享.成长,让自己和他人都能有所收获! 一.前言 你感受到的容易,一定有人为你承担不容易 这句话更像是描述生活的,许许多多的磕磕绊绊总 ...
随机推荐
- python之PIL安装问题
··在windows安装模块 总是出现问题,今天安装PIL的 首先提示我的是pip命令出错,这应该是当你安装Python2.7的时候 并没有把pip模块添加进去 导致出现了这样的一个问题,为了省事,我 ...
- Homebrew安装php5及composer for mac教程
安装brew 可以查看教程:mac os x 10.9.1 安装 Homebrew软件包管理工具及brew安装maven3.1.1 首先更新下brew软件库 brew update brew tap ...
- PHP下拉框选择的实现方法
实现 第一种PHP下拉框实现方法: < ?php //提交下拉框; //直接饱触发onchange事件的结果 $id=$_GET['myselect']; // myselect 为locati ...
- ul动态增加li
--> aaa bbb <%@ page language="java" import="java.util.*" pageEncoding=&qu ...
- SQLite批量插入,修改数据库 zt
SQLiteConnection sqConnection = dataProvider.GetDbConnection(); sqConnection.Open(); SQLiteCommand s ...
- C# return dynamic/anonymous type value as function result
function: public static dynamic GetAppSecret() { //string[] result = new string[] { "", &q ...
- gulp解决RequireJS
gulp解决RequireJS项目前端缓存问题(二) 前言 这一节,我们主要解决在上一节<使用gulp解决RequireJSs项目前端缓存问题(一)>末尾提到的几个问题: 对通过req ...
- [原博客] POJ 2505 A multiplication game 组合游戏
题目链接题意: 有一个数p=1,甲乙两人轮流操作,每次可以把p乘2~9中的一个数,给定一个n,当一个人操作后p>=n,那么这个人赢,问先手是否必胜. 必胜状态:存在一种走法走到一个必败状态. 必 ...
- 中国首个 SaaS 模式的云告警平台 iOS 版 APP 上线
今天上午,国内首个 SaaS 模式的云告警平台 OneAlert 正式发布 ios 版 APP,每个 ios 用户,无需电脑,都可以通过手机全程跟踪所有告警,并且可以和每一个成员一键式电话沟通,团队协 ...
- http://blog.csdn.net/dyllove98/article/details/7706218
http://blog.csdn.net/dyllove98/article/details/7706218