吴裕雄 python 人工智能——基于Mask_RCNN目标检测(1)
import os

import sys

import random

import math

import numpy as np

import skimage.io

import matplotlib

import matplotlib.pyplot as plt

import coco

import utils

import model as modellib

import visualize

%matplotlib inline

# Root directory of the project

ROOT_DIR = os.getcwd()

# Directory to save logs and trained model

MODEL_DIR = os.path.join(ROOT_DIR, "logs")

# Local path to trained weights file

COCO_MODEL_PATH = os.path.join(ROOT_DIR, "mask_rcnn_coco.h5")

# Download COCO trained weights from Releases if needed

if not os.path.exists(COCO_MODEL_PATH):

    utils.download_trained_weights(COCO_MODEL_PATH)

# Directory of images to run detection on

IMAGE_DIR = os.path.join(ROOT_DIR, "images")
class InferenceConfig(coco.CocoConfig):
# Set batch size to 1 since we'll be running inference on
# one image at a time. Batch size = GPU_COUNT * IMAGES_PER_GPU
GPU_COUNT = 1
IMAGES_PER_GPU = 1 config = InferenceConfig()
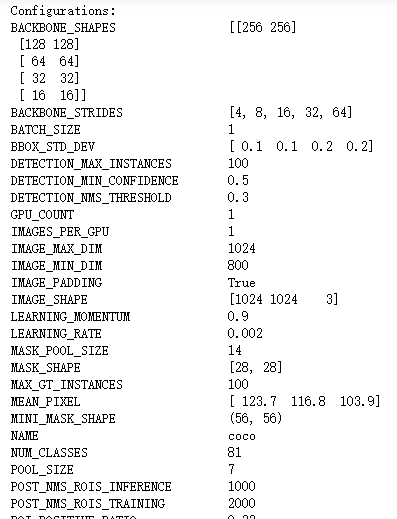
config.display()
# Create model object in inference mode.

model = modellib.MaskRCNN(mode="inference", model_dir=MODEL_DIR, config=config)

# Load weights trained on MS-COCO

model.load_weights(COCO_MODEL_PATH, by_name=True)
# COCO Class names

# Index of the class in the list is its ID. For example, to get ID of

# the teddy bear class, use: class_names.index('teddy bear')

class_names = ['BG', 'person', 'bicycle', 'car', 'motorcycle', 'airplane',

               'bus', 'train', 'truck', 'boat', 'traffic light',

               'fire hydrant', 'stop sign', 'parking meter', 'bench', 'bird',

               'cat', 'dog', 'horse', 'sheep', 'cow', 'elephant', 'bear',

               'zebra', 'giraffe', 'backpack', 'umbrella', 'handbag', 'tie',

               'suitcase', 'frisbee', 'skis', 'snowboard', 'sports ball',

               'kite', 'baseball bat', 'baseball glove', 'skateboard',

               'surfboard', 'tennis racket', 'bottle', 'wine glass', 'cup',

               'fork', 'knife', 'spoon', 'bowl', 'banana', 'apple',

               'sandwich', 'orange', 'broccoli', 'carrot', 'hot dog', 'pizza',

               'donut', 'cake', 'chair', 'couch', 'potted plant', 'bed',

               'dining table', 'toilet', 'tv', 'laptop', 'mouse', 'remote',

               'keyboard', 'cell phone', 'microwave', 'oven', 'toaster',

               'sink', 'refrigerator', 'book', 'clock', 'vase', 'scissors',

               'teddy bear', 'hair drier', 'toothbrush']
# Load a random image from the images folder
file_names = next(os.walk(IMAGE_DIR))[2]
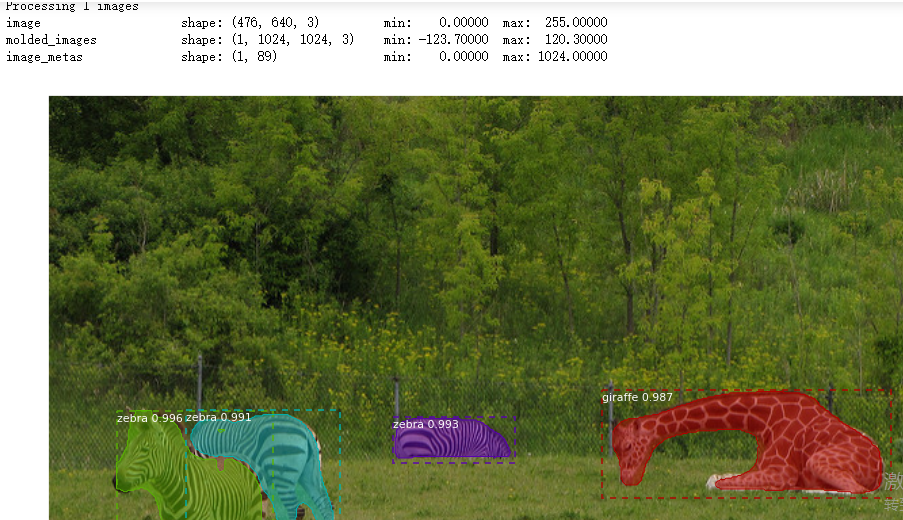
image = skimage.io.imread(os.path.join(IMAGE_DIR, random.choice(file_names))) # Run detection
results = model.detect([image], verbose=1) # Visualize results
r = results[0]
visualize.display_instances(image, r['rois'], r['masks'], r['class_ids'],
class_names, r['scores'])
吴裕雄 python 人工智能——基于Mask_RCNN目标检测(1)的更多相关文章
- 吴裕雄 PYTHON 人工智能——基于MASK_RCNN目标检测(5)
import os import sys import numpy as np import tensorflow as tf import matplotlib import matplotlib. ...
- 吴裕雄 PYTHON 人工智能——基于MASK_RCNN目标检测(4)
import os import sys import random import math import re import time import numpy as np import tenso ...
- 吴裕雄 python 人工智能——基于Mask_RCNN目标检测(3)
import os import sys import random import math import re import time import numpy as np import cv2 i ...
- 吴裕雄 python 人工智能——基于Mask_RCNN目标检测(2)
import os import sys import itertools import math import logging import json import re import random ...
- 吴裕雄 python 人工智能——基于神经网络算法在智能医疗诊断中的应用探索代码简要展示
#K-NN分类 import os import sys import time import operator import cx_Oracle import numpy as np import ...
- 吴裕雄 PYTHON 人工智能——智能医疗系统后台智能分诊模块及系统健康养生公告简约版代码展示
#coding:utf-8 import sys import cx_Oracle import numpy as np import pandas as pd import tensorflow a ...
- 吴裕雄 python 人工智能——智能医疗系统后台用户复诊模块简约版代码展示
#复诊 import sys import os import time import operator import cx_Oracle import numpy as np import pand ...
- 吴裕雄 python 人工智能——智能医疗系统后台用户注册、登录和初诊简约版代码展示
#用户注册.登录模块 #数据库脚本 CREATE TABLE usertable( userid number(8) primary key not null , username varchar(5 ...
- TF项目实战(基于SSD目标检测)——人脸检测1
SSD实战——人脸检测 Tensorflow 一 .人脸检测的困难: 1. 姿态问题 2.不同种族人, 3.光照 遮挡 带眼睛 4.视角不同 5. 不同尺度 二. 数据集介绍以及转化VOC: 1. F ...
随机推荐
- C#中字节数组byte[]和字符串string类型的相互转换
C#中字节数组byte[]和字符串string类型的相互转换: string转byte[]: byte[] byteArray = System.Text.Encoding.Default.GetBy ...
- matplotlib 做图通过弹出窗口展示 spyder
tools =>preferences=>Ipython console=>Graphics Graphics backend 中Backend 由Inline改为 Automati ...
- 搭建Hexo实现个人网站详细教程
全网最全小白搭建Hexo+Gitee/Coding/Github 全网最全小白搭建Hexo+Gitee/Coding/Github 本站内容已全部转移到https://www.myyuns.ltd,具 ...
- IntelliJ IDEA 2017.3尚硅谷-----缓存和索引的清理
- Java.util.Calendar类
Java.util.Calendar类 package myProject; import java.text.SimpleDateFormat; import java.util.Calendar; ...
- Quartus ii 初学遇到的问题以及解决
第一次下载和运行Quartus后,发现几个问题: 下载时安装易出现问题. 解决:在官网下载后,在开始破解: 运行程序出现警告:RTL波形时出现问题? 解决:testbench程序出错. 问题3:在视频 ...
- THINKCMF5 部署到 Windows服务器
问题一 [public/index.php是项目的入口文件,请配置服务器时把 public 目录做为 web 目录]这是官方文档的一句话.如何将public 目录做为 web 目录? 解答:在IIS或 ...
- IMM设置静态ip,安装系统
IMM设置静态ip,安装系统 设置ip: System Setting->Integrated Management Module->Network configuration 修改后选择 ...
- L1-7 谁是赢家
思路 这题好简单,可以分析一下,没有别的情况了. 代码 #include <bits/stdc++.h> using namespace std; int main() { int p1, ...
- xpath解析html标签
最近忙一个需求:把一个字符串形式的html文档转化成excel. 分解需求: ① 实现语言 ———— python ② html解析 ———— 用 lxml库的etree工具,xpath方式解析文档树 ...