ASP.NET Core搭建多层网站架构【8.3-编写角色业务的增删改】
2020/01/29, ASP.NET Core 3.1, VS2019
摘要:基于ASP.NET Core 3.1 WebApi搭建后端多层网站架构【8.3-编写角色业务的增删改】
编写最简单的增删改业务,涉及到DI依赖注入的使用、AutoMapper的使用、工作单元与仓储的使用、雪花Id的生成
本章节介绍了编写最简单的增删改查业务,涉及到DI依赖注入的使用、AutoMapper的使用、工作单元与仓储的使用
类库添加引用
向MS.Services类库添加对MS.Models项目的引用
BaseService
在MS.Services类库中添加BaseService.cs类:
using AutoMapper;

using MS.Common.IDCode;

using MS.DbContexts;

using MS.UnitOfWork;

namespace MS.Services

{

    public interface IBaseService

    {

    }

    public class BaseService : IBaseService

    {

        public readonly IUnitOfWork<MSDbContext> _unitOfWork;

        public readonly IMapper _mapper;

        public readonly IdWorker _idWorker;

        public BaseService(IUnitOfWork<MSDbContext> unitOfWork, IMapper mapper, IdWorker idWorker)

        {

            _unitOfWork = unitOfWork;

            _mapper = mapper;

            _idWorker = idWorker;

        }

    }

}
说明:
- 新建了IBaseService接口,后面新建的服务接口都要继承自该接口
- 新建了BaseService类,实现了IBaseService接口
- 可以看到BaseService类中,使用构造函数的方式依赖注入得到了IUnitOfWork _unitOfWork、IMapper _mapper、IdWorker _idWorker,并且是public类型,所以继承BaseService的类都可以直接使用父类的这三个成员
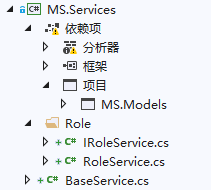
RoleService
在MS.Services类库中新建Role文件夹,在该文件夹下新建IRoleService.cs、RoleService.cs类,注意我这里两个类的命名空间都改为namespace MS.Services,而不是默认的namespace MS.Services.Role
IRoleService接口
修改IRoleService为public类型的interface接口,继承自IBaseService,并添加Create、Update、Delete三个方法:
using MS.Entities;

using MS.Models.ViewModel;

using MS.WebCore.Core;

using System.Threading.Tasks;

namespace MS.Services

{

    public interface IRoleService : IBaseService

    {

        Task<ExecuteResult<Role>> Create(RoleViewModel viewModel);

        Task<ExecuteResult> Update(RoleViewModel viewModel);

        Task<ExecuteResult> Delete(RoleViewModel viewModel);

    }

}
RoleService实现
修改RoleService为public类型,继承自BaseService和IRoleService接口,然后使用快速操作生成构造函数和实现接口

接下来开始实现新增Role的业务方法:
public async Task<ExecuteResult<Role>> Create(RoleViewModel viewModel)

{

    ExecuteResult<Role> result = new ExecuteResult<Role>();

    //检查字段

    if (viewModel.CheckField(ExecuteType.Create, _unitOfWork) is ExecuteResult checkResult && !checkResult.IsSucceed)

    {

        return result.SetFailMessage(checkResult.Message);

    }

    using (var tran = _unitOfWork.BeginTransaction())//开启一个事务

    {

        Role newRow = _mapper.Map<Role>(viewModel);

        newRow.Id = _idWorker.NextId();//获取一个雪花Id

        newRow.Creator = 1219490056771866624;//由于暂时还没有做登录,所以拿不到登录者信息,先随便写一个后面再完善

        newRow.CreateTime = DateTime.Now;

        _unitOfWork.GetRepository<Role>().Insert(newRow);

        await _unitOfWork.SaveChangesAsync();

        await tran.CommitAsync();//提交事务

        result.SetData(newRow);//添加成功,把新的实体返回回去

    }

    return result;

}
说明:
- 异步方法要加上async标记
- 执行添加之前,先进行了字段检查,如果不通过,则返回错误信息
- 使用了var tran = _unitOfWork.BeginTransaction()开启了事务,如果遇到异常,会自动回滚,如果不需要使用事务,可以去除,这里只是顺带演示下事务的使用方法
- 使用了_mapper.Map方法把字段从ViewModel映射到实体类中
- _idWorker.NextId()方法获取一个雪花Id
- 由于还没有做登录,所以没有创建者信息,所以先随便写了一个,等做了登录之后再修改
- 这里方法内部没有做trycatch捕获异常处理,之后会使用AOP拦截器,拦截业务层的每个方法,统一进行业务异常捕获处理
WebApi中调用Service
在MS.WebApi应用程序中,RoleController.cs类中,添加RoleService接口,并在Post中调用Create方法:
//using MS.Services;

//以上代码添加到using引用

public class RoleController : ControllerBase

{

    private readonly IRoleService _roleService;

    public RoleController(IRoleService roleService)

    {

        _roleService = roleService;

    }

    [HttpPost]

    public async Task<ExecuteResult> Post(RoleViewModel viewModel)

    {

        return await _roleService.Create(viewModel);

    }

}
说明:
- 这里依然使用了构造函数依赖注入获取一个接口服务
- 接口设计满足Restful规范
将接口服务添加到依赖注入
在MS.WebApi应用程序中,在Startup.cs类的ConfigureServices方法中追加:
//using MS.Services;

//以上代码添加到using

//注册IBaseService和IRoleService接口及对应的实现类

services.AddScoped<IBaseService, BaseService>();

services.AddScoped<IRoleService, RoleService>();
测试
完成后启动项目,打开Postman调试接口:
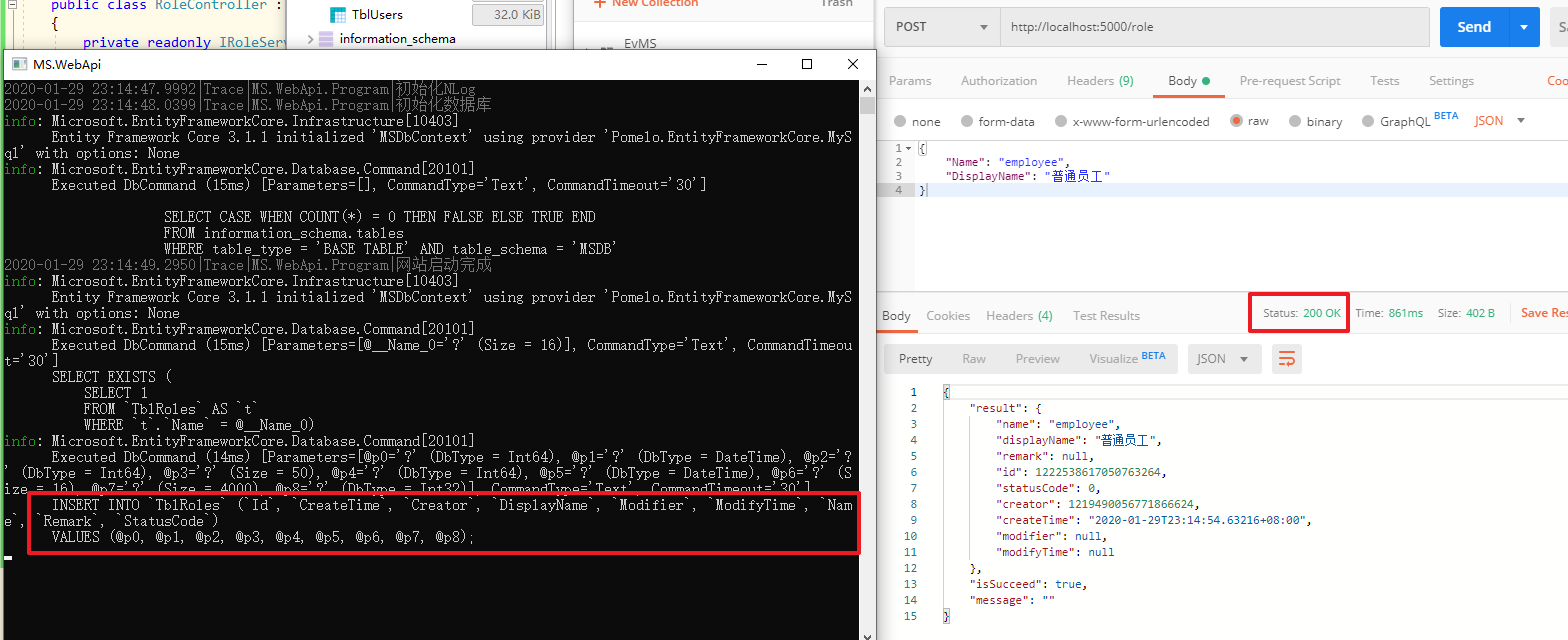
可以看到接口调用成功(也可以看到在控制台中有EntityFrameworkCore执行的sql语句)
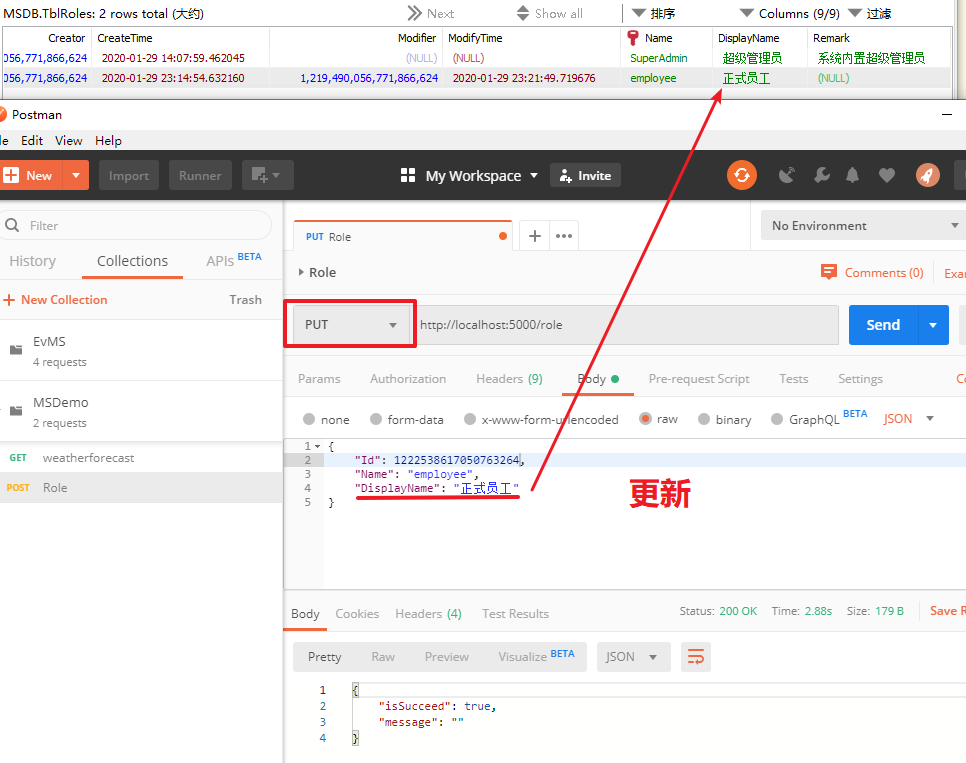
在数据库中看到新增的记录:

再重复调用一次接口,则会提示角色名称已存在:

完整的增删改角色业务代码:
using AutoMapper;

using MS.Common.IDCode;

using MS.DbContexts;

using MS.Entities;

using MS.Models.ViewModel;

using MS.UnitOfWork;

using MS.WebCore.Core;

using System;

using System.Collections.Generic;

using System.Text;

using System.Threading.Tasks;

namespace MS.Services

{

    public class RoleService : BaseService, IRoleService

    {

        public RoleService(IUnitOfWork<MSDbContext> unitOfWork, IMapper mapper, IdWorker idWorker) : base(unitOfWork, mapper, idWorker)

        {

        }

        public async Task<ExecuteResult<Role>> Create(RoleViewModel viewModel)

        {

            ExecuteResult<Role> result = new ExecuteResult<Role>();

            //检查字段

            if (viewModel.CheckField(ExecuteType.Create, _unitOfWork) is ExecuteResult checkResult && !checkResult.IsSucceed)

            {

                return result.SetFailMessage(checkResult.Message);

            }

            using (var tran = _unitOfWork.BeginTransaction())//开启一个事务

            {

                Role newRow = _mapper.Map<Role>(viewModel);

                newRow.Id = _idWorker.NextId();//获取一个雪花Id

                newRow.Creator = 1219490056771866624;//由于暂时还没有做登录,所以拿不到登录者信息,先随便写一个后面再完善

                newRow.CreateTime = DateTime.Now;

                _unitOfWork.GetRepository<Role>().Insert(newRow);

                await _unitOfWork.SaveChangesAsync();

                await tran.CommitAsync();//提交事务

                result.SetData(newRow);//添加成功,把新的实体返回回去

            }

            return result;

        }

        public async Task<ExecuteResult> Delete(RoleViewModel viewModel)

        {

            ExecuteResult result = new ExecuteResult();

            //检查字段

            if (viewModel.CheckField(ExecuteType.Delete, _unitOfWork) is ExecuteResult checkResult && !checkResult.IsSucceed)

            {

                return checkResult;

            }

            _unitOfWork.GetRepository<Role>().Delete(viewModel.Id);

            await _unitOfWork.SaveChangesAsync();//提交

            return result;

        }

        public async Task<ExecuteResult> Update(RoleViewModel viewModel)

        {

            ExecuteResult result = new ExecuteResult();

            //检查字段

            if (viewModel.CheckField(ExecuteType.Update, _unitOfWork) is ExecuteResult checkResult && !checkResult.IsSucceed)

            {

                return checkResult;

            }

            //从数据库中取出该记录

            var row = await _unitOfWork.GetRepository<Role>().FindAsync(viewModel.Id);//在viewModel.CheckField中已经获取了一次用于检查,所以此处不会重复再从数据库取一次,有缓存

            //修改对应的值

            row.Name = viewModel.Name;

            row.DisplayName = viewModel.DisplayName;

            row.Remark = viewModel.Remark;

            row.Modifier = 1219490056771866624;//由于暂时还没有做登录,所以拿不到登录者信息,先随便写一个后面再完善

            row.ModifyTime = DateTime.Now;

            _unitOfWork.GetRepository<Role>().Update(row);

            await _unitOfWork.SaveChangesAsync();//提交

            return result;

        }

    }

}
完整的接口代码:
using Microsoft.AspNetCore.Mvc;

using MS.Models.ViewModel;

using MS.Services;

using MS.WebCore.Core;

using System.Threading.Tasks;

namespace MS.WebApi.Controllers

{

    [Route("[controller]")]

    [ApiController]

    public class RoleController : ControllerBase

    {

        private readonly IRoleService _roleService;

        public RoleController(IRoleService roleService)

        {

            _roleService = roleService;

        }

        [HttpPost]

        public async Task<ExecuteResult> Post(RoleViewModel viewModel)

        {

            return await _roleService.Create(viewModel);

        }

        [HttpPut]

        public async Task<ExecuteResult> Put(RoleViewModel viewModel)

        {

            return await _roleService.Update(viewModel);

        }

        [HttpDelete]

        public async Task<ExecuteResult> Delete(long id)

        {

            return await _roleService.Delete(new RoleViewModel { Id = id });

        }

    }

}
更新接口测试:
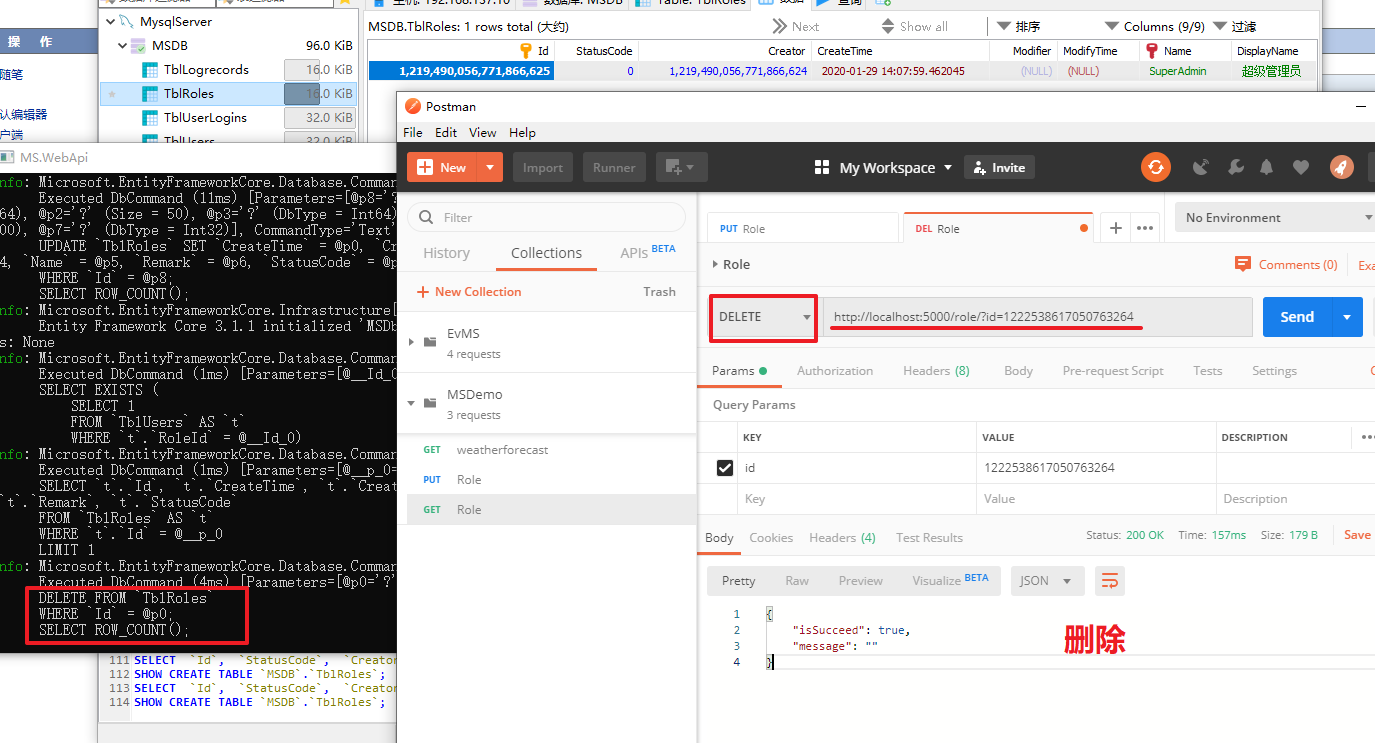
删除接口测试:
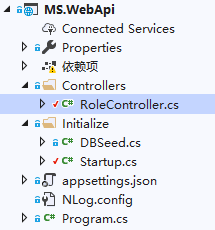
项目完成后,如下图所示
ASP.NET Core搭建多层网站架构【8.3-编写角色业务的增删改】的更多相关文章
- ASP.NET Core搭建多层网站架构【0-前言】
2020/01/26, ASP.NET Core 3.1, VS2019 摘要:基于ASP.NET Core 3.1 WebApi搭建后端多层网站架构 目录 0-前言 1-项目结构分层建立 2-公共基 ...
- ASP.NET Core搭建多层网站架构【1-项目结构分层建立】
2020/01/26, ASP.NET Core 3.1, VS2019 摘要:基于ASP.NET Core 3.1 WebApi搭建后端多层网站架构[1-项目结构分层建立] 文章目录 此分支项目代码 ...
- ASP.NET Core搭建多层网站架构【2-公共基础库】
2020/01/28, ASP.NET Core 3.1, VS2019,Newtonsoft.Json 12.0.3, Microsoft.AspNetCore.Cryptography.KeyDe ...
- ASP.NET Core搭建多层网站架构【3-xUnit单元测试之简单方法测试】
2020/01/28, ASP.NET Core 3.1, VS2019, xUnit 2.4.0 摘要:基于ASP.NET Core 3.1 WebApi搭建后端多层网站架构[3-xUnit单元测试 ...
- ASP.NET Core搭建多层网站架构【4-工作单元和仓储设计】
2020/01/28, ASP.NET Core 3.1, VS2019, Microsoft.EntityFrameworkCore.Relational 3.1.1 摘要:基于ASP.NET Co ...
- ASP.NET Core搭建多层网站架构【5-网站数据库实体设计及映射配置】
2020/01/29, ASP.NET Core 3.1, VS2019, EntityFrameworkCore 3.1.1, Microsoft.Extensions.Logging.Consol ...
- ASP.NET Core搭建多层网站架构【6-注册跨域、网站核心配置】
2020/01/29, ASP.NET Core 3.1, VS2019, NLog.Web.AspNetCore 4.9.0 摘要:基于ASP.NET Core 3.1 WebApi搭建后端多层网站 ...
- ASP.NET Core搭建多层网站架构【7-使用NLog日志记录器】
2020/01/29, ASP.NET Core 3.1, VS2019, NLog.Web.AspNetCore 4.9.0 摘要:基于ASP.NET Core 3.1 WebApi搭建后端多层网站 ...
- ASP.NET Core搭建多层网站架构【8.1-使用ViewModel注解验证】
2020/01/29, ASP.NET Core 3.1, VS2019 摘要:基于ASP.NET Core 3.1 WebApi搭建后端多层网站架构[8.1-使用ViewModel注解验证] 使用V ...
随机推荐
- 使用正则提取字符串中URL等信息
一.说明 背景:最近在做同步京东商品信息时遇到一个问题,同步后的商品详情无法在富文本中修改,强制修改会导致图片无法正常显示,研究发现详情中的图片是在css的作为背景图指定的. 解决:经过多次尝试,最后 ...
- CBE引擎概览
摘录于CBE官方文档:https://www.comblockengine.com/docs/1.0/overview/index/ 架构图总览: Switch Fabric:交换机网络,根据网络环境 ...
- css 动画开关按钮
<style> input[type="checkbox"] { display: none; } input[type="checkbox"] + ...
- Json.Net的介绍与简单实用(兼容2.0/3.0/3.5/4.5/RT)
本文的前提是你已经熟悉Json,如果您还不知道什么是Json是什么,请自行查看维基百科. 一.Json.Net是什么? Json.Net是一个读写Json效率比较高的.Net框架.Json.Net 使 ...
- 2.springboot------微服务
什么是微服务? 微服务是一种架构风格,它要求我们在开发一个应用的时候,这个应用必须构建成一系列小服务的组合:可以通过http的方式进行互通.要说微服务架构,先得说说过去我们的单体应用架构. 单体应用架 ...
- 图的bfs遍历模板(邻接矩阵存储和邻接表存储)
bfs遍历图模板伪代码: bfs(u){ //遍历u所在的连通块 queue q; //将u入队 inq[u] = true; while (q非空){ //取出q的队首元素u进行访问 for (从u ...
- 题解 【洛谷P4290】 [HAOI2008]玩具取名
这道题很明显是区间DP. 为了方便表示,我们可以将'W'.'I'.'N'.'G'分别设为1.2.3.4. 另外,DP可能有点丑,记忆化搜索可能写起来更容易理解. AC代码: #include < ...
- webpack4.41.0配置四(热替换)
每次修改都要去编译,这个操作比较繁琐.所以我们希望编译过程是自动化的,而且页面的更新也是自动化的.所以需要使用这个热替换 1.首先安装webpack-dev-server:npm install w ...
- hadoop学习笔记(十):hdfs在命令行的基本操作命令(包括文件的上传和下载和hdfs中的文件的查看等)
hdfs命令行 ()查看帮助 hdfs dfs -help ()查看当前目录信息 hdfs dfs -ls / ()上传文件 hdfs dfs -put /本地路径 /hdfs路径 ()剪切文件 hd ...
- .h头文件 .lib库文件 .dll动态链接库文件关系
.h头文件是编译时必须的,lib是链接时需要的,dll是运行时需要的. 附加依赖项的是.lib不是.dll,若生成了DLL,则肯定也生成 LIB文件.如果要完成源代码的编译和链接,有头文件和lib就够 ...