Activiti学习之spring boot 与activiti整合
声明:本文是springboot2.0的多项目构建,springboot2.0和spingboot1.5的配置是有出入的,构建项目之前请规范您的springboot版本,选择2.0以上。
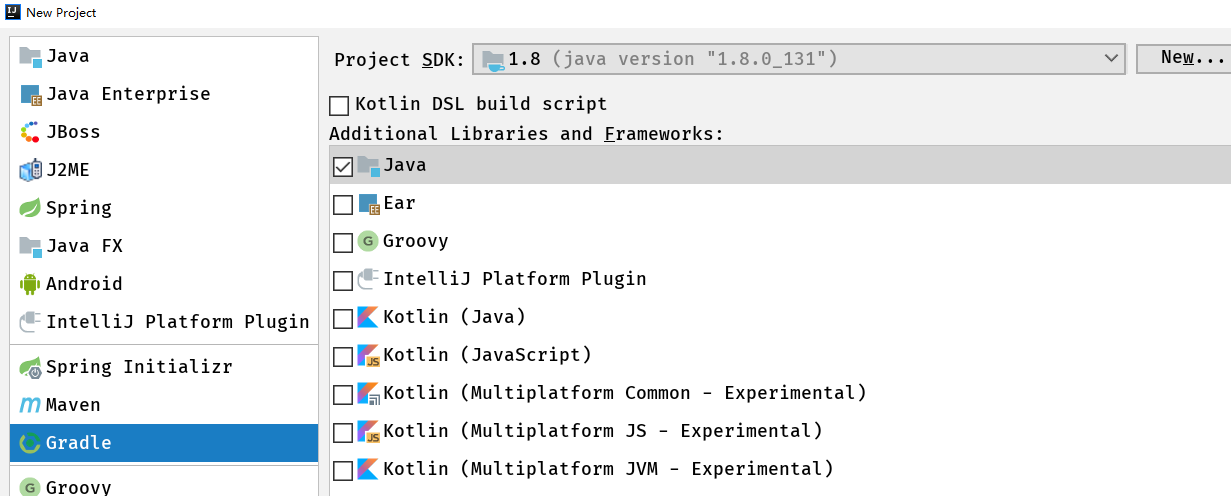
一、在IDEA中使用工具创建SpringBoot + Gradle的父工程
new -> project ->gradle

二、在父工程下新建叁个模块 dao service web
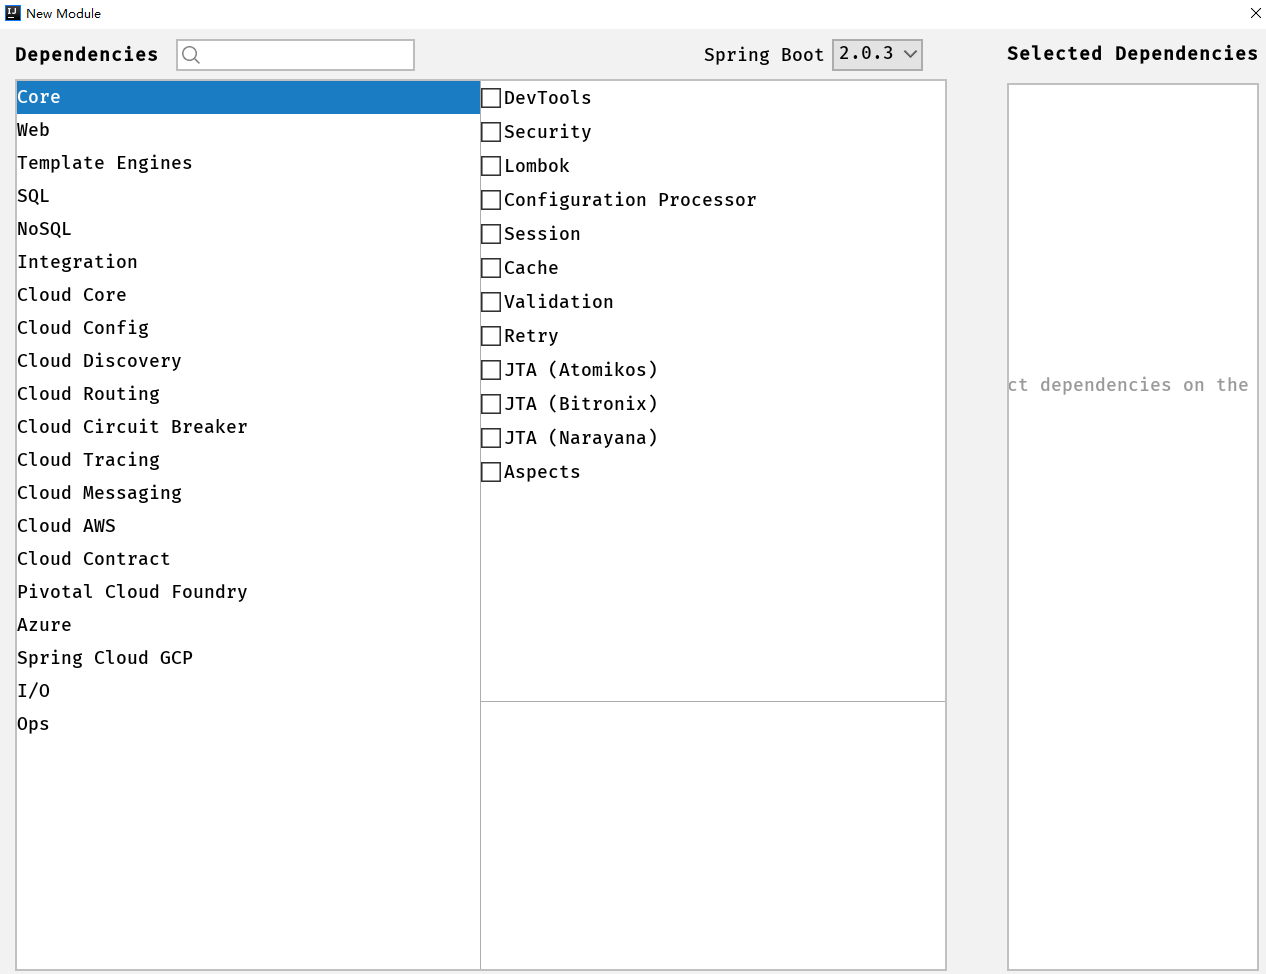
右键单击父工程 new -> module -> Spring Initializr -> type选项选中Gradle Project(其他视情况填写)
创建module的最后一步要注意,子模块最好在父工程的目录下,避免不必要的麻烦
创建每个模块的时候 有一个让你选择加载jar包的过程 你可以选也可以不选 我建议什么都不用 项目创建完毕 根据项目需求 手动在build.gradle目录下加入你需要的jar包

三、以此类推创建service模块和web模块 作为项目的子模块
四、重要的事情说三遍(很重要)
修改父项目 也就是sys(第一个创建的gradle项目)下的setting.gradle文件,加入
include 'dao','service',"web"
此代码表示 dao ,service ,web 这三个项目是他的子项目 如果不加入 后面在父项目中定义的所有规范将毫无意义

五、父项目下bulid.gradle代码

allprojects {
apply plugin: 'java'
apply plugin: 'idea'
group = 'com.huyuqiang'
version = '0.0.1-SNAPSHOT'
//jvm(java虚拟机版本号)第一个是你项目使用的jdk版本 第二个是你项目运行的jdk版本
sourceCompatibility = 1.8
targetCompatibility = 1.8
}
subprojects {
ext {
//版本号定义
springBootVersion = '2.0.3.RELEASE'
}
// java编译的时候缺省状态下会因为中文字符而失败
[compileJava, compileTestJava, javadoc].options.encoding = 'UTF-8'
repositories {
mavenLocal()
maven { url "http://maven.aliyun.com/nexus/content/groups/public" }
maven { url "https://repo.spring.io/libs-release" }
mavenCentral()
jcenter()
}
configurations {
all*.exclude module: 'commons-logging'
}
}
//定义子项目dao的配置
project(':dao') {
dependencies {
compile(
//redis缓存框架随便加的 自己项目中需要什么加什么
'org.springframework.boot:spring-boot-starter-data-redis'
//'org.springframework.boot:spring-boot-starter-jdbc',
//'org.mybatis.spring.boot:mybatis-spring-boot-starter:1.3.2'
)
testCompile(
'org.springframework.boot:spring-boot-starter-test',
"junit:junit:4.12"
)
}
}
//定义子项目service的配置
project(':service') {
dependencies {
//service依赖于dao
compile project(":dao")
compile(
'org.springframework.boot:spring-boot-starter-web',
)
testCompile(
'org.springframework.boot:spring-boot-starter-test',
"junit:junit:4.12"
)
}
}
project(':web') {
apply plugin: "war"
dependencies {
//web依赖于service
compile project(":service")
compile(
'org.springframework.boot:spring-boot-starter-web'
)
testCompile(
'org.springframework.boot:spring-boot-starter-test',
"junit:junit:4.12"
)
// providedCompile(
// "javax.servlet:javax.servlet-api:3.1.0",
// "javax.servlet.jsp:jsp-api:2.2.1-b03",
// "javax.servlet.jsp.jstl:javax.servlet.jsp.jstl-api:1.2.1"
// )
}
processResources{
/ 从'$projectDir/src/main/java'目录下复制文件到'WEB-INF/classes'目录下覆盖原有同名文件/
from("$projectDir/src/main/java")
}
</span><span style="color: #008000;">/*</span><span style="color: #008000;">自定义任务用于将当前子项目的java类打成jar包,此jar包不包含resources下的文件</span><span style="color: #008000;">*/</span><span style="color: #000000;">
def jarArchiveName</span>="${project.name}-${version}.jar"<span style="color: #000000;">
task jarWithoutResources(type: Jar) {
from sourceSets.main.output.classesDir
archiveName jarArchiveName
}
</span><span style="color: #008000;">/*</span><span style="color: #008000;">重写war任务:</span><span style="color: #008000;">*/</span><span style="color: #000000;">
war {
dependsOn jarWithoutResources
</span><span style="color: #008000;">/*</span><span style="color: #008000;"> classpath排除sourceSets.main.output.classesDir目录,加入jarWithoutResources打出来的jar包 </span><span style="color: #008000;">*/</span><span style="color: #000000;">
classpath </span>= classpath.minus(files(sourceSets.main.output.classesDir)).plus(files("$buildDir/$libsDirName/$jarArchiveName"<span style="color: #000000;">))
}
</span><span style="color: #008000;">/*</span><span style="color: #008000;">打印编译运行类路径</span><span style="color: #008000;">*/</span><span style="color: #000000;">
task jarPath </span><<<span style="color: #000000;"> {
println configurations.compile.asPath
}
}
/从子项目拷贝War任务生成的压缩包到根项目的build/explodedDist目录/
task explodedDist(type: Copy) {
into "$buildDir/explodedDist"
subprojects {
from tasks.withType(War)
}
}
六、子项目dao中bulid.gradle代码
buildscript {

    ext {

        springBootVersion = '2.0.3.RELEASE'

    }

    repositories {

        mavenCentral()

    }

    dependencies {

        classpath("org.springframework.boot:spring-boot-gradle-plugin:${springBootVersion}")

    }

}

apply plugin: 'java'


apply plugin: 'idea'


apply plugin: 'org.springframework.boot'


apply plugin: 'io.spring.dependency-management'

group = 'com.huyuqiang'


version = '0.0.1-SNAPSHOT'


sourceCompatibility = 1.8

repositories {


mavenLocal()


maven { url "http://maven.aliyun.com/nexus/content/groups/public" }


maven { url "https://repo.spring.io/libs-release" }


mavenCentral()


jcenter()


}

dependencies {


testCompile('org.springframework.boot:spring-boot-starter-test')


}
七、子项目service中bulid.gradle代码
buildscript {

    ext {

        springBootVersion = '2.0.3.RELEASE'

    }

    repositories {

        mavenCentral()

    }

    dependencies {

        classpath("org.springframework.boot:spring-boot-gradle-plugin:${springBootVersion}")

    }

}

apply plugin: 'java'


apply plugin: 'idea'


apply plugin: 'org.springframework.boot'


apply plugin: 'io.spring.dependency-management'

group = 'com.huyuqiang'


version = '0.0.1-SNAPSHOT'


sourceCompatibility = 1.8

repositories {


mavenLocal()


maven { url "http://maven.aliyun.com/nexus/content/groups/public" }


maven { url "https://repo.spring.io/libs-release" }


mavenCentral()


jcenter()


}

dependencies {


testCompile('org.springframework.boot:spring-boot-starter-test')


}
八、子项目web中bulid.gradle代码
buildscript {

    ext {

        springBootVersion = '2.0.3.RELEASE'

    }

    repositories {

        mavenCentral()

    }

    dependencies {

        classpath("org.springframework.boot:spring-boot-gradle-plugin:${springBootVersion}")

    }

}

apply plugin: 'java'


apply plugin: 'idea'


apply plugin: 'org.springframework.boot'


apply plugin: 'io.spring.dependency-management'


apply plugin: 'war'

group = 'com.huyuqiang'


version = '0.0.1-SNAPSHOT'


sourceCompatibility = 1.8

repositories {


mavenLocal()


maven { url "http://maven.aliyun.com/nexus/content/groups/public" }


maven { url "https://repo.spring.io/libs-release" }


mavenCentral()


jcenter()


}

configurations {


providedRuntime


}

dependencies {


providedRuntime('org.springframework.boot:spring-boot-starter-tomcat')


}
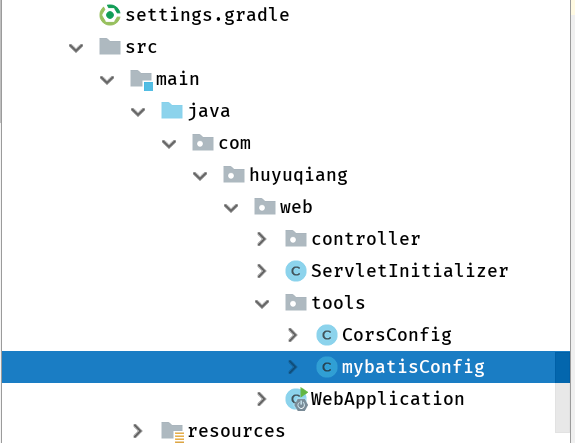
九、在web子模块下创建controller文件夹,文件夹下创建一个controller类,请看清楚我截图的包结构,如果包结构不对,启动项目的时候访问网页会报错(Whiteable Error Page) ),这是springboot有默认的包结构,如果你的包结构不对spring启动的时候是找不到
你的controller类的
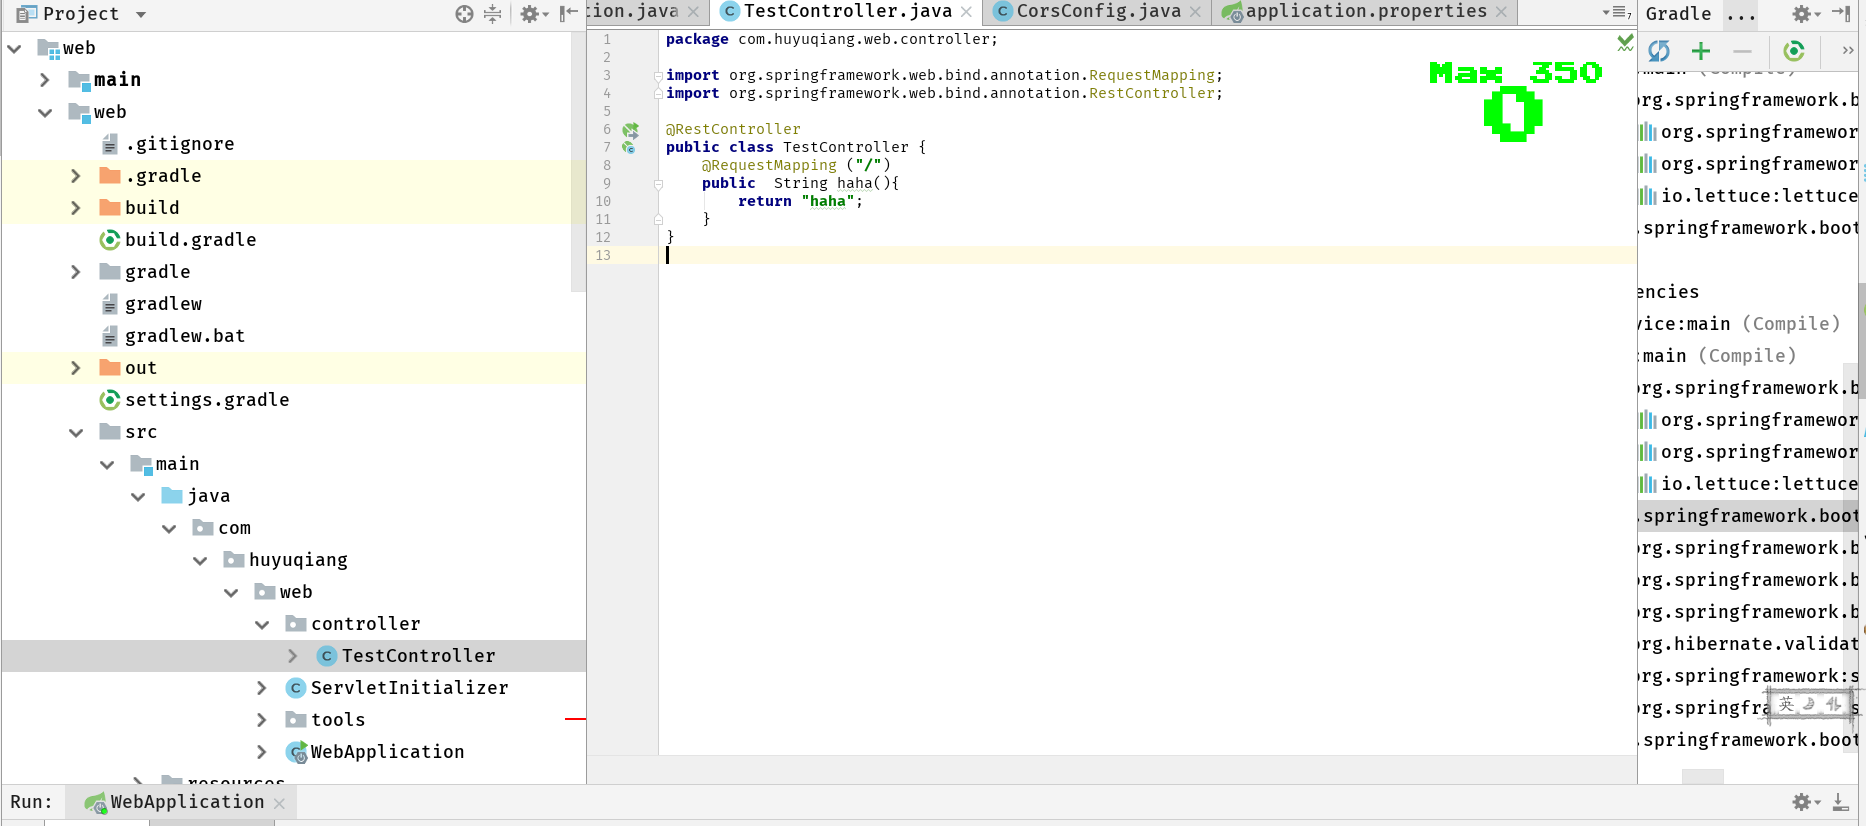
启动web子模块包下的的webapplication启动类,访问localhost:8080
重要提示:
如果你在项目中加入了data框架引用 例如 mybatis jdbc 等 你在第一次启动项目的时候如果没有配置数据源,tomcat会报错无法启动,提示你需要配置数据源。
十、打包:
在父工程目录下输入命令 gradle build
取出 web子模块下 build -> libs -> web-1.0.jar
java -jar 执行即可访问
十一、整合mybatis
逆向工程
一、添加配置文件
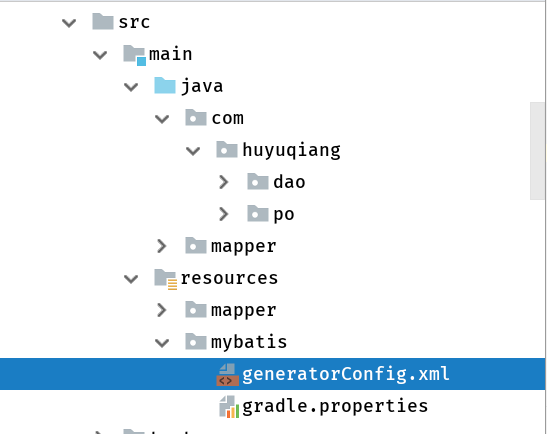
新建一个空的XML配置文件,这里以generatorConfig.xml为名,放在resources目录下mybatis文件中,没有mybatis文件夹自己建一个,顺便创建一个mapper文件夹等下要用来放xm映射文件。具体内容如下:
<?xml version="1.0" encoding="UTF-8"?>
<!DOCTYPE generatorConfiguration
PUBLIC "-//mybatis.org//DTD MyBatis Generator Configuration 1.0//EN"
"http://mybatis.org/dtd/mybatis-generator-config_1_0.dtd">
<generatorConfiguration>
<context id="Mysql" targetRuntime="MyBatis3Simple" defaultModelType="flat">
<commentGenerator>
<property name="suppressAllComments" value="true"></property>
<property name="suppressDate" value="true"></property>
<property name="javaFileEncoding" value="utf-8"/>
</commentGenerator><jdbcConnection driverClass="${driverClass}"<span style="color: #000000;">
connectionURL</span>="${connectionURL}"<span style="color: #000000;">
userId</span>="${userId}"<span style="color: #000000;">
password</span>="${password}">
</jdbcConnection> <javaTypeResolver>
<property name="forceBigDecimals" value="false"/>
</javaTypeResolver> <javaModelGenerator targetPackage="${modelPackage}" targetProject="${src_main_java}">
<property name="enableSubPackages" value="true"></property>
<property name="trimStrings" value="true"></property>
</javaModelGenerator> <sqlMapGenerator targetPackage="${sqlMapperPackage}" targetProject="${src_main_resources}" >
<property name="enableSubPackages" value="true"></property>
</sqlMapGenerator> <javaClientGenerator targetPackage="${mapperPackage}" targetProject="${src_main_java}" type="XMLMAPPER">
<property name="enableSubPackages" value="true"/>
</javaClientGenerator> <!-- sql占位符,表示所有的表 -->
<table tableName="%">
</table>
</context>
</generatorConfiguration>
创建一个gradle.properties文件 代码如下:
# JDBC 驱动类名

jdbc.driverClassName=com.mysql.jdbc.Driver

# JDBC URL: jdbc:mysql:// + 数据库主机地址 + 端口号 + 数据库名

jdbc.url=jdbc:mysql://10.0.0.88:3306/taotaodb?useUnicode=true&characterEncoding=utf8

# JDBC 用户名及密码

jdbc.username=root

jdbc.password=huyuqiang

# 生成实体类所在的包

package.model=com.huyuqiang.po

# 生成 mapper 类所在的包

package.mapper=com.huyuqiang.dao

# 生成 mapper xml 文件所在的包

package.xml=mapper
注意文件路径结构:
bulid.gradle文件代码如下:
//逆向工程方法

configurations {

    mybatisGenerator

}

dependencies {


//逆向工程jar包


mybatisGenerator 'org.mybatis.generator:mybatis-generator-core:1.3.2'


mybatisGenerator 'mysql:mysql-connector-java:5.1.38'


mybatisGenerator 'tk.mybatis:mapper:3.3.1'


testCompile('org.springframework.boot:spring-boot-starter-test')


}

def getDbProperties = {


def properties = new Properties()


file("src/main/resources/mybatis/gradle.properties").withInputStream { inputStream ->


properties.load(inputStream)


}


properties


}


//建立task并应用ant


task mybatisGenerate << {


def properties = getDbProperties()


ant.properties['targetProject'] = projectDir.path


ant.properties['driverClass'] = properties.getProperty("jdbc.driverClassName")


ant.properties['connectionURL'] = properties.getProperty("jdbc.url")


ant.properties['userId'] = properties.getProperty("jdbc.username")


ant.properties['password'] = properties.getProperty("jdbc.password")


ant.properties['src_main_java'] = sourceSets.main.java.srcDirs[0].path


ant.properties['src_main_resources'] = sourceSets.main.resources.srcDirs[0].path


ant.properties['modelPackage'] = properties.getProperty("package.model")


ant.properties['mapperPackage'] = properties.getProperty("package.mapper")


ant.properties['sqlMapperPackage'] = properties.getProperty("package.xml")


ant.taskdef(


name: 'mbgenerator',


classname: 'org.mybatis.generator.ant.GeneratorAntTask',


classpath: configurations.mybatisGenerator.asPath


)


ant.mbgenerator(overwrite: true,


configfile: 'src/main/resources/mybatis/generatorConfig.xml', verbose: true) {


propertyset {


propertyref(name: 'targetProject')


propertyref(name: 'userId')


propertyref(name: 'driverClass')


propertyref(name: 'connectionURL')


propertyref(name: 'password')


propertyref(name: 'src_main_java')


propertyref(name: 'src_main_resources')


propertyref(name: 'modelPackage')


propertyref(name: 'mapperPackage')


propertyref(name: 'sqlMapperPackage')


}


}


}
gradle重建一下,Tasks下的other中会出现mybatiGenerate

右键run,完成逆向工程。
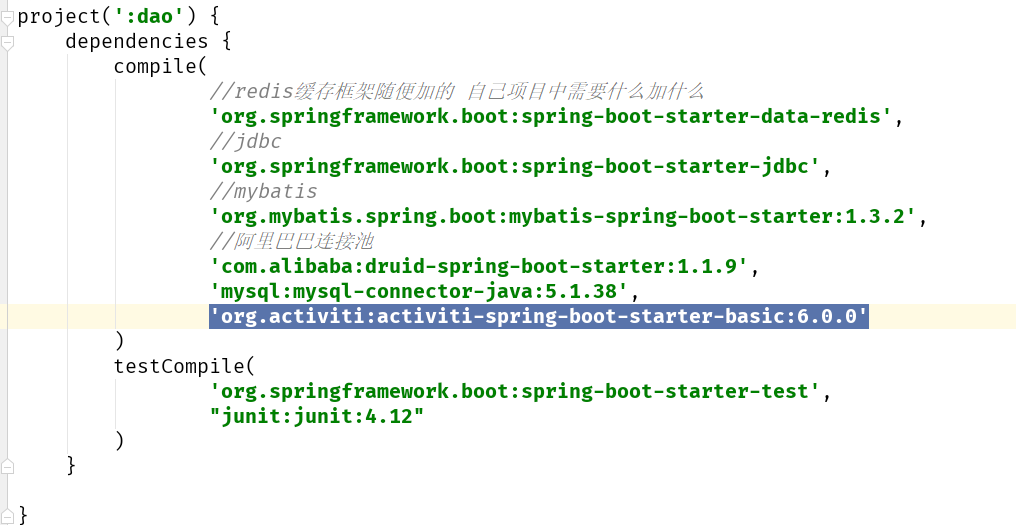
1.父项目build.gradle文件里定义dao模块处添加依赖
project(':dao') {

    dependencies {

        compile(

                //redis缓存框架随便加的 自己项目中需要什么加什么

                'org.springframework.boot:spring-boot-starter-data-redis',

                //jdbc

                'org.springframework.boot:spring-boot-starter-jdbc',

                //mybatis

                'org.mybatis.spring.boot:mybatis-spring-boot-starter:1.3.2',

                //阿里巴巴连接池

                'com.alibaba:druid-spring-boot-starter:1.1.0',

                'mysql:mysql-connector-java:5.1.38'

        )

        testCompile(

                'org.springframework.boot:spring-boot-starter-test',

                "junit:junit:4.12"

        )

    }

}
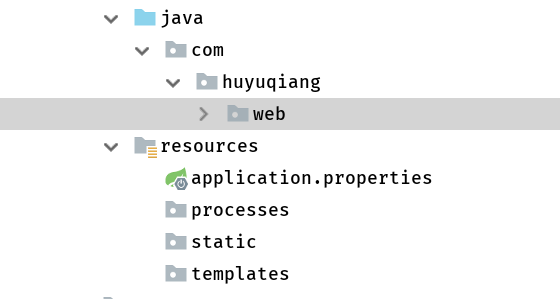
2.web子项目模块resources文件夹下applicationproperties文件加入以下内容,也可以不用properties文件,用yml文件,yml文件的格式会让人感觉很舒服,这里我就不多说了差距不大:
spring.datasource.url=jdbc\:mysql\://10.0.0.8\:3306/taotaodb?useUnicode\=true&characterEncoding\=gbk&zeroDateTimeBehavior\=convertToNull

spring.datasource.username=root

spring.datasource.password=huyuqiang

spring.datasource.driver-class-name=com.mysql.jdbc.Driver

spring.datasource.initialSize=5

spring.datasource.minIdle=5

spring.datasource.maxActive=20

spring.datasource.maxWait=60000
3.java配置代替传统的xml配置
创建一个类,此处名为mybatiConfig目录如下:
代码如下:
package com.huyuqiang.web.tools; import com.alibaba.druid.pool.DruidDataSource;
import org.apache.ibatis.session.SqlSessionFactory;
import org.mybatis.spring.SqlSessionFactoryBean;
import org.mybatis.spring.annotation.MapperScan;
import org.springframework.boot.context.properties.ConfigurationProperties;
import org.springframework.context.annotation.Bean;
import org.springframework.context.annotation.Configuration;
import org.springframework.core.io.support.PathMatchingResourcePatternResolver; @Configuration
/告诉spring mybatis生成的dao所在的位置/
@MapperScan("com.huyuqiang.dao")
public class mybatisConfig {
@Bean
public SqlSessionFactory sqlSessionFactoryBean() throws Exception {SqlSessionFactoryBean sqlSessionFactoryBean </span>= <span style="color: #0000ff;">new</span><span style="color: #000000;"> SqlSessionFactoryBean();
sqlSessionFactoryBean.setDataSource(dataSource()); PathMatchingResourcePatternResolver resolver </span>= <span style="color: #0000ff;">new</span><span style="color: #000000;"> PathMatchingResourcePatternResolver();
</span><span style="color: #008000;">//</span><span style="color: #008000;">/告诉spring mybatis生成的mapper.xml所在的位置</span>
sqlSessionFactoryBean.setMapperLocations(resolver
.getResources("classpath:/mapper/*.xml"));
return sqlSessionFactoryBean.getObject();
}@Bean
</span><span style="color: #008000;">//</span><span style="color: #008000;">配置druid阿里的连接池</span>
@ConfigurationProperties(prefix = "spring.datasource"<span style="color: #000000;">)
</span><span style="color: #0000ff;">public</span><span style="color: #000000;"> DruidDataSource dataSource() {
</span><span style="color: #0000ff;">return</span> <span style="color: #0000ff;">new</span><span style="color: #000000;"> DruidDataSource();
}
}
注:scanBasePackages = "com.huyuqiang.*" 启动的时候
@SpringBootApplication 只会扫描当前包下的文件 因为是多模块项目 springboot并不知道你的service在什么地方,所以必须加。
@SpringBootApplication(scanBasePackages = "com.huyuqiang.*")
public class WebApplication {</span><span style="color: #0000ff;">public</span> <span style="color: #0000ff;">static</span> <span style="color: #0000ff;">void</span><span style="color: #000000;"> main(String[] args) {
SpringApplication.run(WebApplication.</span><span style="color: #0000ff;">class</span><span style="color: #000000;">, args);
}
}
启动web子模块包下的的webapplication启动类,访问localhost:8080。
十二:整合activiti
我整合是把activiti生成的28张表和项目数据库的表放在一个数据库中
至于如何分开放在两个数据库中,说实在的能不能做到,可以,无非是两个数据源,配置多数据源切换
多数据源的切换springboot不是不能做,实现起来也不难,可是用起来就很不舒服,而且在管理事物上也
会出现问题,事物无法同步,其实我还是觉得多数据源这种问题尽量不要在spring中解决 还是应该放到
数据库那边 交给dba做分布式来的比较舒服,也更加正统,毕竟我是做代码层的,数据库仅限于一些sql
语言,对分布式等一些数据库层的定义语言知之甚少 也不敢妄自菲薄 只是说一下个人感想
言归正传 看看springboot2.0和activiti6.0的整合
父项目build.gradle加入jar包依赖
'org.activiti:activiti-spring-boot-starter-basic:6.0.0'
web子模块resources文件夹下创建文件夹processes文件夹,里面放入一个需要部署的bpmn流程文件,因为项目启动的时候springboot会去加载这个文件夹下的bpmn文件
完成自动部署
如果没有就会报错 如果不想让springboot自动部署流程
application.properties文件里加入一下两行代码:
spring.activiti.check-process-definitions=false
spring.activiti.database-schema-update=true

webapplication启动类里面代码如下
@SpringBootApplication(scanBasePackages = "com.huyuqiang.*",exclude = SecurityAutoConfiguration.class)
public class WebApplication {</span><span style="color: #0000ff;">public</span> <span style="color: #0000ff;">static</span> <span style="color: #0000ff;">void</span><span style="color: #000000;"> main(String[] args) {
SpringApplication.run(WebApplication.</span><span style="color: #0000ff;">class</span><span style="color: #000000;">, args);
}
}
@SpringBootApplication(exclude = SecurityAutoConfiguration.class)

剔除安全检查类,这个代码必须有不然会报一个“Error creating bean with name 'requestMappingHandlerMapping'”的错误

好了 就这么简单搞定了 启动直接可以用。
原文地址:https://blog.csdn.net/chq1988/article/details/75699792
Activiti学习之spring boot 与activiti整合的更多相关文章
- activiti学习7:spring和activiti进行整合
目录 activiti学习7:spring和activiti进行整合 一.整合原理 二.整合步骤 2.1 新建一个maven工程并导入相关依赖 2.2 创建spring配置文件 三.测试 activi ...
- Spring Boot 项目学习 (四) Spring Boot整合Swagger2自动生成API文档
0 引言 在做服务端开发的时候,难免会涉及到API 接口文档的编写,可以经历过手写API 文档的过程,就会发现,一个自动生成API文档可以提高多少的效率. 以下列举几个手写API 文档的痛点: 文档需 ...
- Spring Boot 2.x整合Redis
最近在学习Spring Boot 2.x整合Redis,在这里和大家分享一下,希望对大家有帮助. Redis是什么 Redis 是开源免费高性能的key-value数据库.有以下的优势(源于Redis ...
- Spring Boot 项目学习 (三) Spring Boot + Redis 搭建
0 引言 本文主要介绍 Spring Boot 中 Redis 的配置和基本使用. 1 配置 Redis 1. 修改pom.xml,添加Redis依赖 <!-- Spring Boot Redi ...
- spring boot 2.0 整合 elasticsearch6.5.3,spring boot 2.0 整合 elasticsearch NoNodeAvailableException
原文地址:spring boot 2.0 整合 elasticsearch NoNodeAvailableException 原文说的有点问题,下面贴出我的配置: 原码云项目地址:https://gi ...
- Spring Boot入门 and Spring Boot与ActiveMQ整合
1.Spring Boot入门 1.1什么是Spring Boot Spring 诞生时是 Java 企业版(Java Enterprise Edition,JEE,也称 J2EE)的轻量级代替品.无 ...
- Spring Boot和Dubbo整合
provider端 POM依赖 <dependencies> <dependency> <groupId>org.springframework.boot</ ...
- 转-Hive/Phoenix + Druid + JdbcTemplate 在 Spring Boot 下的整合
Hive/Phoenix + Druid + JdbcTemplate 在 Spring Boot 下的整合 http://blog.csdn.net/balabalayi/article/detai ...
- RabbitMQ入门:在Spring Boot 应用中整合RabbitMQ
在上一篇随笔中我们认识并安装了RabbitMQ,接下来我们来看下怎么在Spring Boot 应用中整合RabbitMQ. 先给出最终目录结构: 搭建步骤如下: 新建maven工程amqp 修改pom ...
随机推荐
- sublime3安装javascript控制台环境 方法2
1.下载node.js sublimeText3- 安装nodejs插件 ctrl+shift+p — install package —nodejs 2.修改配置文件 在 Sublie Text ...
- iOS开发——你真的会用SDWebImage?
http://www.cocoachina.com/ios/20160503/16064.html 本文授权转载,作者:hosea_zhou(简书) SDWebImage作为目前最受欢迎的图片下载第三 ...
- TYVJ1340 送礼物
P1340 送礼物 时间: 1000ms / 空间: 131072KiB / Java类名: Main 描述 作为惩罚,GY被遣送去帮助某神牛给女生送礼物(GY:貌似是个好差事)但是在GY看到礼物之后 ...
- socket in android
Server - JAVA package com.jim.ndkdemo; import android.net.LocalServerSocket; import android.net.Lo ...
- Linux常用命令6 压缩解压命令
.zip是Linux和Windows共有的压缩格式 1.压缩解压命令:gzip 命令英文原意:GNU zip 命令所在路径:/bin/gzip 执行权限:所有用户 语法: gzip [文件] ...
- JS运算的优先级
汇总表 下面的表将所有运算符按照优先级的不同从高到低排列. 优先级 运算类型 关联性 运算符 20 圆括号 n/a ( … ) 19 成员访问 从左到右 … . … 需计算的成员访问 从左到右 … [ ...
- SPSS和Mplus如何做非线性中介调节效应分析?如倒U形曲线
SPSS和Mplus如何做非线性中介调节效应分析?如倒U形曲线 传统的线性回归模型用的比较多,但有时候变量之间的关系更符合非线性关系,此时使用非线性模型其拟合度会更好,模型预测效果更佳.在非线性关系中 ...
- laravel 文件
用laravel处理上传的文件 1.获取上传的文件 $file=$request->file('file');2.获取上传文件的文件名(带后缀,如abc.png) $filename=$file ...
- VUE中的style 样式处理的Scope (<style scope>)
在VUE组件中,为了让样式私有化,不对全局造成污染,可以在style标签上添加scoped属性以表示它的只属于当下的模块. 但是这样的话,就会导致无法修改其他第三方组件样式,或者是内嵌的样式,解决方案 ...
- Facebook POP动效库使用教程
编者注:用Origami作iOS动效的同学如果愁怎么实现,可以把这个给开发看看作为参考哦 如果说Origami这款动效原型工具是Facebook Paper的幕后功臣,那么POP便是Origami的地 ...