Java基础之多线程篇(线程创建与终止、互斥、通信、本地变量)
线程创建与终止
线程创建
Thread类与Runnable接口的关系
public interface Runnable {

  public abstract void run();

}

public class Thread implements Runnable {

    /* What will be run. */

  private Runnable target;

  ......

  /**

   * Causes this thread to begin execution; the Java Virtual Machine

   * calls the <code>run</code> method of this thread.

   */

  public synchronized void start() {......}

  ......

    @Override

    public void run() {

        if (target != null) {

            target.run();

        }

  }

  ......

}
Thread类与Runnable接口都位于java.lang包中。从上面我们可以看出,Runnable接口中只定义了run()方法,Thread类实现了Runnable 接口并重写了run()方法。当调用Thread 类的start()方法时,实际上Java虚拟机就去调用Thread 类的run()方法,而Thread 类的run()方法中最终调用的是Runnable类型对象的run()方法。
继承Thread并重写run方法
public class ThreadTest1 extends Thread {

    @Override

    public void run() {

        while(true) {

            try {

                Thread.sleep(1000);

            } catch (InterruptedException e) {

                e.printStackTrace();

            }

            System.out.println("thread 1:" + Thread.currentThread().getName());

        }

    }

    public static void main(String[] args) {

        ThreadTest1 thread = new ThreadTest1 ();

        thread.start();

    }//main end

}
可以写成内部类的形式,new Thread(){@Override run(...)}.start();
实现Runnable接口并重写run方法
public class ThreadTest2  implements Runnable {

    @Override

    public void run() {

        while(true) {

            try {

                Thread.sleep(1000);

            } catch (InterruptedException e) {

                e.printStackTrace();

            }

            System.out.println("thread 3:" + Thread.currentThread().getName());

        }

    }

    public static void main(String[] args) {

        ThreadTest2  thread3 = new ThreadTest2();

        Thread thread = new Thread(thread3);

        thread.start();

    }//main end

}
可以写成内部类的形式,new Thread(new Runnable(){@Override run(...)}).start();
线程终止
当调用Thread类的start()方法时,将会创建一个线程,这时刚创建的线程处于就绪状态(可运行状态),并没有运行,处于就绪状态的线程就可以等JVM调度。当JVM调度该线程时,该线程进入运行状态,即执行Thread类的run()方法中的内容。run()方法执行完,线程结束,线程进入死亡状态。这是线程自然终止的过程,我们也可以通过Thread类提供的一些方法来终止线程。
interrupt()\isInterrupted()\interrupted()方法介绍
stop()方法没有做任何的清除操作就粗暴终止线程,释放该线程所持有的对象锁(下文将介绍),受该对象锁保护的其它对象对其他线程可见,因此具有不安全性。
suspend()方法会使目标线程会停下来,但仍然持有在这之前获得的对象锁,对任何线程来说,如果它们想恢复目标线程,同时又试图使用任何一个锁定的资源,就会造成死锁。
终上所述,不建议使用stop()方法和suspend()方法来终止线程,通常我们通过interrupt()方法来终止处于阻塞状态和运行状态的线程。
需要注意的是,interrupt()方法不会中断一个正在运行的线程,仅仅是将线程的中断标记设为true,当调用了阻塞方法之后,线程会不断监听中断标志,如果为true,则产生一个InterruptedException异常,将InterruptedException放在catch中就能终止线程。
isInterrupted()方法可以返回中断标记,常用循环判断条件。
interrupted()方法测试当前线程是否已经中断,线程的中断标志由该方法清除。interrupted()除了返回中断标记之外,它还会清除中断标记。
interrupt()用法
看下面例子
public class ThreadInterruptedTest extends Thread {

    @Override

    public void run() {

            try {

                int i = 0;

                while(!isInterrupted()) {

                    i ++ ;

                    Thread.sleep(1000);

                    System.out.println(this.getName() + " is looping,i=" + i);

                }

            } catch (InterruptedException e) {

                System.out.println(this.getName() +

                        " catch InterruptedException,state:" + this.getState());

                e.printStackTrace();

            }

    }

    public static void main(String[] args) throws Exception {

        ThreadInterruptedTest thread = new ThreadInterruptedTest();

        System.out.println(thread.getName()

                + " state:" + thread.getState());

        thread.start();

        System.out.println(thread.getName()

                + " state:" + thread.getState());

        Thread.sleep(5000);

        System.out.println("flag: " + thread.isInterrupted());

        //发出中断指令

        thread.interrupt();

        System.out.println("flag: " + thread.isInterrupted());

        System.out.println(thread.getName()

                + " state:" + thread.getState());

        System.out.println(thread.interrupted());

    }

}
运行结果
Thread-0 state:NEW

Thread-0 state:RUNNABLE

Thread-0 is looping,i=1

Thread-0 is looping,i=2

Thread-0 is looping,i=3

Thread-0 is looping,i=4

flag: false

flag: true

Thread-0 state:TIMED_WAITING

Thread-0 catch InterruptedException,state:RUNNABLE

false

java.lang.InterruptedException: sleep interrupted

    at java.lang.Thread.sleep(Native Method)

    at com.itpsc.thread.ThreadInterruptedTest.run(ThreadInterruptedTest.java:11)
从运行结果可以看出,调用interrupt() 发出中断指令前,中断标志位false,发出中断指令后中断标志位为true,而调用interrupted()方法后则中断标志被清除。从发出的异常来看,是在一个sleep interrupted,且发出异常后线程被唤醒,以便线程能从异常中正常退出。
线程运行状态图
线程从创建到终止可能会经历各种状态。在java.lang.Thread.State类的源码中,可以看到线程有以下几种状态:NEW、RUNNABLE、BLOCKED、WAITING、TIMED_WAITING、TERMINATED。各种状态的转换如下:
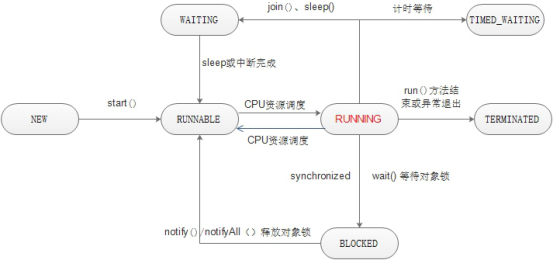
当通过Thread t = new Thread()方式创建线程时,线程处于新建状态;当调用t.start()方法时,线程进入可运行状态(注意,还没有运行);处于可运行状态的线程将在适当的时机被CPU资源调度器调度,进入运行状态,也就是线程执行run()方法中的内容;run()方法执行完或者程序异常退出线程进入终止状态。线程从运行状态也有可能进入阻塞状态,如调用wait()方法后进入等待对象锁(下文将介绍),调用sleep()方法后进行入计时等待。
线程互斥
现在我们已经知道线程的创建与终止了。互斥,是指系统中的某些共享资源,一次只允许一个线程访问,当一个线程正在访问该临界资源时,其它线程必须等待。
对象锁
在java中,每一个对象有且仅有一个锁,锁也称为对象监视器。通过对象的锁,多个线程之间可以实现对某个方法(临界资源)的互斥访问。那么,如何获取对象的锁呢?当我们调用对象的synchronized修饰的方法或者synchronized修饰的代码块时,锁住的是对象实例,就获取了该对象的锁。
全局锁
Java中有实例对象也有类对象,竟然有对象锁,那么久有类锁,也称全局锁。当synchronized修饰静态方法或者静态代码块时,锁住的是该类的Class实例(字节码对象),获取的便是该类的全局锁。看下面获取对象锁实现线程互斥的两种方式。
线程互斥的两种方式
先看下面这个没有实现线程互斥的例子。
public class SynchronizedTest {

    public static void main(String[] args) {

        new SynchronizedTest().init();

    }

    private void init() {

        final Outputer output = new Outputer();

        //线程1打印"hello,i am thread 1"

        new Thread(new Runnable(){

            @Override

            public void run() {

                while(true) {

                     try{

                         Thread.sleep(1000);

                     }catch(InterruptedException e) {

                         e.printStackTrace();

                     }

                     output.output("hello,i am thread 1");

                }

            }

        }).start();

        //线程2打印"hello,i am thread 2"

        new Thread(new Runnable(){

            @Override

            public void run() {

                while(true) {

                     try{

                         Thread.sleep(1000);

                     }catch(InterruptedException e) {

                         e.printStackTrace();

                     }

                     output.output("hello,i am thread 2");

                }

            }

        }).start();

    }

    class Outputer {

        public void output(String name) {

            for(int i=0; i<name.length(); i++) {

                System.out.print(name.charAt(i));

            }

            System.out.println();

        }

    }

}
运行结果
hello,i am thread 1

hello,i am thread 2

hello,i am hellthread 1

o,i am thread 2

hello,i am thread 2

hello,i am thread 1

hello,i am thread 2

hello,i am threadhel 2lo,i am thread

1
线程1和线程2同时调用output方法进行输出,从运行结果可以看出,线程之间没有执行完各自的输出任务就被交替了运行了。下面通过对象的锁实现线程1和线程2对output方法的互斥访问。
synchronized修饰方法
使用synchronized 对output方法进行修饰,可以让调用者获得锁。synchronized 修饰方法没有显示声明锁的对象,默认是当前方法所在类的对象this。
public synchronized void output(String name) {

    for(int i=0; i<name.length(); i++) {

        System.out.print(name.charAt(i));

    }

    System.out.println();

}
synchronized修饰代码块
使用synchronized 对output方法中的代码块进行修饰,也可以让调用者获得锁。
public void output(String name) {

    synchronized(this){

        for(int i=0; i<name.length(); i++) {

            System.out.print(name.charAt(i));

        }

        System.out.println();

    }

}
使用synchronized之后,线程1和线程2对output方法实现了互斥访问。
hello,i am thread 1

hello,i am thread 2

hello,i am thread 1

hello,i am thread 2

hello,i am thread 1

hello,i am thread 2

hello,i am thread 1
synchronized用法
先看下面的例子,我们来总结下synchronized的一些常用用法。
public class SynchronizedTest {

    public static void main(String[] args) {

        new SynchronizedTest().init();

    }

    private void init() {

        final Outputer output = new Outputer();

        //线程1打印"hello,i am thread 1"

        new Thread(new Runnable(){

            @Override

            public void run() {

                output.output("hello,i am thread 1");

            }

        }).start();

        //线程2打印"hello,i am thread 2"

        new Thread(new Runnable(){

            @Override

            public void run() {

                output.output("hello,i am thread 2");

            }

        }).start();

    }

    static class Outputer {

        public synchronized void output(String name) {

            for(int i=0; i<5; i++) {

                try {

                    Thread.sleep(1000);

                } catch (InterruptedException e) {

                    e.printStackTrace();

                }

                System.out.println(name);

            }

        }

        public void output2(String name) {

            synchronized(this) {

                for(int i=0; i<5; i++) {

                    try {

                        Thread.sleep(1000);

                    } catch (InterruptedException e) {

                        e.printStackTrace();

                    }

                    System.out.println(name);

                }

            }

        }

        public void output3(String name) {

            for(int i=0; i<5; i++) {

                try {

                    Thread.sleep(1000);

                } catch (InterruptedException e) {

                    e.printStackTrace();

                }

                System.out.println(name);

            }

        }

        public static synchronized void output4(String name) {

            for(int i=0; i<5; i++) {

                try {

                    Thread.sleep(1000);

                } catch (InterruptedException e) {

                    e.printStackTrace();

                }

                System.out.println(name);

            }

        }

        public void output5(String name) {

            synchronized(Outputer.class) {

                for(int i=0; i<5; i++) {

                    try {

                        Thread.sleep(1000);

                    } catch (InterruptedException e) {

                        e.printStackTrace();

                    }

                    System.out.println(name);

                }

            }

        }

    }

}
运行结果
hello,i am thread 1

hello,i am thread 1

hello,i am thread 1

hello,i am thread 1

hello,i am thread 1

hello,i am thread 2

hello,i am thread 2

hello,i am thread 2

hello,i am thread 2

hello,i am thread 2
线程1和线程2同时访问output 对象的synchronized 修饰的output 方法,即两个线程竞争的是output 对象的锁,这是同一个锁,所以当线程1在持有锁的时候,线程2必须等待,即下面的用法1。
用法1
当一个线程访问某个对象的synchronized 方法或者synchronized 代码块时,其它线程对该对象的该synchronized 方法或者synchronized 代码块的访问将阻塞。
用法2
当一个线程访问某个对象的synchronized 方法或者synchronized 代码块时,其它线程对该对象的其他synchronized 方法或者synchronized 代码块的访问将阻塞。
修该上面的SynchronizedTest 例子,线程1访问output方法,线程2访问output2 方法,运行结果同上,因为output方法 和output2方法都属于同一个对象output ,因此线程1和线程2竞争的也是同一个锁。
用法3
当一个线程访问某个对象的synchronized 方法或者synchronized 代码块时,其它线程仍然可以对该对象的其他非synchronized 方法或者synchronized 代码块访问。
修该上面的SynchronizedTest 例子,线程1访问output方法,线程2访问output3方法,运行结果是线程1和线程2交替输出。结果显而易见,线程2访问output3方法并不是synchronized 修饰的output 方法或者代码块,线程2并不需要持有锁,因此线程1的运行不会阻塞线程2的运行。
用法4
当synchronized 修饰静态方法时,锁住的是该类的Class实例(字节码对象)。修该上面的SynchronizedTest 例子,线程1访问output4方法,线程2访问output5方法,运行结果同用法1,说明线程1和线程2竞争的是Outputer类的Class实例(字节码对象)的锁。
线程通信
多个线程之间往往需要相互协作来完成某一个任务,synchronized 和对象锁能实现线程互斥,但是不能实现线程通信。
wait()\notify()\notifyAll()介绍
线程之间的通信通过java.lang包中Object类中的wait()方法和notify()、notifyAll()等方法进行。我们知道,Java中每个对象都有一个锁,wait()方法用于等待对象的锁,notify()、notifyAll()方法用于通知其他线程对象锁可以使用。
wait()\notify()\notifyAll()依赖于对象锁,对象锁是对象所持有,Object类是所有java类的父类,这样每一个java类(对象)都有线程通信的基本方法。这就是这些方法定义在Object类中而不定义在Thread类中的原因。
wait()方法的会让当前线程释放对象锁并进入等待对象锁的状态,当前线程是指正在cpu上运行的线程。当前线程调用notify()\notifyAll()后,等待对象锁的线程将被唤醒。
调用wait()方法或者notify()方法的对象必须和对象锁所属的对象是同一个对象,并且必须在synchronized方法或者synchronized代码块中被调用。
yieId()介绍
yieId()的作用是给线程调度器一个提示,告知线程调度器当前线程愿意让出CPU,但是线程调度器可以忽略这个提示。因此,yieId()的作用仅仅是告知线程调度器当前线程愿意让出CPU给其他线程执行(竟然只是愿意,当前线程可以随时反悔,那其他线程也不一定能得到CPU执行),而且不会让当前线程释放对象锁。
yieId()能让当前线程由运行状态进入到就绪状态,从而让其它具有相同优先级的等待线程获取执行权。但是,并不能保证在当前线程调用yield()之后,其它具有相同优先级的线程就一定能获得执行权,也有可能当前线程又进入到运行状态继续运行。
yieId()只建议在测试环境中使用。
wait()和yield()的区别
(1)wait()是让线程由运行状态进入到等待(阻塞)状态,而yield()是让线程由运行状态进入到就绪状态。
(2)wait()是让线程释放它所持有对象的锁,而yield()方法不会释放锁。
多线程交替输出及volatile应用
下面的例子是“主线程输出三次接着子线程输出三次”,重复两次。
public class WaitnotifyTest {

    public static volatile boolean shouldChildren = false;

    public static void main(String[] args) throws Exception{

        final Outputer outputer = new Outputer();

        //创建子线程

        Thread chrild = new Thread(new Runnable(){

            @Override

            public void run() {

                try {

                    for(int i=0;i<2;i++)

                        outputer.children();

                } catch (Exception e) {

                    e.printStackTrace();

                }

            }

        });

        chrild.start();

        //主线程

        for(int i=0;i<2;i++)

            outputer.main();

    }

}

class Outputer {

    //子线程循环输出

    public synchronized void children() throws Exception{

        while(!WaitnotifyTest.shouldChildren) {

            System.out.println(Thread.currentThread().getName()

                    + " thread end loop,go to waitting");

            //子线程进入等待状态

            this.wait();

        }

        System.out.println(Thread.currentThread().getName()

                + " thread start loop");

        for(int i=1; i<=3; i++) {

            System.out.println("hello,i am chrildren thread,loop:" + i);

        }

        WaitnotifyTest.shouldChildren = false;

        //唤醒主线程

        this.notify();

    }

    //主线程循环输出

    public synchronized void main() throws Exception{

        while(WaitnotifyTest.shouldChildren) {

            System.out.println(Thread.currentThread().getName()

                    + " thread end loop,go to waitting");

            //主线程进入等待状态

            this.wait();

        }

        System.out.println(Thread.currentThread().getName()

                + " thread start loop");

        for(int i=1; i<=3; i++) {

            System.out.println("hello,i am main thread,loop:" + i);

        }

        WaitnotifyTest.shouldChildren = true;

        //唤醒子线程

        this.notify();

    }

}
运行结果
main thread start loop

hello,i am main thread,loop:1

hello,i am main thread,loop:2

hello,i am main thread,loop:3

main thread end loop,go to waitting

Thread-0 thread start loop

hello,i am chrildren thread,loop:1

hello,i am chrildren thread,loop:2

hello,i am chrildren thread,loop:3

Thread-0 thread end loop,go to waitting

main thread start loop

hello,i am main thread,loop:1

hello,i am main thread,loop:2

hello,i am main thread,loop:3

Thread-0 thread start loop

hello,i am chrildren thread,loop:1

hello,i am chrildren thread,loop:2

hello,i am chrildren thread,loop:3
volatile修饰shouldChildren,线程直接读取shouldChildren变量并且不缓存它,修改了shouldChildren立马让其他线程可见,这就确保线程读取到的变量是一致的。
线程本地变量
线程本地变量
线程本地变量,可能称为线程局部变量更容易理解,即为每一个使用该变量的线程都提供一个变量值的副本,相当于将变量的副本绑定到线程中,每一个线程可以独立地修改自己的变量副本,而不会和其它线程的变量副本冲突。在线程消失之后,线程局部变量的所有副本都会被垃圾回收(下面的源码分析中将提到)。
ThreadLocal实现分析
ThreadLocal
在java.lang.Thread类中,有一个ThreadLocal.ThreadLocalMap类型的变量threadLocals,这个变量就是用来存储线程局部变量的。
/* ThreadLocal values pertaining to this thread. This map is maintained

 * by the ThreadLocal class. */

ThreadLocal.ThreadLocalMap threadLocals = null;
下面我们重点分析ThreadLocal的内部实现。ThreadLocal也位于java.lang包中。其主要成员有:
public T get() {}

private T setInitialValue() {}

public void set(T value) {}

private void remove(ThreadLocal key) {}

ThreadLocalMap getMap(Thread t){}

void createMap(Thread t, T firstValue) {}

static class ThreadLocalMap {}
Set
我们从set方法开始。Set方法源码如下
/**

 * Sets the current thread's copy of this thread-local variable

 * to the specified value.  Most subclasses will have no need to

 * override this method, relying solely on the {@link #initialValue}

 * method to set the values of thread-locals.

 *

 * @param value the value to be stored in the current thread's copy of

 *        this thread-local.

 */

public void set(T value) {

    Thread t = Thread.currentThread();

    ThreadLocalMap map = getMap(t);

    if (map != null)

        map.set(this, value);

    else

        createMap(t, value);

}
先获取当前的线程,然后通过getMap(t)方法获取到一个map,map的类型为ThreadLocalMap。
这个map其实就是存储线程变量的对象threadLocals。ThreadLocalMap是ThreadLocal中的一个内部类,是一个定制的hashmap以便适用于存储线程本地变量。竟然是定制的hashmap,那么就有Entry 和table(hashmap的内部实现参考上一篇:Java基础加强之集合篇(模块记忆、精要分析))。而ThreadLocalMap中的Entry 继承了WeakReference,弱引用是不能保证不被垃圾回收器回收的,这就是前文提到的在线程消失之后,线程局部变量的所有副本都会被垃圾回收。此外,Entry 中使用ThreadLocal作为key,线程局部变量作为value。如果threadLocals不为空,则设值否者调用createMap方法创建threadLocals。注意设值的时候传的是this而不是当前线程t。
/**

 * ThreadLocalMap is a customized hash map suitable only for

 * maintaining thread local values. No operations are exported

 * outside of the ThreadLocal class. The class is package private to

 * allow declaration of fields in class Thread.  To help deal with

 * very large and long-lived usages, the hash table entries use

 * WeakReferences for keys. However, since reference queues are not

 * used, stale entries are guaranteed to be removed only when

 * the table starts running out of space.

 */

static class ThreadLocalMap {

    /**

     * The entries in this hash map extend WeakReference, using

     * its main ref field as the key (which is always a

     * ThreadLocal object).  Note that null keys (i.e. entry.get()

     * == null) mean that the key is no longer referenced, so the

     * entry can be expunged from table.  Such entries are referred to

     * as "stale entries" in the code that follows.

     */

    static class Entry extends WeakReference<ThreadLocal> {

        /** The value associated with this ThreadLocal. */

        Object value;

        Entry(ThreadLocal k, Object v) {

            super(k);

            value = v;

        }

    }
接下来我们看看createMap方法
/**

 * Create the map associated with a ThreadLocal. Overridden in

 * InheritableThreadLocal.

 *

 * @param t the current thread

 * @param firstValue value for the initial entry of the map

 * @param map the map to store.

 */

void createMap(Thread t, T firstValue) {

    t.threadLocals = new ThreadLocalMap(this, firstValue);

}
createMap方法其实就是为当前线程的threadLocals变量分配空间并存储线程的第一个变量。现在我们已经知道线程是如何初始化并设值自己的局部变量了,下面我们看看取值。
Get
/**

 * Returns the value in the current thread's copy of this

 * thread-local variable.  If the variable has no value for the

 * current thread, it is first initialized to the value returned

 * by an invocation of the {@link #initialValue} method.

 *

 * @return the current thread's value of this thread-local

 */

public T get() {

    Thread t = Thread.currentThread();

    ThreadLocalMap map = getMap(t);

    if (map != null) {

        ThreadLocalMap.Entry e = map.getEntry(this);

        if (e != null)

            return (T)e.value;

    }

    return setInitialValue();

}
先获取当前的线程,然后通过getMap(t)方法获取当前线程存变量的对象threadLocals,如果threadLocals不为空则取值并返回(注意传入的key是this对象而不是当前线程t),否则调用setInitialValue方法初始化。setInitialValue和set方法唯一不同的是调用了initialValue进行初始化,也就是在获取变量之前要初始化。
/**

 * Variant of set() to establish initialValue. Used instead

 * of set() in case user has overridden the set() method.

 *

 * @return the initial value

 */

private T setInitialValue() {

    T value = initialValue();

    Thread t = Thread.currentThread();

    ThreadLocalMap map = getMap(t);

    if (map != null)

        map.set(this, value);

    else

        createMap(t, value);

    return value;

}
总的来讲,每创建一个线程(Thread对象),该线程即拥有存储线程本地变量的threadLocals对象,threadLocals对象初始为null,当通过ThreadLocal对象调用set/get方法时,就会对线程的threadLocals对象进行初始化,并且以当前ThreadLocal对象为键值,以ThreadLocal要保存的变量为value,存到threadLocals。看下面的例子。
ThreadLocal应用
public class ThreadLocalShareVariable {

    public static void main(String[] args) {

        //创建3个线程

        for(int i=0; i<3;i++) {

            //创建线程

            new Thread(new Runnable(){

                @Override

                public void run() {

                    //线程设置自己的变量

                    int age = new Random().nextInt(100);

                    String name = getRandomString(5);

                    System.out.println("Thread " + Thread.currentThread().getName()

                            + " has put data:" + name + " " + age);

                    //存储与当前线程有关的变量

                    Passenger.getInstance().setName(name);

                    Passenger.getInstance().setAge(age);

                    //线程访问共享变量

                    new ModuleA().getData();

                    new ModuleB().getData();

                }

            }).start();

        }

    }

    static class ModuleA {

        public void getData(){

            //获取与当前线程有关的变量

            String name = Passenger.getInstance().getName();

            int data = Passenger.getInstance().getAge();

            System.out.println("moduleA get data from "

            + Thread.currentThread().getName() + ":" + name + " "+ data);

        }

    }

    static class ModuleB {

        public void getData(){

            //获取与当前线程有关的变量

            String name = Passenger.getInstance().getName();

            int data = Passenger.getInstance().getAge();

            System.out.println("moduleB get data from "

            + Thread.currentThread().getName() + ":" + name + " "+ data);

        }

    }

    /**

     * 随机生成字符串

     * @param length

     * @return

     */

    public static String getRandomString(int length){

        final String str = "abcdefghijklmnopqrstuvwxyz";

        StringBuffer sb = new StringBuffer();

        int len = str.length();

        for (int i = 0; i < length; i++) {

            sb.append(str.charAt(

                    (int) Math.round(Math.random() * (len-1))));

        }

        return sb.toString();

    }

}

class Passenger {

    private String name;

    private int age;

    public String getName() {

        return name;

    }

    public void setName(String name) {

        this.name = name;

    }

    public int getAge() {

        return age;

    }

    public void setAge(int age) {

        this.age = age;

    }

    public Passenger(){}

    //ThreadLocal存储线程变量

    public static ThreadLocal<Passenger> thsd = new ThreadLocal<Passenger>();

    public static Passenger getInstance() {

        //获取当前线程范围内的共享变量实例

        Passenger passenger = thsd.get();

        //懒汉模式创建实例

        if(passenger == null) {

            passenger = new Passenger();

            thsd.set(passenger);

        }

        return passenger;

    }

}
运行结果
Thread Thread-1 has put data:vwozg 33

Thread Thread-2 has put data:hubdn 30

Thread Thread-0 has put data:mkwrt 35

moduleA get data from Thread-2:hubdn 30

moduleA get data from Thread-0:mkwrt 35

moduleA get data from Thread-1:vwozg 33

moduleB get data from Thread-1:vwozg 33

moduleB get data from Thread-0:mkwrt 35

moduleB get data from Thread-2:hubdn 30
创建3个线程,每个线程要保存一个Passenger 对象,并且通过ModuleA 、ModuleB来访问每个线程对应保存的Passenger 对象。
多线程之间共享变量
上面我们讨论的是多线程之间如何访问自己的变量。那么多线程之间共享变量时如何的呢,看下的例子,线程1对共享变量进行减一操作,线程2对共享变量进行加2操作。
public class MutilThreadShareVariable {

    static volatile int count = 100;

    public static void main(String[] args) throws Exception{

        final ShareDataDec sdDec = new ShareDataDec();

        final ShareDataInc sdInc = new ShareDataInc();

        //线程1

        new Thread(new Runnable() {

            @Override

            public void run() {

                for(int i=0;i<5;i++) {

                    sdDec.dec();

                    try {

                        Thread.sleep(1000);

                    } catch (InterruptedException e) {

                        e.printStackTrace();

                    }

                }

            }

        }).start();

        //线程2

        new Thread(new Runnable(){

            @Override

            public void run() {

                for(int i=0;i<5;i++) {

                    sdInc.inc();

                    try {

                        Thread.sleep(1000);

                    } catch (InterruptedException e) {

                        e.printStackTrace();

                    }

                }

            }

        }).start();;

    }

    static class ShareDataDec {

        public synchronized void dec() {

            count --;

            System.out.println("Thread " + Thread.currentThread().getName()

                    + " dec 1 from count,count remain " + count);

        }

    }

    static class ShareDataInc {

        public synchronized void inc() {

            count = count + 2;

            System.out.println("Thread " + Thread.currentThread().getName()

                    + " inc 2 from count,count remain " + count);

        }

    }

}
运行结果
Thread Thread-0 dec 1 from count,count remain 99

Thread Thread-1 inc 2 from count,count remain 101

Thread Thread-0 dec 1 from count,count remain 100

Thread Thread-1 inc 2 from count,count remain 102

Thread Thread-0 dec 1 from count,count remain 101

Thread Thread-1 inc 2 from count,count remain 103

Thread Thread-0 dec 1 from count,count remain 102

Thread Thread-1 inc 2 from count,count remain 104

Thread Thread-0 dec 1 from count,count remain 103

Thread Thread-1 inc 2 from count,count remain 105
线程共享变量,只要对要对共享变量进行修改的代码进行同步即可。
Java基础之多线程篇(线程创建与终止、互斥、通信、本地变量)的更多相关文章
- Java基础加强之多线程篇(线程创建与终止、互斥、通信、本地变量)
线程创建与终止 线程创建 Thread类与Runnable接口的关系 public interface Runnable { public abstract void run(); } public ...
- java基础(26):Thread、线程创建、线程池
1. 多线程 1.1 多线程介绍 学习多线程之前,我们先要了解几个关于多线程有关的概念. 进程:进程指正在运行的程序.确切的来说,当一个程序进入内存运行,即变成一个进程,进程是处于运行过程中的程序,并 ...
- Python多线程之线程创建和终止
python主要是通过thread和threading这两个模块来实现多线程支持. python的thread模块是比較底层的模块,python的threading模块是对thread做了一些封装,能 ...
- 黑马程序员——JAVA基础之多线程的线程间通讯等
------- android培训.java培训.期待与您交流! ---------- 线程间通讯: 其实就是多个线程在操作同一个资源,但是动作不同. wait(); 在其他线程调用此对象的notif ...
- Java基础学习——多线程之线程池
1.线程池介绍 线程池是一种线程使用模式.线程由于具有空闲(eg:等待返回值)和繁忙这种不同状态,当数量过多时其创建.销毁.调度等都会带来开销.线程池维护了多个线程,当分配可并发执行的任务时, ...
- Java基础学习总结(88)——线程创建与终止、互斥、通信、本地变量
线程创建与终止 线程创建 Thread类与 Runnable 接口的关系 public interface Runnable { public abstract void run(); ...
- Java基础技术多线程与并发面试【笔记】
Java基础技术多线程与并发 什么是线程死锁? 死锁是指两个或两个以上的进程(线程)在执行过程中,由于竞争资源或者由于彼此通信而造成的一种阻塞的现象,若无外力作用,它们都将无法推进下去,我们就可以称 ...
- iOS开发多线程篇—线程的状态
iOS开发多线程篇—线程的状态 一.简单介绍 线程的创建: self.thread=[[NSThread alloc]initWithTarget:self selector:@selector(te ...
- iOS开发多线程篇—线程安全
iOS开发多线程篇—线程安全 一.多线程的安全隐患 资源共享 1块资源可能会被多个线程共享,也就是多个线程可能会访问同一块资源 比如多个线程访问同一个对象.同一个变量.同一个文件 当多个线程访问同一块 ...
随机推荐
- 使用 Immutable Subject 来驱动 Angular 应用
现状 最近在重构手上的一个 Angular 项目,之前是用的自己写的一个仿 Elm 架构的库来进行的状态管理,期间遇到了这些痛点: 样板代码太多 异步处理太过繁琐 需要单独维护一个 npm 包 其中, ...
- 【Redis】4、Redis学习资料
Redis 集群规范 http://www.redis.cn/topics/cluster-spec.html Redis 集群教程 http://www.redis.cn/topics/cluste ...
- Java集合之HashSet源码分析
概述 HashSet是基于HashMap来实现的, 底层采用HashMap的key来保存数据, 借此实现元素不重复, 因此HashSet的实现比较简单, 基本上的都是直接调用底层HashMap的相关方 ...
- EmitMapper的使用小结
最近公司开发项目前端使用一个js框架,后端使用ef,js前台读取的json采用实体的dto来进行生成. 在网上看到了EmitMapper相对其他映射框架处理速度可以更快,就拿来用了.下面是代码中常用的 ...
- Csharp: read Sybase SQL anywhere5.5 using c#
private void button1_Click(object sender, EventArgs e) { try { //OdbcConnection conn = new OdbcConne ...
- Google Chrome 中安装 PostMan 扩展
简介 PostMan 是调试 HTTP 请求的好工具,也是业界的佼佼者,这对于我们开发 Web Service 提供了很好的调试入口,支持请求认证机制.最关键的是,这个工具提供 Google Chro ...
- LeetCode题解之Insert into a Binary Search Tree
1.题目描述 2.分析 插入算法. 3.代码 TreeNode* insertIntoBST(TreeNode* root, int val) { insert(root, val); return ...
- 洗礼灵魂,修炼python(49)--巩固篇—包
包(Package) 这个其实前面也说过的,不过同模块一样,没有具体的解析 1.什么是包 在创建许许多多模块后,我们可能希望将某些功能相近的文件组织在同一文件夹下,那么此文件夹(目录)即为包,文件夹( ...
- JAVA开发学习
一.安装JAVA开发工具IDEA,下载Ultimate旗舰版版本,Community社区版不支持Java EE开发...... 下载地址:https://www.jetbrains.com/idea/ ...
- windwos安装RabbitMQ
目录 windows 安装RabbitMQ 安装erlang 安装rabbitmq 添加windows环境变量 检测rabbitmq状态 启动web管理插件 rabbitmq服务 windows 安装 ...