Tars --- Hello World
服务端开发
1,创建一个 webapp maven 项目,pom.xml 导入依赖
<dependency>

    <groupId>com.tencent.tars</groupId>

    <artifactId>tars-server</artifactId>

    <version>1.6.0</version>

    <type>jar</type>

</dependency>
2,添加插件
在生成代码的时候会根据此插件来生成
<plugin>

     <groupId>com.tencent.tars</groupId>

     <artifactId>tars-maven-plugin</artifactId>

     <version>1.6.0</version>

     <configuration>

          <tars2JavaConfig>

              <!-- 项目中 tars 文件位置 -->

              <tarsFiles>

                    <tarsFile>${basedir}/src/main/resources/hello.tars</tarsFile>

              </tarsFiles>

              <!-- 源文件编码 -->

              <tarsFileCharset>UTF-8</tarsFileCharset>

              <!-- 生成服务端代码 -->

              <servant>true</servant>

              <!-- 生成源代码编码 -->

              <charset>UTF-8</charset>

              <!-- 生成的源代码目录 -->

              <srcPath>${basedir}/src/main/java</srcPath>

              <!-- 生成源代码包前缀 -->

              <packagePrefixName>com.qq.tars.quickstart.server.</packagePrefixName>

           </tars2JavaConfig>

       </configuration>

</plugin>
3,在 src/main/resources 中新建 hello.tars 文件
module TestApp {

	interface Hello{

	    string hello(int no, string name);

	};

};
4,在工程目录下运行 mvn tars:tars2java 命令来生成接口文件
tars 文件决定了生成的接口,命名上追加 Servant ;内容也基本类似。具体如下:
@Servant

public interface HelloServant {

    public String hello(int no, String name);

}
5,继承接口,实现方法
public class HelloServantImpl implements HelloServant {

    public String hello(int no, String name) {

        // TODO Auto-generated method stub

        return String.format("hello no=%s, name=%s, time=%s", no, name, System.currentTimeMillis());

    }

}
6,在 src/main/resources 中新建 servants.xml 文件,目的是暴露服务
<?xml version="1.0" encoding="UTF-8"?>

<servants>

    <!-- 这是 OBJ 名 -->

    <servant name="HelloObj">

        <!-- tars 生成的接口路径 -->

        <home-api>com.qq.tars.quickstart.server.testapp.HelloServant</home-api>

        <!-- 我们自己的实现类路径 -->

        <home-class>com.qq.tars.quickstart.server.testapp.impl.HelloServantImpl</home-class>

    </servant>

</servants>
一定要正确配置接口和实现类的路径,我之前就是路径问题,花了好长时间才解决的~
7,打成 war 包,这就是一个服务,准备上传
在这里需要上传到管理平台,如果没有搭建好 tars 服务管理平台,请参照上一篇博文
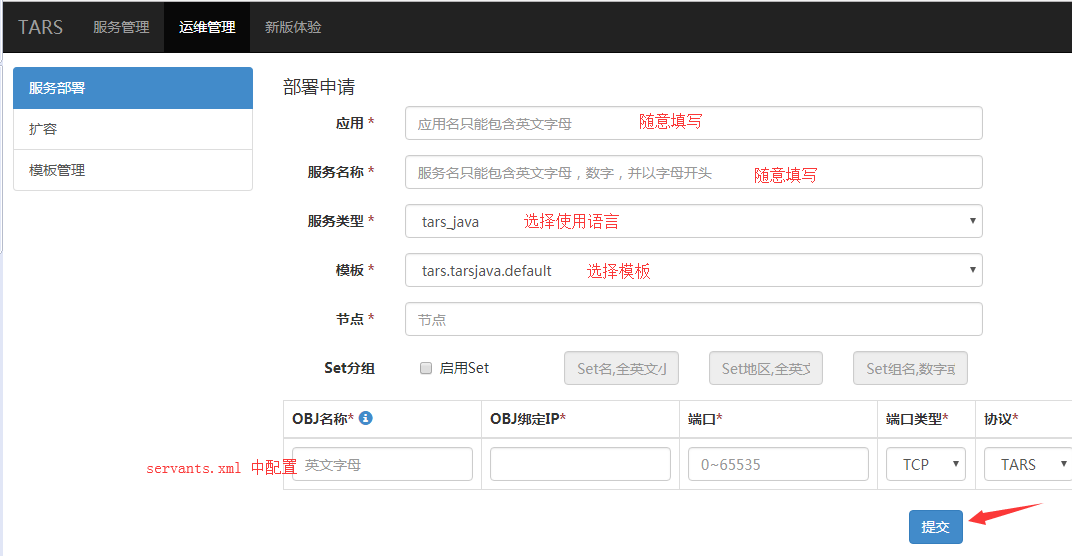
点击提交后到导航菜单“发布管理”,选中服务,上传 war 包,点击发布
客户端开发
1,新建 maven webapp 项目,导入依赖
和服务端基本一致,区别是<artifactId>标签里是tars-client
<dependency>

            <groupId>com.tencent.tars</groupId>

            <artifactId>tars-client</artifactId>

            <version>1.6.0</version>

            <type>jar</type>

        </dependency>
2,添加插件
和服务端基本一致,区别是 <servant> 标签里是 false ,和生成源代码包前缀
<plugin>

                <groupId>com.tencent.tars</groupId>

                <artifactId>tars-maven-plugin</artifactId>

                <version>1.6.0</version>

                <configuration>

                    <tars2JavaConfig>

                        <!-- tars文件位置 -->

                        <tarsFiles>

                            <tarsFile>${basedir}/src/main/resources/hello.tars</tarsFile>

                        </tarsFiles>

                        <!-- 源文件编码 -->

                        <tarsFileCharset>UTF-8</tarsFileCharset>

                        <!-- 生成代码,PS:客户端调用,这里需要设置为false -->

                        <servant>false</servant>

                        <!-- 生成源代码编码 -->

                        <charset>UTF-8</charset>

                        <!-- 生成的源代码目录 -->

                        <srcPath>${basedir}/src/main/java</srcPath>

                        <!-- 生成源代码包前缀 -->

                        <packagePrefixName>com.qq.tars.quickstart.client.</packagePrefixName>

                    </tars2JavaConfig>

                </configuration>

            </plugin>
3,在 src/main/resources 中新建 hello.tars 文件
文件和服务端的 tars 文件一致,拷贝即可
4,工程目录下运行 mvn tars:tars2java 命令生成接口
和服务端一致
5,测试,直接运行该文件即可
同步调用
public class Test {

    public static void main(String[] args) {

        // TODO Auto-generated method stub

        CommunicatorConfig cfg = new CommunicatorConfig();

        //构建通信器

        Communicator communicator = CommunicatorFactory.getInstance().getCommunicator(cfg);

        //通过通信器,生成代理对象

        HelloPrx proxy = communicator.stringToProxy(HelloPrx.class, "TestAppToTwo.HelloServer.HelloObj@tcp -h 111.231.63.166 -p 8202");

        String ret = proxy.hello(1000, "HelloWorld");

        System.out.println(ret);

    }

}
异步调用
public class TestAsync {

    public static void main(String[] args) {

        // TODO Auto-generated method stub

        CommunicatorConfig cfg = new CommunicatorConfig();

        //构建通信器

        Communicator communicator = CommunicatorFactory.getInstance().getCommunicator(cfg);

        //通过通信器,生成代理对象

        HelloPrx proxy = communicator.stringToProxy(HelloPrx.class, "TestAppToTwo.HelloServer.HelloObj@tcp -h 111.231.63.166 -p 8202");

        proxy.async_hello(new HelloPrxCallback() {

            @Override

            public void callback_expired() {

            }

            @Override

            public void callback_exception(Throwable ex) {

            }

            @Override

            public void callback_hello(String ret) {

                System.out.println(ret);

            }

        }, 1000, "Hello World!");

    }

}
Tars --- Hello World的更多相关文章
- 【转】tars源码漫谈第1篇------tc_loki.h (牛逼哄哄的loki库)
loki库是C++模板大牛Andrei写的, 里面大量运用模板的特性, 而tc_loki.h借用了loki库的部分代码, 形成了一个基本的文件tc_loki.h, 来看看: #ifndef __TC_ ...
- Tars 负载均衡
// 传入主控地址,在 db_tars t_registry_info 表中 Communicator communicator = CommunicatorFactory.getInstance() ...
- Tars http服务
http服务 发布到平台后可以直接使用 http 请求来调用,注意发布服务时选择 非 tars 协议! 1,创建一个 springboot 项目,并在启动类添加 @EnableTarsServer 注 ...
- Tars 服务调服务
1,创建一个 tars 服务工程 2,把需要调用的服务的 客户端接口文件 拷贝到当前服务 3,构建通信器 CommunicatorConfig 调用,如果是 springboot 开发客户端可以使用注 ...
- springboot 开发 Tars
1,创建 springboot 项目,并在启动类添加 @EnableTarsServer 注解 @SpringBootApplication @EnableTarsServer public clas ...
- 三、安装cmake,安装resin ,tars服务,mysql 安装介绍,安装jdk,安装maven,c++ 开发环境安装
三.安装cmake,安装resin 2018年07月01日 21:32:05 youz1976 阅读数:308 开发环境说明: centos7.2 ,最低配置:1核cpu,2G内存,1M带宽 1. ...
- 一、tars简单介绍 二、tars 安装部署资料准备
1.github地址https://github.com/Tencent/Tars/ 2.tars是RPC开发框架,目前支持c++,java,nodejs,php 3.tars 在腾讯内部已经使用了快 ...
- 【Tars】腾讯微服务框架Tars介绍
目录 1.介绍2.设计思路3.整体架构4.平台特性1. 介绍 Tars是[基于名字服务][使用Tars协议]的高性能[RPC]开发框架,同时配套一体化的[服务治理平台],帮助个人或者企业快速的以微服务 ...
- SSM 开发 Tars
目录结构 tars生成的文件当成 controller 来调用 service ,service 调用 mapper POM 注意如果 mybatis是3.4.1 spring 是4.1.14的话, ...
- spring 开发 Tars
和不使用 Spring 的 tars HelloWord 项目相比,客户端完全一样,服务端两个地方不一样 创建不使用 Spring 的 tars HelloWord 步骤: https://www.c ...
随机推荐
- APK防护——Anti_Virtual App的思路和实现
作者:HAI_i 原文来自:https://bbs.ichunqiu.com/thread-42982-1-1.html 0×00 前言 Virtual App是一个很强大的存在,破坏了Android ...
- zookeeper常用指令
zk服务 bin 目录下常用的脚本解释 zkCleanup 清理 Zookeeper 历史数据,包括日志文件和快照数据文件 zkCli Zookeeper 的一个简易客户端 zkEnv 设置 Zook ...
- Tools - VirtualBox的使用方法和技巧
01 - 为CentOS虚拟机安装VirtualBox增强功能 启动CentOS虚拟机,点击"菜单 -> 设备 -> 安装增强功能". vboxadd的映像文件将会被挂 ...
- DRF项目工程基础包
drf开发基础包 日常使用drf进行后端开发中,每次开发新项目就的做很多的工程基础配置操作,我觉得这样是没必要的,我们主要关注在业务的开发中,而不是每次都要做这些繁琐的基础操作,所以我把这些做了一个基 ...
- ffmpeg 实现多宫格效果,视频拼接合成
通过FFmpeg建立画布,以多宫格方式展现 一下为执行命令 -re -i 1.mp4 -re -i 2.mp4 -re -i 3.mp4 -re -i 4.mp4 -filter_complex &q ...
- 课程四(Convolutional Neural Networks),第三 周(Object detection) —— 1.Practice questions:Detection algorithms
[解释] tree的两个bounding boxes 都要保留,因为交并比小于0.5:car 0.73保留:pedestrain 0.98保留:motorcycle 0.58保留.一共5个. [解释] ...
- volatile 关键字了解与使用
前言 不管是在面试还是实际开发中 volatile 都是一个应该掌握的技能. 首先来看看为什么会出现这个关键字. 内存可见性 由于 Java 内存模型(JMM)规定,所有的变量都存放在主内存中,而每个 ...
- thymeleaf 的使用
thymeleaf 语法详解1.变量输出: th:text :在页面中输出某个值 th:value :将一个值放到input标签中的value中.2.判断字符串是否为空 ①:调用内置对象一定要用# ② ...
- 【OSX】build AOSP 2.3.7时的build error解决
原始的error log: ============================================ PLATFORM_VERSION_CODENAME=REL PLATFORM_VE ...
- Docker修改默认网段
因阿里云服务器VPC默认占用了172.16.0.0/16 网段,与Docker里的网段相同,导致Docker里无法连接VPC服务器.后来找到的解决方案是修改Docker的默认网段. 由于Docker默 ...