2017-2018-2 20165312 实验四《Android程序设计》实验报告
2017-2018-2 20165312 实验四《Android程序设计》实验报告
一、安装Android Studio并进行Hello world测试和调试程序
安装Android Studio
可以参考娄老师的博客Android开发简易教程或者参考《Java和Android开发学习指南》第二十四章,里面都有详细步骤,一步一步来就很简单~
新建一个project项目后,project窗口主要有两个主要的节点:app和Gradle Scripts。app节点中包含了应用程序中所有的组件,我们编写程序时也是主要使用app。app节点下面有包含3个节点
manifests包含一个AndroidManifest.xml清单文件java包含了所有的Java应用程序和测试类res包含了资源文件,在这个目录下还有一些目录:drawablelayoutmenuvaluesmipmap
以上就初步了解了Android Studio的构造
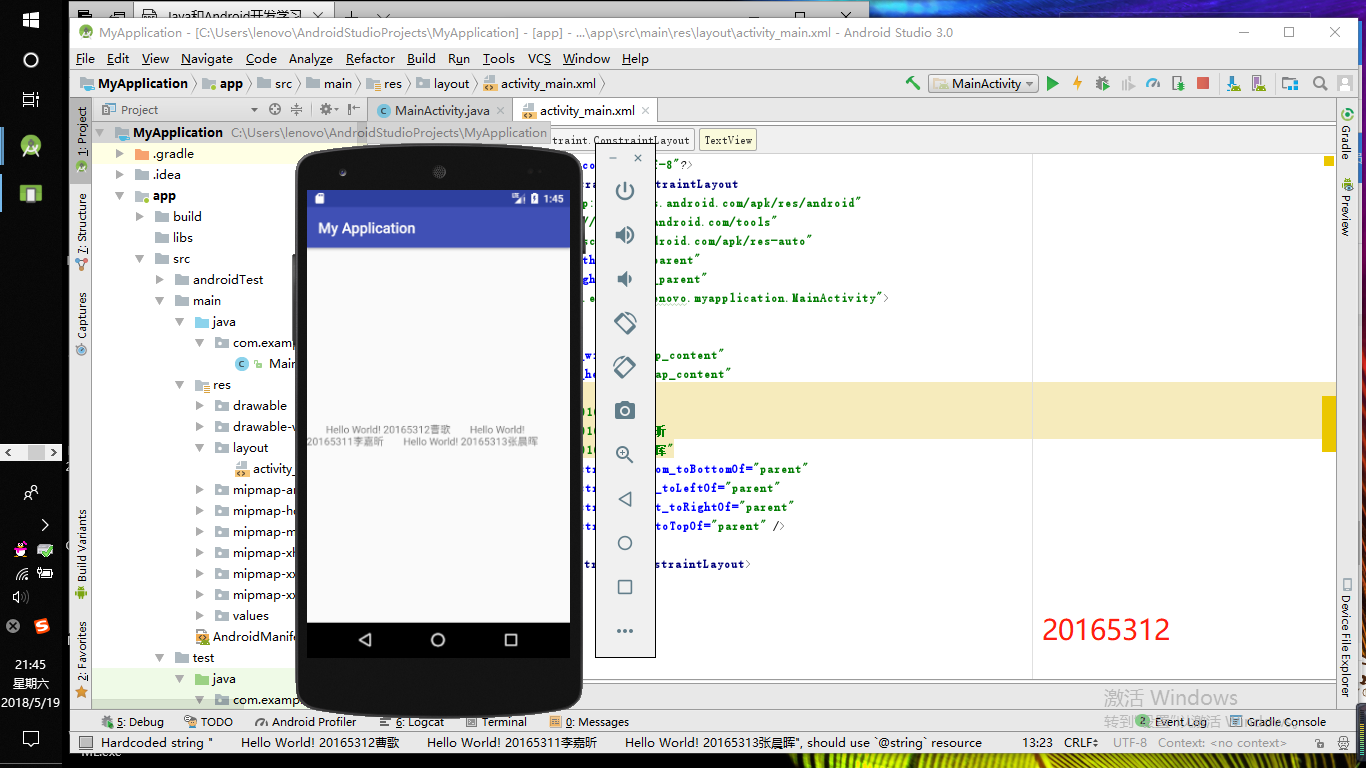
进行Hello World测试
步骤:
- 打开
layout->activity_main.xml - 修改
android:text
<?xml version="1.0" encoding="utf-8"?>

<android.support.constraint.ConstraintLayout

    xmlns:android="http://schemas.android.com/apk/res/android"

    xmlns:tools="http://schemas.android.com/tools"

    xmlns:app="http://schemas.android.com/apk/res-auto"

    android:layout_width="match_parent"

    android:layout_height="match_parent"

    tools:context="com.example.lenovo.myapplication.MainActivity">

    <TextView

        android:layout_width="wrap_content"

        android:layout_height="wrap_content"

        android:text="

       Hello World! 20165312曹歌

       Hello World! 20165311李嘉昕

       Hello World! 20165313张晨晖"

        app:layout_constraintBottom_toBottomOf="parent"

        app:layout_constraintLeft_toLeftOf="parent"

        app:layout_constraintRight_toRightOf="parent"

        app:layout_constraintTop_toTopOf="parent" />

</android.support.constraint.ConstraintLayout>
- 运行
MainActivity.java
进行调试程序
日志消息
调试一个应用程序最简单的办法就是使用日志消息。在开发过程中,可以在Android Studio主屏幕的底部看到Android DDMS视图。关于LogCat,不同日志级别的消息以不同的颜色来显示,每条消息都有一个标签,这使得很容易找到一条消息。

跟踪程序
- 在任意一行设置断点
- 打开
Run->Debug即可进行调试程序 - 在Android Studio下方的Debug栏即可进入代码、浏览变量
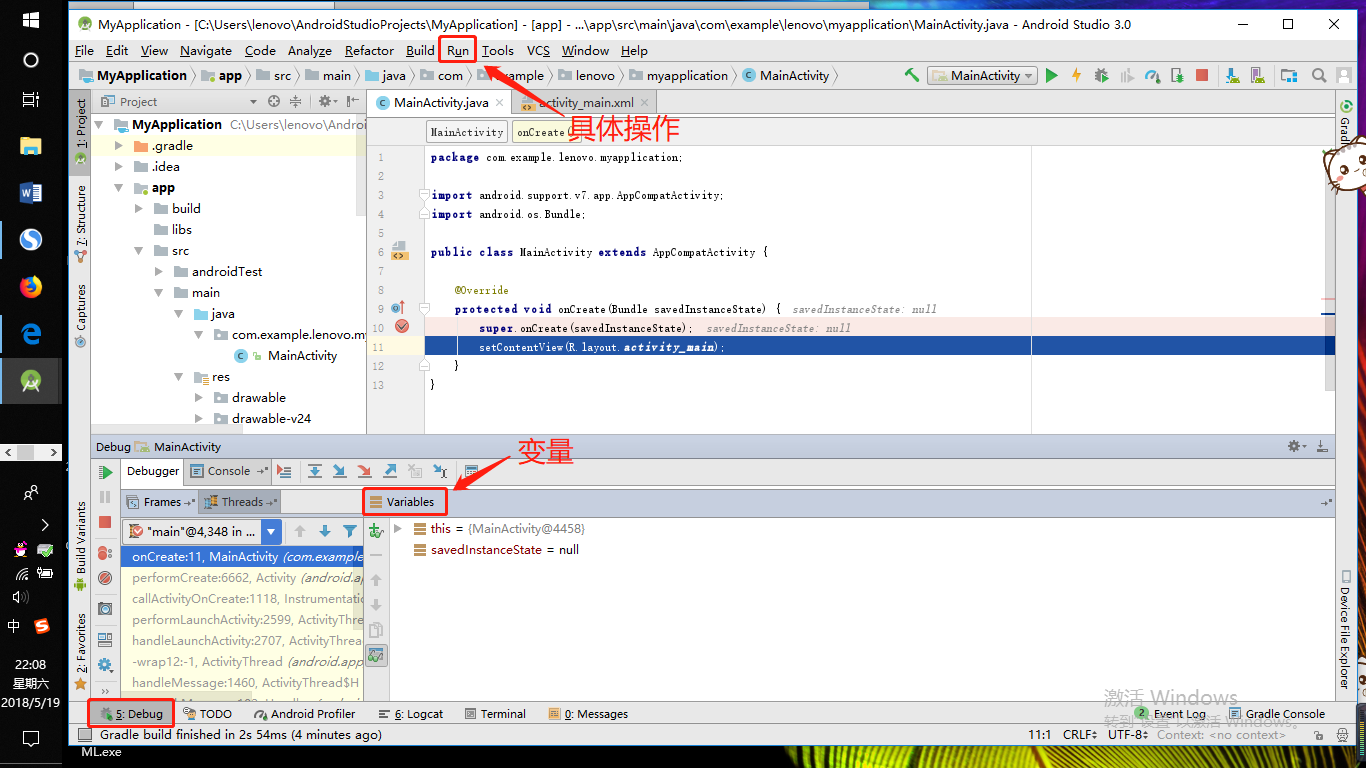
- 具体的调试代码方法操作个人认为是和IDEA调试代码方法相同的~
二、Activity测试
活动(activity)是包含了用户界面组件的一个窗口,一个典型的Android应用程序,都是从启动一个活动开始的。应用程序所创建的第一个窗口,叫做主活动。appliaction元素定义两个活动,其中之一使用intent-filter元素声明的为主活动。
启动一个activity涉及实例化活动类,并且调用生命周期方法:
onCreat()onStart()onResume()onPause()onStop()onRestart()onDestory()
每一个控制文件的Activity都需要有对应的启动程序文件(.java)和相应的布局文件(.xml)
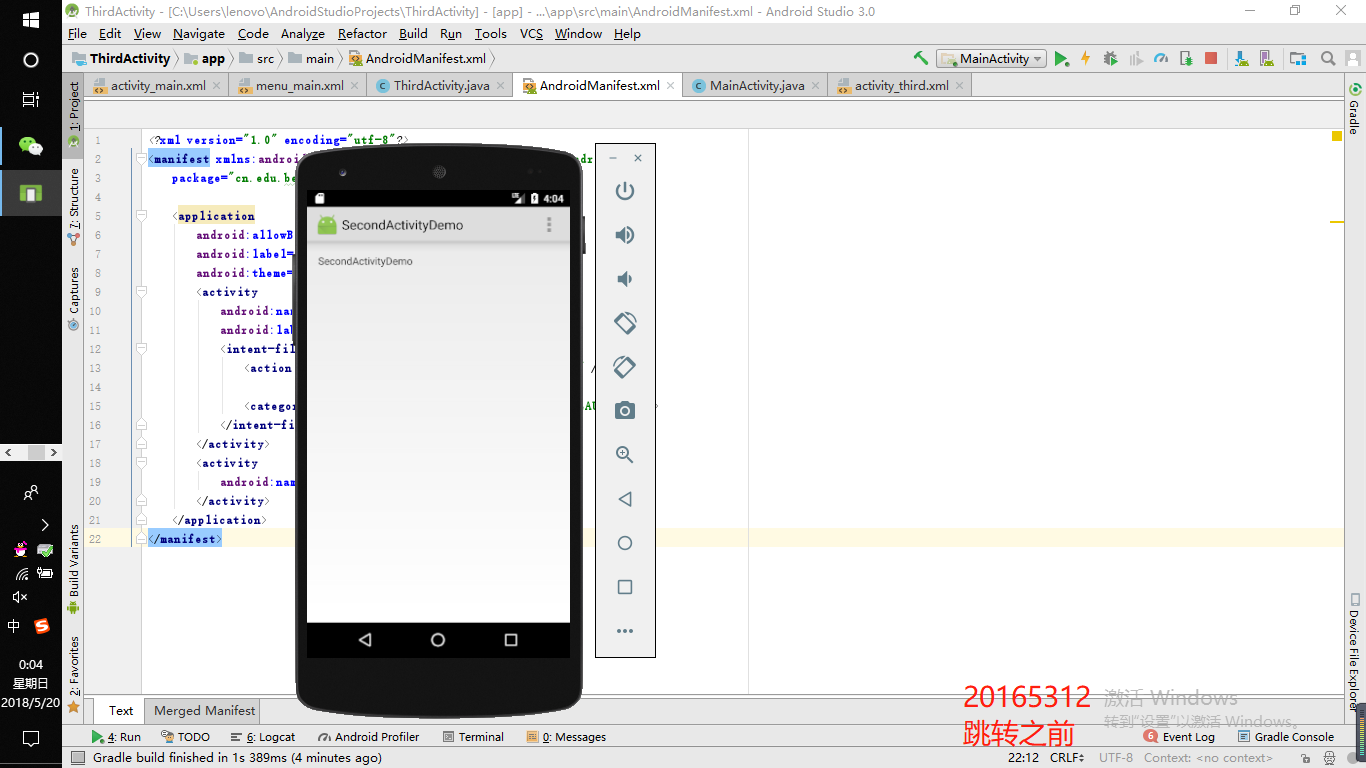
构建项目,运行教材相关代码
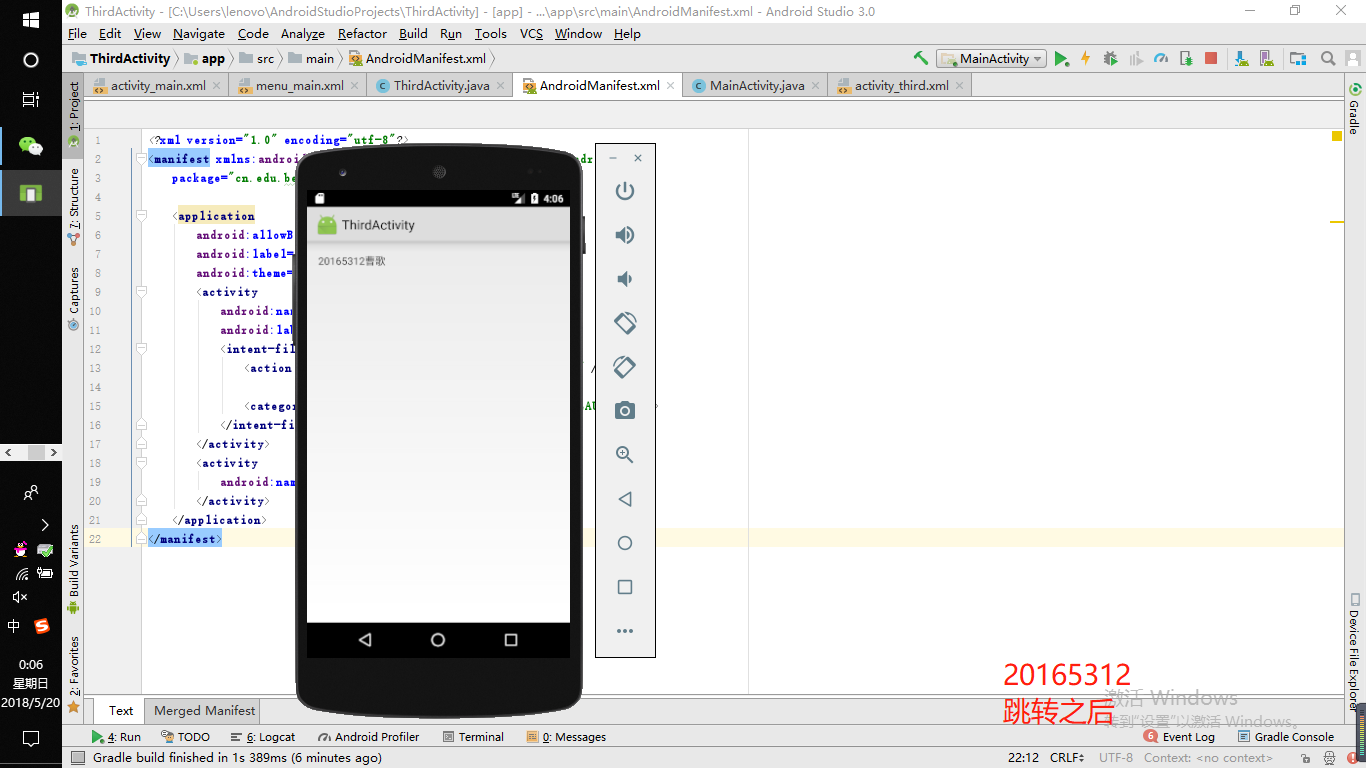
创建 ThirdActivity, 在ThirdActivity中显示自己的学号,修改代码让MainActivity启动ThirdActivity
步骤:
- 在
AndroidManifest.xml清单文件中添加一个activity
        <activity

            android:name=".ThirdActivity">

        </activity>
- 添加一个
ThirdActivity.java文件
package cn.edu.besti.is.cg;

import android.app.Activity;

import android.os.Bundle;

public class ThirdActivity extends Activity {

    @Override

    protected void onCreate(Bundle savedInstanceState) {

        super.onCreate(savedInstanceState);

        setContentView(R.layout.activity_third);

    }

}
- 添加一个
third_activity.xml文件
<RelativeLayout xmlns:android="http://schemas.android.com/apk/res/android"

    xmlns:tools="http://schemas.android.com/tools"

    android:layout_width="match_parent"

    android:layout_height="match_parent"

    android:paddingBottom="@dimen/activity_vertical_margin"

    android:paddingLeft="@dimen/activity_horizontal_margin"

    android:paddingRight="@dimen/activity_horizontal_margin"

    android:paddingTop="@dimen/activity_vertical_margin"

    tools:context=".ThirdActivity">

    <TextView

        android:id="@+id/textView1"

        android:layout_width="wrap_content"

        android:layout_height="wrap_content"

        android:text="20165312曹歌"/>

</RelativeLayout>
- 修改
MainActivity.java使其能够自启动ThirdActivity.java
package cn.edu.besti.is.cg;

import android.app.Activity;

import android.content.Intent;

import android.os.Bundle;

import android.view.Menu;

import android.view.MotionEvent;

import android.view.View;

import android.view.View.OnTouchListener;

import android.widget.TextView;

import static cn.edu.besti.is.cg.R.id.textView1;

public class MainActivity extends Activity implements

        OnTouchListener {

    @Override

    protected void onCreate(Bundle savedInstanceState) {

        super.onCreate(savedInstanceState);

        setContentView(R.layout.activity_main);

        TextView tv = (TextView) findViewById(textView1);

        tv.setOnTouchListener(this);

    }

    @Override

    public boolean onCreateOptionsMenu(Menu menu) {

        // Inflate the menu; this adds items to the action bar if it

        // is present.

        getMenuInflater().inflate(R.menu.menu_main, menu);

        return true;

    }

    @Override

    public boolean onTouch(View arg0, MotionEvent event) {

        Intent intent = new Intent(this, ThirdActivity.class);

        intent.putExtra("message", "Message from First Screen");

        startActivity(intent);

        return true;

    }

}
三、UI测试
所谓UI,就是为主活动构建用户交叉(user interface)
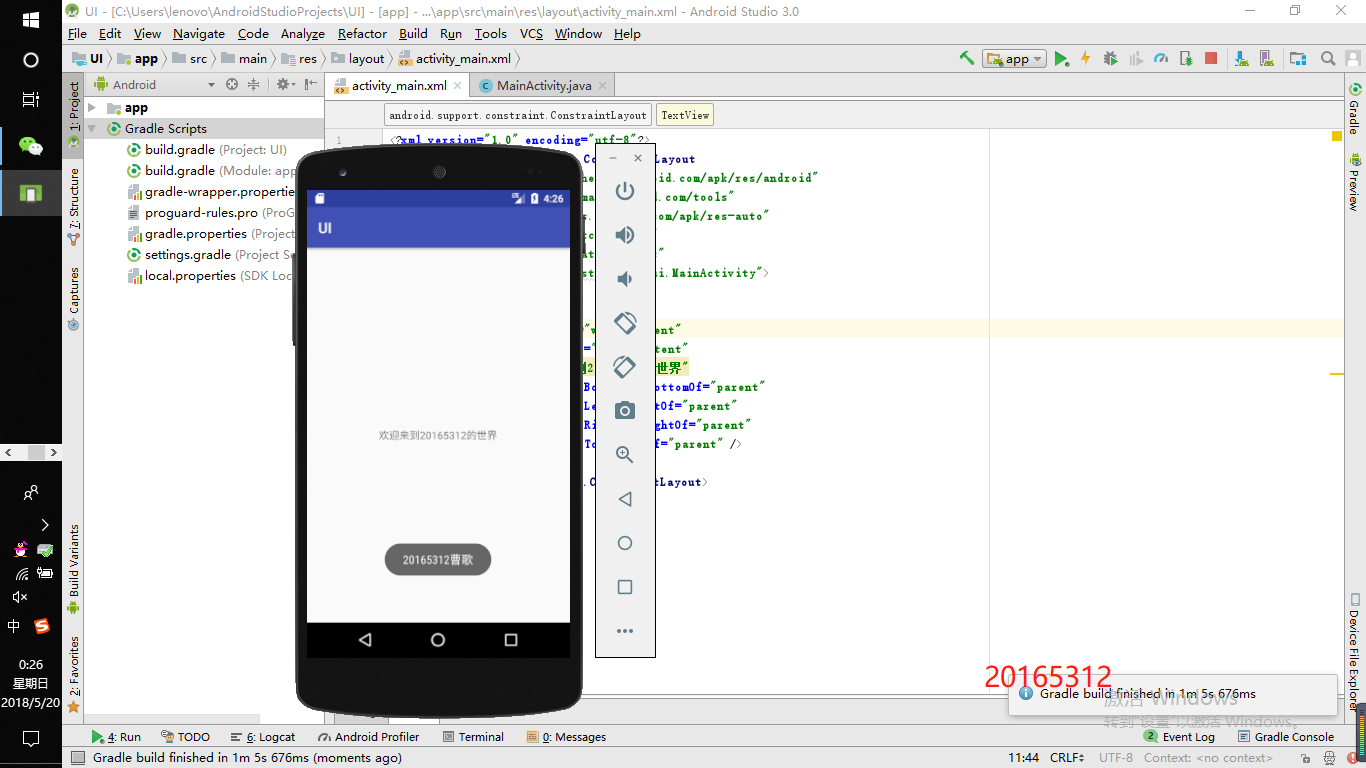
修改代码让Toast消息中显示自己的学号信息
Toast:一个消费弹出对话框,用于显示一条消息作为给用户的反馈,Toast并不会代替当前的内容。
修改activity_main.xml
<?xml version="1.0" encoding="utf-8"?>

<android.support.constraint.ConstraintLayout

    xmlns:android="http://schemas.android.com/apk/res/android"

    xmlns:tools="http://schemas.android.com/tools"

    xmlns:app="http://schemas.android.com/apk/res-auto"

    android:layout_width="match_parent"

    android:layout_height="match_parent"

    tools:context="cn.edu.besti.is.cg.ui.MainActivity">

    <TextView

        android:layout_width="wrap_content"

        android:layout_height="wrap_content"

        android:text="欢迎来到20165312的世界"

        app:layout_constraintBottom_toBottomOf="parent"

        app:layout_constraintLeft_toLeftOf="parent"

        app:layout_constraintRight_toRightOf="parent"

        app:layout_constraintTop_toTopOf="parent" />

</android.support.constraint.ConstraintLayout>
修改MainActivity.java
package cn.edu.besti.is.cg.ui;

import android.support.v7.app.AppCompatActivity;

import android.os.Bundle;

import android.widget.Toast;

public class MainActivity extends AppCompatActivity {

    @Override

    protected void onCreate(Bundle savedInstanceState) {

        super.onCreate(savedInstanceState);

        setContentView(R.layout.activity_main);

        Toast toast = Toast.makeText(MainActivity.this, "20165312曹歌", Toast.LENGTH_LONG);

        toast.show();

    }

}
四、布局测试
Android中的一些布局:
LinearLayout将所有子视图以相同的方向(水平或者垂直)对齐的一个布局RelativeLayout根据子视图的一个或者多个同级视图的位置来排列他的一个布局FrameLayout将每一个子视图放在另一个子视图顶部的一种布局TableLayout将子视图按照行和列来组织的一种布局GridLayout将子视图放置到一个栅格中的一种布局
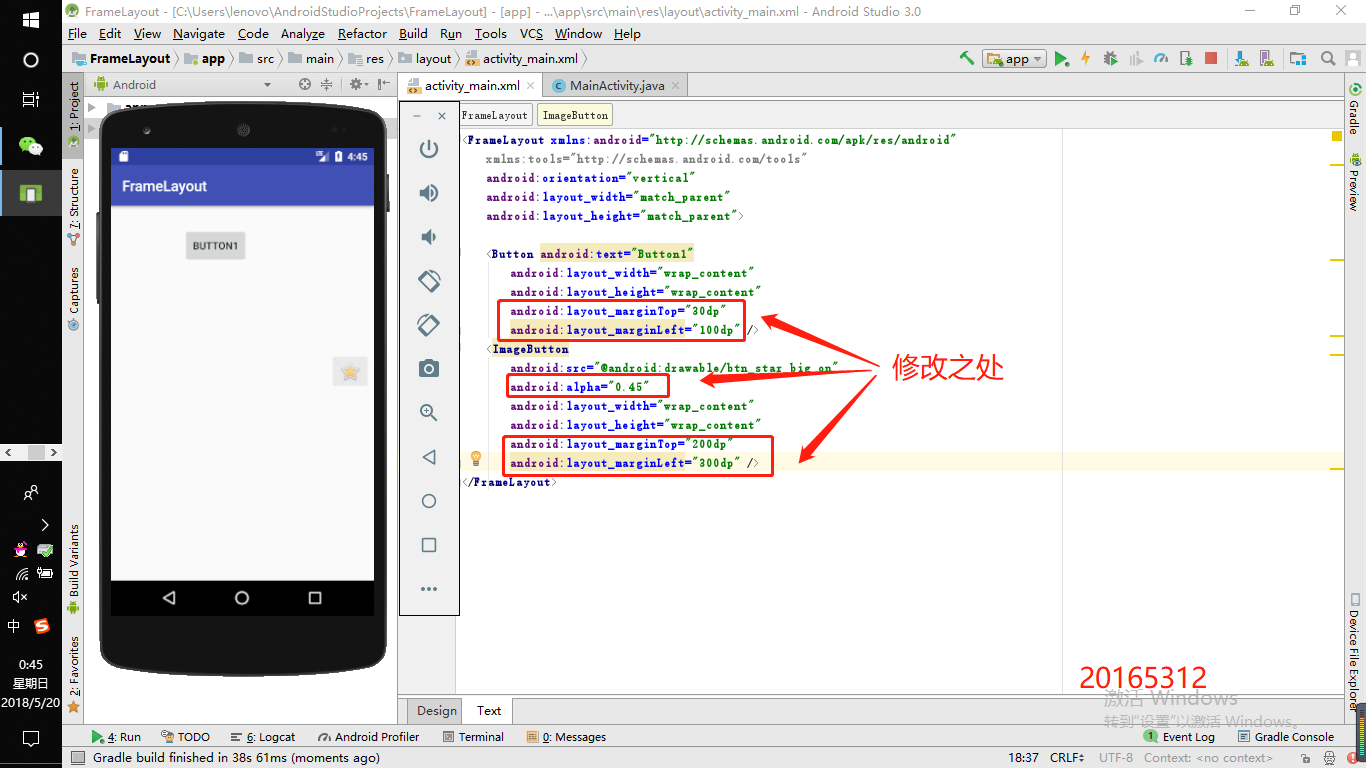
修改布局让P290页的界面与教材不同
修改activity_main.xml
<FrameLayout xmlns:android="http://schemas.android.com/apk/res/android"

    xmlns:tools="http://schemas.android.com/tools"

    android:orientation="vertical"

    android:layout_width="match_parent"

    android:layout_height="match_parent">

    <Button android:text="Button1"

        android:layout_width="wrap_content"

        android:layout_height="wrap_content"

        android:layout_marginTop="30dp"

        android:layout_marginLeft="100dp" />

    <ImageButton

        android:src="@android:drawable/btn_star_big_on"

        android:alpha="0.45"

        android:layout_width="wrap_content"

        android:layout_height="wrap_content"

        android:layout_marginTop="200dp"

        android:layout_marginLeft="300dp" />

</FrameLayout>
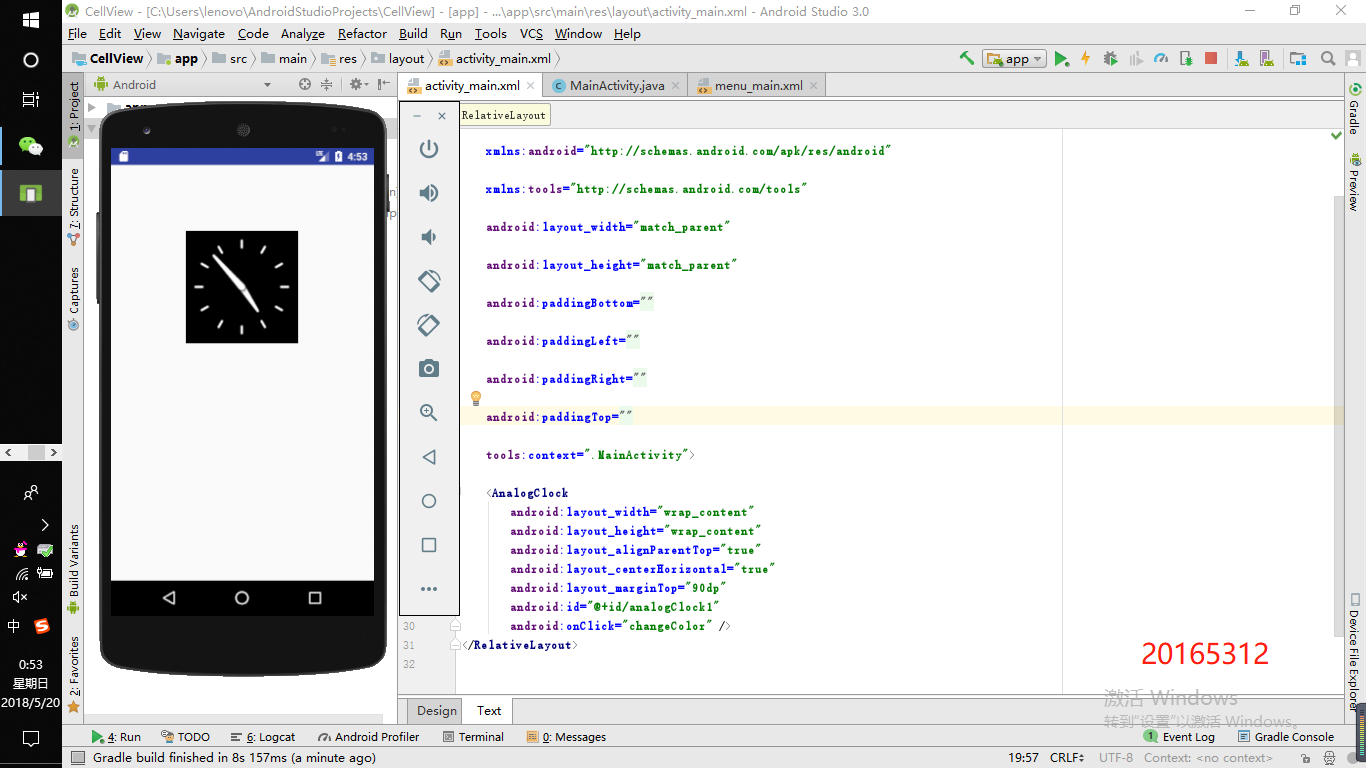
五、事件处理测试
运行教材代码
MainActivity.java
package cn.edu.besti.is.cg.cellview;

import android.app.Activity;

import android.graphics.Color;

import android.os.Bundle;

import android.view.Menu;

import android.view.View;

public class MainActivity extends Activity {

    int counter = 0;

    int[] colors = { Color.BLACK, Color.BLUE, Color.CYAN,

            Color.DKGRAY, Color.GRAY, Color.GREEN, Color.LTGRAY,

            Color.MAGENTA, Color.RED, Color.WHITE, Color.YELLOW };

    @Override

    protected void onCreate(Bundle savedInstanceState) {

        super.onCreate(savedInstanceState);

        setContentView(R.layout.activity_main);

    }

    @Override

    public boolean onCreateOptionsMenu(Menu menu) {

// Inflate the menu; this adds items to the action bar if it

// is present.

        getMenuInflater().inflate(R.menu.menu_main, menu);

        return true;

    }

    public void changeColor(View view) {

        if (counter == colors.length) {

            counter = 0;

        }

        view.setBackgroundColor(colors[counter++]);

    }

}
activity_main.xml
<?xml version="1.0" encoding="utf-8"?>

<RelativeLayout

    xmlns:android="http://schemas.android.com/apk/res/android"

    xmlns:tools="http://schemas.android.com/tools"

    android:layout_width="match_parent"

    android:layout_height="match_parent"

    android:paddingBottom="@dimen/activity_vertical_margin"

    android:paddingLeft="@dimen/activity_horizontal_margin"

    android:paddingRight="@dimen/activity_horizontal_margin"

    android:paddingTop="@dimen/activity_vertical_margin"

    tools:context=".MainActivity">

    <AnalogClock

        android:layout_width="wrap_content"

        android:layout_height="wrap_content"

        android:layout_alignParentTop="true"

        android:layout_centerHorizontal="true"

        android:layout_marginTop="90dp"

        android:id="@+id/analogClock1"

        android:onClick="changeColor" />

</RelativeLayout>
实验中遇到的问题
出现Executing tasks: app:assembleDebug的问题,百度之后找到androidStudio出现Executing tasks: app:assembleDebug。
将build.gradle(module:app)文件中
testApplicationId“com.cn.skypiea.test"

testInstrumentationRunner "android.test.InstrumentationTestRunner"
注释之后,就可以成功打包了。
出现Execution failed for task ':app:preDebugAndroidTestBuild的问题,百度之后找到一篇博客,Build->Rebuild Project之后即可正常运行
出现R标红的问题
其实吧我觉得R挺玄乎的,我尝试过好几种解决办法,第一次我重新运行了一遍然后R就自动不标红了,反正就是挺奇怪的;第二次标红我修改了package的内容然后就可以了;第三次我采取了Ctrl+Enter新建一个东西就ok了,所以多尝试。。。
最后我找到了一篇博客 Android studio中R变成红色studio中R变成红色供大家参考。。
2017-2018-2 20165312 实验四《Android程序设计》实验报告的更多相关文章
- 20165230 《Java程序设计》实验四 Android程序设计实验报告
20165230 <Java程序设计>实验四 Android程序设计实验报告 一.实验报告封面 课程:Java程序设计 班级:1652班 姓名:田坤烨 学号:20165230 成绩: 指导 ...
- 实验四 Android程序设计 实验报告
实验四 Android程序设计 实验报告 目录 代码托管地址 Android程序设计-1 Android程序设计-2 Android程序设计-3 Android程序设计-4 Android程序设计-5 ...
- 20155326 实验四 Android程序设计实验报告
20155326 实验四 Android程序设计实验报告 实验内容 1.基于Android Studio开发简单的Android应用并部署测试; 2.了解Android.组件.布局管理器的使用: 3. ...
- 20162325金立清 实验四 Android程序设计 实验报告
实验四 Android程序设计 实验报告 代码托管地址 码云链接 实验内容 安装使用Android Stuidio Activity测试 UI测试 布局测试 事件处理测试 Android程序设计-1 ...
- 实验四 Android程序设计 实验报告 20162305李昱兴
实验四 Android程序设计 实验报告 20162305李昱兴 一.Android Studio的安装测试 1.有关该软件 Android Studio,是基于Itellij IDEA的一款流行的I ...
- 20172302《程序设计与数据结构》实验四Android程序设计实验报告
课程:<程序设计与数据结构> 班级: 1723 姓名: 侯泽洋 学号:20172302 实验教师:王志强老师 实验日期:2018年5月30日 必修/选修: 必修 1.实验内容 (1)And ...
- 20155328 实验四 Android程序设计 实验报告
20155328 实验四 Android程序设计 第24章 初识Android 提交点1:完成HelloWorld并显示自己的学号 安装Android Studio后,创建了属于自己的Project( ...
- 2016-2017-2 20155312 实验四Android程序设计实验报告
遇到的问题及解决过程 「问题1」Android Studio-R文件出错 解决:参考Android Studio-R文件错误的解决办法步骤如下: 第一步:检查xml文件,R文件错误通常是由于我们的xm ...
- 20165235实验四 Android程序设计
20165235实验四 Android程序设计 实验课程:JAVA编程设计 实验名称:Android开发 姓名:祁瑛 学号:20165235 实验时间:2018.05.16 指导老师:娄家鹏 Andr ...
- 实验四 Android程序设计
20155224 实验四 Android程序设计 实验报告 实验报告封面: 课程:Java程序设计 班级:1652班 姓名:王高源 学号:20165225 指导教师:娄嘉鹏 实验日期:2018年5月1 ...
随机推荐
- [BZOJ1406]密码箱
Problem 给你1个数n,求出0 ≤ x < n,并且x ^ 2 % n = 1 Solution x ^ 2 - 1 = kn,(x - 1) * (x + 1) = kn 所以枚举n的约 ...
- day71 菜单的排序 点击被选中
菜单的排序:(给菜单设置权重,权重高的让他显示在上面) from django import template from django.conf import settings from collec ...
- 用记事本编写helloworld文件但是javac时报错
刚开始编写第一个java文件时遇到的错误: javac HelloWorld.java HelloWorld.java:1: 错误: 写入HelloWorld时出错: HelloWorld.class ...
- NOIP2012提高组 Day 2 Problem 2 借教室
原题 题目描述 在大学期间,经常需要租借教室.大到院系举办活动,小到学习小组自习讨论,都需要向学校申请借教室.教室的大小功能不同,借教室人的身份不同,借教室的手续也不一样. 面对海量租借教室的信息,我 ...
- 剑指Offer 39. 平衡二叉树 (二叉树)
题目描述 输入一棵二叉树,判断该二叉树是否是平衡二叉树. 题目地址 https://www.nowcoder.com/practice/8b3b95850edb4115918ecebdf1b4d222 ...
- java001单词拼写
System.out.printIn("string"); 报错: 百度大神指点,是小写的l而不是大写的I,应该为 System.out.println("Hello S ...
- 当git上文件名大小写重命名的修改时(git大小写敏感/默认不敏感),如何重命名并提交
git默认是大小写不敏感!!! 加了感叹号是什么意思呢,意思就是这本身就是一个坑,本人使用的IDE是idea(网上说Eclipse可以避开问题),这个IDE本身就集成了git,但是如果要在termin ...
- Vue.js学习使用心得(四)——组件
一.组件 组件(Component)是 Vue.js 最强大的功能之一. 组件可以扩展 HTML 元素,封装可重用的代码. 组件系统让我们可以用独立可复用的小组件来构建大型应用,几乎任意类型的应用的界 ...
- 开发中经常遇到SVN清理失败的问题:
开发中经常遇到SVN清理失败的问题: 解决方法: step1: 到 sqlite官网 https://www.sqlite.org/download.html 下载 sqlite3.exe ...
- 学习笔记TF038:实现估值网络
Q-Learning,学习Action对应期望值(Expected Utility).1989年,Watkins提出.收敛性,1992年,Watkins和Dayan共同证明.学习期望价值,从当前一步到 ...