iOS 超 Easy 实现 渐变导航栏
接着上周的项目, 在上周我别出心裁的在自定义TabbarController中加入了自定义转场动画, 受到了大家广泛的喜爱, 再次表示感激, 今天我们继续实现LifestyleViewController的第二个功能渐变导航栏!!
渐变导航栏, 现在很多项目里都有这个功能, 我们就把这个功能集成到我们的项目中来; 根据设计图纸需求, 我们需要在轮播图下面有一个搜索栏, 搜索栏根据滑动偏移到导航栏之上.
具体怎么实现呢, Easy啦~ 不急,我们一步一步来.
创建搜索栏Cell
首先打开我们的项目先在轮播图Cell下创建一个搜索栏Cell 并添加子控件.
- (UIImageView *)hotSpotsImageView {
if (!_hotSpotsImageView) {
_hotSpotsImageView = [UIImageView new];
_hotSpotsImageView.image = [UIImage imageNamed:@"Hot Spots"];
}
return _hotSpotsImageView;
}
- (void)layoutSubviews {
[super layoutSubviews];
CGFloat padding = kSpace;
CGFloat hotSpotsImageViewX = padding;
CGFloat hotSpotsImageViewW = 90;
CGFloat hotSpotsImageViewH = 20;
CGFloat hotSpotsImageViewY = self.height - hotSpotsImageViewH - 5;
self.hotSpotsImageView.frame = CGRectMake(hotSpotsImageViewX, hotSpotsImageViewY, hotSpotsImageViewW, hotSpotsImageViewH);
}
这时你可能会问 为什么不在Cell中添加TextField之类的, 由于我们的效果,之后再向您揭晓;
控制器 多Cell设计
这时回到控制器, 但是控制器中不止一种Cell, 我们怎么来设计呢?? 我的实现方法是KeysArr, 那什么是KeysArr呢,我们来看代码.
首先我们需要创建一个全局类 (这个写法和上周的 投机流 自定义转场有异曲同工之妙)
创建全局类
全局类中的每一个Key对应着你的一个Cell
.h
extern NSString * const kSQLifestyleBannerKey;
extern NSString * const kSQLifestyleSearchKey;
.m
NSString * const kSQLifestyleBannerKey = @"轮播图";
NSString * const kSQLifestyleSearchKey = @"热点";
keys数组
接着我们创建一个数组来持有这些key;
@property (nonatomic,strong) NSArray * keysArr;
- (NSArray *)keysArr {
if (!_keysArr) {
_keysArr = @[kSQLifestyleBannerKey,
kSQLifestyleSearchKey];
}
return _keysArr;
}
Tableview delegate mothod
最后在代理方法中进行判断
- (NSInteger)tableView:(UITableView *)tableView numberOfRowsInSection:(NSInteger)section {
return self.keysArr.count;
}
- (UITableViewCell *)tableView:(UITableView *)tableView cellForRowAtIndexPath:(NSIndexPath *)indexPath {
NSString * const key = self.keysArr[indexPath.row];
if (key == kSQLifestyleBannerKey) {
SQLifestyleBannerCell * cell = [SQLifestyleBannerCell cellWithTableView:tableView];
return cell;
}
if (key == kSQLifestyleSearchKey) {
SQLifestyleSearchCell * cell = [SQLifestyleSearchCell cellWithTableView:tableView];
return cell;
}
return nil;
}
- (CGFloat)tableView:(UITableView *)tableView heightForRowAtIndexPath:(NSIndexPath *)indexPath {
NSString * const key = self.keysArr[indexPath.row];
if (key == kSQLifestyleBannerKey) {
return [SQLifestyleBannerCell cellHeight];
}
if (key == kSQLifestyleSearchKey) {
return [SQLifestyleSearchCell cellHeight];
}
return 0;
}
这样当不需要某个cell显示的时候,只需要将keys从KeysArr中移除即可, 是不是很方便!!
创建搜索栏View
这里需要提醒大家的一点, 当你在自定义View的时候最好要实现initWithFrame和initWithCoder两个方法, 这样无论是用纯代码还是Xib,Storyboard使用自定义View时都能够直接加载!!
- (instancetype)initWithFrame:(CGRect)frame {
self = [super initWithFrame:frame];
if (self) {
[self setupSubviews];
}
return self;
}
- (instancetype)initWithCoder:(NSCoder *)coder {
self = [super initWithCoder:coder];
if (self) {
[self setupSubviews];
}
return self;
}
- (UITextField *)searchBarTextField {
if (!_searchBarTextField) {
_searchBarTextField = [UITextField new];
_searchBarTextField.backgroundColor = [UIColor whiteColor];
_searchBarTextField.layer.borderColor = KC05_dddddd.CGColor;
_searchBarTextField.layer.borderWidth = 0.5f;
_searchBarTextField.layer.cornerRadius = 5;
_searchBarTextField.layer.masksToBounds= YES;
_searchBarTextField.placeholder = @"Searching for something new";
_searchBarTextField.leftView = self.magnifierImageView;
_searchBarTextField.leftViewMode = UITextFieldViewModeAlways;
[_searchBarTextField setValue:KC04_999999 forKeyPath:@"placeholderLabel.textColor"];
}
return _searchBarTextField;
}
- (UIImageView *)magnifierImageView {
if (!_magnifierImageView) {
_magnifierImageView = [UIImageView new];
_magnifierImageView.image = [UIImage imageNamed:@"fa-search"];
_magnifierImageView.frame = CGRectMake(0, 0, 34, 34);
_magnifierImageView.contentMode = UIViewContentModeCenter;
}
return _magnifierImageView;
}
- (void)setupSubviews {
[self addSubview:self.searchBarTextField];
}
- (void)layoutSubviews {
[super layoutSubviews];
CGFloat searchBarTextFieldX = 0;
CGFloat searchBarTextFieldY = 0;
CGFloat searchBarTextFieldW = self.width;
CGFloat searchBarTextFieldH = 34;
self.searchBarTextField.frame = CGRectMake(searchBarTextFieldX, searchBarTextFieldY, searchBarTextFieldW, searchBarTextFieldH);
}
实现位移渐变
重于到今天的重头戏了, 我们来实现位移渐变!! 上面的自定义View 我们并不是将其添加到Cell之中, 而是将他添加到navigationController.view之上!!
创建两个自定义View
@property (nonatomic,strong) SQLifestyleSearchBarView * titleView;
@property (nonatomic,strong) SQLifestyleSearchBarView * searchBarView;
- (SQLifestyleSearchBarView *)titleView {
if (!_titleView) {
_titleView = [SQLifestyleSearchBarView new];
_titleView.frame = self.navigationController.navigationBar.frame;
}
return _titleView;
}
- (SQLifestyleSearchBarView *)searchBarView {
if (!_searchBarView) {
_searchBarView = [SQLifestyleSearchBarView new];
}
return _searchBarView;
}
其中一个的frame = self.navigationController.navigationBar.frame
并将其添加到titleView中!! 另一个将其加载navigationController.view中!! 并在viewWillLayoutSubviews中设置布局!!
- (void)loadView {
[super loadView];
[self.navigationItem setTitleView:self.titleView];
[self.navigationController.navigationBar setBackgroundImage:[UIImage imageWithColor:[UIColor clearColor]] forBarMetrics:UIBarMetricsDefault];
[self.navigationController.navigationBar setShadowImage:[UIImage imageWithColor:[UIColor clearColor]]];
}
- (void)viewDidLoad {
[super viewDidLoad];
[self.view addSubview:self.tableView];
[self.navigationController.view addSubview:self.searchBarView];
}
- (void)viewWillLayoutSubviews {
[super viewWillLayoutSubviews];
CGFloat searchBarViewX = kSpace;
CGFloat searchBarViewW = self.titleView.width;
CGFloat searchBarViewH = self.titleView.height;
CGFloat searchBarViewY = kScaleLength(210) + searchBarViewH - self.tableView.contentOffset.y - searchBarViewH;
self.searchBarView.frame = CGRectMake(searchBarViewX, searchBarViewY, searchBarViewW, searchBarViewH);
}
监听偏移
我们将设置导航栏背景颜色的方法从LoadView移到scrollViewDidScroll中来
这里需要和大家细说一下监听偏移渐变,其实很简单,就是一个公式而已 float alpha = 1 - (offset) - scrollView.contentOffset.y) / offset); 其中的offset 指的是y轴方向从初始值viewWillLayoutSubviews中的初始设定 到导航栏的位移!!
每滑动下重新调用viewWillLayoutSubviews方法重新布局, 当其到达位移点的时候, 两个View进行交换就达到了 预期的效果!!
- (void)scrollViewDidScroll:(UIScrollView *)scrollView {
[self viewWillLayoutSubviews];
[[[UIApplication sharedApplication] keyWindow] endEditing:YES];
float alpha = 1 - ((kScaleLength(190.5) - scrollView.contentOffset.y) / kScaleLength(190.5));
[self.navigationController.navigationBar setBackgroundImage:[UIImage imageWithColor:[KC01_57c2de colorWithAlphaComponent:alpha > 0.95f ? 0.95f : alpha]] forBarMetrics:UIBarMetricsDefault];
self.titleView.hidden = scrollView.contentOffset.y > kScaleLength(190.5) ? NO : YES;
self.searchBarView = !titleView.hidden;
}
对位移渐变的封装
上面的代码看到晕晕乎乎,讲的不清不楚!! 我们来讲这个功能封装一下, 先创建一个UIViewController的Catagory 实现方法!!
scrollView: 传入需要位移的scrollView;
titleView: 传入导航栏上的titleView;
movableView: 传入需要移动的自定义View;
offset: 传入y轴方向从初始值到导航栏的位移;
color: 传入导航栏颜色
- (void)navigationBarGradualChangeWithScrollView:(UIScrollView *)scrollView titleView:(UIView *)titleView movableView:(UIView *)movableView offset:(CGFloat)offset color:(UIColor *)color {
float alpha = 1 - ((offset - scrollView.contentOffset.y) / offset);
[self.navigationController.navigationBar setBackgroundImage:[UIImage imageWithColor:[color colorWithAlphaComponent:alpha > 0.95f ? 0.95f : alpha]] forBarMetrics:UIBarMetricsDefault];
titleView .hidden = scrollView.contentOffset.y > offset ? NO : YES;
movableView.hidden = !titleView .hidden;
}
这样我们在调用的时候就简单明了多了!! 以后做到这个功能的时候可以直接拿来用了!!
- (void)scrollViewDidScroll:(UIScrollView *)scrollView {
[self viewWillLayoutSubviews];
[[[UIApplication sharedApplication] keyWindow] endEditing:YES];
[self navigationBarGradualChangeWithScrollView:scrollView titleView:self.titleView movableView:self.searchBarView offset:kScaleLength(190.5) color:KC01_57c2de];
}
模拟效果
为了能看到效果 我们在控制器中多加几个cell 方法很简单只要在Key数组中多加几个对象即可! 并在key == @"" 时加载如下Cell
- (NSArray *)keysArr {
if (!_keysArr) {
_keysArr = @[kSQLifestyleBannerKey,
kSQLifestyleSearchKey,
@"",@"",@"",@"",@"",
@"",@"",@"",@"",@"",
@"",@"",@"",@"",@"",
@"",@"",@"",@"",@""];
}
return _keysArr;
}
static NSString * identifier = @"cell";
UITableViewCell * cell = [tableView dequeueReusableCellWithIdentifier:identifier];
if (!cell) {
cell = [[UITableViewCell alloc]initWithStyle:UITableViewCellStyleDefault reuseIdentifier:identifier];
} cell.textLabel.text = @"https://coderZsq.github.io";
return cell;
好了 我们来看下显示效果吧~~
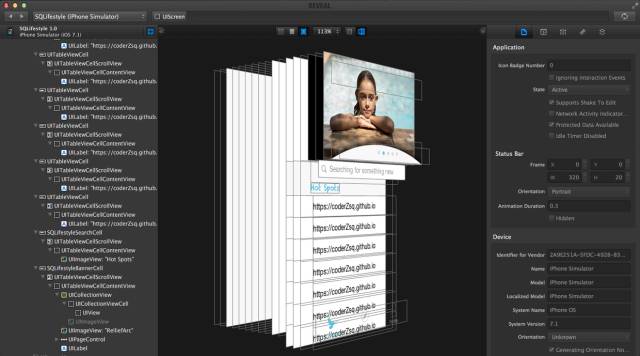
在Reaval中显示

最终显示

具体源码及SQExtension方法信息 请到github上进行下载! 喜欢的朋友送下小星星哟!!
https://github.com/coderZsq/coderZsq.project.ios
iOS 超 Easy 实现 渐变导航栏的更多相关文章
- iOS渐变导航栏封装
由于最近开发的几个项目都有渐变导航栏,每次写的时候都要copy一堆关于导航渐变相关的代码,显得类很冗余,所以花了点时间封装了一个渐变类,直接继承就可以满足大部分需求啦,这里简单写一下心路历程: 渐变的 ...
- 超详细Vue实现导航栏绑定内容锚点+滚动动画+vue-router(hash模式可用)
超详细Vue实现导航栏绑定内容锚点+滚动动画+vue-router(hash模式可用) 转载自:https://www.jianshu.com/p/2ad8c8b5bf75 亲测有效~ <tem ...
- 【iOS开发-22】navigationBar导航栏,navigationItem建立:获取导航栏中的基本文本和button以及各种跳跃
(1)navigationBar导航栏可以被看作是self.navigationController一个属性导航控制器,它可以由点直接表示self.navigationController.navig ...
- IOS开发之Bug--iOS7View被导航栏遮挡问题的解决
在实际开发中,遇到在UITextView的frame等于当前控制器的View的frame的情况下,然后运行的时候,发现控制器的Frame的高度y值会从导航条的位置64变化到0. 导致UITextVie ...
- iOS开发笔记1:[转]导航栏里的"Back"按钮显示不出来
最近项目中遇到一个问题,push过去的ViewController的Nav上面没有返回按钮,遂搜索资料,找到了以下文档.经测试i,问题解决. 原文地址:http://www.cnblogs.com/s ...
- iOS:自定义工具栏、导航栏、标签栏
工具栏为UIToolBar,导航栏UINavigationBar,标签栏UITabBar.它们的样式基本上时差不多的,唯一的一点区别就是,工具栏一般需要自己去创建,然后添加到视图中,而导航栏和标签栏不 ...
- [iOS微博项目 - 1.2] - 导航栏搜索框
A.导航栏搜索框 1.需求 在“发现”页面,在顶部导航栏NavigationBar上添加一个搜索框 左端带有“放大镜”图标 github: https://github.com/hellovoidwo ...
- iOS 删除黑色边框线导航栏&删除搜索框的阴影边界线和中黑色文本输入框 - 解
删除黑色边框线导航栏 in viewDidload: [self.navigationController.navigationBar setBackgroundImage:[[UIImage all ...
- iOS 要定义自己的导航栏button样式Button Image 执行出彩是不一样的与原来的颜色 -解
在相机闪光灯,在导航栏中自己定义"闪"样式.点击变换的图像期望,但一直没有变化.原来是该条款的Global Tint颜色.因此,系统会自己主动改变图片的颜色Global Tint颜 ...
随机推荐
- cocos中添加显示文字的三种方式(CCLabelTTF 、CCLabelBMFont 和CCLabelAtlas)
CCLabelTTF CCLabelTTF 每次调用 setString (即改变文字)的时候,一个新的OPENGL 纹理将会被创建..这意味着setString 和创建一个新的标签一样慢. 这个类使 ...
- 轻松学习Linux之理解进程的管理与控制
本文出自 "李晨光原创技术博客" 博客,谢绝转载!
- cocos2d-x3.2下获取文件夹下所有文件名的方法
这里提供一个函数获取文件夹下所有文件名的方法,直接上代码了. 原文地址:http://blog.csdn.net/qqmcy/article/details/36184733 // // Visib ...
- 【转】玩转log4j
原文链接:http://www.cnblogs.com/shenliang123/archive/2012/05/02/2479286.html 由于最近正在扩展卫生局考务系统,由于上一次使用过一次该 ...
- ArrayList中元素去重问题
如题所示,如果一个ArrayList中包含多个重复元素,该如何去重呢? 思路一以及实现: 声明2个ArrayList,分别为listA与listB ,listA为待去重list ,listB 保存去重 ...
- Windows下Mysql5.6启用监控执行脚本的日志
修改my.ini (我的MySQL安装位置是:E:\MySQL\MySQL Server 5.6) log-output=FILE general-log=1 general_log_file=&qu ...
- OC:Block语法、Block使用、Block实现数组排序
Block //定义一个求两个数最大值函数 int maxValue (int ,int); //函数的实现 int maxValue (int a, int b){ return a > b ...
- 关于刘冬大侠Spring.NET系列学习笔记3的一点勘正
诚如他第22楼“只因渴求等待”提出的疑问一样,他的下面那一段代码是存在一点点问题的, XElement root = XElement.Load(fileName); var objects = fr ...
- js 数组去重 的5种方法
一万数组,4个重复项,先贴上成绩. 1.3毫秒 2.115毫秒 3.71毫秒 4.6毫秒 1.哈希表 2.JQuery (最快的方法是用JQuery 这句话是截图带的... 实际上Jq是最慢的) 3. ...
- 在VS2012中使用GDI+
首先说明,在VS的较高版本中,已经包含GDI+的SDK,不用再次下载,只需要使用前应用相应的头文件,添加些代码即可.但是VC6.0中,没有GDI+SDK,需要同志们下载才行. 步骤: 1.在stdaf ...
