从零开始学android开发-布局中 layout_gravity、gravity、orientation、layout_weight
线性布局中,有 4 个及其重要的参数,直接决定元素的布局和位置,这四个参数是
android:layout_gravity ( 是本元素相对于父元素的重力方向 )
android:gravity (是本元素所有子元素的重力方向)
android:orientation (线性布局以列或行来显示内部子元素)
android:layout_weight (线性布局内子元素对未占用空间【水平或垂直】分配权重值,其值越小,权重越大。
前提是子元素 设置了 android:layout_width = "fill_parent" 属性(水平方向)
或 android:layout_height = "fill_parent" 属性(垂直方向)
如果某个子元素的 android:layout_width = "wrap_content"
或 android:layout_height =" wrap_content” ,
则 android:layout_weight 的设置值 对该方向上空间的分配刚好相反。
下面以一个简单例子来说明这 4个参数
<? xml version = "1.0" encoding = "utf-8" ?>
< LinearLayout xmlns:android = "http://schemas.android.com/apk/res/android"
android:layout_height = "200dp"
android:layout_width = "200dp"
android:background = "#AABBCC"
android:orientation= "horizontal"
android:layout_gravity= "center" >
< TextView android:text = "ONE"
android:background = "#aa0000"
android:layout_height = "wrap_content"
android:layout_width = "wrap_content"
android:layout_margin = "1dp" />
< TextView android:text = "TWO"
android:background = "#aa0000"
android:layout_height = "wrap_content"
android:layout_width = "wrap_content"
android:layout_margin = "1dp" />
</ LinearLayout >
说明:在上面的例子中,根布局是LinearLayout, 其包含有2 个TextView 视图,为了对参数 android:layout_gravity有直观的了解,对根布局 LinearLayout 特意加了 3 个参数
android:layout_height = "200dp"
android:layout_width = "200dp"
android:background = "#AABBCC"
为布局指定了固定的宽度和高度,以及背景颜色,上面的例子运行后效果如下图:
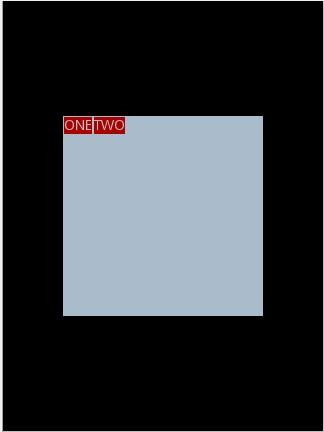
说明:对LinearLayout 中的参数android:layout_gravity 来说,其意义是指定本布局相对于父布局的重力方向,由于该布局的已经是根布局,其父布局是整个屏幕,那么该参数设置的是相对于屏幕的位置,可以换不同的参数top|bottom|left|right 等等参数来试验。
现在增加参数 android:gravity = "bottom|right" 完整 XML 如下,看看效果
<? xml version = "1.0" encoding = "utf-8" ?>
< LinearLayout xmlns:android = "http://schemas.android.com/apk/res/android"
android:layout_height = "200dp"
android:layout_width = "200dp"
android:background = "#AABBCC"
android:orientation="horizontal"
android:layout_gravity= "center"
android:gravity = "bottom|right " >
< TextView android:text = "ONE"
android:background = "#aa0000"
android:layout_height = "wrap_content"
android:layout_width = "wrap_content"
android:layout_margin = "1dp" />
< TextView android:text = "TWO"
android:background = "#aa0000"
android:layout_height = "wrap_content"
android:layout_width = "wrap_content"
android:layout_margin = "1dp" />
</ LinearLayout >
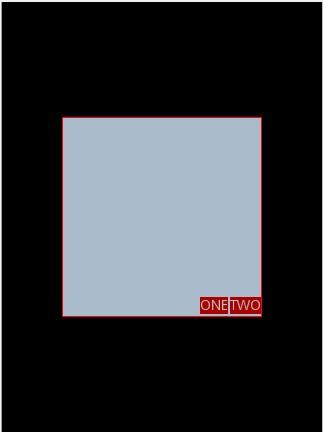
通过改变android:gravity 参数的值可以看到实际效果。
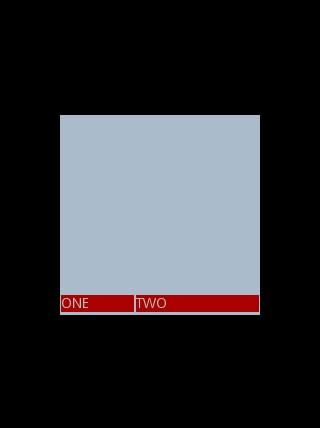
参数 android:orientation= " horizontal " 决定了每个子元素各占一列,如果
参数 android:orientation= " vertical " , 则每个子元素各占一行,也就是从上到下排列了。
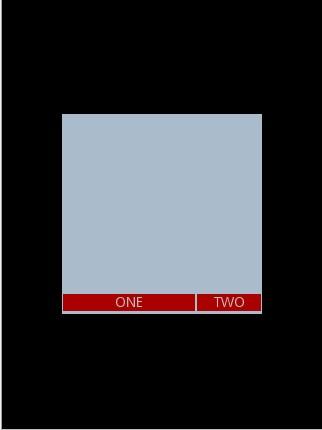
对于 LinearLayout 布局的子元素,给每个子元素加上参数 android:layout_weight
看看效果
<? xml version = "1.0" encoding = "utf-8" ?>
< LinearLayout xmlns:android = "http://schemas.android.com/apk/res/android"
android:layout_height = "200dp"
android:layout_width = "200dp"
android:background = "#AABBCC"
android:layout_gravity = "center"
android:gravity = "bottom|right"
android:orientation = "horizontal" >
< TextView android:text = "ONE"
android:background = "#aa0000"
android:layout_height = "wrap_content"
android:layout_width = "wrap_content"
android:layout_margin = "1dp"
android:layout_weight = "1" />
< TextView android:text = "TWO"
android:background = "#aa0000"
android:layout_height = "wrap_content"
android:layout_width = "wrap_content"
android:layout_margin = "1dp"
android:layout_weight = "2" />
</ LinearLayout >
Text 为ONE 的权重为1 ,但明显占的宽度比TWO 的小,百思不得其解,后来得知,如果把TextView 的参数android:layout_width = "wrap_content" 全部修改为 android:layout_width = "fill_parent", 则 ok ,代码如下
<? xml version = "1.0" encoding = "utf-8" ?>
< LinearLayout xmlns:android = "http://schemas.android.com/apk/res/android"
android:layout_height = "200dp"
android:layout_width = "200dp"
android:background = "#AABBCC"
android:layout_gravity = "center"
android:gravity = "bottom|right"
android:orientation = "horizontal" >
< TextView android:text = "ONE"
android:background = "#aa0000"
android:layout_height = "wrap_content"
android:layout_width = " fill_parent "
android:layout_margin = "1dp"
android:layout_weight = "1" />
< TextView android:text = "TWO"
android:background = "#aa0000"
android:layout_height = "wrap_content"
android:layout_width = " fill_parent "
android:layout_margin = "1dp"
android:layout_weight = "2" />
</ LinearLayout >
从零开始学android开发-布局中 layout_gravity、gravity、orientation、layout_weight的更多相关文章
- 从零开始学android开发- 应用程序窗体显示状态操作requestWindowFeature
我们在开发程序是经常会需要软件全屏显示.自定义标题(使用按钮等控件)和其他的需求,今天这一讲就是如何控制Android应用程序的窗体显示. 首先介绍一个重要方法那就是requestWindowFeat ...
- 从零开始学android开发- layout属性介绍
android:id 为控件指定相应的ID android:text 指定控件当中显示的文字,需要注意的是,这里尽量使用strings.xml文件当中的字符串 android:gravity 指定Vi ...
- 从零开始学android开发-通过WebService进行网络编程,使用工具类轻松实现
相信大家在平常的开发中,对网络的操作用到HTTP协议比较多,通过我们使用Get或者Post的方法调用一个数据接口,然后服务器给我们返回JSON格式的数据,我们解析JSON数据然后展现给用户,相信很多人 ...
- 从零开始学android开发-创建第一个android项目
打开ADT开发工具
- 从零开始学android开发-adt-bundle-eclipse下的修改android app名称
eclipse中,打开项目根目录中的AndoirManifest.xml文件,找到如下内容 <application android:allowBackup="true" a ...
- 从零开始学android开发-通过WebService获取今日天气情况
因为本身是在搞.NET方面的东东,现在在学习Android,所以想实现Android通过WebService接口来获取数据,网上很多例子还有有问题的.参考:Android 通过WebService进行 ...
- 从零开始学android开发-View的setOnClickListener的添加方法
1)第一种,也是最长见的添加方法(一下都以Button为例) Button btn = (Button) findViewById(R.id.myButton); btn .setOnClickLis ...
- 从零开始学android开发-Json转换利器Gson之实例
Gson 是 Google 提供的用来在 Java 对象和 JSON 数据之间进行映射的 Java 类库.可以将一个 JSON 字符串转成一个 Java 对象,或者反过来. jar和源码下载地址: h ...
- 从零开始学android开发-获取TextView的值
昨日写一个Android Demo,逻辑大概是从TextView获取其中的值,然后处理后再放回TextView中.整个处理过程是由一个Button的OnClick触发的. 可是在调试的过程中,一点击B ...
随机推荐
- 【转】TLB(Translation Lookaside Buffers,TLB)的作用
原文网址:http://sdnydubing.blog.163.com/blog/static/137470570201122810503396/ 从虚拟地址到物理地址的转换过程可知:使用一级页表进行 ...
- Oracle的OracleBulkCopy不支持事务处理
在进行OracleBulkCopy批量数据导入的过程中使用事务后抛出了异常, 没使用事务时可以正确批量导入, ORA-12154:无法解析指定的连接字符串, 但是TNS配置肯定是没有错的, 难道是Co ...
- Wireshark和TcpDump抓包分析心得
Wireshark和 TcpDump抓包分析心得 1. Wireshark与tcpdump介绍 Wireshark是一个网络协议检测工具,支持Windows平台和Unix平台,我一般只在Window ...
- ajax请求总是不成功?浏览器的同源策略和跨域问题详解
场景 码农小明要做一个展示业务数据的大屏给老板看,里面包含了来自自己网站的数据和来自隔壁老王的数据.那么自己网站的数据提供了 http://xiaoming.com/whoami 这样的数据接口隔壁老 ...
- hdu 5335 Walk Out(bfs+斜行递推) 2015 Multi-University Training Contest 4
题意—— 一个n*m的地图,从左上角走到右下角. 这个地图是一个01串,要求我们行走的路径形成的01串最小. 注意,串中最左端的0全部可以忽略,除非是一个0串,此时输出0. 例: 3 3 001 11 ...
- AutoLayout UITableViewCell 动态高度
从这里http://www.cnblogs.com/liandwufan/p/4516956.html?utm_source=tuicool 转载过来的 -(UITableViewCell*)tabl ...
- Seam carving 学习笔记
今天首次接触了图像编辑中的seam carving知识,感觉挺神奇的.虽然我自己可能理解的不是很深刻,但是记录下来,总是好的. seam carving直接翻译过来是“线裁剪”的意思.它的主要用途是对 ...
- Eclipse中设置在创建新类时自动生成注释的方法
windows–>preference Java–>Code Style–>Code Templates code–>new Java files 编辑它 ${filecom ...
- 多校1005 HDU5785 Interesting (manacher)
// 多校1005 HDU5785 Interesting // 题意:给你一个串,求相邻两个回文串左边端点*右边端点的和 // 思路:马拉车算出最长回文半径,求一个前缀和,既得到每个点对答案的贡献. ...
- 《GettingThingsDone》--GTD学习笔记(二)-GTD实践指导
一.准备阶段的建议: 高级的工作管理方法就是学会一套系统并付诸实施,直到将这套系统和方法融入你的工作和生活中. 通过行动使自己感觉良好,要比通过使自己感觉良好而进入一种较佳的行动状态容易的多. 当你在 ...