JDBC示例(增删查改)
前提:
1、项目中引入MySQL的JAR包,POM参考如下配置:
        <!-- mysql-connector-java -->

        <!-- http://mvnrepository.com/artifact/mysql/mysql-connector-java -->

        <dependency>

            <groupId>mysql</groupId>

            <artifactId>mysql-connector-java</artifactId>

            <version>5.1.38</version>

        </dependency>
示例:
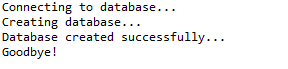
一、创建数据库
//STEP 1. Import required packages

import java.sql.*;

public class JDBCExample {

    // JDBC driver name and database URL

    static final String JDBC_DRIVER = "com.mysql.jdbc.Driver";

    static final String DB_URL = "jdbc:mysql://localhost/";

    // Database credentials

    static final String USER = "root";

    static final String PASS = "root";

    public static void main(String[] args) {

        Connection conn = null;

        Statement stmt = null;

        try {

            // STEP 2: Register JDBC driver

            Class.forName("com.mysql.jdbc.Driver");

            // STEP 3: Open a connection

            System.out.println("Connecting to database...");

            conn = DriverManager.getConnection(DB_URL, USER, PASS);

            // STEP 4: Execute a query

            System.out.println("Creating database...");

            stmt = conn.createStatement();

            String sql = "CREATE DATABASE STUDENTS";

            stmt.executeUpdate(sql);

            System.out.println("Database created successfully...");

        } catch (SQLException se) {

            // Handle errors for JDBC

            se.printStackTrace();

        } catch (Exception e) {

            // Handle errors for Class.forName

            e.printStackTrace();

        } finally {

            // finally block used to close resources

            try {

                if (stmt != null)

                    stmt.close();

            } catch (SQLException se2) {

            } // nothing we can do

            try {

                if (conn != null)

                    conn.close();

            } catch (SQLException se) {

                se.printStackTrace();

            } // end finally try

        } // end try

        System.out.println("Goodbye!");

    }// end main

}// end JDBCExample
这将产生如下所示结果:
二、选择数据库
//STEP 1. Import required packages

import java.sql.*;

public class JDBCExample2 {

    // JDBC driver name and database URL

    static final String JDBC_DRIVER = "com.mysql.jdbc.Driver";

    static final String DB_URL = "jdbc:mysql://localhost/STUDENTS?serverTimezone=UTC";

    // Database credentials

    static final String USER = "root";

    static final String PASS = "root";

    public static void main(String[] args) {

        Connection conn = null;

        try {

            // STEP 2: Register JDBC driver

            Class.forName("com.mysql.jdbc.Driver");

            // STEP 3: Open a connection

            System.out.println("Connecting to a selected database...");

            conn = DriverManager.getConnection(DB_URL, USER, PASS);

            System.out.println("Connected database successfully...");

        } catch (SQLException se) {

            // Handle errors for JDBC

            se.printStackTrace();

        } catch (Exception e) {

            // Handle errors for Class.forName

            e.printStackTrace();

        } finally {

            // finally block used to close resources

            try {

                if (conn != null)

                    conn.close();

            } catch (SQLException se) {

                se.printStackTrace();

            } // end finally try

        } // end try

        System.out.println("Goodbye!");

    }// end main

}// end JDBCExample
这将产生如下所示结果:

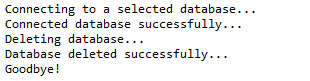
三、删除数据库
//STEP 1. Import required packages

import java.sql.*;

public class JDBCExample3 {

    // JDBC driver name and database URL

    static final String JDBC_DRIVER = "com.mysql.jdbc.Driver";

    static final String DB_URL = "jdbc:mysql://localhost/";

    // Database credentials

    static final String USER = "root";

    static final String PASS = "root";

    public static void main(String[] args) {

        Connection conn = null;

        Statement stmt = null;

        try {

            // STEP 2: Register JDBC driver

            Class.forName("com.mysql.jdbc.Driver");

            // STEP 3: Open a connection

            System.out.println("Connecting to a selected database...");

            conn = DriverManager.getConnection(DB_URL, USER, PASS);

            System.out.println("Connected database successfully...");

            // STEP 4: Execute a query

            System.out.println("Deleting database...");

            stmt = conn.createStatement();

            String sql = "DROP DATABASE STUDENTS";

            stmt.executeUpdate(sql);

            System.out.println("Database deleted successfully...");

        } catch (SQLException se) {

            // Handle errors for JDBC

            se.printStackTrace();

        } catch (Exception e) {

            // Handle errors for Class.forName

            e.printStackTrace();

        } finally {

            // finally block used to close resources

            try {

                if (stmt != null)

                    conn.close();

            } catch (SQLException se) {

            } // do nothing

            try {

                if (conn != null)

                    conn.close();

            } catch (SQLException se) {

                se.printStackTrace();

            } // end finally try

        } // end try

        System.out.println("Goodbye!");

    }// end main

}// end JDBCExample
这将产生如下所示结果:
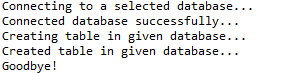
四、创建表
//STEP 1. Import required packages

import java.sql.*;

public class JDBCExample4 {

    // JDBC driver name and database URL

    static final String JDBC_DRIVER = "com.mysql.jdbc.Driver";

    static final String DB_URL = "jdbc:mysql://localhost/STUDENTS?serverTimezone=UTC";

    // Database credentials

    static final String USER = "root";

    static final String PASS = "root";

    public static void main(String[] args) {

        Connection conn = null;

        Statement stmt = null;

        try {

            // STEP 2: Register JDBC driver

            Class.forName("com.mysql.jdbc.Driver");

            // STEP 3: Open a connection

            System.out.println("Connecting to a selected database...");

            conn = DriverManager.getConnection(DB_URL, USER, PASS);

            System.out.println("Connected database successfully...");

            // STEP 4: Execute a query

            System.out.println("Creating table in given database...");

            stmt = conn.createStatement();

            String sql = "CREATE TABLE REGISTRATION " + "(id INTEGER not NULL, " + " first VARCHAR(255), "

                    + " last VARCHAR(255), " + " age INTEGER, " + " PRIMARY KEY ( id ))";

            stmt.executeUpdate(sql);

            System.out.println("Created table in given database...");

        } catch (SQLException se) {

            // Handle errors for JDBC

            se.printStackTrace();

        } catch (Exception e) {

            // Handle errors for Class.forName

            e.printStackTrace();

        } finally {

            // finally block used to close resources

            try {

                if (stmt != null)

                    conn.close();

            } catch (SQLException se) {

            } // do nothing

            try {

                if (conn != null)

                    conn.close();

            } catch (SQLException se) {

                se.printStackTrace();

            } // end finally try

        } // end try

        System.out.println("Goodbye!");

    }// end main

}// end JDBCExample
这将产生如下所示结果:
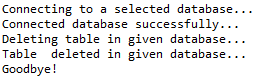
五、删除表
//STEP 1. Import required packages

import java.sql.*;

public class JDBCExample5 {

    // JDBC driver name and database URL

    static final String JDBC_DRIVER = "com.mysql.jdbc.Driver";

    static final String DB_URL = "jdbc:mysql://localhost/STUDENTS?serverTimezone=UTC";

    // Database credentials

    static final String USER = "root";

    static final String PASS = "root";

    public static void main(String[] args) {

        Connection conn = null;

        Statement stmt = null;

        try {

            // STEP 2: Register JDBC driver

            Class.forName("com.mysql.jdbc.Driver");

            // STEP 3: Open a connection

            System.out.println("Connecting to a selected database...");

            conn = DriverManager.getConnection(DB_URL, USER, PASS);

            System.out.println("Connected database successfully...");

            // STEP 4: Execute a query

            System.out.println("Deleting table in given database...");

            stmt = conn.createStatement();

            String sql = "DROP TABLE REGISTRATION ";

            stmt.executeUpdate(sql);

            System.out.println("Table  deleted in given database...");

        } catch (SQLException se) {

            // Handle errors for JDBC

            se.printStackTrace();

        } catch (Exception e) {

            // Handle errors for Class.forName

            e.printStackTrace();

        } finally {

            // finally block used to close resources

            try {

                if (stmt != null)

                    conn.close();

            } catch (SQLException se) {

            } // do nothing

            try {

                if (conn != null)

                    conn.close();

            } catch (SQLException se) {

                se.printStackTrace();

            } // end finally try

        } // end try

        System.out.println("Goodbye!");

    }// end main

}// end JDBCExample
这将产生如下所示结果:
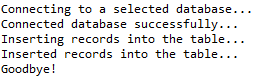
六、插入记录
//STEP 1. Import required packages

import java.sql.*;

public class JDBCExample6 {

    // JDBC driver name and database URL

    static final String JDBC_DRIVER = "com.mysql.jdbc.Driver";

    static final String DB_URL = "jdbc:mysql://localhost/STUDENTS?serverTimezone=UTC";

    // Database credentials

    static final String USER = "root";

    static final String PASS = "root";

    public static void main(String[] args) {

        Connection conn = null;

        Statement stmt = null;

        try {

            // STEP 2: Register JDBC driver

            Class.forName("com.mysql.jdbc.Driver");

            // STEP 3: Open a connection

            System.out.println("Connecting to a selected database...");

            conn = DriverManager.getConnection(DB_URL, USER, PASS);

            System.out.println("Connected database successfully...");

            // STEP 4: Execute a query

            System.out.println("Inserting records into the table...");

            stmt = conn.createStatement();

            String sql = "INSERT INTO Registration " + "VALUES (100, 'Zara', 'Ali', 18)";

            stmt.executeUpdate(sql);

            sql = "INSERT INTO Registration " + "VALUES (101, 'Mahnaz', 'Fatma', 25)";

            stmt.executeUpdate(sql);

            sql = "INSERT INTO Registration " + "VALUES (102, 'Zaid', 'Khan', 30)";

            stmt.executeUpdate(sql);

            sql = "INSERT INTO Registration " + "VALUES(103, 'Sumit', 'Mittal', 28)";

            stmt.executeUpdate(sql);

            System.out.println("Inserted records into the table...");

        } catch (SQLException se) {

            // Handle errors for JDBC

            se.printStackTrace();

        } catch (Exception e) {

            // Handle errors for Class.forName

            e.printStackTrace();

        } finally {

            // finally block used to close resources

            try {

                if (stmt != null)

                    conn.close();

            } catch (SQLException se) {

            } // do nothing

            try {

                if (conn != null)

                    conn.close();

            } catch (SQLException se) {

                se.printStackTrace();

            } // end finally try

        } // end try

        System.out.println("Goodbye!");

    }// end main

}// end JDBCExample
这将产生如下所示结果:
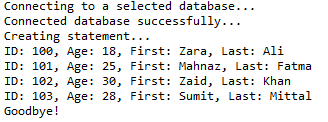
七、查询表记录
//STEP 1. Import required packages

import java.sql.*;

public class JDBCExample7 {

    // JDBC driver name and database URL

    static final String JDBC_DRIVER = "com.mysql.jdbc.Driver";

    static final String DB_URL = "jdbc:mysql://localhost/STUDENTS?serverTimezone=UTC";

    // Database credentials

    static final String USER = "root";

    static final String PASS = "root";

    public static void main(String[] args) {

        Connection conn = null;

        Statement stmt = null;

        try {

            // STEP 2: Register JDBC driver

            Class.forName("com.mysql.jdbc.Driver");

            // STEP 3: Open a connection

            System.out.println("Connecting to a selected database...");

            conn = DriverManager.getConnection(DB_URL, USER, PASS);

            System.out.println("Connected database successfully...");

            // STEP 4: Execute a query

            System.out.println("Creating statement...");

            stmt = conn.createStatement();

            String sql = "SELECT id, first, last, age FROM Registration";

            ResultSet rs = stmt.executeQuery(sql);

            // STEP 5: Extract data from result set

            while (rs.next()) {

                // Retrieve by column name

                int id = rs.getInt("id");

                int age = rs.getInt("age");

                String first = rs.getString("first");

                String last = rs.getString("last");

                // Display values

                System.out.print("ID: " + id);

                System.out.print(", Age: " + age);

                System.out.print(", First: " + first);

                System.out.println(", Last: " + last);

            }

            rs.close();

        } catch (SQLException se) {

            // Handle errors for JDBC

            se.printStackTrace();

        } catch (Exception e) {

            // Handle errors for Class.forName

            e.printStackTrace();

        } finally {

            // finally block used to close resources

            try {

                if (stmt != null)

                    conn.close();

            } catch (SQLException se) {

            } // do nothing

            try {

                if (conn != null)

                    conn.close();

            } catch (SQLException se) {

                se.printStackTrace();

            } // end finally try

        } // end try

        System.out.println("Goodbye!");

    }// end main

}// end JDBCExample
这将产生如下所示结果:
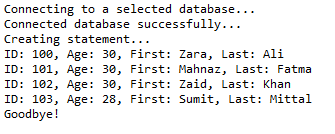
八、更新表记录
//STEP 1. Import required packages

import java.sql.*;

public class JDBCExample8 {

    // JDBC driver name and database URL

    static final String JDBC_DRIVER = "com.mysql.jdbc.Driver";

    static final String DB_URL = "jdbc:mysql://localhost/STUDENTS?serverTimezone=UTC";

    // Database credentials

    static final String USER = "root";

    static final String PASS = "root";

    public static void main(String[] args) {

        Connection conn = null;

        Statement stmt = null;

        try {

            // STEP 2: Register JDBC driver

            Class.forName("com.mysql.jdbc.Driver");

            // STEP 3: Open a connection

            System.out.println("Connecting to a selected database...");

            conn = DriverManager.getConnection(DB_URL, USER, PASS);

            System.out.println("Connected database successfully...");

            // STEP 4: Execute a query

            System.out.println("Creating statement...");

            stmt = conn.createStatement();

            String sql = "UPDATE Registration " + "SET age = 30 WHERE id in (100, 101)";

            stmt.executeUpdate(sql);

            // Now you can extract all the records

            // to see the updated records

            sql = "SELECT id, first, last, age FROM Registration";

            ResultSet rs = stmt.executeQuery(sql);

            while (rs.next()) {

                // Retrieve by column name

                int id = rs.getInt("id");

                int age = rs.getInt("age");

                String first = rs.getString("first");

                String last = rs.getString("last");

                // Display values

                System.out.print("ID: " + id);

                System.out.print(", Age: " + age);

                System.out.print(", First: " + first);

                System.out.println(", Last: " + last);

            }

            rs.close();

        } catch (SQLException se) {

            // Handle errors for JDBC

            se.printStackTrace();

        } catch (Exception e) {

            // Handle errors for Class.forName

            e.printStackTrace();

        } finally {

            // finally block used to close resources

            try {

                if (stmt != null)

                    conn.close();

            } catch (SQLException se) {

            } // do nothing

            try {

                if (conn != null)

                    conn.close();

            } catch (SQLException se) {

                se.printStackTrace();

            } // end finally try

        } // end try

        System.out.println("Goodbye!");

    }// end main

}// end JDBCExample
这将产生如下所示结果:
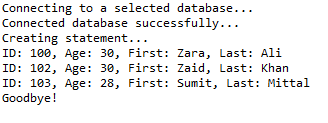
九、删除记录
//STEP 1. Import required packages

import java.sql.*;

public class JDBCExample9 {

    // JDBC driver name and database URL

    static final String JDBC_DRIVER = "com.mysql.jdbc.Driver";

    static final String DB_URL = "jdbc:mysql://localhost/STUDENTS?serverTimezone=UTC";

    // Database credentials

    static final String USER = "root";

    static final String PASS = "root";

    public static void main(String[] args) {

        Connection conn = null;

        Statement stmt = null;

        try {

            // STEP 2: Register JDBC driver

            Class.forName("com.mysql.jdbc.Driver");

            // STEP 3: Open a connection

            System.out.println("Connecting to a selected database...");

            conn = DriverManager.getConnection(DB_URL, USER, PASS);

            System.out.println("Connected database successfully...");

            // STEP 4: Execute a query

            System.out.println("Creating statement...");

            stmt = conn.createStatement();

            String sql = "DELETE FROM Registration " + "WHERE id = 101";

            stmt.executeUpdate(sql);

            // Now you can extract all the records

            // to see the remaining records

            sql = "SELECT id, first, last, age FROM Registration";

            ResultSet rs = stmt.executeQuery(sql);

            while (rs.next()) {

                // Retrieve by column name

                int id = rs.getInt("id");

                int age = rs.getInt("age");

                String first = rs.getString("first");

                String last = rs.getString("last");

                // Display values

                System.out.print("ID: " + id);

                System.out.print(", Age: " + age);

                System.out.print(", First: " + first);

                System.out.println(", Last: " + last);

            }

            rs.close();

        } catch (SQLException se) {

            // Handle errors for JDBC

            se.printStackTrace();

        } catch (Exception e) {

            // Handle errors for Class.forName

            e.printStackTrace();

        } finally {

            // finally block used to close resources

            try {

                if (stmt != null)

                    conn.close();

            } catch (SQLException se) {

            } // do nothing

            try {

                if (conn != null)

                    conn.close();

            } catch (SQLException se) {

                se.printStackTrace();

            } // end finally try

        } // end try

        System.out.println("Goodbye!");

    }// end main

}// end JDBCExample
这将产生如下所示结果:
十、Where子句
//STEP 1. Import required packages
import java.sql.*; public class JDBCExample10 {
// JDBC driver name and database URL
static final String JDBC_DRIVER = "com.mysql.jdbc.Driver";
static final String DB_URL = "jdbc:mysql://localhost/STUDENTS?serverTimezone=UTC"; // Database credentials
static final String USER = "root";
static final String PASS = "root"; public static void main(String[] args) {
Connection conn = null;
Statement stmt = null;
try {
// STEP 2: Register JDBC driver
Class.forName("com.mysql.jdbc.Driver"); // STEP 3: Open a connection
System.out.println("Connecting to a selected database...");
conn = DriverManager.getConnection(DB_URL, USER, PASS);
System.out.println("Connected database successfully..."); // STEP 4: Execute a query
System.out.println("Creating statement...");
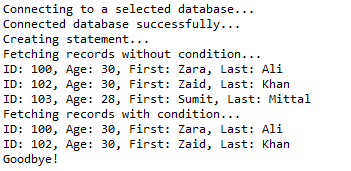
stmt = conn.createStatement(); // Extract records without any condition.
System.out.println("Fetching records without condition...");
String sql = "SELECT id, first, last, age FROM Registration";
ResultSet rs = stmt.executeQuery(sql); while (rs.next()) {
// Retrieve by column name
int id = rs.getInt("id");
int age = rs.getInt("age");
String first = rs.getString("first");
String last = rs.getString("last"); // Display values
System.out.print("ID: " + id);
System.out.print(", Age: " + age);
System.out.print(", First: " + first);
System.out.println(", Last: " + last);
} // Select all records having ID equal or greater than 101
System.out.println("Fetching records with condition...");
sql = "SELECT id, first, last, age FROM Registration" + " WHERE id >= 101 ";
rs = stmt.executeQuery(sql); while (rs.next()) {
// Retrieve by column name
int id = rs.getInt("id");
int age = rs.getInt("age");
String first = rs.getString("first");
String last = rs.getString("last"); // Display values
System.out.print("ID: " + id);
System.out.print(", Age: " + age);
System.out.print(", First: " + first);
System.out.println(", Last: " + last);
}
rs.close();
} catch (SQLException se) {
// Handle errors for JDBC
se.printStackTrace();
} catch (Exception e) {
// Handle errors for Class.forName
e.printStackTrace();
} finally {
// finally block used to close resources
try {
if (stmt != null)
conn.close();
} catch (SQLException se) {
} // do nothing
try {
if (conn != null)
conn.close();
} catch (SQLException se) {
se.printStackTrace();
} // end finally try
} // end try
System.out.println("Goodbye!");
}// end main
}// end JDBCExample
这将产生如下所示结果:

十一、Like子句
//STEP 1. Import required packages

import java.sql.*;

public class JDBCExample11 {

    // JDBC driver name and database URL

    static final String JDBC_DRIVER = "com.mysql.jdbc.Driver";

    static final String DB_URL = "jdbc:mysql://localhost/STUDENTS?serverTimezone=UTC";

    // Database credentials

    static final String USER = "root";

    static final String PASS = "root";

    public static void main(String[] args) {

        Connection conn = null;

        Statement stmt = null;

        try {

            // STEP 2: Register JDBC driver

            Class.forName("com.mysql.jdbc.Driver");

            // STEP 3: Open a connection

            System.out.println("Connecting to a selected database...");

            conn = DriverManager.getConnection(DB_URL, USER, PASS);

            System.out.println("Connected database successfully...");

            // STEP 4: Execute a query

            System.out.println("Creating statement...");

            stmt = conn.createStatement();

            // Extract records without any condition.

            System.out.println("Fetching records without condition...");

            String sql = "SELECT id, first, last, age FROM Registration";

            ResultSet rs = stmt.executeQuery(sql);

            while (rs.next()) {

                // Retrieve by column name

                int id = rs.getInt("id");

                int age = rs.getInt("age");

                String first = rs.getString("first");

                String last = rs.getString("last");

                // Display values

                System.out.print("ID: " + id);

                System.out.print(", Age: " + age);

                System.out.print(", First: " + first);

                System.out.println(", Last: " + last);

            }

            // Select all records having ID equal or greater than 101

            System.out.println("Fetching records with condition...");

            sql = "SELECT id, first, last, age FROM Registration" + " WHERE first LIKE '%za%' ";

            rs = stmt.executeQuery(sql);

            while (rs.next()) {

                // Retrieve by column name

                int id = rs.getInt("id");

                int age = rs.getInt("age");

                String first = rs.getString("first");

                String last = rs.getString("last");

                // Display values

                System.out.print("ID: " + id);

                System.out.print(", Age: " + age);

                System.out.print(", First: " + first);

                System.out.println(", Last: " + last);

            }

            rs.close();

        } catch (SQLException se) {

            // Handle errors for JDBC

            se.printStackTrace();

        } catch (Exception e) {

            // Handle errors for Class.forName

            e.printStackTrace();

        } finally {

            // finally block used to close resources

            try {

                if (stmt != null)

                    conn.close();

            } catch (SQLException se) {

            } // do nothing

            try {

                if (conn != null)

                    conn.close();

            } catch (SQLException se) {

                se.printStackTrace();

            } // end finally try

        } // end try

        System.out.println("Goodbye!");

    }// end main

}// end JDBCExample
这将产生如下所示结果:
十二、排序
//STEP 1. Import required packages
import java.sql.*; public class JDBCExample12 {
// JDBC driver name and database URL
static final String JDBC_DRIVER = "com.mysql.jdbc.Driver";
static final String DB_URL = "jdbc:mysql://localhost/STUDENTS?serverTimezone=UTC"; // Database credentials
static final String USER = "root";
static final String PASS = "root"; public static void main(String[] args) {
Connection conn = null;
Statement stmt = null;
try {
// STEP 2: Register JDBC driver
Class.forName("com.mysql.jdbc.Driver"); // STEP 3: Open a connection
System.out.println("Connecting to a selected database...");
conn = DriverManager.getConnection(DB_URL, USER, PASS);
System.out.println("Connected database successfully..."); // STEP 4: Execute a query
System.out.println("Creating statement...");
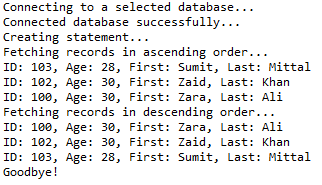
stmt = conn.createStatement(); // Extract records in ascending order by first name.
System.out.println("Fetching records in ascending order...");
String sql = "SELECT id, first, last, age FROM Registration" + " ORDER BY first ASC";
ResultSet rs = stmt.executeQuery(sql); while (rs.next()) {
// Retrieve by column name
int id = rs.getInt("id");
int age = rs.getInt("age");
String first = rs.getString("first");
String last = rs.getString("last"); // Display values
System.out.print("ID: " + id);
System.out.print(", Age: " + age);
System.out.print(", First: " + first);
System.out.println(", Last: " + last);
} // Extract records in descending order by first name.
System.out.println("Fetching records in descending order...");
sql = "SELECT id, first, last, age FROM Registration" + " ORDER BY first DESC";
rs = stmt.executeQuery(sql); while (rs.next()) {
// Retrieve by column name
int id = rs.getInt("id");
int age = rs.getInt("age");
String first = rs.getString("first");
String last = rs.getString("last"); // Display values
System.out.print("ID: " + id);
System.out.print(", Age: " + age);
System.out.print(", First: " + first);
System.out.println(", Last: " + last);
}
rs.close();
} catch (SQLException se) {
// Handle errors for JDBC
se.printStackTrace();
} catch (Exception e) {
// Handle errors for Class.forName
e.printStackTrace();
} finally {
// finally block used to close resources
try {
if (stmt != null)
conn.close();
} catch (SQLException se) {
} // do nothing
try {
if (conn != null)
conn.close();
} catch (SQLException se) {
se.printStackTrace();
} // end finally try
} // end try
System.out.println("Goodbye!");
}// end main
}// end JDBCExample
这将产生如下所示结果:
测试工程:https://github.com/easonjim/5_java_example/tree/master/jdbcbasics/test10/
JDBC示例(增删查改)的更多相关文章
- SSH框架的多表查询和增删查改 (方法一)上
原创作品,允许转载,转载时请务必标明作者信息和声明本文章==> http://www.cnblogs.com/zhu520/p/7772823.html 因为最近在做Android 练习的 ...
- jdbc的实例应用:增删查改实现
//在jdbc中进行增删查改 //查看所有 public static void findAll() { String url = "jdbc:mysql://localhost:3306/ ...
- 2015.8.2 jdbc实现商品类的增删查改
在惠普济宁基地进行了两周sql和java的学习,学到很多东西 刚才实现了用jdbc访问数据库对数据库进行操作,是用eclipse写的,过几天移植到NetBeans上,个人还是比较习惯看图形化界面 前几 ...
- JDBC+Servlet+jsp(增删查改)
先在mysql新增数据库和表先,把下面的几句代码复制去到mysql运行就可以创建成功了! 创建数据库 create database jdbc01 character set utf8 collat ...
- JDBC终章- 使用 DBUtils实现增删查改- C3P0Utils数据源/QueryRunner runner连接数据源并执行sql
JDBC终章- 使用 DBUtils实现增删查改 1.数据库结构 Create Table CREATE TABLE `user` ( `id` ) NOT NULL AUTO_INCREMENT, ...
- [课本]JDBC课程6--使用JDBC的DAO模块化--完成数据库的增删查改_工具类JDBCTools四个(Preparedstatement)功能模块的敲定版
(课本P273-任务九) /**DAO: Data Access Object * 为什么用: 实现功能的模块化,更有利于代码的维护和升级 * 是什么: 访问数据信息的类,包含对数据的CRUD(cre ...
- 在Eclipse上实现简单的JDBC增删查改操作
在Javaweb的学习里,学到了如何完成简单的增删查改操作,在这里撰写一篇文章以便自己整理回忆. 首先要建立一些包和导入一些文件.建一些类.具体框架如图 编写Product类 public clas ...
- hibernate基础增删查改简单实例
hibernate 基础理论知识网上很多,可以百度和google.这里不做多的介绍,以一个User表来开展例子 建一个web-project 我这里用了junit单元测试环境来进行增删查改的测试,别的 ...
- 利用dbutils工具实现数据的增删查改操作(dbutis入门)
一.前期准备 1.安装数据库(如:mysql5.5) 2.安装Eclipse(如:3.4) 3.下载数据库驱动包 4.下载dbutis工具包 5.在Eclipse创建名为 dbutils 的工程并在工 ...
- 极极极极极简的的增删查改(CRUD)解决方案
去年这个时候写过一篇全自动数据表格的文章http://www.cnblogs.com/liuyh/p/5747331.html.文章对自己写的一个js组件做了个概述,很多人把它当作了一款功能相似的纯前 ...
随机推荐
- Node.js(二)常用的系统模块
http模块 第一章已经介绍了 node.js 的模块都可以传一个回调函数 回调函数支持两个参数 error , data let fs = require('fs'); fs.readFile( ...
- Bmob使用心得
1.在 Project 的 build.gradle 文件中添加 Bmob的maven仓库地址,示例如下:(注意文字说明部分): allprojects { repositories { jcente ...
- SQL——视图、事务、锁、存储过程
https://www.bilibili.com/video/av15496406/?p=57 https://blog.csdn.net/u013630349/article/details/750 ...
- 使用Caliburn.Micro系列2:Convention
CM中实现一个比较有意思的特性,就是智能匹配. 通常使用MVVM的写法:在匹配 View和ViewModel时会使用DataContext,在匹配数据属性时使用Binding,在匹配事件命令时使用Co ...
- CAD参数绘制对齐标注(com接口)
主要用到函数说明: _DMxDrawX::DrawDimAligned 绘制一个对齐标注.详细说明如下: 参数 说明 DOUBLE dExtLine1PointX 第一条界线开始点X值 DOUBLE ...
- 第2节 hive基本操作:12、hive当中的hql语法
3.2. hive查询语法 3.2.1.SELECT https://cwiki.apache.org/confluence/display/Hive/LanguageManual+Select 基本 ...
- vue set方法
<!DOCTYPE html> <html lang="en"> <head> <meta charset="UTF-8 ...
- tinyXml输出utf-8文档
TiXmlDocument虽然能读取utf-8的xml文件,但读入后在内存中是以多字节存储.如果新建一个TiXmlDocument,即使定义头为utf-8编码,直接调用SaveFile方法保存的文档仍 ...
- [Luogu] P1156 垃圾陷阱
题目描述 卡门――农夫约翰极其珍视的一条Holsteins奶牛――已经落了到“垃圾井”中.“垃圾井”是农夫们扔垃圾的地方,它的深度为D(2≤D≤100)英尺. 卡门想把垃圾堆起来,等到堆得与井同样高时 ...
- nginx下TP5 隐藏入口文件+支持pathinfo模式+配置多项目根目录
首先说下项目目录情况 跟目录/usr/share/nginx/html/(别说怎么这么深 0.0) html文件夹下面两个目录 pssh pssh_shop 两个tp5项目分别对应两个二级域名 ...