Android布局之线性布局——LinearLayout
本文将详细介绍线性布局的各种xml属性。
xml属性
<?xml version="1.0" encoding="utf-8"?>

<LinearLayout xmlns:android="http://schemas.android.com/apk/res/android"

    android:layout_width="match_parent"

    android:layout_height="match_parent"

    android:orientation="vertical">

</LinearLayout>
①android:layout_width---->设置此布局的宽度,有三种模式:
fill_parent:充满屏幕(已过时,用下面的match_parent代替)
match_parent:充满屏幕(推荐)
wrap_content:包含组件,意思就是你的组件多大,那么就占多大的空间。
②android:layout_height---->设置此布局的高度,模式同上;
③android:orientation---->此属性设置此线性布局的方式,有两个参数:
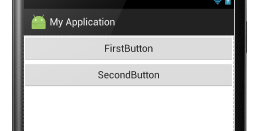
vertical:垂直布局:即子控件都在子控件的上下位置,例如
<LinearLayout xmlns:android="http://schemas.android.com/apk/res/android"

    android:layout_width="match_parent"

    android:layout_height="match_parent"

    android:orientation="vertical">            //这里选用垂直布局

    <Button

        android:layout_width="match_parent"        //宽度充满屏幕

        android:layout_height="wrap_content"        //高度包含组件

        android:text="FirstButton"

        android:id="@+id/button" />

    <Button

        android:layout_width="match_parent"

        android:layout_height="wrap_content"

        android:text="SecondButton"

        android:id="@+id/button2" />

</LinearLayout>
显示结果:
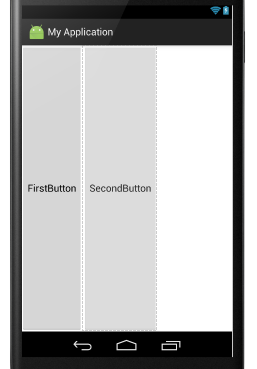
horizontal:水平布局:即子控件都在子控件的左右位置。例如:
<LinearLayout xmlns:android="http://schemas.android.com/apk/res/android"

    android:layout_width="match_parent"

    android:layout_height="match_parent"

    android:orientation="horizontal">      //这里设置为水平布局,

    <Button

        android:layout_width="wrap_content"      //宽度包含组件

        android:layout_height="match_parent"    //这里设置Button控件的高度充满屏幕

        android:text="FirstButton"

        android:id="@+id/button" />

    <Button

        android:layout_width="wrap_content"

        android:layout_height="match_parent"

        android:text="SecondButton"

        android:id="@+id/button2" />

</LinearLayout>
显示结果:
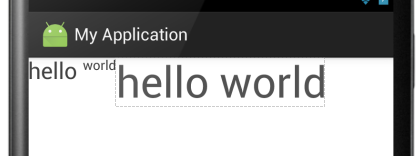
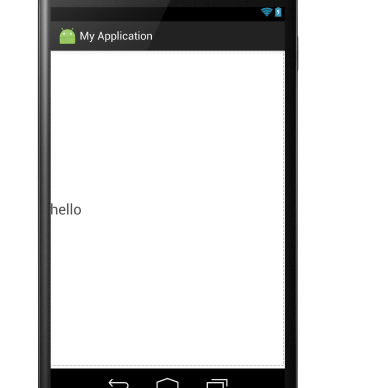
④android:baselineAligned---->此布局中的子控件是否基线对齐,其实就是设置在不在一条线上,他只有两个参数,true和false
false:若设置false,那么他里面的内容就不对齐。
true:若设置true,那么就对齐。 例如:
<LinearLayout xmlns:android="http://schemas.android.com/apk/res/android"

    android:layout_width="match_parent"

    android:layout_height="match_parent"

    android:baselineAligned="false"      //这里设置为false

    android:orientation="horizontal">

    <TextView

        android:layout_width="wrap_content"

        android:layout_height="wrap_content"

        android:text="hello "

        android:textSize="24sp"

         />

    <TextView

        android:layout_width="wrap_content"

        android:layout_height="wrap_content"

        android:text="world"

         />

    <TextView

        android:layout_width="wrap_content"

        android:layout_height="wrap_content"

        android:text="hello world"

        android:textSize="45sp"

        />

</LinearLayout>
显示结果:
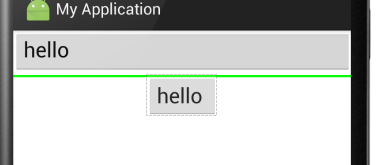
当设置为true时:

结果一目了然。
⑤android:gravity:指定布局里面的子控件的位置,几个常用参数,可以接受两个参数中间用”|“分隔开
center:控件处于布局的中心位置。
left:控件位于布局的左边。
right:控件位于布局的右边。
center|left:控件位于布局的中左位置。(也可以用center_vertical,和这个同样的作用)
官方给出的属性:
大家可以见明知义。例子:
<LinearLayout xmlns:android="http://schemas.android.com/apk/res/android"

    android:layout_width="match_parent"

    android:layout_height="match_parent"

    android:gravity="center|left"

    android:orientation="horizontal">

    <TextView

        android:layout_width="wrap_content"

        android:layout_height="wrap_content"

        android:text="hello "

        android:textSize="24sp"

         />

</LinearLayout>
显示结果为:
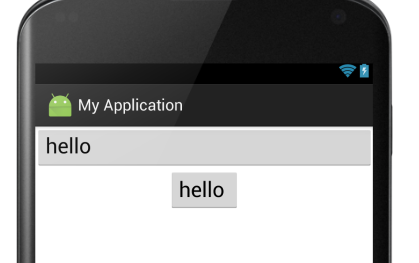
⑥android:layout_gravity:是指此子控件在布局中的位置。参数同上:
<LinearLayout xmlns:android="http://schemas.android.com/apk/res/android"

    android:layout_width="match_parent"

    android:layout_height="match_parent"

    android:orientation="vertical">

    <Button

        android:layout_width="match_parent"

        android:layout_height="wrap_content"

        android:text="hello "

        android:gravity="left"

        android:textSize="24sp"

         />

    <Button

        android:layout_width="wrap_content"

        android:layout_height="wrap_content"

        android:text="hello "

        android:textSize="24sp"

        android:layout_gravity="center"

        />

</LinearLayout>
显示结果:
⑦android:divider:绘制子组件之间的分割线,参数可以是一个图片也可以是一个xml的shape标记,图片或者shape位于drawable下
android:showDividers:显示分割线的方式,有四种:
begging:在整体的上方添加
middle:在每个组件之间添加
end:在整体的下方添加
none:不显示
例如:
<LinearLayout xmlns:android="http://schemas.android.com/apk/res/android"

    android:layout_width="match_parent"

    android:layout_height="match_parent"

    android:divider="@drawable/shapee"      //这里引用的shapee为一个xml文件,代码在下面

    android:showDividers="middle"         //这里显示方法为在每个组件之间添加

    android:orientation="vertical">
shapee.xml文件
<?xml version="1.0" encoding="utf-8"?>

<shape xmlns:android="http://schemas.android.com/apk/res/android">

    <solid android:color="#00ff00" />         //此属性指定颜色

    <size android:height="5px" />            //分割线的高度

</shape>
效果如下:
⑧android:weightSum:设定子控件中weight中的总和,其实就是控制子控件与屏幕或者其他子控件的比例,个人感觉这个比较重要,对于布局有很好的作用。
例如一下代码:
<LinearLayout xmlns:android="http://schemas.android.com/apk/res/android"

    android:layout_width="match_parent"

    android:layout_height="match_parent"

    android:orientation="horizontal"                  //布局设置为水平布局

    android:weightSum="1"                        //设置子控件的weight总和为1

    >

    <Button

        android:layout_width="0dp"                  //这里设置为0是为了好计算,计算公式在下面介绍

        android:layout_height="wrap_content"

        android:layout_weight="0.5"                  //这里设置weight(权值)为0.5,也就是占用了一行的一半。

        android:text="hello "

        android:textSize="24sp"

         />

    <Button

        android:layout_width="0dp"

        android:layout_height="wrap_content"

        android:layout_weight="0.4"                    //这里是0.4,就是40%,还有1-0.5-0.4=0.1为空白

        android:text="hello "

        android:textSize="24sp"

        />

</LinearLayout>
显示结果:

计算公式: 此实例中Button的宽度计算:{ Button的width值+Button的weight*父控件width(这里是match_content,
如果父控件为200dp,那么这里就是200)/ weightSum的值 }
Android布局之线性布局——LinearLayout的更多相关文章
- Android开发之线性布局详解(布局权重)
布局权重 线性布局支持给个别的子视图设定权重,通过android:layout_weight属性.就一个视图在屏幕上占多大的空间而言,这个属性给其设 定了一个重要的值.一个大的权重值,允许它扩大到填充 ...
- android学习之线性布局
效图如下 移通152余继彪 该布局使用了线性布局完成 父布局为线性布局,黄色和灰色部分为水平的线性布局,剩余50%部分为水平线性布局,该布局中包含了两个垂直的线性布局分别占了三分之1和三分之二
- 第21/22讲 UI_布局 之 线性布局
第21/22讲 UI_布局 之 线性布局 布局管理就是组件在activity中呈现方式,包括组件的大小,间距和对齐方式等. Android提供了两种布局的实现方式: 1.在xml配置文件中声明:这种方 ...
- Android:控件布局(线性布局)LinearLayout
LinearLayout是线性布局控件:要么横向排布,要么竖向排布 决定性属性:必须有的! android:orientation:vertical (垂直方向) .horizontal(水平方向) ...
- Android 自学之线性布局 LinearLayout
线性布局(LinearLayout),线性布局有点想AWT编程里面的FolwLayout,他们都会将容器里面的组件挨个的排列起来. 他们最大的区别在于:Android的线性布局不会换行:AWT里面的F ...
- Android——布局(线性布局linearLayout,表格布局TableLayout,帧布局FrameLayout)
线性布局: <?xml version="1.0" encoding="utf-8"?> <LinearLayout xmlns:androi ...
- .Net程序猿玩转Android开发---(6)线性布局LinearLayout
LinearLayout控件是Android中重要的布局控件,是一个线性控件,所谓线性控件的意思是指该控件里面的内容仅仅能水平或垂直排列.也就 ...
- android布局之线性布局
LinearLayout 线性布局有两种,分别是水平线性布局和垂直线性布局,LinearLayout属性中android:orientation为设置线性布局当其="vertical&quo ...
- Android 布局(线性布局、相对布局)
一.线性布局(LinearLayout) <LinearLayout****</LinearLayout>1. orientation(布局方向)value=0 horizontal ...
随机推荐
- the little schemer 笔记(0)
the little schemer 笔记 Z.X.L 2012年08月13日 五项规则 car的规则car只对非空列表有定义. cdr的规则cdr只对非空列表有定义.任何非空列表的cdr是另外一个列 ...
- c++ 头文件路径选择
单文件引用头文件./ 当前目录 ../ 父级目录 / 根目录 多文件引用头文件多文件引用头文件 定义单独放在cpp文件里面 ,声明放在().h)里面
- net 配置文件处理视频
1. 视频 <staticContent> <mimeMap fileExtension=".mp4" mimeType="video/mp4 ...
- websocket实现单聊
server# @File: ws from flask import Flask, request, render_template from geventwebsocket.handler imp ...
- HDU6446(树上、排列的贡献计算)
关键点在于:全排列中,任意两点u.v相邻的次数一定是(n - 1)! * 2次,即一个常数(可以由高中数学知识计算,将这两个点捏一起然后全排列然后乘二:或者用n! / C(2, n)). 这之后就好算 ...
- URAL 7077 Little Zu Chongzhi's Triangles(14广州I)
题目传送门 题意:有n根木棍,三根可能能够构成三角形,选出最多的三角形,问最大面积 分析:看到这个数据范围应该想到状压DP,这次我想到了.0010101的状态中,1表示第i根木棍选择,0表示没选,每一 ...
- Codeforces Round #295 (Div. 2) B. Two Buttons
B. Two Buttons time limit per test 2 seconds memory limit per test 256 megabytes input standard inpu ...
- [转]MVC 检测用户是否已经登录
本文转自:http://blog.csdn.net/jayzai/article/details/41252137 当我们访问某个网站的时候需要检测用户是否已经登录(通过Session是否为null) ...
- P1720 月落乌啼算钱
题目背景 (本道题目木有以藏歌曲……不用猜了……) <爱与愁的故事第一弹·heartache>最终章. 吃完pizza,月落乌啼知道超出自己的预算了.为了不在爱与愁大神面前献丑,只好还是硬 ...
- 【C#】为什么有可能会被多个线程修改的对象要加线程锁
例1.不用线程锁的情况下,两个线程对同一个变量进行加减操作 static void Main(string[] args) { Counter counter = new Counter(); var ...