sonne_game网站开发02spring+mybatis框架搭建
从最开始搭框架谈起,而且,我不仅仅会讲how,还会努力讲why。因为对于web开发,由于有太多好的框架、组件、工具,使得how往往不是那么深刻,背后的why更值得专研。如果有初学者关注我这个系列,也一定会对你有很大帮助。因为我要做的就是从起步阶段,独立一人开发一个网站。而且这是一个非常简洁清晰的网站。
本篇相关代码已上传github:sonne game
第一步,jar包:
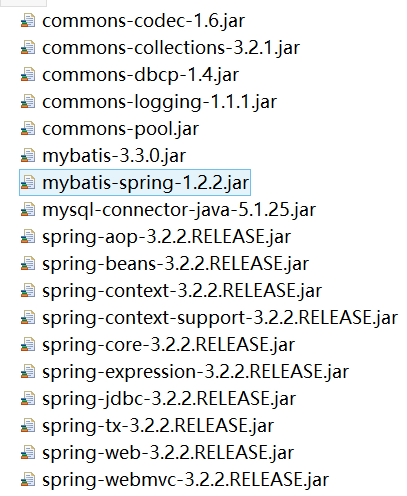
以上这些jar包并不算多,spring的jar包、mybatis的两个jar包、一个mysql数据库连接的jar包,剩下一些commons jar包。
这篇文章介绍了spring相关的jar包,我觉得很不错:spring各jar包作用
此外,commons-collections.jar的作用:为Java标准的Collections API提供了相当好的补充。在此基础上对其常用的数据结构操作进行了很好的封装、抽象和补充。保证性能的同时大大简化代码。spring是要依赖这个包的。
commons-codec.jar是Apache开源组织提供的用于摘要运算、编码的包。DES、SHA1、MD5、Base64,URL,Soundx等等。
commons-dbcp.jar是主流数据库连接池之一,之前日向博客用的是c3p0。
commons-pool.jar是用于实现对象池,用这个包可以减少创建对象次数。
commons-logging.jar 日志相关,是spring的必备包。
第二步,数据库的准备:
我使用的是mysql数据库。关于最基本的mysql使用就不必说了。mysql的安装我博客园的日志有总结:sql 笔记(mysql)介绍了windows、linux的ubuntu和centos下的安装方法。另外还介绍了mysql数据库的导入导出等。
windows下安装mysql,zip包的方式很简单,解压后做一些相应配置即可。
在安装好mysql的基础上,创建一个数据库,create database sonne_game; use sonne_game;
创建表,目前只是搭建框架,并且实验的阶段,所以这个表只有三个字段,用户名、密码、id:create table User(id int primary key,usrname varchar(20),passwd varchar(20));
向表中插入:
insert into User values (1,'sonne','passwd123');
insert into User values(2,'whoami','passwd321');
第三步,mybatis mapper
创建实体类,这是每个java web项目必须的过程。该实体类对应着刚才建的那个数据库表。
- package sonn.web.entity;
- /**
- * @ClassName: User
- * @Description: entity class of Usr.
- * @author sonne
- * @date 2017-1-6 21:24:00 create the class
- * @version 1.0
- */
- public class User {
- private int id;
- private String usrname;
- private String passwd;
- //private String nick_name;
- //private String register_date;
- //private String profile_pic_path;
- public int getId() {
- return id;
- }
- public void setId(int id) {
- this.id = id;
- }
- public String getUsrname() {
- return usrname;
- }
- public void setUsrname(String usrname) {
- this.usrname = usrname;
- }
- public String getPasswd() {
- return passwd;
- }
- public void setPasswd(String passwd) {
- this.passwd = passwd;
- }
- }
在该实体类同一个目录下,建mapper的xml。这是mybatis的写法。下面xml中有一条sql语句,会由mybatis为我们执行。众所周知,mybatis和hibernate不同一点,是要自己写sql语句的,在某些方面更加灵活。那么问题是,既然是要自己写sql语句,与不使用mybatis又有何区别呢。我认为这样至少实现了sql和代码的分离,是种更好的设计。代码统一写在xml里,也方便统一管理。
我之前的日向博客是使用的open jpa。写法有很大不同。那种是真正的orm。有兴趣的可以去我github上看看:日向博客代码
- <?xml version="1.0" encoding="UTF-8"?>
- <!DOCTYPE mapper
- PUBLIC "-//mybatis.org//DTD Mapper 3.0//EN"
- "http://mybatis.org/dtd/mybatis-3-mapper.dtd">
- <mapper namespace = "sonn.web.mapper.UserMapper">
- <select id = "findAll" resultType = "sonn.web.entity.User">
- select ID,USRNAME,PASSWD from USER
- </select>
- </mapper>
上述只是一个实体类,和一个xml文件,xml里面配置了查询的sql语句。
User是entity层,那么那个xml应该是实现dao的功能,但设想我们在controller里要进行查询的动作的话,该如何写?用java代码怎么调用xml文件里的sql ?
顺理成章的,我们会发现这时需要一个java的接口:
- package sonn.web.mapper;
- import java.util.List;
- import sonn.web.entity.User;
- /**
- * @ClassName: UserMapper
- * @Description: User Mapper Interface
- * @author sonne
- * @date 2017-1-7 15:51:11
- * @version 1.0
- */
- public interface UserMapper {
- public List<User> findAll();
- }
至于该接口与实体类和xml的对应关系,是由mybatis来替我们做。
第四步,spring基本配置,并测试:
项目src目录下,创建spring的xml配置文件:spring-common.xml
- <?xml version="1.0" encoding="UTF-8"?>
- <beans xmlns:xsi="http://www.w3.org/2001/XMLSchema-instance"
- xmlns="http://www.springframework.org/schema/beans"
- xmlns:context="http://www.springframework.org/schema/context"
- xmlns:tx="http://www.springframework.org/schema/tx"
- xsi:schemaLocation="
- http://www.springframework.org/schema/beans
- http://www.springframework.org/schema/beans/spring-beans-3.2.xsd
- http://www.springframework.org/schema/context
- http://www.springframework.org/schema/context/spring-context-3.2.xsd
- http://www.springframework.org/schema/tx
- http://www.springframework.org/schema/tx/spring-tx-3.2.xsd">
- <bean id = "myDataSource" class = "org.apache.commons.dbcp.BasicDataSource" destroy-method = "close">
- <property name="driverClassName" value="com.mysql.jdbc.Driver"></property>
- <property name="url" value="jdbc:mysql://localhost/sonne_game?useUnicode=true&characterEncoding=UTF-8"></property>
- <property name="username" value="root"></property>
- <property name="password" value=""></property>
- </bean>
- <bean id = "sqlSessionFactory" class = "org.mybatis.spring.SqlSessionFactoryBean">
- <property name = "dataSource" ref = "myDataSource" />
- <property name = "mapperLocations" value = "classpath:sonn/web/entity/*.xml" />
- </bean>
- <!-- define mapper -->
- <bean id = "userMapper" class = "org.mybatis.spring.mapper.MapperFactoryBean">
- <property name = "mapperInterface" value = "sonn.web.mapper.UserMapper" />
- <property name = "sqlSessionFactory" ref = "sqlSessionFactory" />
- </bean>
- </beans>
myDataSource这个bean是配置的dbcp数据库连接。属于commons-dbcp.jar这个包。里面配置了数据库类型、url、用户名、密码。老生常谈了。由于目前用不到数据库连接池,先不管。
sqlSessionFactory则是mybatis很核心的东西
userMapper就是第三步所写的那些,对于User类的操作的bean。
这个xml文件是spring最基础的东西,实在没法再细说了。
上述这些东西做过之后,其实就等于完成了mybatis和spring的整合,我们可以写个测试类:
- package sonn.web.test;
- import java.util.List;
- import org.junit.Test;
- import org.springframework.context.ApplicationContext;
- import org.springframework.context.support.ClassPathXmlApplicationContext;
- import sonn.web.entity.User;
- import sonn.web.mapper.UserMapper;
- public class TestUserMapper {
- @Test
- public void testFindAll() {
- String conf = "spring-common.xml";
- ApplicationContext ac = new ClassPathXmlApplicationContext(conf);
- UserMapper mapper = ac.getBean("userMapper", UserMapper.class);
- List<User> lst = mapper.findAll();
- for (User usr : lst) {
- System.out.println(usr.getUsrname() + ":" + usr.getPasswd());
- }
- }
- }
输出结果:
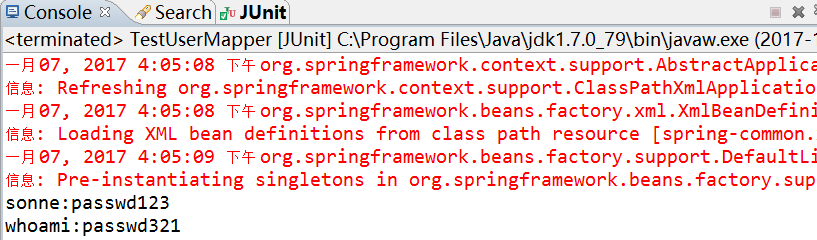
如果只是本地的程序(以实现对数据库的操作),写成这样也就好了,但我们要做的是web项目,还需要一个view层。这时就需要spring-mvc出场了。
第五步,spring mvc配置:
关于mvc模型,真不想多说了。太基础了。
之前我博客园两篇文章探讨过spring-mvc的概念和配置:spring-mvc
标签简化spring mvc(不了解spring-mvc概念的请先看懂这两篇,否则下面的你是看不懂的)
前者是最基本的mvc概念,后者是前者基础上加入自动扫描机制。有了自动扫描机制,用spring搞web会简单好多。用标签简化了繁琐的bean的配置。
在src路径下,再新建一个spring的xml文件,名叫spring-mvc.xml:
- <?xml version="1.0" encoding="UTF-8"?>
- <beans xmlns="http://www.springframework.org/schema/beans"
- xmlns:xsi="http://www.w3.org/2001/XMLSchema-instance"
- xmlns:context="http://www.springframework.org/schema/context"
- xmlns:mvc="http://www.springframework.org/schema/mvc"
- xmlns:util="http://www.springframework.org/schema/util"
- xsi:schemaLocation=
- "http://www.springframework.org/schema/beans
- http://www.springframework.org/schema/beans/spring-beans-3.2.xsd
- http://www.springframework.org/schema/context
- http://www.springframework.org/schema/context/spring-context-3.2.xsd
- http://www.springframework.org/schema/mvc
- http://www.springframework.org/schema/mvc/spring-mvc-3.2.xsd
- http://www.springframework.org/schema/util
- http://www.springframework.org/schema/util/spring-util-3.2.xsd">
- <!-- 这个标签注册了Spring MVC分发请求到控制器所必须的DefaultAnnotationHandlerMapping和AnnotationMethodHandlerAdapter实例 -->
- <mvc:annotation-driven/>
- <context:component-scan base-package="sonn.web.controller"/>
- <!-- 定义视图解析器viewResolver -->
- <bean id = "viewResolver"
- class = "org.springframework.web.servlet.view.InternalResourceViewResolver">
- <property name = "prefix" value = "/jsp/"/>
- <property name = "suffix" value = ".jsp"/>
- </bean>
- </beans>
该xml文件配置了自动扫描,路径是controller文件夹。
视图解析器配置了前端页面的路径WebRoot/jsp/xxxx.jsp
暂时使用jsp,freemarker的引入还要下一篇文章说。
有人会有疑问,目前建的两个spring的xml文件,spring-common.xml和spring-mvc.xml文件到底是怎样由spring读取到呢?
答案是:写在web.xml里:
- <?xml version="1.0" encoding="UTF-8"?>
- <web-app version="3.0"
- xmlns="http://java.sun.com/xml/ns/javaee"
- xmlns:xsi="http://www.w3.org/2001/XMLSchema-instance"
- xsi:schemaLocation="http://java.sun.com/xml/ns/javaee
- http://java.sun.com/xml/ns/javaee/web-app_3_0.xsd">
- <display-name></display-name>
- <context-param>
- <param-name>contextConfigLocation</param-name>
- <param-value>classpath:/spring-*.xml</param-value>
- </context-param>
- <servlet>
- <servlet-name>springmvc</servlet-name>
- <servlet-class>org.springframework.web.servlet.DispatcherServlet</servlet-class>
- <init-param>
- <param-name>contextConfigLocation</param-name>
- <param-value>classpath:/spring-mvc.xml</param-value>
- </init-param>
- <load-on-startup>1</load-on-startup>
- </servlet>
- <servlet-mapping>
- <servlet-name>springmvc</servlet-name>
- <url-pattern>*.form</url-pattern>
- </servlet-mapping>
- <listener>
- <listener-class>org.springframework.web.context.ContextLoaderListener</listener-class>
- </listener>
- <welcome-file-list>
- <welcome-file>index.jsp</welcome-file>
- </welcome-file-list>
- </web-app>
spring-mvc配置好之后,就可以建一个controller类了,下面有一些很基本的标签,如@RequestMapping,规定的是请求路径。方法里通过mapper接口调用的是spring配置文件里配置好的bean。用这个bean实现数据库查询后,使用Model发送到前端。最后返回的"gamne_lst"。会被spring-mvc解析为/jsp/game_lst.jsp这样的路径(见上文提到的配置)。依据这个路径浏览器加载对应的jsp文件,实现了view层的展示。
这样一番entity实体类-dao数据库操作-controller-view前端页面的过程,就是MVC结构,spring-mvc !
- package sonn.web.controller;
- import java.util.List;
- import javax.annotation.Resource;
- import javax.servlet.http.HttpServletRequest;
- import org.springframework.stereotype.Controller;
- import org.springframework.ui.Model;
- import org.springframework.web.bind.annotation.RequestMapping;
- import org.springframework.web.bind.annotation.RequestMethod;
- import sonn.web.entity.User;
- import sonn.web.mapper.UserMapper;
- /**
- * @ClassName: GameController
- * @Description: the controller of game
- * @author sonne
- * @date 2017-1-7 16:20:16
- * @version 1.0
- */
- @Controller
- @RequestMapping("/game")
- public class GameController {
- @Resource(name = "userMapper")
- private UserMapper userMapper;
- @RequestMapping(value = "/lst", method = RequestMethod.GET)
- public String submit(HttpServletRequest request,Model model) throws Exception {
- List<User> usr_lst = userMapper.findAll();
- model.addAttribute("lst", usr_lst);
- return "game_lst";
- }
- }
下面是jsp的代码,用到了jstl标签来展示后台传过来的数据,不多说:
- <%@page pageEncoding="utf-8" contentType="text/html;charset=utf-8"%>
- <%@ taglib uri="http://java.sun.com/jsp/jstl/core" prefix="c"%>
- <!DOCTYPE HTML PUBLIC "-//W3C//DTD HTML 4.01 Transitional//EN">
- <html>
- <head>
- <meta http-equiv="Content-Type" content="text/html; charset=gb2312" />
- <title>Sonn Game</title>
- </head>
- <body>
- <p>Hello.Here is Sonne's New website Sonn_Game</p>
- <c:forEach items="${lst}" var="usr" >
- <p>Usrname is ${usr.usrname} and usr's passwd is ${usr.passwd}</p>
- </c:forEach>
- </body>
- </html>
第六步,查看效果:
eclipse使用tomcat加载运行本项目,之后浏览器访问:http://localhost:8888/Sonne_game/game/lst.form(tomcat默认端口号是8080,我这里是8888,Sonne_game是我的项目名字,game/lst是controller里面requestmapping标签规定的路径,.form后缀是web.xml里设置的):

这样我们就实现了一个最基本的页面,逻辑虽然简单,却代表了非常本质的东西。在此基础上扩展,就是一个成熟的网站。
最后截图展示整个项目结构,上述所有内容都应该对应着这个结构来理解:
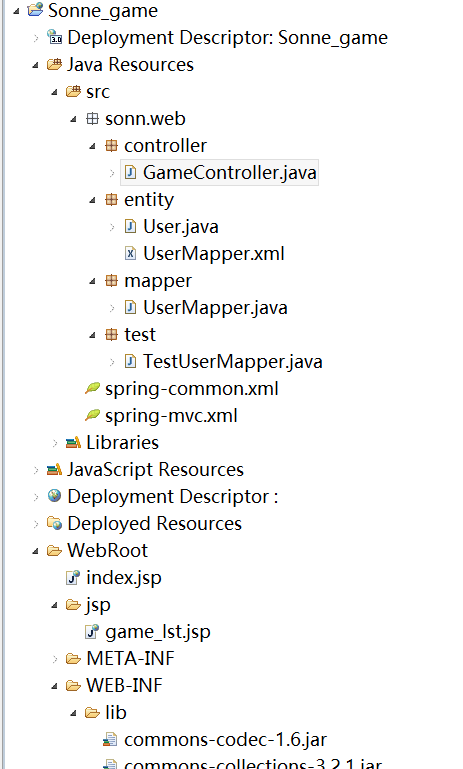
想要上述所有代码的话,当然是通过github来获取:github地址
sonne_game网站开发02spring+mybatis框架搭建的更多相关文章
- mybatis框架搭建学习初步
mybatis框架搭建步骤:1. 拷贝jar到lib目录下,而且添加到工程中2. 创建mybatis-config.xml文件,配置数据库连接信息 <environments default=& ...
- SpringMVC+Mybatis框架搭建
一.新建javaweb项目,并建好相应的包结构 二.添加项目jar到lib目录下 三.在config包中新建配置文件 sping-mvc.xml,内容如下: <?xml version=&quo ...
- Mybatis框架搭建
Mybatis框架搭建 思路: 搭建环境 导入Mybatis 编写代码 测试 一.搭建环境 创建数据库 /* Navicat Premium Data Transfer Source Server ...
- Angular企业级开发(5)-项目框架搭建
1.AngularJS Seed项目目录结构 AngularJS官方网站提供了一个angular-phonecat项目,另外一个就是Angular-Seed项目.所以大多数团队会基于Angular-S ...
- ASP.NET MVC5 网站开发实践(一) - 框架(续) 模型、数据存储、业务逻辑
上次搭建好了项目框架,但还是觉得不太对劲,后来才想起来没有对开发目标进行定位,这个小demo虽然不用做需求分析,但是要实现什么效果还得明确.后来想了一下就做个最简单的网站,目标定为小公司进行展示用的网 ...
- SSM(Spring +SpringMVC + Mybatis)框架搭建
SSM(Spring +SpringMVC + Mybatis)框架的搭建 最近通过学习别人博客发表的SSM搭建Demo,尝试去搭建一个简单的SSMDemo---实现的功能是对用户增删改查的操作 参考 ...
- spring+springmvc+mybatis框架搭建
一.开发前准备 1)ecplise4.11.0 百度网盘:https://pan.baidu.com/s/1wO9_I52lp0mYNeNTdnj80w 提取码:booa 2)jdk1.6.0_45 ...
- 学习MVC之租房网站(二)-框架搭建及准备工作
在上一篇<学习MVC之租房网站(一)-项目概况>中,确定了UI+Service的“双层”架构,并据此建立了项目 接下来要编写Common类库.配置AdminWeb和FrontWeb 一.编 ...
- Mybatis 框架搭建实例
前言 MyBatis是一个优秀的持久层框架.原生的jdbc操作存在大量的重复性代码(如注册驱动,创建连接,创建statement,结果集检测等).框架的作用就是把这些繁琐的代码封装. MyBatis通 ...
随机推荐
- 引用64位dll时候出现 未能加载文件或程序集“System.Data.SQLite”或它的某一个依赖项。试图加载格式不正确的程序。
引用64位dll时候出现 未能加载文件或程序集“System.Data.SQLite”或它的某一个依赖项.试图加载格式不正确的程序. 需要在web.config增加配置 <startup use ...
- 拼sql条件时判断 是不是当前时间是不是周五,如果今天不是周五,就选上周五
if (Request.QueryString["start"] == null) { for (int i = 0; i < 6; i++) { if (DateTime. ...
- SAP项目管理模块培训教材
SAP项目管理模块培训教材(PLM210.PLM220.PLM230)分享: http://sap.npbok.com/
- vc11(vs2012)下编译php
需要原料: vs2012.php源码 1.本机的mingw没搞定,参考网上文章尝试vs2012编译,借助vs2012自带的命令行工具: 需要去bison官网下载bison.exe放在“c:/windo ...
- 使用django-admin.py 时出错
我在安装好django后,运行django-admin.py 时出现两处错误: 一.当你在dos命令下输入django-admin.py 时不会运行,而是以记事本的方式打开了. 解决办法:找到你的dj ...
- java 单利模式
首先何为单利模式: 单利模式即多次调用同一个对象的时候,只有一个实例(这里所谓的实例就是,假如创建了两个对象,它们的hashCode相同) 下面是相关代码: 1 创建一个对象Singleton类 pa ...
- Freemarker常用指令使用范例
我的開發環境 框架: springmvc+freemarker 開發工具: springsource-tool-suite-2.9.0 JDK版本: 1.6.0_29 ...
- Python垃圾回收机制
引用计数Python默认的垃圾收集机制是“引用计数”,每个对象维护了一个ob_ref字段.它的优点是机制简单,当新的引用指向该对象时,引用计数 引用计数 Python默认的垃圾收集机制是“引用计数”, ...
- jboss hello world
http://developers.redhat.com/products/devstudio/get-started/ 1. 下载 Red Hat JBoss Developer studio 2. ...
- java-7311练习(下)
java练习,仅供参考! 欢迎同学们交流讨论. JDK 1.8 API帮助文档 JDK 1.6 API中文文档 第一次小组作业:模拟双色球彩票 第一次小组作业(一) 控制台版 游戏规则: • 双色球为 ...