Django - 常用配置
一、logging配置
Django项目常用的logging配置
settings.py
LOGGING = {

    'version': 1,

    'disable_existing_loggers': False,

    'formatters': {

        'standard': {

            'format': '[%(asctime)s][%(threadName)s:%(thread)d][task_id:%(name)s][%(filename)s:%(lineno)d]'

                      '[%(levelname)s][%(message)s]'

        },

        'simple': {

            'format': '[%(levelname)s][%(asctime)s][%(filename)s:%(lineno)d]%(message)s'

        },

        'collect': {

            'format': '%(message)s'

        }

    },

    'filters': {

        'require_debug_true': {

            '()': 'django.utils.log.RequireDebugTrue',

        },

    },

    'handlers': {

        'console': {

            'level': 'DEBUG',

            'filters': ['require_debug_true'],  # 只有在Django debug为True时才在屏幕打印日志

            'class': 'logging.StreamHandler',

            'formatter': 'simple'

        },

        'default': {

            'level': 'INFO',

            'class': 'logging.handlers.RotatingFileHandler',  # 保存到文件,自动切

            'filename': os.path.join(BASE_LOG_DIR, "xxx_info.log"),  # 日志文件

            'maxBytes': 1024 * 1024 * 50,  # 日志大小 50M

            'backupCount': 3,

            'formatter': 'standard',

            'encoding': 'utf-8',

        },

        'error': {

            'level': 'ERROR',

            'class': 'logging.handlers.RotatingFileHandler',  # 保存到文件,自动切

            'filename': os.path.join(BASE_LOG_DIR, "xxx_err.log"),  # 日志文件

            'maxBytes': 1024 * 1024 * 50,  # 日志大小 50M

            'backupCount': 5,

            'formatter': 'standard',

            'encoding': 'utf-8',

        },

        'collect': {

            'level': 'INFO',

            'class': 'logging.handlers.RotatingFileHandler',  # 保存到文件,自动切

            'filename': os.path.join(BASE_LOG_DIR, "xxx_collect.log"),

            'maxBytes': 1024 * 1024 * 50,  # 日志大小 50M

            'backupCount': 5,

            'formatter': 'collect',

            'encoding': "utf-8"

        }

    },

    'loggers': {

       # 默认的logger应用如下配置

        '': {

            'handlers': ['default', 'console', 'error'],  # 上线之后可以把'console'移除

            'level': 'DEBUG',

            'propagate': True,

        },

        # 名为 'collect'的logger还单独处理

        'collect': {

            'handlers': ['console', 'collect'],

            'level': 'INFO',

        }

    },

}
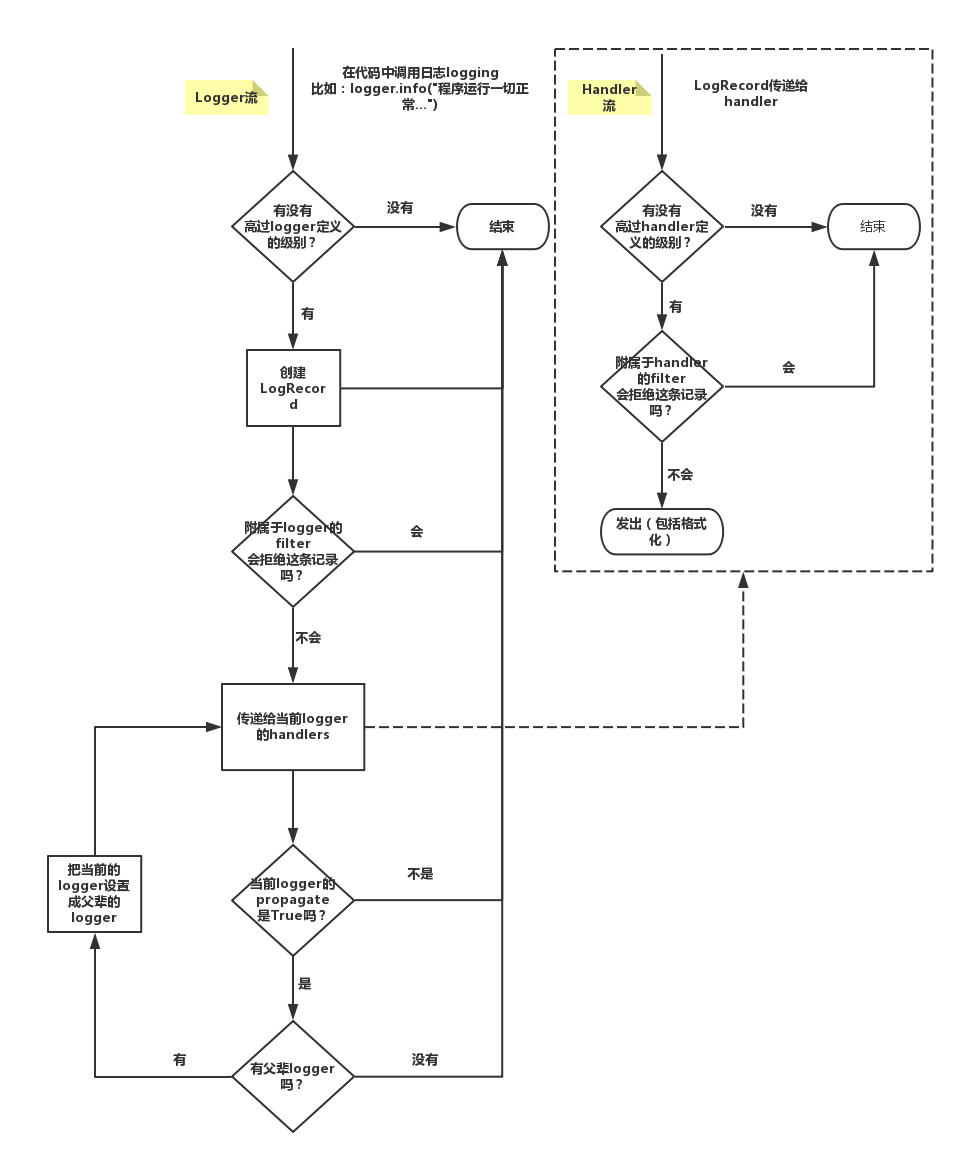
Python logger流示图
使用:

settings.py
"""

Django settings for about_middleware project.

Generated by 'django-admin startproject' using Django 2.0.1.

For more information on this file, see

https://docs.djangoproject.com/en/2.0/topics/settings/

For the full list of settings and their values, see

https://docs.djangoproject.com/en/2.0/ref/settings/

"""

import os

# Build paths inside the project like this: os.path.join(BASE_DIR, ...)

BASE_DIR = os.path.dirname(os.path.dirname(os.path.abspath(__file__)))

# Quick-start development settings - unsuitable for production

# See https://docs.djangoproject.com/en/2.0/howto/deployment/checklist/

# SECURITY WARNING: keep the secret key used in production secret!

SECRET_KEY = 's011rs!(ga_n!j#*1@!-c2is3)xaw()87bpj=ffjhel^$vzi5v'

# SECURITY WARNING: don't run with debug turned on in production!

DEBUG = True  # 真正上线 这是 false

ALLOWED_HOSTS = []

# Application definition

INSTALLED_APPS = [

    'django.contrib.admin',

    'django.contrib.auth',

    'django.contrib.contenttypes',

    'django.contrib.sessions',

    'django.contrib.messages',

    'django.contrib.staticfiles',

    'app01.apps.App01Config',

]

MIDDLEWARE = [

    'django.middleware.security.SecurityMiddleware',

    'django.contrib.sessions.middleware.SessionMiddleware',

    'django.middleware.common.CommonMiddleware',

    'django.middleware.csrf.CsrfViewMiddleware',

    'django.contrib.auth.middleware.AuthenticationMiddleware',

    'django.contrib.messages.middleware.MessageMiddleware',

    'django.middleware.clickjacking.XFrameOptionsMiddleware',

    # 注册两个自定义的中间件

    'my_middleware.MD1',

    'my_middleware.MD2',

]

# 中间件 https://www.cnblogs.com/liwenzhou/p/8761803.html

from django.middleware.security import SecurityMiddleware

from django.middleware.csrf import CsrfViewMiddleware

from django.middleware.clickjacking import XFrameOptionsMiddleware

# process_request(self,request)

# process_view(self, request, view_func, view_args, view_kwargs)

# process_template_response(self,request,response)

# process_exception(self, request, exception)

# process_response(self, request, response)

ROOT_URLCONF = 'about_middleware.urls'

TEMPLATES = [

    {

        'BACKEND': 'django.template.backends.django.DjangoTemplates',

        'DIRS': [os.path.join(BASE_DIR, 'templates')]

        ,

        'APP_DIRS': True,

        'OPTIONS': {

            'context_processors': [

                'django.template.context_processors.debug',

                'django.template.context_processors.request',

                'django.contrib.auth.context_processors.auth',

                'django.contrib.messages.context_processors.messages',

            ],

        },

    },

]

WSGI_APPLICATION = 'about_middleware.wsgi.application'

# Database

# https://docs.djangoproject.com/en/2.0/ref/settings/#databases

DATABASES = {

    'default': {

        'ENGINE': 'django.db.backends.sqlite3',

        'NAME': os.path.join(BASE_DIR, 'db.sqlite3'),

    }

}

# Password validation

# https://docs.djangoproject.com/en/2.0/ref/settings/#auth-password-validators

AUTH_PASSWORD_VALIDATORS = [

    {

        'NAME': 'django.contrib.auth.password_validation.UserAttributeSimilarityValidator',

    },

    {

        'NAME': 'django.contrib.auth.password_validation.MinimumLengthValidator',

    },

    {

        'NAME': 'django.contrib.auth.password_validation.CommonPasswordValidator',

    },

    {

        'NAME': 'django.contrib.auth.password_validation.NumericPasswordValidator',

    },

]

# Internationalization

# https://docs.djangoproject.com/en/2.0/topics/i18n/

LANGUAGE_CODE = 'en-us'

TIME_ZONE = 'UTC'

USE_I18N = True

USE_L10N = True

USE_TZ = True

# Static files (CSS, JavaScript, Images)

# https://docs.djangoproject.com/en/2.0/howto/static-files/

STATIC_URL = '/static/'

# https://www.cnblogs.com/liwenzhou/p/8763264.html

# django 的日志配置项

BASE_LOG_DIR = os.path.join(BASE_DIR,'log')

LOGGING = {

    'version': 1,  # 保留字

    'disable_existing_loggers': False,  # 禁用已经存在的 logger 实例

    'formatters': {

        # 详细的日志格式

        'standard': {

            'format': '[%(asctime)s][%(threadName)s:%(thread)d][task_id:%(name)s][%(filename)s:%(lineno)d]'

                      '[%(levelname)s][%(message)s]'

        },

        # 简单的日志格式

        'simple': {

            'format': '[%(levelname)s][%(asctime)s][%(filename)s:%(lineno)d]%(message)s'

        },

        # 定义一个特殊的日志格式

        'collect': {

            'format': '%(message)s'

        }

    },

    # 过滤器

    'filters': {

        # DEBUG = True 的情况 才过滤

        'require_debug_true': {

            '()': 'django.utils.log.RequireDebugTrue',

        },

    },

    # 处理器

    'handlers': {

        # 在终端打印

        'console': {

            'level': 'DEBUG',

            'filters': ['require_debug_true'],  # 只有在Django debug为True时才在屏幕打印日志

            'class': 'logging.StreamHandler',

            'formatter': 'simple'

        },

        # 默认

        'default': {

            'level': 'INFO',

            'class': 'logging.handlers.RotatingFileHandler',  # 保存到文件,自动切

            'filename': os.path.join(BASE_LOG_DIR, "xxx_info.log"),  # 日志文件

            'maxBytes': 1024 * 1024 * 50,  # 日志大小 50M 一般配500M

            'backupCount': 3, # 最多备份3个

            'formatter': 'standard',

            'encoding': 'utf-8',

        },

        # 专门用来记 错误日志

        'error': {

            'level': 'ERROR',

            'class': 'logging.handlers.RotatingFileHandler',  # 保存到文件,自动切

            'filename': os.path.join(BASE_LOG_DIR, "xxx_err.log"),  # 日志文件

            'maxBytes': 1024 * 1024 * 50,  # 日志大小 50M

            'backupCount': 5,

            'formatter': 'standard',

            'encoding': 'utf-8',

        },

        # 专门 定义一个 收集特定信息的日志

        'collect': {

            'level': 'INFO',

            'class': 'logging.handlers.RotatingFileHandler',  # 保存到文件,自动切

            'filename': os.path.join(BASE_LOG_DIR, "xxx_collect.log"),

            'maxBytes': 1024 * 1024 * 50,  # 日志大小 50M

            'backupCount': 5,

            'formatter': 'collect',

            'encoding': "utf-8"

        }

    },

    'loggers': {

       # 默认的logger应用如下配置

        '': {

            'handlers': ['default', 'console', 'error'],  # 上线之后可以把'console'移除

            'level': 'DEBUG',

            'propagate': True,  # 向不向更高级别的logger传递

        },

        # 名为 'collect'的logger还单独处理

        'collect': {

            'handlers': ['console', 'collect'],

            'level': 'INFO',

        }

    },

}
settings
views.py
from django.shortcuts import render,HttpResponse

# Create your views here.

import logging

# 生成一个以当前文件名为名字的logger实例

logger = logging.getLogger(__name__)

collect_logger = logging.getLogger('collect') # 生成一个名为collect的实例

def index(requset):

    logger.debug('一个debug萌萌的请求...')

    logger.info('一个info萌萌的请求...')

    '''

    这是视图函数index的doc信息

    :param requset:

    :return:

    '''

    print('@'*120)

    print('这是app01里面的index函数')

    # print(requset.s9)

    # raise ValueError('hehe,抛异常')

    # return HttpResponse('OK')

    rep = HttpResponse('OK')

    collect_logger.info('这是collect_logger日志')

    collect_logger.info('hello:collect')

    # def render():

    #     return HttpResponse('不常用')

    #

    # rep.render = render

    return rep
views
二、静态文件配置
settings.py
STATIC_URL = '/static/'

STATICFILES_DIRS = [

    os.path.join(BASE_DIR,'static')

]
项目/static
/plugins/sweetalert # 插件
下载 dist css js 引入
https://github.com/lipis/bootstrap-sweetalert
https://lipis.github.io/bootstrap-sweetalert/

/bootstrap-3.3.7/css. fonts. js. # 下载
js ... # 下载
css ...
使用:
<script src="/static/jquery-3.2.1.min.js"></script>

<script src="/static/init_ajax.js"></script>

<script src="/static/bootstrap-3.3.7/js/bootstrap.min.js"></script>

<script src="/static/plugins/sweetalert/sweetalert.min.js"></script>

<script type="text/javascript">

    //给删除按钮绑定事件

    $('.delete').click(function () {

        var id = $(this).parent().prev().prev().text();

        var $currentTr = $(this).parent().parent();

            swal({

              title: "确定要删除吗? ",

              text: "删了就找不回来了",

              type: "warning",

              showCancelButton: true,  // 显不显示取消按钮

              confirmButtonClass: "btn-danger",

              confirmButtonText: "是,就是删除",  //取消按钮上的文字

              closeOnConfirm: false

            },

            function(){

                $.ajax({

                        url:'/delete_publisher/',

                        type:'post',

                        data:{'publisher_id':id},

                        success:function (arg) {

                            var ret = JSON.parse(arg);

                            if(ret.status === 0){

                                $currentTr.remove();

                                swal("删除成功!", "你可以跑路了", "success");

                            }else{

                                swal(ret.msg, "你可以尝试在删一次", "error");

                            }

                        }

                });

            });

    });

</script>
三、mysql配置
settings.py
DATABASES = {

    'default': {

        'ENGINE': 'django.db.backends.mysql',

        'NAME': 'bms',

        'HOST':'127.0.0.1',

        'PORT':3306,

        'USER':'root',

        'PASSWORD':'',

    }

}
在项目bms  __init__ 下设置
import pymysql
pymysql.install_as_MySQLdb()
python manage.py makemigrations
python manage.py migrate
四、ajax post (csrf-token)请求前配置
项目/static/init_ajax.js
// 从cooikie 取 csft token 的值

function getCookie(name) {

    var cookieValue = null;

    if (document.cookie && document.cookie !== '') {

        var cookies = document.cookie.split(';');

        for (var i = 0; i < cookies.length; i++) {

            var cookie = jQuery.trim(cookies[i]);

            // Does this cookie string begin with the name we want?

            if (cookie.substring(0, name.length + 1) === (name + '=')) {

                cookieValue = decodeURIComponent(cookie.substring(name.length + 1));

                break;

            }

        }

    }

    return cookieValue;

}

var csrftoken = getCookie('csrftoken');

// 将csrftoken 设置到ajax 请求头中,后续的ajax请求就会自动携带这个csrf token

function csrfSafeMethod(method) {

  // these HTTP methods do not require CSRF protection

  return (/^(GET|HEAD|OPTIONS|TRACE)$/.test(method));

}

$.ajaxSetup({

  beforeSend: function (xhr, settings) {

    if (!csrfSafeMethod(settings.type) && !this.crossDomain) {

      xhr.setRequestHeader("X-CSRFToken", csrftoken);

    }

  }

});
<script src="/static/jquery-3.2.1.min.js"></script>
<script src="/static/init_ajax.js"></script>
五、事务
import os

if __name__ == '__main__':

    os.environ.setdefault("DJANGO_SETTINGS_MODULE", "BMS.settings")

    import django

    django.setup()

    import datetime

    from app01 import models

    try:

        from django.db import transaction

        with transaction.atomic():

            new_publisher = models.Publisher.objects.create(name="火星出版社")

            models.Book.objects.create(title="橘子物语", publish_date=datetime.date.today(), publisher_id=10)  # 指定一个不存在的出版社id

    except Exception as e:

        print(str(e))
六、Django终端打印SQL语句
settings.py
LOGGING = {

    'version': 1,

    'disable_existing_loggers': False,

    'handlers': {

        'console':{

            'level':'DEBUG',

            'class':'logging.StreamHandler',

        },

    },

    'loggers': {

        'django.db.backends': {

            'handlers': ['console'],

            'propagate': True,

            'level':'DEBUG',

        },

    }

}
七、在Python脚本中调用Django环境
项目/myscript.py
import os

if __name__ == '__main__':

    os.environ.setdefault("DJANGO_SETTINGS_MODULE", "BMS.settings")

    import django

    django.setup()

    from app01 import models

    books = models.Book.objects.all()

    print(books)
测试数据,批量插入数据:
myscript.py
# -*- coding:utf-8 -*-

import os

if __name__ == '__main__':

    os.environ.setdefault("DJANGO_SETTINGS_MODULE", "BMS.settings")

    import django

    django.setup()

    # 创建300个出版社

    from app01 import models

    # Publisher.objects.create(name='水星第{}出版社'.format(i))

    # obj = Publisher(name='火星出版社')

    # obj.save()

    # ret = []

    # for i in range(300):

    #     obj = Publisher(name='水星第{}出版社'.format(i))

    #     ret.append(obj)

    # ret = [models.Publisher(name='水星第{}出版社'.format(i)) for i in range(300)]

    # 批量创建300个出版社对象

    # models.Publisher.objects.bulk_create(ret)  # 只提交一次

    # 创建300本书

    import random

    ret = [models.Book(title='番茄物语{}'.format(i),price=random.randint(10, 90),publisher_id=1) for i in range(300)]

    models.Book.objects.bulk_create(ret)
八、自定义分页组件
项目/utils/mypage.py
'''
自定义分页组件 '''
class Pagination(object): def __init__(self, data_num, current_page,url_prefix, per_page = 10, max_show = 11):
"""
进行初始化
:param data_num: 数据总数
:param current_page: 当前页
:param url_prefix: 生成得页码得链接前缀
:param per_page: 每页显示多少条数据
:param max_show: 页面最多显示多少个页码
"""
self.data_num = data_num
self.per_page = per_page
self.max_show = max_show
self.url_prefix = url_prefix # 把页码数算出来
self.page_num, more = divmod(self.data_num, self.per_page)
if more:
self.page_num += 1 try:
current_page = int(current_page)
except Exception as e:
current_page = 1
if current_page <= 0: # 如果页面数是 负数
current_page = 1
elif current_page > self.page_num: # 如果页面 大于 总页面
current_page = self.page_num
self.current_page = current_page # 页码数得一半
self.half_show = self.max_show // 2 if self.current_page - self.half_show <= 1:
self.page_start = 1
self.page_end = self.max_show
elif self.current_page + self.half_show >= self.page_num: # 如果右边 越界了
self.page_start = self.page_num - self.max_show + 1
self.page_end = self.page_num
else:
self.page_start = self.current_page - self.half_show
self.page_end = self.current_page + self.half_show @property
def start(self):
return (self.current_page-1) * self.per_page # 数据从哪开始切 @property
def end(self):
return self.current_page * self.per_page # 数据切到哪 def page_html(self):
# 生成页码
li = []
# 加一个首页
li.append('<li><a href="{}?page=1">首页</a></li>'.format(self.url_prefix))
# 加一个上一页
if self.current_page == 1:
li.append(
'<li class="disabled"><a href="#"><span aria-hidden="true">«</span></a></li>')
else:
li.append('<li><a href="{0}?page={1}"><span aria-hidden="true">«</span></a></li>'.format(
self.url_prefix,self.current_page - 1))
for i in range(self.page_start, self.page_end + 1):
if i == self.current_page:
tmp = '<li class="active"><a href="{0}?page={1}">{1}</a></li>'.format(self.url_prefix,i)
else:
tmp = '<li><a href="{0}?page={1}">{1}</a></li>'.format(self.url_prefix,i)
li.append(tmp)
# 加一个下一页
if self.current_page == self.page_num:
li.append(
'<li class="disabled"><a href="#"><span aria-hidden="true">»</span></a></li>')
else:
li.append('<li><a href="{0}?page={1}"><span aria-hidden="true">»</span></a></li>'.format(self.url_prefix,
self.current_page + 1))
li.append('<li><a href="{0}?page={1}">尾页</a></li>'.format(self.url_prefix,self.page_num)) return "".join(li)

views.py
def publisher_list(request):

    data = Publisher.objects.all()

    data_num = data.count()  # 数据得总数

    current_page = request.GET.get('page', 1)

    from utils import mypage

    obj = mypage.Pagination(data_num,current_page,request.path)

    publisher_list = data[obj.start:obj.end]

    page_html = obj.page_html()

    return render(

        request,

        'publisher_list.html',

        {'publisher_list': publisher_list,'page_html':page_html}

    )
publisher_list.html
<!DOCTYPE html>

<html lang="en">

<head>

    <meta charset="UTF-8">

    <title>publisher_list</title>

    <link rel="stylesheet" href="/static/bootstrap-3.3.7/css/bootstrap.min.css">

    <link rel="stylesheet" href="/static/plugins/sweetalert/sweetalert.css">

    <style type="text/css">

        .sweet-alert h2{padding-top: 20px;}

    </style>

</head>

<body>

<a href="/logout">注销</a>

<div class="container">

    <table class="table table-bordered">

        <thead>

        <tr>

            <th>#</th>

            <th>ID</th>

            <th>出版社名称</th>

            <th>操作</th>

        </tr>

        </thead>

        <tbody>

        {% for publisher in publisher_list %}

            <tr>

                <td>{{ forloop.counter }}</td>

                <td>{{ publisher.id }}</td>

                <td>{{ publisher.name }}</td>

                <td>

                    {#  https://github.com/lipis/bootstrap-sweetalert        #}

                    <button class="btn btn-danger delete">删除</button>

                </td>

            </tr>

        {% endfor %}

        </tbody>

    </table>

    <nav aria-label="...">

        <ul class="pagination">

            {{ page_html|safe }}

         </ul>

    </nav>

</div>

<script src="/static/jquery-3.2.1.min.js"></script>

<script src="/static/init_ajax.js"></script>

<script src="/static/bootstrap-3.3.7/js/bootstrap.min.js"></script>

<script src="/static/plugins/sweetalert/sweetalert.min.js"></script>

<script type="text/javascript">

    //给删除按钮绑定事件

    $('.delete').click(function () {

        var id = $(this).parent().prev().prev().text();

        var $currentTr = $(this).parent().parent();

            swal({

              title: "确定要删除吗? ",

              text: "删了就找不回来了",

              type: "warning",

              showCancelButton: true,  // 显不显示取消按钮

              confirmButtonClass: "btn-danger",

              confirmButtonText: "是,就是删除",  //取消按钮上的文字

              closeOnConfirm: false

            },

            function(){

                $.ajax({

                        url:'/delete_publisher/',

                        type:'post',

                        data:{'publisher_id':id},

                        success:function (arg) {

                            var ret = JSON.parse(arg);

                            if(ret.status === 0){

                                $currentTr.remove();

                                swal("删除成功!", "你可以跑路了", "success");

                            }else{

                                swal(ret.msg, "你可以尝试在删一次", "error");

                            }

                        }

                });

            });

    });

</script>

</body>

</html>
九、django分页组件(CBV)

re_path(r'^book_list/',views.BookList.as_view(),name="book_list"),
# 类视图 要调用as_view()
 # 以ip和端口后面什么都没有,就能匹配上url
 re_path(r'^$',views.publisher_list),
views.py
# 使用django 内置得分页

from django.core.paginator import Paginator,EmptyPage,PageNotAnInteger

class BookList(View):

    @method_decorator(check_login)

    def get(self,request):

        current_page = request.GET.get('page',1)

        data = Book.objects.all()

        # 用内置得分页类 得到一个分页对象

        page_obj = Paginator(data,10)

        try:

            # 尝试去取 current_page

            ret = page_obj.page(current_page)

        except PageNotAnInteger:

            ret = page_obj.page(1)  # 返回第一页

        except EmptyPage:

            ret = page_obj.page(page_obj.num_pages)  # 返回最后一页

        return render(request,'book_list2.html',{'book_list':ret,})
book_list2.html
<!DOCTYPE html>

<html lang="en">

<head>

    <meta charset="UTF-8">

    <title>book_list</title>

    <link rel="stylesheet" href="/static/bootstrap-3.3.7/css/bootstrap.min.css">

</head>

<body>

<h1>这是书籍列表页</h1>

<a href="/logout">注销</a>

<div class="container">

    <table class="table table-bordered">

        <thead>

        <tr>

            <th>#</th>

            <th>ID</th>

            <th>书籍名称</th>

        </tr>

        </thead>

        <tbody>

        {% for book in book_list %}

            <tr>

                <td>{{ forloop.counter }}</td>

                <td>{{ book.id }}</td>

                <td>{{ book.title }}</td>

            </tr>

        {% endfor %}

        </tbody>

    </table>

    <nav aria-label="...">

        <ul class="pagination">

            {% if book_list.has_previous %}

                <li><a href="/book_list?page={{ book_list.previous_page_number }}">«</a></li>

            {% else %}

                 <li class="disabled"><a href="#">«</a></li>

            {% endif %}

            <li class="active"><a href="/book_list?page={{ book_list.number }}">{{ book_list.number }}</a></li>

            {% if book_list.has_next %}

                <li><a href="/book_list?page={{ book_list.next_page_number}}">»</a></li>

            {% else %}

                 <li class="disabled"><a href="#">»</a></li>

            {% endif %}

         </ul>

    </nav>

</div>

<script src="/static/jquery-3.2.1.min.js"></script>

<script src="/static/bootstrap-3.3.7/js/bootstrap.min.js"></script>

</body>

</html>
十、django缓存 - redis
http://www.cnblogs.com/wupeiqi/articles/5246483.html
由于Django是动态网站,所有每次请求均会去数据进行相应的操作,当程序访问量大时,耗时必然会更加明显,最简单解决方式是使用:缓存,缓存将一个某个views的返回值保存至内存或者memcache中,5分钟内再有人来访问时,则不再去执行view中的操作,而是直接从内存或者Redis中之前缓存的内容拿到,并返回。
Django中提供了6种缓存方式:
- 开发调试
- 内存
- 文件
- 数据库
- Memcache缓存(python-memcached模块)
- Memcache缓存(pylibmc模块)
1、配置
a、开发调试

    # 此为开始调试用,实际内部不做任何操作

    # 配置:

        CACHES = {

            'default': {

                'BACKEND': 'django.core.cache.backends.dummy.DummyCache',     # 引擎

                'TIMEOUT': 300,                                               # 缓存超时时间(默认300,None表示永不过期,0表示立即过期)

                'OPTIONS':{

                    'MAX_ENTRIES': 300,                                       # 最大缓存个数(默认300)

                    'CULL_FREQUENCY': 3,                                      # 缓存到达最大个数之后,剔除缓存个数的比例,即:1/CULL_FREQUENCY(默认3)

                },

                'KEY_PREFIX': '',                                             # 缓存key的前缀(默认空)

                'VERSION': 1,                                                 # 缓存key的版本(默认1)

                'KEY_FUNCTION' 函数名                                          # 生成key的函数(默认函数会生成为:【前缀:版本:key】)

            }

        }

    # 自定义key

    def default_key_func(key, key_prefix, version):

        """

        Default function to generate keys.

        Constructs the key used by all other methods. By default it prepends

        the `key_prefix'. KEY_FUNCTION can be used to specify an alternate

        function with custom key making behavior.

        """

        return '%s:%s:%s' % (key_prefix, version, key)

    def get_key_func(key_func):

        """

        Function to decide which key function to use.

        Defaults to ``default_key_func``.

        """

        if key_func is not None:

            if callable(key_func):

                return key_func

            else:

                return import_string(key_func)

        return default_key_func
b、内存
    # 此缓存将内容保存至内存的变量中

    # 配置:

        CACHES = {

            'default': {

                'BACKEND': 'django.core.cache.backends.locmem.LocMemCache',

                'LOCATION': 'unique-snowflake',

            }

        }

    # 注:其他配置同开发调试版本
c、文件
    # 此缓存将内容保存至文件

    # 配置:

        CACHES = {

            'default': {

                'BACKEND': 'django.core.cache.backends.filebased.FileBasedCache',

                'LOCATION': '/var/tmp/django_cache',

            }

        }

    # 注:其他配置同开发调试版本
d、数据库
    # 此缓存将内容保存至数据库

    # 配置:

        CACHES = {

            'default': {

                'BACKEND': 'django.core.cache.backends.db.DatabaseCache',

                'LOCATION': 'my_cache_table', # 数据库表

            }

        }

    # 注:执行创建表命令 python manage.py createcachetable
e、Memcache缓存(python-memcached模块)
# 此缓存使用python-memcached模块连接memcache

    CACHES = {

        'default': {

            'BACKEND': 'django.core.cache.backends.memcached.MemcachedCache',

            'LOCATION': '127.0.0.1:11211',

        }

    }

    CACHES = {

        'default': {

            'BACKEND': 'django.core.cache.backends.memcached.MemcachedCache',

            'LOCATION': 'unix:/tmp/memcached.sock',

        }

    }

    CACHES = {

        'default': {

            'BACKEND': 'django.core.cache.backends.memcached.MemcachedCache',

            'LOCATION': [

                '172.19.26.240:11211',

                '172.19.26.242:11211',

            ]

        }

    }
f、Memcache缓存(pylibmc模块)
    # 此缓存使用pylibmc模块连接memcache

    CACHES = {

        'default': {

            'BACKEND': 'django.core.cache.backends.memcached.PyLibMCCache',

            'LOCATION': '127.0.0.1:11211',

        }

    }

    CACHES = {

        'default': {

            'BACKEND': 'django.core.cache.backends.memcached.PyLibMCCache',

            'LOCATION': '/tmp/memcached.sock',

        }

    }

    CACHES = {

        'default': {

            'BACKEND': 'django.core.cache.backends.memcached.PyLibMCCache',

            'LOCATION': [

                '172.19.26.240:11211',

                '172.19.26.242:11211',

            ]

        }

    }
g. Redis缓存(依赖:pip3 install django-redis)
CACHES = {

    "default": {

        "BACKEND": "django_redis.cache.RedisCache",

        "LOCATION": "redis://127.0.0.1:6379",

        "OPTIONS": {

            "CLIENT_CLASS": "django_redis.client.DefaultClient",

            "CONNECTION_POOL_KWARGS": {"max_connections": 100}

            # "PASSWORD": "密码",

        }

    }

}
from django_redis import get_redis_connection

conn = get_redis_connection("default")
2、应用
a. 全站使用
   使用中间件,经过一系列的认证等操作,如果内容在缓存中存在,则使用FetchFromCacheMiddleware获取内容并返回给用户,当返回给用户之前,判断缓存中是否已经存在,如果不存在则UpdateCacheMiddleware会将缓存保存至缓存,从而实现全站缓存

    MIDDLEWARE = [

        'django.middleware.cache.UpdateCacheMiddleware',

        # 其他中间件...

        'django.middleware.cache.FetchFromCacheMiddleware',

    ]

    CACHE_MIDDLEWARE_ALIAS = ""

    CACHE_MIDDLEWARE_SECONDS = ""

    CACHE_MIDDLEWARE_KEY_PREFIX = ""
b. 单独视图缓存
    方式一:

        from django.views.decorators.cache import cache_page

        @cache_page(60 * 15)

        def my_view(request):

            ...

    方式二:

        from django.views.decorators.cache import cache_page

        urlpatterns = [

            url(r'^foo/([0-9]{1,2})/$', cache_page(60 * 15)(my_view)),

        ]
c、局部视图使用
    a. 引入TemplateTag

        {% load cache %}

    b. 使用缓存

        {% cache 5000 缓存key %}

            缓存内容

        {% endcache %}
更多:猛击这里
django缓存配置
由于Django是动态网站,所有每次请求均会去数据进行相应的操作,当程序访问量大时,耗时必然会更加明显,最简单解决方式是使用:缓存,缓存将一个某个views的返回值保存至内存或者memcache中,5分钟内再有人来访问时,则不再去执行view中的操作,而是直接从内存或者Redis中之前缓存的内容拿到,并返回。
Django中提供了6种缓存方式:
- 开发调试
- 内存
- 文件
- 数据库
- Memcache缓存(python-memcached模块)
- Memcache缓存(pylibmc模块)
通用配置
'TIMEOUT': 300,                                               # 缓存超时时间(默认300,None表示永不过期,0表示立即过期)

                'OPTIONS':{

                    'MAX_ENTRIES': 300,                                       # 最大缓存个数(默认300)

                    'CULL_FREQUENCY': 3,                                      # 缓存到达最大个数之后,剔除缓存个数的比例,即:1/CULL_FREQUENCY(默认3)

                },

                'KEY_PREFIX': '',                                             # 缓存key的前缀(默认空)

                'VERSION': 1,                                                 # 缓存key的版本(默认1)

                'KEY_FUNCTION' 函数名                                          # 生成key的函数(默认函数会生成为:【前缀:版本:key】)
以上六中模式都可以使用
自定义key
 def default_key_func(key, key_prefix, version):

        """

        Default function to generate keys.

        Constructs the key used by all other methods. By default it prepends

        the `key_prefix'. KEY_FUNCTION can be used to specify an alternate

        function with custom key making behavior.

        """

        return '%s:%s:%s' % (key_prefix, version, key)

    def get_key_func(key_func):

        """

        Function to decide which key function to use.

        Defaults to ``default_key_func``.

        """

        if key_func is not None:

            if callable(key_func):

                return key_func

            else:

                return import_string(key_func)

        return default_key_func
开发调试
    # 此为开始调试用,实际内部不做任何操作

    # 配置:

        CACHES = {

            'default': {

                'BACKEND': 'django.core.cache.backends.dummy.DummyCache',     # 引擎

              通用配置

            }

        }
内存
    # 此缓存将内容保存至内存的变量中

    # 配置:

        CACHES = {

            'default': {

                'BACKEND': 'django.core.cache.backends.locmem.LocMemCache',

                'LOCATION': 'unique-snowflake',

              通用配置

            }

        }

    # 注:其他配置同开发调试版本
文件
    # 此缓存将内容保存至文件

    # 配置:

        CACHES = {

            'default': {

                'BACKEND': 'django.core.cache.backends.filebased.FileBasedCache',

                'LOCATION': '/var/tmp/django_cache',

                 通用配置

            }

        }

    # 注:其他配置同开发调试版本
数据库
 # 此缓存将内容保存至数据库

    # 配置:

        CACHES = {

            'default': {

                'BACKEND': 'django.core.cache.backends.db.DatabaseCache',

                'LOCATION': 'my_cache_table', # 数据库表

              通用配置

            }

        }

    # 注:执行创建表命令 python manage.py createcachetable
Memcache缓存(python-memcached模块)
# 此缓存使用python-memcached模块连接memcache

    CACHES = {

        'default': {

            'BACKEND': 'django.core.cache.backends.memcached.MemcachedCache',

            'LOCATION': '127.0.0.1:11211',

        }

    }

    CACHES = {

        'default': {

            'BACKEND': 'django.core.cache.backends.memcached.MemcachedCache',

            'LOCATION': 'unix:/tmp/memcached.sock',

        }

    }

    CACHES = {

        'default': {

            'BACKEND': 'django.core.cache.backends.memcached.MemcachedCache',

            'LOCATION': [

                '172.19.26.240:11211',

                '172.19.26.242:11211',

            ]

        }

    }
Memcache缓存(pylibmc模块)
 # 此缓存使用pylibmc模块连接memcache

    CACHES = {

        'default': {

            'BACKEND': 'django.core.cache.backends.memcached.PyLibMCCache',

            'LOCATION': '127.0.0.1:11211',

        }

    }

    CACHES = {

        'default': {

            'BACKEND': 'django.core.cache.backends.memcached.PyLibMCCache',

            'LOCATION': '/tmp/memcached.sock',

        }

    }

    CACHES = {

        'default': {

            'BACKEND': 'django.core.cache.backends.memcached.PyLibMCCache',

            'LOCATION': [

                '172.19.26.240:11211',

                '172.19.26.242:11211',

            ]

        }

    }
缓存的应用
单独视图缓存
from django.views.decorators.cache import cache_page

@cache_page(60 * 15)

def my_view(request):

            ...
即通过装饰器的方式实现,导入模块之后,在需要缓存的函数前加@cache_page(60 * 15) 60*15表示缓存时间是15分钟
例子如下:
from django.views.decorators.cache import cache_page

@cache_page(10)

def cache(request):

    import time

    ctime = time.time()

    return  render(request,"cache.html",{"ctime":ctime})
前端页面如下:
<!DOCTYPE html>

<html lang="en">

<head>

    <meta charset="UTF-8">

    <title>Title</title>

</head>

<body>

    <h1>{{ ctime }}</h1>

    <h1>{{ ctime }}</h1>

    <h1>{{ ctime }}</h1>

</body>

</html>
这样在前端页面在获取的ctime的时候就会被缓存10秒钟,10秒钟之后才会变化,但是这样的话就相当月所有的调用ctime的地方都被缓存了
局部缓存
引入TemplateTag

{% load cache %}

使用缓存

{% cache 5000 缓存key %}

缓存内容

{% endcache %}
更改前端代码如下:
{% load cache %}

<!DOCTYPE html>

<html lang="en">

<head>

    <meta charset="UTF-8">

    <title>Title</title>

</head>

<body>

    <h1>{{ ctime }}</h1>

    <h1>{{ ctime }}</h1>

    {% cache 10 c1 %}

    <h1>{{ ctime }}</h1>

    {% endcache %}

</body>

</html>
这样就实现了最后一个ctime缓存,其他两个不缓存
全站缓存
全站缓存的时候,需要在中间件的最上面添加:
'django.middleware.cache.UpdateCacheMiddleware',
在中间件的最下面添加:
'django.middleware.cache.FetchFromCacheMiddleware',
其中'django.middleware.cache.UpdateCacheMiddleware'里面只有process_response方法,在'django.middleware.cache.FetchFromCacheMiddleware'中只有process_request方法,所以最开始是直接跳过UpdateCacheMiddleware,然后从第一个到最后一个中间件的resquest,第一次没有缓存座椅匹配urls路由关系依次进过中间件的process_view,到达views函数,再经过process_exception最后经过response,到达FetchFromCacheMiddleware
使用中间件,经过一系列的认证等操作,如果内容在缓存中存在,则使用FetchFromCacheMiddleware获取内容并返回给用户,当返回给用户之前,判断缓存中是否已经存在,如果不存在则UpdateCacheMiddleware会将缓存保存至缓存,从而实现全站缓存
MIDDLEWARE = [ 'django.middleware.cache.UpdateCacheMiddleware',#放到第一个中间件位置 # 其他中间件... 'django.middleware.cache.FetchFromCacheMiddleware',#放到最后一个 ] CACHE_MIDDLEWARE_ALIAS = "" CACHE_MIDDLEWARE_SECONDS = "" # 可设置缓存时间 CACHE_MIDDLEWARE_KEY_PREFIX = ""Django - 常用配置的更多相关文章
- 最全的Django入门及常用配置
Django 常用配置 Django 安装 pipx install django x 为python解释器版本2 or 3 如果你想安装指定版本的django,使用pip install djang ...
- django->基本操作和新建项目常用配置
一.安装django pip install django==2.1.5 -U #安装django/升级最新版本 二.创建.启动django项目 django-admin startproject m ...
- Django常用命令及参数配置(Django 1.8.6)
常用命令 #新建Django项目 django-admin startproject mysite(项目名) #新建一个APP cd mysite python manager.py startapp ...
- Django - 日志工作中常用配置
工作中常用配置 # 日志配置 BASE_LOG_DIR = os.path.join(BASE_DIR, "log") LOGGING = { 'version': 1, # 保留 ...
- Django笔记&教程 1-2 二 常用配置
Django 自学笔记兼学习教程第1章第2节--二 常用配置 点击查看教程总目录 新手建议简单浏览本文,不理解的建议跳过,不要强行理解. Django的设置涉及多个模块,需要了解Django的一些相关 ...
- django-debug-toolbar和Django 日志配置
django-debug-toolbar介绍 django-debug-toolbar 是一组可配置的面板,可显示有关当前请求/响应的各种调试信息,并在单击时显示有关面板内容的更多详细信息. gith ...
- python 全栈开发,Day96(Django REST framework 视图,django logging配置,django-debug-toolbar使用指南)
昨日内容回顾 1. Serializer(序列化) 1. ORM对应的query_set和ORM对象转换成JSON格式的数据 1. 在序列化类中定义自定义的字段:SerializerMethodFie ...
- Pycharm常用配置
Pycharm常用配置 pycharm中的设置是可以导入和导出的,file>export settings 可以保存当前pycharm中的设置为jar文件,重装时可以直接import setti ...
- 12: nginx原理及常用配置
1.1 nginx基本介绍 1.nginx高并发原理( 多进程+epoll实现高并发 ) 1. Nginx 在启动后,会有一个 master 进程和多个相互独立的 worker 进程. 2. 每个子进 ...
随机推荐
- sqlserver 字符串split
select value from TF_NJVALUES('3C457A2D-188B-4D99-A822-2968054E1FB8,3C457A2D-188B-4D99-A822-2968054E ...
- PL/SQL developer(绿色版)安装及配置
1.PL/SQL Developer下载地址:百度网盘: 2.tsname.ora配置: orcl = (DESCRIPTION = (ADDRESS_LIST = (ADDRESS )) ) (CO ...
- jquery-插入兄弟元素
1.after方法 在匹配元素集合中的每个元素的 后面 插入参数所指定的内容,作为其兄弟节点 参数类型说明: 1)普通字符串(可包含各种html标签) $('div').after('html字符串' ...
- hbase shell学习-2
一个学生成绩表的例子来演示hbase的用法. name grade course math english Tom 5 97 87 Jim 4 89 80 表的创建:语法:create '表名称',' ...
- git分支合并的冲突解决方法
本次学习的是解决不同分支提交的内容不同导致合并冲突,及怎样解决冲突. 基本命令: git log --graph查看分支合并图 具体步骤: 新建分支branch1,并修改rea ...
- error MSB8031
http://go.microsoft.com/fwlink/p/?LinkId=286820 下载
- ubuntu 执行make menuconfig ARCH=arm
1.ubuntu 执行make menuconfig ARCH=arm出错了!! *** Unable to find the ncurses libraries or the *** require ...
- 一、NHibernate配置所支持的属性
属性名 用途 dialect 设置NHibernate的Dialect类名 - 允许NHibernate针对特定的关系数据库生成优化的SQL 可用值: full.classname.of.Dialec ...
- Nginx 链接
Nginx反向代理以及负载均衡配置:http://www.cnblogs.com/Miss-mickey/p/6734831.html
- CH7-WEB开发(集成在一起)