CSS圆角进化论
CSS圆角发展过程
大致经历了3个阶段,包括:
- 背景图片实现圆角
- CSS2.0+标签模拟圆角
- CSS3.0圆角属性(border-radius属性)实现圆角
☛背景图片实现圆角:==使用背景图片实现圆角的方式很多,实现的方式和圆角的切图方式关系密切
实现方式有多种,主要讲解2种:
(一)宽度固定,高度自适应
实现关键点,4个块级标签构成
圆角矩形容器(box)—设置固定宽度,同圆角宽度
顶部圆角(radius-top)—使用背景图片实现顶部圆角
内容( content )—放置主体内容
底部圆角( radius-bottom )—使用背景图片实现顶部圆角
(二)宽度和高度均自适应
实现关键点,5个标签构成
圆角矩形容器(box)—1.上下内边距大小至少设置为圆角高度;2.相对定位;3.放置内容
4个圆角—4个标签,1.分别设置各个圆角背景图片;2.绝对定位于box的4个角
当然,实现的方法还有很多,比如滑动门方法、浮动定位法等
优势:无需过多无意义标签、能够实现个性化圆角
劣势:增加了HTTP请求和页面字节数
1.在以IE6和IE8占主流的今天,考虑到浏览器兼容性,CSS3.0方式设置圆角在Web应用中,暂且还没有得到完全普及
2.无需多余无意义标签,能够实现个性化的圆角,将设计师的设计完美的以代码实现,使得用背景图片实现圆角仍旧是实现圆角的主流方法
☛CSS2.0+标签模拟圆角: border属性+标签模拟:border属性实现圆角颜色,标签模拟圆角弧度,圆角像素越大,所需标签越多
1.所需模拟标签数=圆角像素
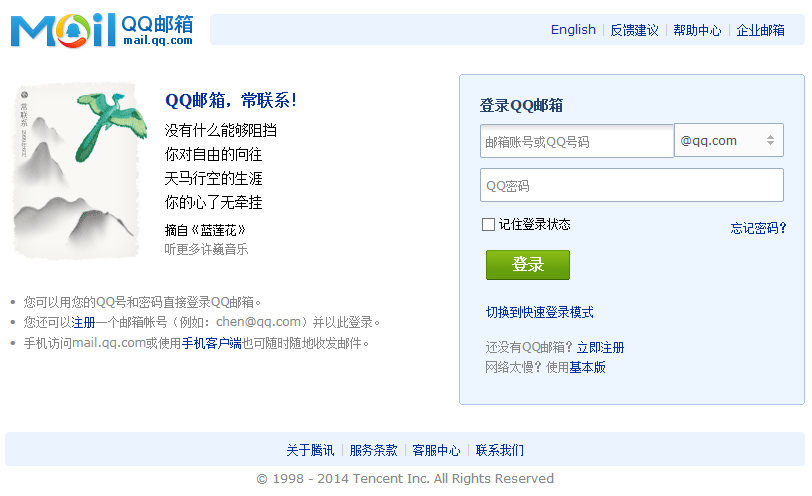
2.分析各像素圆角特点,讲解实现思路,再使用代码实现QQ邮箱登录页的登录圆角
优势:纯CSS代码,易于维护,体积小
劣势:圆角像素越大,无意义标签越多数,圆角越发呆板,只能实现纯色圆角,局限性大
☛CSS3.0圆角属性实现圆角: 圆角属性+边框属性实现圆角:border属性设置边框样式(颜色、粗细、样式),border-radius属性实现圆角
注意:使用css3.0实现圆角,各浏览器存在显示差异,需通过私有前缀解决:-ms-(IE)、-moz-(FF)、-webkit-(谷歌,safari),特别的,各浏览器对border-radius属性支持较好,不写私有前缀也能正常显示,但像线性渐变属性linear-gradient,就必须写私有前缀,否则就会出现显示差异
优势:专用CSS代码,易于维护,体积小,圆角自然圆滑,适合扁平化圆角实现
劣势:IE8及以下版本不支持CSS3.0,存在兼容性问题,对于个性化圆角实现上存在局限性
目前,CSS3.0已被广泛应用于移动APP应用,不考虑IE8及以下版本兼容问题,一些网站已经将圆角属性广应用到了Web端,案例中的腾讯登录框就使用了border-radius属性实现了圆角,但该圆角在IE8中显示不出来,而呈现为直角
实战项目案例:
效果图

<!DOCTYPE html PUBLIC "-//W3C//DTD XHTML 1.0 Transitional//EN" "http://www.w3.org/TR/xhtml1/DTD/xhtml1-transitional.dtd">

<html xmlns="http://www.w3.org/1999/xhtml">

<head>

<meta http-equiv="Content-Type" content="text/html; charset=utf-8" />

<title>登录QQ邮箱</title>

<link href="css/login.css" type="text/css" rel="stylesheet" />

</head>

<body>

<div id="wrap">

  <div id="header">

          <h1></h1>

          <div class="topnav">

               <div class="top_radius"></div>

               <div class="content txt_align_r">
          <p class="margin_r_10">
            <a href="#">English</a>|<a href="#">反馈建议</a>|<a href="#">帮助中心</a>|<a href="#">企业邮箱</a>
          </p>
         </div>

               <div class="btm_radius"></div>

          </div>

     </div>

     <div id="mainbody">

          <div class="left"><img src="data:images/left_cont.gif" width="383" height="290" /></div>

          <div class="right">

               <div class="radius_border_1"></div>

               <div class="radius_border_2"></div>

               <div class="loginbox">

                 <h2>登录QQ邮箱</h2>

                 <ul>

                    <li>
              <input type="text" value="邮箱账号或QQ号码" class="account" />
              <input type="button" value="@qq.com" class="mail_btn" /></li>

                    <li>
              <input type="text" value="QQ密码" />
            </li>

                 </ul>

               <img src="data:images/login_txt.gif" width="312" height="171" /></div>

               <div class="radius_border_2"></div>

               <div class="radius_border_1"></div>

          </div>

     </div>

     <div id="footer">

          <div class="content txt_align_c">

          <span class="l_top_radius"></span>

          <span class="r_top_radius"></span>

          <span class="l_btm_radius"></span>

          <span class="r_btm_radius"></span>

          <p class="line-height_24"><a href="#">关于腾讯</a>|<a href="#">服务条款</a>|<a href="#">客服中心</a>|<a href="#">联系我们</a></p>

          </div>

          <p class="txt_align_c">© 1998 - 2014 Tencent Inc. All Rights Reserved</p>

     </div>

</div>

</body>

</html>
@charset "utf-8";

/* common style */

*{margin:; padding:; font-size:12px; font-family:Verdana, Geneva, sans-serif,"宋体"; list-style:none;}

a{text-decoration:none; color:#04309b;}

a:hover{text-decoration:underline;}

.txt_align_c{text-align:center;}

.txt_align_r{text-align:right;}

.margin_r_10{margin-right:10px;}

.line-height_24{line-height:24px;}

#wrap{width:800px; margin:40px auto;}

#header,#mainbody,#footer{width:100%; overflow:hidden;}

#header h1{background:url(../images/logo.gif) no-repeat; height:43px; width:200px; float:left;}

/*背景图像实现固定宽度圆角*/

.topnav{float:right; width:595px; margin-top:5px;}

.top_radius{width:100%; overflow:hidden; background:url(../images/t_radius_595.gif) no-repeat; height:3px;}

.btm_radius{width:100%; overflow:hidden; background:url(../images/b_radius_595.gif) no-repeat; height:3px;}

.content{background:#ebf3ff; padding:5px; position:relative;}

.content p{color:#d0ccda;}

.content p a{margin:0 5px;}

/*背景图像实现宽度、高度自适应圆角*/

.l_top_radius,.r_top_radius,.l_btm_radius,.r_btm_radius{width:4px; height:3px; position:absolute;}

.l_top_radius{background:url(../images/l_top_radius.gif) no-repeat; left:; top:;}

.r_top_radius{background:url(../images/r_top_radius.gif) no-repeat; right:; top:;}

.l_btm_radius{background:url(../images/l_btm_radius.gif) no-repeat; left:; bottom:;}

.r_btm_radius{background:url(../images/r_btm_radius.gif) no-repeat; right:; bottom:;}

#mainbody{margin-top:22px;}

.left{float:left;}

/*CSS2.0+标签实现圆角--登录模块外框*/

.right{float:right; width:346px;}

.radius_border_1{margin:0 2px; height:1px; background:#acc3e3;}

.radius_border_2{margin:0 1px; height:1px; background:#edf6ff; border-left:1px solid #acc3e3; border-right:1px solid #acc3e3;}

.loginbox{background:#edf6ff; border-left:1px solid #acc3e3; border-right:1px solid #acc3e3; padding:20px;}

.loginbox h2{color:#28456f; font-size:14px;}

.loginbox ul{margin-top:10px;}

.loginbox li{margin-bottom:10px;}

/*CSS3.0圆角属性实现表单元素圆角*/

.loginbox li input{border:1px solid #9dadc6; border-radius:2px; height:32px; padding:0 5px; color:#888; width:292px;}

.loginbox li input.account{width:182px; border-right:1px solid #d5deed;
border-top-right-radius:; border-bottom-right-radius:;
background:-moz-linear-gradient( top,#ddd 0%,#eee 10%,#fff 20%);
background:-webkit-linear-gradient( top,#ddd 0%,#eee 10%,#fff 20%);
background:-ms-linear-gradient( top,#ddd 0%,#eee 10%,#fff 20%);}

.loginbox li input.mail_btn{
  width:110px;
  height:34px;
  border-top-left-radius:;
  border-bottom-left-radius:;
  background:url(../images/select.gif) 90px center no-repeat #fbfbfb;
  color:#504c4d;
  text-align:left;
  cursor:pointer;
}

#footer{margin-top:27px;}

#footer p{line-height:24px; color:#888;}

#footer .content p{color:#d0ccda;}
来源于:http://www.imooc.com/learn/118
CSS圆角进化论的更多相关文章
- DIV+CSS圆角边框
简洁型css圆角: 方法1: 简洁型css圆角矩形 code1: <style type="text/css"> .b1,.b2,.b3,.b4,.b1b,.b2b,. ...
- css圆角矩形及去掉空格属性
css圆角矩形 -webkit-border-radius:5px; -moz-border-radius:5px; border-radius:5px; 去掉空格 white-space:nowra ...
- 大神写的一个纯CSS圆角框,膜拜!(支持IE9一下的低版本)
留着提醒自己,底层才是最重要的,不要一直傻瓜的编程下去! <!DOCTYPE html PUBLIC "-//W3C//DTD XHTML 1.0 Transitional//EN&q ...
- CSS圆角效果
看了院子里一篇关于CSS圆角技巧的文章,试了一下,觉得很好,贴出练习的代码.优秀文章链接: http://www.cnblogs.com/luluping/archive/2010/06/26/176 ...
- CSS圆角样式
CSS圆角: /*纯css,设置图片圆角*/ #top2 { margin-left:20px; padding:10px; width:600px; height:300px; border: 5p ...
- 兼容性很好的纯css圆角
<!DOCTYPE HTML> <html lang="en-US"> <head> <meta charset="UTF-8& ...
- CSS圆角框,圆角提示框
<!DOCTYPE html PUBLIC "-//W3C//DTD XHTML 1.0 Transitional//EN" "http://www.w3.org/ ...
- CSS 圆角框
转载请注明来源:https://www.cnblogs.com/hookjc/ 其实这种圆角框是靠一个个容器堆砌而成的,每一个容器的宽度不同,这个宽度是由margin外边距来实现的,如:margin: ...
- css圆角边框
一.CSS3圆角的优点 传统的圆角生成方案,必须使用多张图片作为背景图案.CSS3的出现,使得我们再也不必浪费时间去制作这些图片了,而且还有其他多个优点: * 减少维护的工作量.图片文件的生成.更新. ...
随机推荐
- 生成短链接的URL
假设你想做一个像微博短链接那样的短链接服务,短链接服务生成的URL都非常短例如: http://t.cn/E70Piib, 我们应该都能想到链接中的E70Piib对应的就是存储长链接地址的数据记录的I ...
- Linux df 与du用法
df 查看一级目录的大小,但是不能查看文件的大小.du 可以查看目录或者文件大小. 1 df的基本用法 df命令可以显示目前所有文件系统的总空间及当前可用空间,用法如下: -a 全部文件系统列表-h ...
- Azure系列1.1.2 —— 用于 IntelliJ 的 Azure 工具包的登录说明
(文中大部分内容(95%)Azure官网上有,我只是把我自己实际操作中遇到的问题在这里阐述一下.) 先决条件 若要完成文章中的步骤,需要安装用于 IntelliJ 的 Azure 工具包,该工具包需要 ...
- CMake--List用法
list(LENGTH <list><output variable>) list(GET <list> <elementindex> [<ele ...
- Flutter之Container详解
1 基本内容1.1 继续关系Object > Diagnosticable > DiagnosticableTree > Widget > StatelessWidget &g ...
- 非关系型数据库----MongoDB
一.什么是MongoDB? MongoDB 是由C++语言编写的,是一个基于分布式文件存储的开源数据库系统. 在高负载的情况下,添加更多的节点,可以保证服务器性能. MongoDB 旨在为WEB应用提 ...
- java学习之—链表(1)
/** * 单链表操作 * Create by Administrator * 2018/6/14 0014 * 下午 2:05 **/ public class Link { public int ...
- WPF设置软件界面背景为MediaElement并播放视频
在我们的常见的软件界面设计中我们经常会设置软件的背景为SolidColorBrush或者LinerColorBrush.RadialGradientBrush 等一系列的颜色画刷为背景,有时我们也会使 ...
- 个人用的感觉比较舒服的 idea 插件,不定时更新
1.mybatis plugin 用的最舒服的 idea 上的 plugin 之一,快速跳转 dao 的映射的 xml 文件,生成配置文件.语法提示等 不过这个收费,,具体步骤百度吧 2.Rainbo ...
- LODOP设置判断后执行哪个
LODOP的语句是普通的语句,可以通过JS判断确定要执行哪个,或通过循环循环执行一些语句.如果需要执行某些打印项在哪些条件下不打印,不需要通过代码删除打印项,类似LODOP.SET_PRINT_STY ...
