CSS3基础入门03
CSS3 基础入门03
线性渐变
在
css3当中,通过渐变属性实现之前只能通过图片实现的渐变效果。渐变分为线性渐变和径向渐变以及重复渐变三种。线性渐变的模式主要是颜色从一个方向过渡到另外一个方向,而径向渐变则是以一个点为基点(圆心),以点向四周进行渐变。渐变形状为一个圆,重复渐变则分为重复线性渐变和重复径向渐变,是对于前面两种渐变的一种重复模式。
语法:
linear-gradient:point| angle color percentage
point表示方向,angle表示角度。color表示颜色,一般分为起始颜色、过渡颜色和结束颜色。percentage表示百分比,一般表示颜色渐变过程中的百分比。
下面是一个简单的渐变效果的实现:
<!DOCTYPE html>

<html>

	<head>

		<meta charset="utf-8">

		<title>线性渐变</title>

		<style type="text/css">

			.box {

				width: 300px;

				height: 300px;

				background-image: linear-gradient(red,yellow);

			}

		</style>

	</head>

	<body>

		<div class="box"></div>

	</body>

</html>
通过上面的代码,我们可以实现颜色从red到yellow的一个渐变效果。但是需要注意的是,通过渐变设置颜色其实相当于设置了background-image也就是背景图片。当然也可以采用background简写属性来设置渐变。
在上面的代码中,颜色默认的渐变方向是
从上到下,这一点需要注意。
多个颜色的线性渐变:
我们也可以设置多个颜色的渐变,例如从红色到蓝色再到黄色,可以直接在linear-gradient属性值当中设置red blue 和yellow.
demo:
<!DOCTYPE html>

<html>

	<head>

		<meta charset="utf-8">

		<title>线性渐变</title>

		<style type="text/css">

			.box {

				width: 300px;

				height: 300px;

				background-image: linear-gradient(red,blue,yellow);

			}

		</style>

	</head>

	<body>

		<div class="box"></div>

	</body>

</html>
改变线性渐变方向:
我们可以通过在颜色值的前面添加方向关键词来调整颜色渐变的起始方向。
demo:
<!DOCTYPE html>

<html>

	<head>

		<meta charset="utf-8">

		<title>线性渐变</title>

		<style type="text/css">

			.box {

				width: 300px;

				height: 300px;

				background-image: linear-gradient(to left,red,blue,yellow);

			}

		</style>

	</head>

	<body>

		<div class="box"></div>

	</body>

</html>
在上面的案例当中,我们在颜色的前面添加了表示方向的关键词to left,表示线性渐变从右到左。
当然我们也可以直接设置为left,但是因为兼容性的问题,我们就必须设置浏览器前缀。
<!DOCTYPE html>

<html>

	<head>

		<meta charset="utf-8">

		<title>线性渐变</title>

		<style type="text/css">

			.box {

				width: 300px;

				height: 300px;

				background-image: -webkit-linear-gradient(left,red,blue,yellow);

			}

		</style>

	</head>

	<body>

		<div class="box"></div>

	</body>

</html>
当我们将渐变方向关键词变为left,则正好与上面的demo渐变方向相反,表示从左向右。
并不推荐使用这种方式,因为我们还要考虑到兼容性的问题。
其他的方向关键词设置:
我们可以将常用的方向关键词进行组合使用。
to left 从右向左

to right 从左向右

to bottom 从上向下

to top 从下到上

to left top 从右下到左上

to right top 从左下到右上

to left bottom 从右上到左下

to right bottom 从左上到右下
通过角度angle来设置方向:
我们除了通过关键词来设置渐变方向以外,还可以通过具体的角度值来设置渐变方向。
在
css当中,deg表示角度。
demo:
<!DOCTYPE html>

<html>

	<head>

		<meta charset="utf-8">

		<title>线性渐变</title>

		<style type="text/css">

			.box {

				width: 300px;

				height: 300px;

				background-image: linear-gradient(0deg,red,blue);

			}

		</style>

	</head>

	<body>

		<div class="box"></div>

	</body>

</html>
在上面的例子中,我们将方向值变成了角度值,同样也可以实现渐变方向的改变。
需要注意的是,角度值为正则方向为顺时针的变化,角度值为负则方向为逆时针的变化,下面的demo中,通过JavaScript来查看角度分别为正和负时渐变颜色的变化。
demo:
<!DOCTYPE html>

<html lang="zh">

<head>

	<meta charset="UTF-8">

	<title>线性渐变</title>

	<style>

		#box {

			width: 400px;

			height: 400px;

			background-image: linear-gradient(0deg,red,blue);

		}

	</style>

</head>

<body>

	<div id="box"></div>

	<button id="btn1">正角度</button>

	<button id="btn2">负角度</button>

</body>

<script>

	let oBox  = document.querySelector("#box");

	let oBtn1 = document.querySelector("#btn1");

	let oBtn2 = document.querySelector("#btn2");

	let num = 0;

	oBtn1.onclick = function () {

		setInterval(function(){

			num = num +1;

			box.style.backgroundImage = `linear-gradient(${num}deg,red,blue)`;

		},30)

	}

	oBtn2.onclick = function () {

		setInterval(function(){

			num = num  - 1;

			box.style.backgroundImage = `linear-gradient(${num}deg,red,blue)`;

		},30)

	}

</script>

</html>
在上面的示例代码中,我们点击正角度按钮就可以让元素按照角度值为正进行变换。点击负角度按钮可以让元素按照角度值为负进行变换。从而证实我们上面所说的问题。
线性渐变百分比的设置:
我们可以给每个颜色后面加上一个百分比,从而让渐变的过程受到我们的把控。
demo:
<!DOCTYPE html>

<html lang="zh">

<head>

	<meta charset="UTF-8">

	<title>线性渐变</title>

	<style>

		.box {

			width: 400px;

			height: 400px;

			background: linear-gradient(red 30%,blue 60%);

		}

	</style>

</head>

<body>

	<div class="box"></div>

</body>

</html>
我们在上面的代码中,我们在每个颜色的后面加入了百分比。
上面的代码的含义是,从0%到30%为纯红色,从30%到60%为红色到蓝色的渐变,而60%到100%则表示纯蓝色。
根据上面的解释,如果我们想要在一个盒子形成一半为纯红色,一半为纯蓝色的背景,该怎么实现呢?
其实非常简单,只需要让中间渐变的过程为0即可。
demo:
<!DOCTYPE html>

<html lang="zh">

<head>

	<meta charset="UTF-8">

	<title>线性渐变</title>

	<style>

		.box {

			width: 400px;

			height: 400px;

			background: linear-gradient(red 50%,blue 50%);

		}

	</style>

</head>

<body>

	<div class="box"></div>

</body>

</html>
例如上面的例子,我们将从0%到50%设置为纯红色,从50%到50%设置为红色到蓝色的渐变,从50%到100%设置为纯蓝色,即可实现我们上面的需求。
盒子当中实现四个颜色平均分配:
我们可以根据上面所学来完成一下小练习,例如,我们希望在一个盒子中存在红绿蓝黄四个颜色,并且并不存在渐变的效果,四个颜色皆为纯色并且平均分配,该怎么做呢?
demo:
<!DOCTYPE html>

<html lang="zh">

<head>

	<meta charset="UTF-8">

	<title>线性渐变</title>

	<style>

		.box {

			width: 400px;

			height: 400px;

			background: linear-gradient(red 25%, green 25%,green 50%,blue 50%, blue 75%,yellow 75%);

		}

	</style>

</head>

<body>

	<div class="box"></div>

</body>

</html>
在
渐变中我们不仅仅可以设置百分比来表示颜色变换的过程,也可以设置length具体值。
关于IE的线性渐变:
在IE浏览器中,我们可以实现两个颜色之间的渐变效果,语法格式如下:
filter:progid:DXImageTransform.Microsoft.gradient(startColorstr='#ffffff',endColorstr='#ff0000',GradientType='1');
startColorstr表示起始颜色
endColorstr表示结束颜色
GradientType值为1表示从左向右 值为0表示从上向下
径向渐变
不同于上面我们说的线性渐变,径向渐变有些类似于放射性的,从点放射到四周。
语法:
background: radial-gradient(center, shape size, start-color, ..., last-color);
虽然上面的语法看上去有些复杂,但是用法上起始与线性渐变很是类似,下面我们来看下具体的使用。
最简单的径向渐变:
<!DOCTYPE html>

<html lang="zh">

<head>

	<meta charset="UTF-8">

	<title>径向渐变</title>

	<style>

		.box {

			width: 400px;

			height: 400px;

			background: radial-gradient(red,yellow);

		}

	</style>

</head>

<body>

	<div class="box"></div>

</body>

</html>
上面的代码将会在box这个元素中形成一个渐变效果,呈现的形状为一个正圆。圆心开始为红色,从圆心开始逐渐的向四周过渡。
设置形状:
径向渐变的形状是一个圆,在径向渐变中,可以设置正圆circle和椭圆ellipse。默认情况下为正圆。
demo:
<!DOCTYPE html>

<html lang="zh">

<head>

	<meta charset="UTF-8">

	<title>径向渐变</title>

	<style>

		.box {

			width: 400px;

			height: 400px;

			background: radial-gradient(ellipse,red,blue);

		}

	</style>

</head>

<body>

	<div class="box"></div>

</body>

</html>
设置多个颜色:
在径向渐变中同样可以设置多个颜色。
demo:
<!DOCTYPE html>

<html lang="zh">

<head>

	<meta charset="UTF-8">

	<title>径向渐变</title>

	<style>

		.box {

			width: 400px;

			height: 400px;

			background: radial-gradient(red,blue,pink);

		}

	</style>

</head>

<body>

	<div class="box"></div>

</body>

</html>
设置径向渐变的方向:
在径向渐变中设置渐变方向,需要注意,不能采用to + 方向 这种形式,而是应该直接设置方向关键词,并且添加浏览器前缀。
demo:
<!DOCTYPE html>

<html lang="zh">

<head>

	<meta charset="UTF-8">

	<title>径向渐变</title>

	<style>

		.box {

			width: 400px;

			height: 400px;

			background: -webkit-radial-gradient(left,red,blue,pink);

		}

	</style>

</head>

<body>

	<div class="box"></div>

</body>

</html>
设置径向渐变的起始位置:
在径向渐变中,我们没有办法设置具体的角度值,我们可以通过length设置圆心的位置,从而改变径向渐变的起始位置。
demo:
<!DOCTYPE html>

<html lang="zh">

<head>

	<meta charset="UTF-8">

	<title>径向渐变</title>

	<style>

		.box {

			width: 400px;

			height: 400px;

			background: -webkit-radial-gradient(140px 300px,red,blue,pink);

		}

	</style>

</head>

<body>

	<div class="box"></div>

</body>

</html>
设置颜色渐变百分比:
径向渐变中同样可以设置颜色渐变的百分比,用以把控渐变的过程。
<!DOCTYPE html>

<html lang="zh">

<head>

	<meta charset="UTF-8">

	<title>径向渐变</title>

	<style>

		.box {

			width: 400px;

			height: 400px;

			background: -webkit-radial-gradient(red 20%, blue 30%, lightblue 50%);

		}

	</style>

</head>

<body>

	<div class="box"></div>

</body>

</html>
径向渐变中颜色百分比的原理和线性渐变相同。
设置径向渐变的横向半径和纵向半径:
径向渐变中我们可以设置圆形的坐标,从而实现更改渐变的位置。我们在上面说到,径向渐变还可以更改径向渐变的形状,可以设置为正圆和椭圆。当我们设置圆的形状时,除了通过关键词,还可以通过具体的length来进行设置。
demo:
<!DOCTYPE html>

<html lang="zh">

<head>

	<meta charset="UTF-8">

	<title>径向渐变</title>

	<style>

		.box {

			width: 400px;

			height: 400px;

			background: -webkit-radial-gradient(100px 100px,200px 300px,red,lightblue);

		}

	</style>

</head>

<body>

	<div class="box"></div>

</body>

</html>
100px 100px 表示圆心坐标,200px 300px表示横半径和纵半径。
通过关键词来设置径向渐变圆的大小:
在径向渐变中存在几个关键词,通过这些关键词可以设置径向渐变圆的大小。
关键词如下:
closest-side:最近边;

farthest-side:最远边;

closest-corner:最近角;

farthest-corner:最远角
demo:
<!DOCTYPE html>

<html lang="zh">

<head>

	<meta charset="UTF-8">

	<title>径向渐变</title>

	<style>

		.box {

			width: 400px;

			height: 400px;

			background: -webkit-radial-gradient(100px 100px ,closest-side,blue,lightblue);

		}

	</style>

</head>

<body>

	<div class="box"></div>

</body>

</html>
重复渐变
当我们在一个元素中需要将渐变进行重复时,可以使用重复渐变。重复渐变又分为重复线性渐变和重复径向渐变,用法很简单,只是在渐变属性的前面添加repeating即可。
demo:
<!DOCTYPE html>

<html lang="zh">

<head>

	<meta charset="UTF-8">

	<title>径向渐变</title>

	<style>

		.box {

			width: 400px;

			height: 400px;

			background: -webkit-repeating-radial-gradient(100px 100px ,closest-side,blue,lightblue);

		}

	</style>

</head>

<body>

	<div class="box"></div>

</body>

</html>
CSS3 过渡
在css3中,通过过渡,可以让元素的动画变化放缓,从而具有更好的观感效果。
语法:
transition: property duration timing-function delay;
transition为过渡效果的简写属性,这个属性具体可以拆分为下面几个属性:
transition-property 规定应用过度的css属性名称

transition-duration 定义过渡效果需要时间

transition-timing-function 规定过渡效果的时间曲线,默认是“ease”

transition-delay   延迟
参与过渡的属性:
想要具体设置参与过渡的具体属性,可以通过transition-property,具体的值如下:
transition-property:none | all | property(css属性名称,用逗号进行分隔)
demo:
<!DOCTYPE html>

<html lang="zh">

<head>

	<meta charset="UTF-8">

	<title>过渡</title>

	<style>

		.box {

			width: 200px;

			height: 200px;

			background-color: red;

			transition-property: width,height;

		}

	</style>

</head>

<body>

	<div class="box"></div>

</body>

</html>
设置过渡时间:
通过transition-duration可以设置过渡所需的时间。单位是 s|ms。
我们可以把上面的代码继续完善一下。
demo:
<!DOCTYPE html>

<html lang="zh">

<head>

	<meta charset="UTF-8">

	<title>过渡</title>

	<style>

		.box {

			width: 200px;

			height: 200px;

			background-color: red;

			transition-property: width,height;

			transition-duration: 2s;

		}

		.box:hover {

			width: 300px;

			height: 300px;

		}

	</style>

</head>

<body>

	<div class="box"></div>

</body>

</html>
设置过渡的速度时间曲线:
通过transition-timing-function可以设置过渡效果的时间曲线:
cubic-bezier (n,n,n,n)  贝塞尔曲线

linear 规定以相同速度开始至结束的过渡效果(等于 cubic-bezier(0,0,1,1))

ease   规定慢速开始,然后变快,然后慢速结束的过渡效果(cubic-bezier(0.25,0.1,0.25,1))

ease-in    规定以慢速开始的过渡效果(等于 cubic-bezier(0.42,0,1,1))

ease-out  慢速结束过渡效果 等于 cubic-bezier(0,0,0.58,1)

ease-in-out  	规定以慢速开始和结束的过渡效果(等于 cubic-bezier(0.42,0,0.58,1))
关于`贝塞尔曲线,可以参考下面的网址:http://cubic-bezier.com/#.17,.67,.94,.18
demo:
<!DOCTYPE html>

<html lang="zh">

<head>

	<meta charset="UTF-8">

	<title>过渡</title>

	<style>

		.box {

			width: 200px;

			height: 200px;

			background-color: red;

			transition-property: width,height;

			transition-duration: 2s;

			transition-timing-function: ease-in-out;

		}

		.box:hover {

			width: 300px;

			height: 300px;

		}

	</style>

</head>

<body>

	<div class="box"></div>

</body>

</html>
设置延迟时间:
在x秒或者x毫秒后执行效果。
<!DOCTYPE html>

<html lang="zh">

<head>

	<meta charset="UTF-8">

	<title>过渡</title>

	<style>

		.box {

			width: 200px;

			height: 200px;

			background-color: red;

			transition-property: width,height;

			transition-duration: 2s;

			transition-timing-function: ease-in-out;

			transition-delay: 1s;

		}

		.box:hover {

			width: 300px;

			height: 300px;

		}

	</style>

</head>

<body>

	<div class="box"></div>

</body>

</html>
我们在开发的时候,推荐尽可能的使用简写属性。
给不同的样式设置不同的执行时间和延迟时间:
我们可以单独的给不同的样式分别设置执行时间和延迟时间。
demo:
<!DOCTYPE html>

<html lang="zh">

<head>

	<meta charset="UTF-8">

	<title>过渡</title>

	<style>

		.box {

			width: 200px;

			height: 200px;

			background-color: red;

			transition: width 2s 1s,height 2s 2s,background-color 3s 1s;

		}

		.box:hover {

			width: 300px;

			height: 300px;

			background-color: lightblue;

		}

	</style>

</head>

<body>

	<div class="box"></div>

</body>

</html>
CSS Banner点击切换
demo:
<!DOCTYPE html>

<html lang="en">

<head>

    <meta charset="UTF-8">

    <title>banner广告css代码实现</title>

    <style>

        body, figure {

            margin: 0;

        }

        img {

            width:100%;

            height: 700px;

        }

        figcaption {

            display: block;

            font-weight: bold;

            padding: 1em 0;

        }

        .gallery {

            position: relative;

        }

        .gallery > .item {

            opacity: 0;

            position: absolute;

            left: 0;

            top: 0;

            width: 100%;

            text-align: center;

            -webkit-transition: opacity .5s;

            -o-transition: opacity .5s;

            transition: opacity .5s;

        }

        .gallery > .item:first-of-type {

            position: static;

            opacity: 1;

        }

        .gallery > .controls {

            position: absolute;

            bottom: 0;

            width: 100%;

            text-align: center;

        }

        .gallery > .control-operator {

            display: none;

        }

        .gallery .control-button {

            display: inline-block;

            margin: 0 .02em;

            font-size: 3em;

            text-align: center;

            text-decoration: none;

            -webkit-transition: color .1s;

            -o-transition: color .1s;

            transition: color .1s;

        }

        .gallery > .control-operator:target ~ .item {

            opacity: 0;

        }

        .gallery > .control-operator:nth-of-type(1):target ~ .item:nth-of-type(1) {

            opacity: 1;

        }

        .gallery > .control-operator:nth-of-type(2):target ~ .item:nth-of-type(2) {

            opacity: 1;

        }

        .gallery > .control-operator:nth-of-type(3):target ~ .item:nth-of-type(3) {

            opacity: 1;

        }

        /* a 按钮的样式 */

        .gallery .control-button {

            color: #ccc;

            color: rgba(255, 255, 255, 0.4);

        }

        .gallery .control-button:first-of-type {

            color: white;

            color: rgba(255, 255, 255, 0.8);

        }

        .gallery .control-button:hover {

            color: white;

            color: rgba(255, 255, 255, 0.8);

        }

        .gallery .control-operator:target ~ .controls .control-button {

            color: #ccc;

            color: rgba(255, 255, 255, 0.4);

        }

        .gallery .control-operator:target ~ .controls .control-button:hover {

            color: white;

            color: rgba(255, 255, 255, .8);

        }

        /* 被选中时 设置<a>.</a>颜色为 rgba(255,255,255,.8) */

        .gallery .control-operator:nth-of-type(1):target ~ .controls .control-button:nth-of-type(1),

        .gallery .control-operator:nth-of-type(2):target ~ .controls .control-button:nth-of-type(2),

        .gallery .control-operator:nth-of-type(3):target ~ .controls .control-button:nth-of-type(3) {

            color: white;

            color: rgba(255, 255, 255, 0.8);

        }

    </style>

</head>

<body>

    <div class="gallery">

        <!--control-operator 用来控制,不显示-->

        <div id="gallery-1" class="control-operator"></div>

        <div id="gallery-2" class="control-operator"></div>

        <div id="gallery-3" class="control-operator"></div>

        <figure class="item">

            <figcaption>壁纸1</figcaption>

            <img src="./images/b1.jpg" alt="">

        </figure>

        <figure class="item">

            <figcaption>壁纸2</figcaption>

            <img src="./images/b2.jpg" alt="">

        </figure>

        <figure class="item">

            <figcaption>壁纸3</figcaption>

            <img src="./images/b3.jpg" alt="">

        </figure>

        <div class="controls">

            <a href="#gallery-1" class="control-button">○</a>

            <a href="#gallery-2" class="control-button">○</a>

            <a href="#gallery-3" class="control-button">○</a>

        </div>

    </div>

</body>

</html>
CSS3 2D
css3中新增加了2D效果和3D效果,我们可以通过相关的属性设置从而实现很多之前只能通过JavaScript实现的效果。
相关属性:
transform  2D /3D 转换属性

transform-origin 更改元素旋转基点
2D变换方法:
translate(x,y)   沿着x y 移动元素/ translateX(n)  translateY(n)

scale(x,y)  缩放  更改元素的宽度和高度 ,将宽度改为原来的x倍,高度改为原来的y倍 / scaleX(n) 更改宽度  scaleY(n)  更改高度

rotate(angle)  旋转

skew(x-angle,y-angle)  定义2D 倾斜转换 沿着x轴和y轴  / skewX(angle) 沿着x轴转换  skewY(angle) 沿着y轴
2D效果主要针对的是页面当中的x轴和y轴进行的一系列的元素变化。
位移:
通过translate属性可以让元素沿着x轴和y轴进行位移。
demo:
<!DOCTYPE html>

<html lang="zh">

<head>

	<meta charset="UTF-8">

	<title>2d</title>

	<style>

		.box {

			width: 500px;

			height: 500px;

			border:1px solid red;

			margin:200px auto;

		}

		.test {

			width: 100px;

			height: 100px;

			background-color: lightblue;

			transition: 1s;

		}

		.box:hover .test {

			transform: translate(300px,100px);

		}

	</style>

</head>

<body>

	<div class="box">

		<div class="test"></div>

	</div>

</body>

</html>
缩放:
通过scale属性可以对元素进行缩放操作。
demo:
<!DOCTYPE html>

<html lang="zh">

<head>

	<meta charset="UTF-8">

	<title>2d</title>

	<style>

		.box {

			width: 500px;

			height: 500px;

			border:1px solid red;

			margin:200px auto;

		}

		.test {

			width: 100px;

			height: 100px;

			background-color: lightblue;

			transition: 1s;

		}

		.box:hover .test {

			transform: scale(2);

		}

	</style>

</head>

<body>

	<div class="box">

		<div class="test"></div>

	</div>

</body>

</html>
需要注意的是,缩放的值为宽度或者高度的倍数。
旋转:
通过rotate属性可以让元素进行旋转。
demo:
<!DOCTYPE html>

<html lang="zh">

<head>

	<meta charset="UTF-8">

	<title>2d</title>

	<style>

		.box {

			width: 500px;

			height: 500px;

			border:1px solid red;

			margin:200px auto;

		}

		.test {

			width: 100px;

			height: 100px;

			background-color: lightblue;

			transition: 1s;

		}

		.box:hover .test {

			transform: rotate(360deg);

		}

	</style>

</head>

<body>

	<div class="box">

		<div class="test"></div>

	</div>

</body>

</html>
如果更改元素的旋转基点,元素的旋转位置将会发生变化。
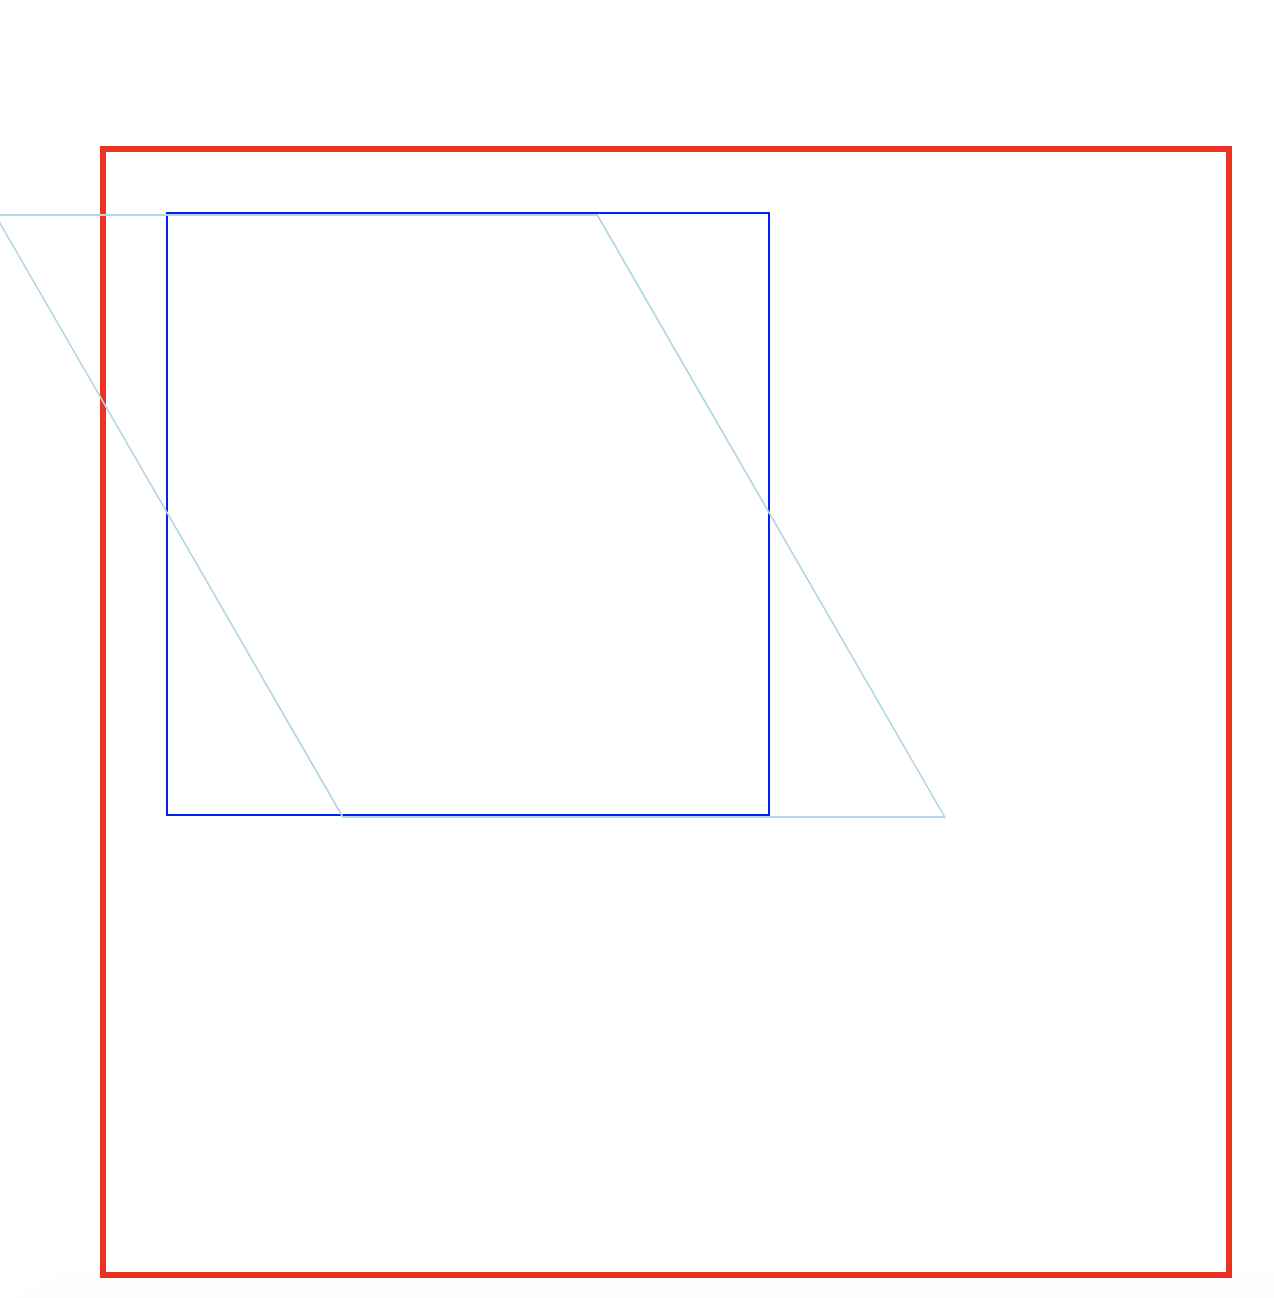
倾斜:
通过skew可以让元素沿着x轴或者y轴进行倾斜。
skew语法有些特殊:
transform:skew(<angle> [,<angle>]);
包含两个参数值,分别表示X轴和Y轴倾斜的角度,如果第二个参数为空,则默认为0,参数为负表示向相反方向倾斜。
skewX(<angle>);表示只在X轴(水平方向)倾斜。
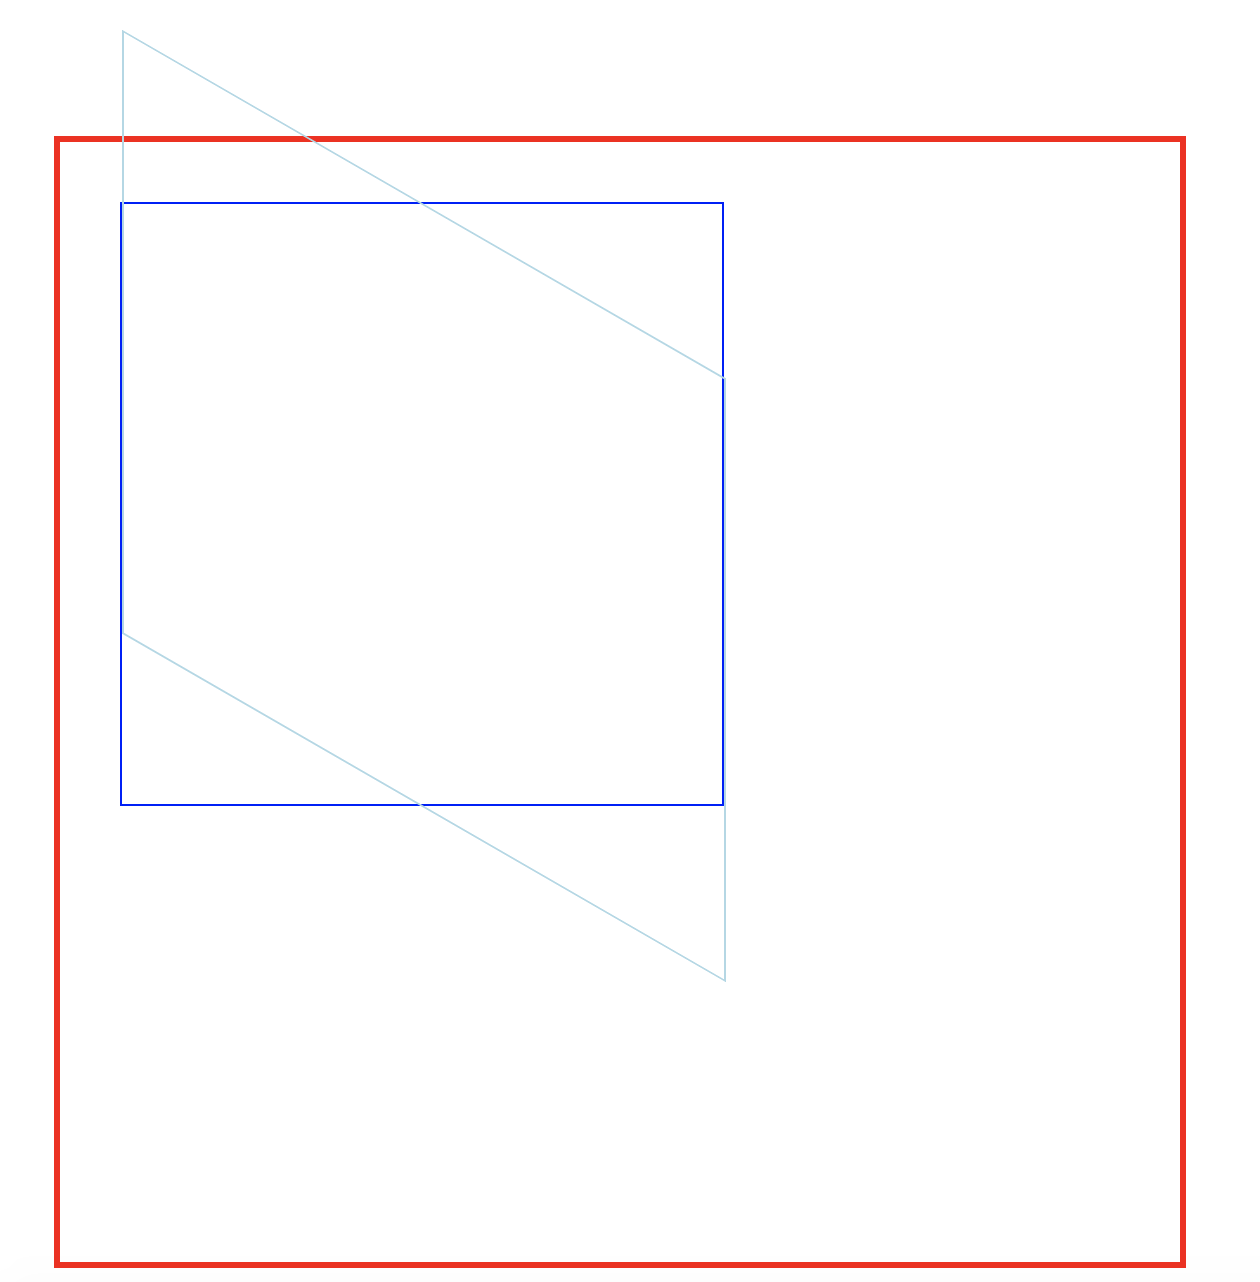
skewY(<angle>);表示只在Y轴(垂直方向)倾斜。
demo:
<!DOCTYPE html>

<html lang="zh">

<head>

	<meta charset="UTF-8">

	<title></title>

	<style>

		.main {

			width: 500px;

			height: 500px;

			border:3px solid red;

			margin:100px auto;

			padding:30px;

		}

		.box,.son {

			width: 300px;

			height: 300px;

		}

		.box {

			border:1px solid blue;

		}

		.son {

			border:1px solid lightblue;

			transform: skew(30deg);

		}

	</style>

</head>

<body>

	<div class="main">

		<div class="box">

			<div class="son"></div>

		</div>

	</div>

</body>

</html>
形成效果如下:
下面是倾斜Y轴:
<!DOCTYPE html>

<html lang="zh">

<head>

	<meta charset="UTF-8">

	<title></title>

	<style>

		.main {

			width: 500px;

			height: 500px;

			border:3px solid red;

			margin:100px auto;

			padding:30px;

		}

		.box,.son {

			width: 300px;

			height: 300px;

		}

		.box {

			border:1px solid blue;

		}

		.son {

			border:1px solid lightblue;

			transform: skewY(30deg);

		}

	</style>

</head>

<body>

	<div class="main">

		<div class="box">

			<div class="son"></div>

		</div>

	</div>

</body>

</html>
基点的改变对于元素变幻的影响:
通过transform-origin可以更改元素的基点,元素的基点一旦发生更改之后,就会产生不一样的效果。
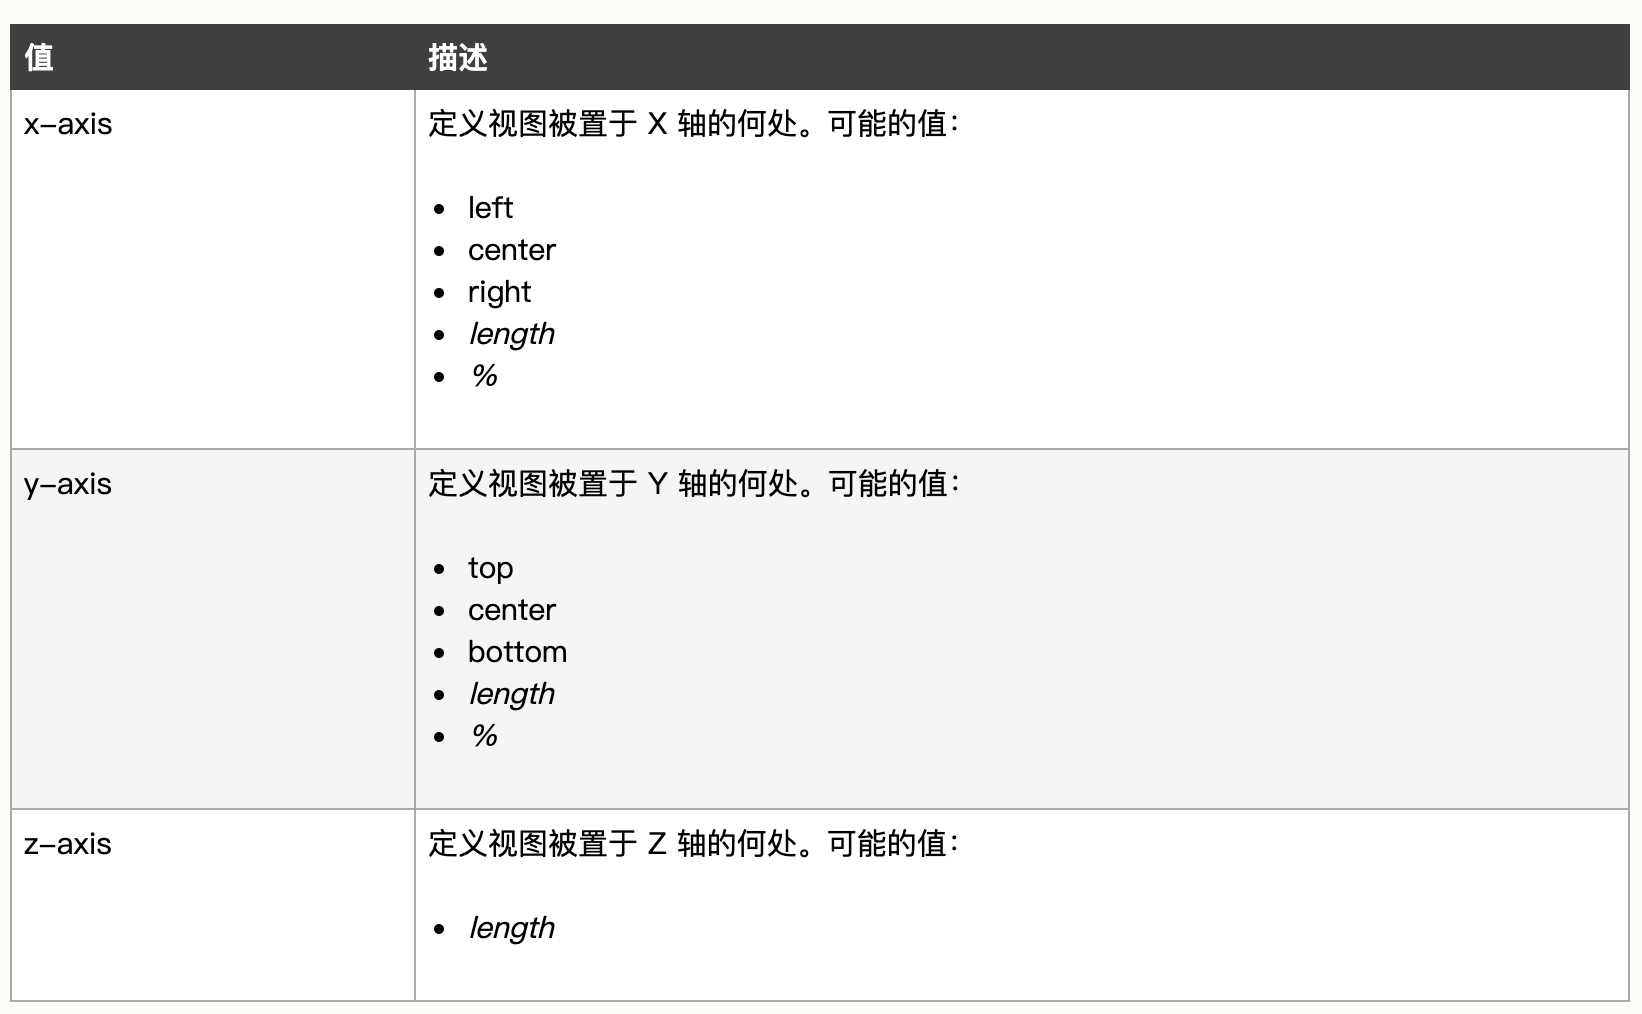
例如,旋转roate,默认基点是元素的正中心,但是一旦改变基点之后旋转就会发生改变。
demo:
<!DOCTYPE html>

<html lang="zh">

<head>

	<meta charset="UTF-8">

	<title></title>

	<style>

		.box {

			width: 500px;

			height: 500px;

			border:1px solid red;

			margin:100px auto;

		}

		.test {

			width: 100px;

			height: 100px;

			background-color: lightblue;

			transition: 1s;

			transform-origin: left top;

		}

		.box:hover .test {

			transform: rotate(360deg);

		}

	</style>

</head>

<body>

	<div class="box">

		<div class="test"></div>

	</div>

</body>

</html>
图片切换:
<!DOCTYPE html>

<html lang="zh">

<head>

	<meta charset="UTF-8">

	<title></title>

	<style>

		img {

			width: 300px;

			height: 300px;

		}

		.t_image {

			transition: all 1s ease-in-out;

			cursor: pointer;

		}

		.t_image_top {

			position: absolute;

			transform: scale(0,0);

		}

		.img_box:hover .t_image_top {

			transform: scale(1,1);

			transform-origin: top right;

		}

		.img_box:hover .t_image_bottom {

			transform: scale(0,0);

			transform-origin:bottom left;

		}

	</style>

</head>

<body>

	<div class="img_box">

		<img src="photo3.jpg" alt="" class="t_image t_image_top">

		<img src="photo4.jpg" alt="" class="t_image t_image_bottom">

	</div>

</body>

</html>
Banner图切换:
<!DOCTYPE html>

<html lang="en">

<head>

    <meta charset="UTF-8">

    <title>banner</title>

    <style>

        #content {

            width: 800px;

            margin:30px auto;

            position: relative;

        }

        input[type="radio"]{

            display: none;

        }

        input[type="radio"]~img {

            width: 800px;

            height: 500px;

            position: absolute;

            top:0;

            left:0;

            opacity: 0;

            transform: scale(1.1);

            transition: all 1s ;

        }

        input:checked + label + img {

           opacity: 1;

            transform: scale(1.0);

        }

        input:checked + label img {

            border: 8px solid lightblue;

            opacity: 1.0;

            transition: all 1s;

        }

        label {

            display: inline-block;

            width: 134px;

            margin:5px 8px;

        }

        label img {

            opacity: 0.5;

            width:134px;

            height: 75px;

            margin-top:500px;

            border:8px solid #ccc;

        }

    </style>

</head>

<body>

    <div id="content">

        <input type="radio" name="carousel" id="list1" checked>

        <label for="list1">

            <img src="./images/photo1.jpg" alt="">

        </label>

        <img src="./images/photo1.jpg" alt="">

        <input type="radio" name="carousel" id="list2" >

        <label for="list2">

            <!--小图片-->

            <img src="./images/photo2.jpg" alt="">

        </label>

        <!--大图片-->

        <img src="./images/photo2.jpg" alt="">

        <input type="radio" name="carousel" id="list3" >

        <label for="list3">

            <img src="./images/photo3.jpg" alt="">

        </label>

        <img src="./images/photo3.jpg" alt="">

        <input type="radio" name="carousel" id="list4" >

        <label for="list4">

            <img src="./images/photo4.jpg" alt="">

        </label>

        <img src="./images/photo4.jpg" alt="">

        <input type="radio" name="carousel" id="list5" >

        <label for="list5">

            <img src="./images/photo5.jpg" alt="">

        </label>

        <img src="./images/photo5.jpg" alt="">

    </div>

</body>

</html>
CSS3 3D
相关属性:
transform    2d/3d转换

transform-origin   更改基点

transform-style    开启3D空间

perspective    视距

perspective-origin   景深基点

backface-visibibility   背面隐藏
3D变换方法:
translate3d(x,y,z)  /  translateX  translateY  translateZ

scale3d(x,y,z)  /  scaleX  scaleY  scaleZ

rotate3d(x,y,angle)  / rotateX(angle) rotateY(angle)  rotateZ(angle)
关于Z轴:
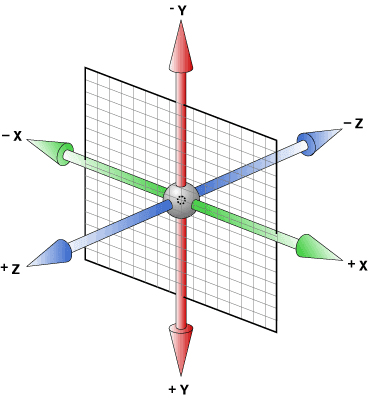
在2D中,我们说,网页的变换主要围绕x轴和y轴,而到了CSS3 3D,则相对于之前,多了一个Z轴。
Z轴表示垂直于网页的一个坐标轴,通过Z轴,能够构建网页当中的3D效果。
视距:
观察者沿着平行于Z轴的视线与屏幕之间的距离即为视距的距离,简称视距。
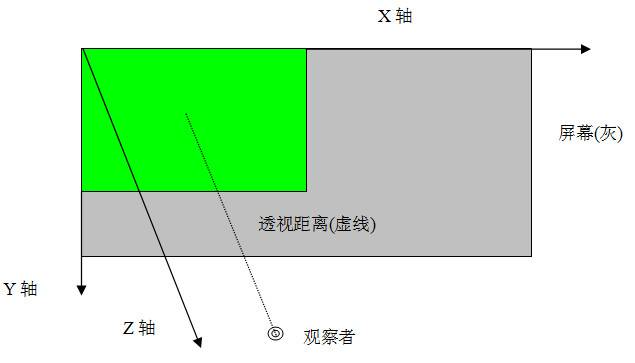
视距要设置在父元素的身上,才会有效果。
<!DOCTYPE html>

<html lang="en">

<head>

    <meta charset="UTF-8">

    <title>Title</title>

    <style>

        section {

            width: 400px;

            height: 400px;

            border: 1px solid red;

            margin: 100px auto;

            /*一定要设置在父元素的身上*/

            perspective: 300px;

        }

        div {

            width: 100px;

            height: 100px;

            background-color: lightblue;

            transition: 1s;

        }

        section:hover div {

            transform: rotateX(45deg);

        }

    </style>

</head>

<body>

    <section>

        <div></div>

    </section>

</body>

</html>
开启3D空间:
正常情况下,我们是没有办法创建3D空间的,我们需要通过属性transform-style属性来开启3D空间。
transform-style: flat|preserve-3d;
当属性等于preserve-3d时,即可开启3D空间 。
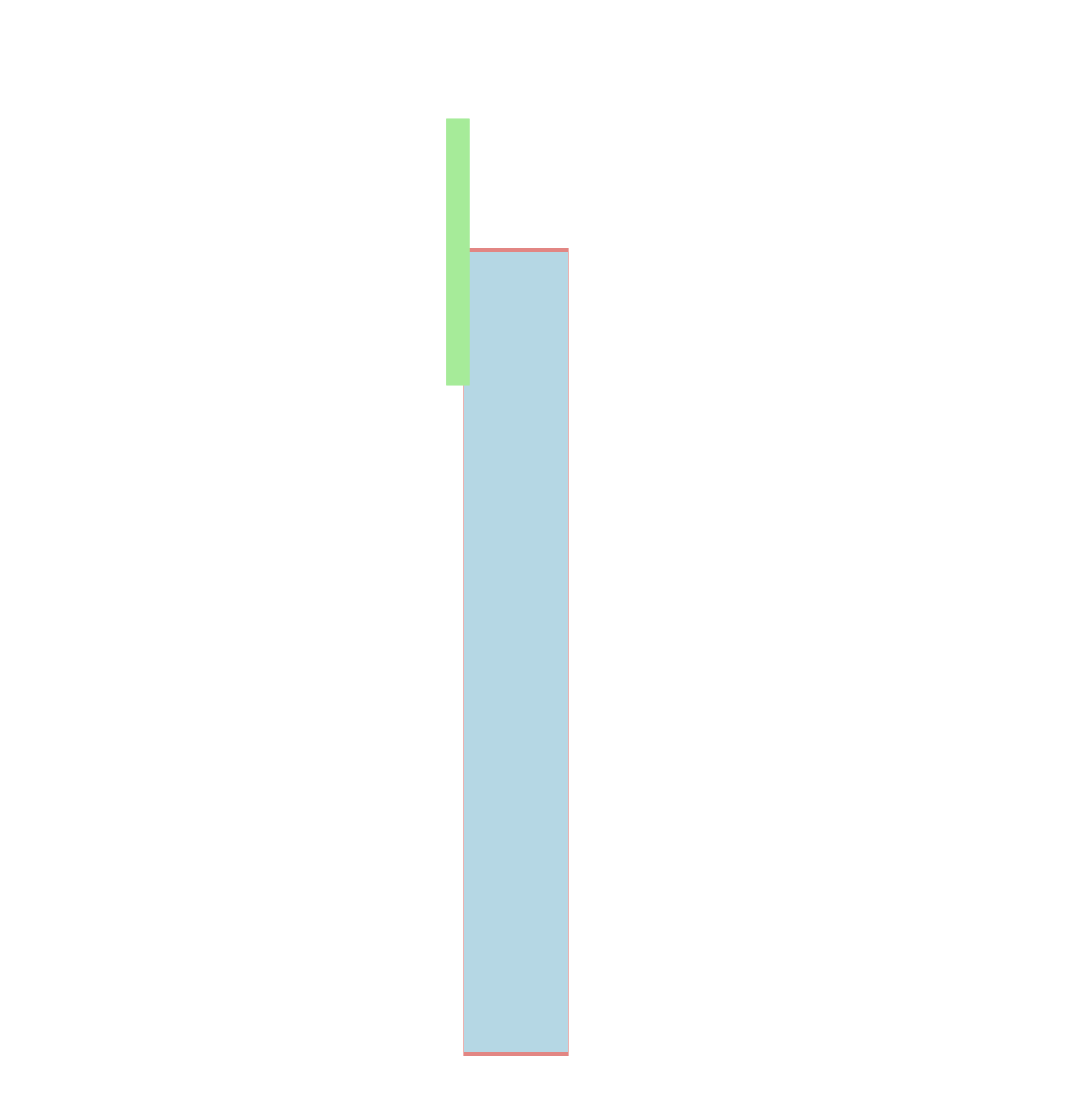
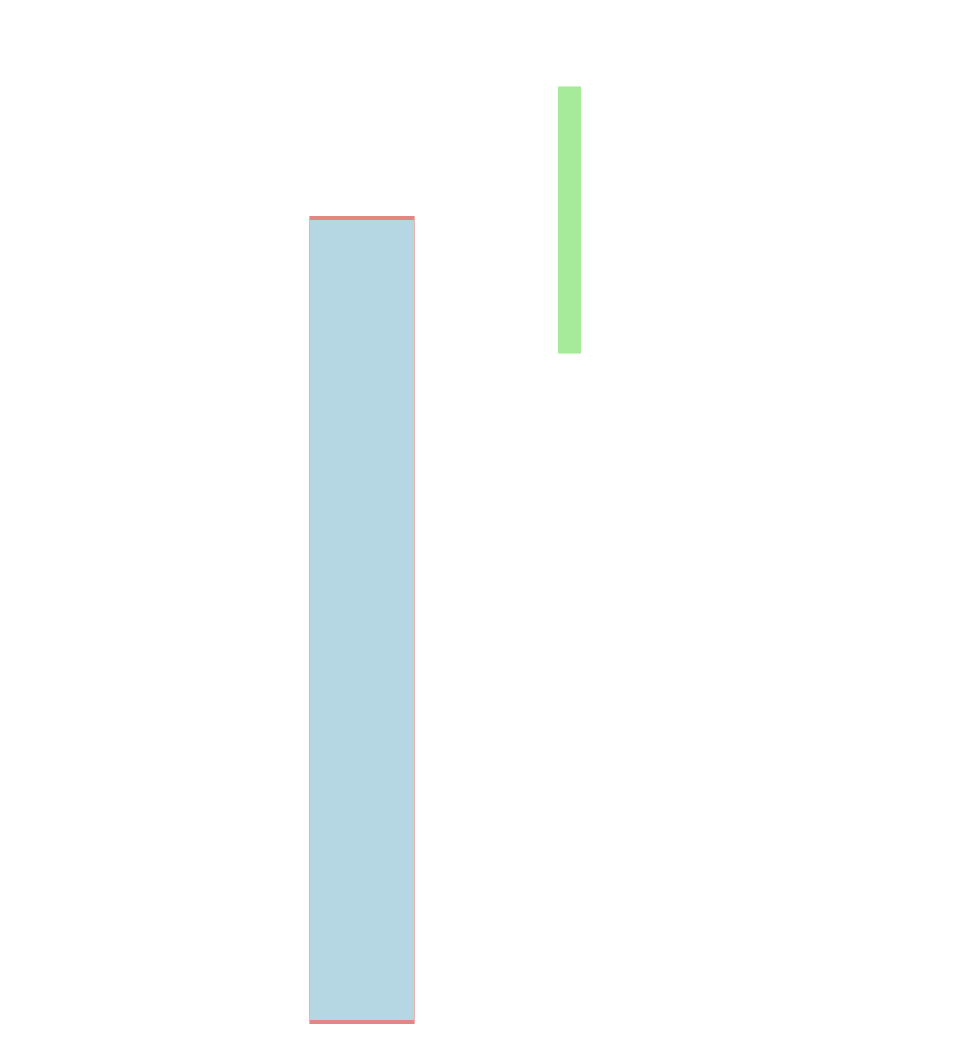
例如下面的案例,在开启3D空间和不开启3D空间完全是两个效果。
demo:
<!DOCTYPE html>

<html lang="en">

<head>

    <meta charset="UTF-8">

    <title>Title</title>

    <style>

        section {

            width: 600px;

            height: 400px;

            border: 2px solid lightcoral;

            margin: 200px auto;

            background-color: lightblue;

          	/*关闭3d空间*/

            /*transform-style: preserve-3d;*/

            perspective: 400px;

            transition: 2s;

        }

        section div {

            width: 100px;

            height: 100px;

            background-color: lightgreen;

            transition: 2s;

        }

        section:hover {

            transform:rotateY(85deg);

        }

        section:hover div {

            transform: translateZ(100px);

        }

    </style>

</head>

<body>

    <section>

        <div></div>

    </section>

</body>

</html>
效果如下:
而如果开启了3d空间,效果如下:
关于Z轴的操作:
在上面的案例中,我们使用了一个属性,translateZ()表示元素在Z轴上的距离。而除了translateZ以外,还有rotateZ() ,用来表示元素在Z轴上的旋转。
demo:
<!DOCTYPE html>

<html lang="en">

<head>

    <meta charset="UTF-8">

    <title>Title</title>

    <style>

        section {

            width: 600px;

            height: 400px;

            border: 2px solid lightcoral;

            margin: 200px auto;

            background-color: lightblue;

          	/*关闭3d空间*/

            transform-style: preserve-3d;

            perspective: 400px;

            transition: 5s;

        }

        section div {

            width: 100px;

            height: 100px;

            background-color: lightgreen;

            transition: 2s;

        }

        section:hover {

            transform:rotateY(85deg);

        }

        section:hover div {

            transform: translateZ(100px) rotateZ(1800deg);

        }

    </style>

</head>

<body>

    <section>

        <div></div>

    </section>

</body>

</html>
scaleZ()表示元素在Z轴上的放大比例。需要注意的是单独使用可能没有效果,需要搭配其他属性一起使用。
demo:
<!DOCTYPE html>

<html lang="en">

<head>

    <meta charset="UTF-8">

    <title>Title</title>

    <style>

        .stage {

            width: 300px;

            height: 300px;

            float: left;

            margin:15px;

            position: relative;

            background: url("./img/bg.jpg") repeat center center;

            perspective: 1200px;

        }

        .container {

            position: absolute;

            top:20%;

            left:50%;

            transform-style: preserve-3d;

        }

        .container img {

            position: absolute;

            margin-left:-70px;

            margin-right:-100px;

        }

        .container img:nth-child(1) {

            z-index:1;

            opacity: .6;

        }

        .s1 img:nth-child(2) {

            z-index: 2;

            transform: scaleZ(5) rotateX(45deg);

        }

        .s2 img:nth-child(2) {

            z-index: 2;

            transform: scaleZ(0.25) rotateX(45deg);

        }

    </style>

</head>

<body>

<div class="stage s1">

    <div class="container">

        <img src="./img/k2.png" alt="" width="140" height="200">

        <img src="./img/k2.png" alt="" width="140" height="200">

    </div>

</div>

<div class="stage s2">

    <div class="container">

        <img src="./img/k2.png" alt="" width="140" height="200">

        <img src="./img/k2.png" alt="" width="140" height="200">

    </div>

</div>

</body>

</html>
translate3d、roate3d、scale3d
1、rotate3d
rotate3d(x,y,z,a)
x:是一个0到1之间的数值,主要用来描述元素围绕X轴旋转的矢量值;
y:是一个0到1之间的数值,主要用来描述元素围绕Y轴旋转的矢量值;
z:是一个0到1之间的数值,主要用来描述元素围绕Z轴旋转的矢量值;
a:是一个角度值,主要用来指定元素在3D空间旋转的角度,如果其值为正值,元素顺时针旋转,反之元素逆时针旋转。
2、scale3d()
CSS3 3D变形中的缩放主要有scaleZ()和scale3d()两种函数,当scale3d()中X轴和Y轴同时为1,即scale3d(1,1,sz),其效果等同于scaleZ(sz)。通过使用3D缩放函数,可以让元素在Z轴上按比例缩放。默认值为1,当值大于1时,元素放大,反之小于1大于0.01时,元素缩小。
scale3d(sx,sy,sz)
sx:横向缩放比例;
sy:纵向缩放比例;
sz:Z轴缩放比例;
注:scaleZ()和scale3d()函数单独使用时没有任何效果,需要配合其他的变形函数一起使用才会有效果
<!DOCTYPE html>

<html lang="en">

<head>

    <meta charset="UTF-8">

    <title>Title</title>

    <style>

        section {

            width: 400px;

            height: 400px;

            border: 2px solid lightseagreen;

            perspective: 300px;

            transform-style: preserve-3d;

        }

        div {

            width: 100px;

            height: 100px;

            background-color: lime;

            transition: 8s;

        }

        section:hover div {

            transform:rotateX(720deg) scale3d(1.2,2.1,3);

        }

    </style>

</head>

<body>

    <section>

        <div></div>

    </section>

</body>

</html>
3、translate3d
<!DOCTYPE html>

<html lang="en">

<head>

    <meta charset="UTF-8">

    <title>Title</title>

    <style>

        .stage {

            width: 300px;

            height: 300px;

            float: left;

            margin:15px;

            position: relative;

            background: url("./img/bg.jpg") repeat center center;

            perspective: 1200px;

        }

        .container {

            position: absolute;

            top:20%;

            left:50%;

            transform-style: preserve-3d;

        }

        .container img {

            position: absolute;

            margin-left:-70px;

            margin-right:-100px;

        }

        .container img:nth-child(1) {

            z-index:1;

            opacity: .6;

        }

        .s1 img:nth-child(2) {

            z-index:2;

            transform:translate3d(30px,30px,200px);

        }

        .s2 img:nth-child(2) {

            z-index: 2;

            transform: translate3d(30px,30px,-200px);

        }

    </style>

</head>

<body>

<div class="stage s1">

    <div class="container">

        <img src="./img/k2.png" alt="" width="70" height="100">

        <img src="./img/k2.png" alt="" width="70" height="100">

    </div>

</div>

<div class="stage s2">

    <div class="container">

        <img src="./img/k2.png" alt="" width="70" height="100">

        <img src="./img/k2.png" alt="" width="70" height="100">

    </div>

</div>

</body>

</html>
正方体:
<!DOCTYPE html>

<html lang="zh">

<head>

	<meta charset="UTF-8">

	<title>正方体</title>

	<style>

		* {

			margin:0;

			padding:0;

		}

		ul,li{list-style: none;}

		ul {

			width: 200px;

			height: 200px;

			margin:100px auto;

			position: relative;

			transition: 6s;

			transform-style: preserve-3d;

		}

		ul li {

			width: 100%;

			height: 100%;

			text-align: center;

			line-height: 200px;

			color:white;

			font-size:40px;

			position: absolute;

		}

		ul li:nth-child(1) {

			transform:rotateX(0deg) translateZ(100px);

			background: rgba(255,0,0,.6);

		}

		ul li:nth-child(2) {

			transform:rotateX(-90deg) translateZ(100px);

			background: rgba(0,255,0,.6);

		}

		ul li:nth-child(3) {

			transform:rotateX(-180deg) translateZ(100px);

			background: rgba(0,0,255,.6);

		}

		ul li:nth-child(4) {

			transform:rotateX(-270deg) translateZ(100px);

			background: rgba(0,255,255,.6);

		}

		ul li:nth-child(5) {

			transform:rotateY(90deg) translateZ(100px);

			background: rgba(255,0,255,.6);

		}

		ul li:nth-child(6) {

			transform:rotateY(-90deg) translateZ(100px);

			background: rgba(23,0,23,.6);

		}

		ul:hover {

			transform: rotateX(360deg) rotateY(360deg);

		}

	</style>

</head>

<body>

	<ul>

		<li>第一个盒子</li>

		<li>第二个盒子</li>

		<li>第三个盒子</li>

		<li>第四个盒子</li>

		<li>第五个盒子</li>

		<li>第六个盒子</li>

	</ul>

</body>

</html>
CSS3 动画
通过animation动画属性,css可以实现非常实用的动画效果。
相关属性:
Animation是一个简写属性,包含以下内容:

1、Animation-name    调用关键帧

2、Animation-duration   设置完成时间

3、Animation-timing-function   动画的速度曲线

4、Animation –delay			延迟

5、Animation-iteration-count   动画应该播放的次数

	N  设置播放次数    infinite   无限次播放

6、Animation-direction		规定是否该轮流反向播放动画

	Normal   alternate   动画应该轮流反向播放

7、Animation-play-state		暂停/运行

  Paused  暂停

  Running  运行

8、Animation-fill-mode   规定动画在播放之前或者之后,其动画效果是否可见

  None  不改变默认

  Forwards  当动画完成后保持最后一个属性值

  Backwards  在Animation –delay指定的一段时间之内,在动画显示之前,应用开始属性值。

  Both  向前和向后填充模式都被应用。
简写语法:
Animation: name duration timing-function delay iteration -count direction
关键帧:
@keyframes name {

	0% {code ...}

	10% {code ...}

	20% {code ...}

}

也可以通过from和to来设置:

@keyframes name {

	from {}

	to {}

}
心跳:
<!DOCTYPE html>
<html lang="en">
<head>
<meta charset="UTF-8">
<title>Red Heart</title>
<style>
html, body {
height: 100%;
}
body {
margin: 0;
padding: 0;
background: #ffa5a5;
background: linear-gradient(to bottom, #ffa5a5 0%,#ffd3d3 100%);
}
.chest {
width: 500px;
height: 500px;
margin: 0 auto;
position: relative;
}
.heart {
position: absolute;
z-index: 2;
background: linear-gradient(-90deg, #F50A45 0%, #d5093c 40%);
animation: beat 0.7s ease 0s infinite normal;
}
.heart.center {
background: linear-gradient(-45deg, #B80734 0%, #d5093c 40%);
}
.heart.top {
z-index: 3;
}
.side {
top: 100px;
width: 220px;
height: 220px;
border-radius: 220px;
}
.center {
width: 210px;
height: 210px;
bottom: 100px;
left: 145px;
font-size: 0;
text-indent: -9999px;
}
.left {
left: 62px;
}
.right {
right: 62px;
}
@keyframes beat {
0% {
transform: scale(1) rotate(225deg);
box-shadow:0 0 40px #d5093c;
}
50% {
transform: scale(1.1) rotate(225deg);
box-shadow:0 0 70px #d5093c;
}
100% {
transform: scale(1) rotate(225deg);
box-shadow:0 0 40px #d5093c;
}
}
</style>
</head>
<body>
<div class="chest">
<div class="heart left side top"></div>
<div class="heart center">♥</div>
<div class="heart right side"></div>
</div>
</body>
</html>
animate 动画库
通过animate动画库可以实现一些动画效果。
网址:https://daneden.github.io/animate.css/
使用方法:
在代码中引入animate.css,并且将相应的类名设置给不同的元素。
demo:
<!DOCTYPE html>

<html lang="en">

<head>

    <meta charset="UTF-8">

    <title>执行</title>

    <link rel="stylesheet" href="animate.css">

    <style>

        .box {

            width: 500px;

            margin:200px auto;

        }

    </style>

</head>

<body>

    <div class="animated jello box">

        昨天我碰到一个帅哥,长相惊人,貌比潘安,凭颜值可以征服全世界的那种

        <br>,我们两个默默对视了很长时间,终于,我离开了他的视线,放下了镜子。

    </div>

</body>

</html>
可以通过下面的代码来查看不同的效果:
<!doctype html>

<html lang="en">

<head>

    <meta charset="UTF-8">

    <title>动画</title>

    <link rel="stylesheet" href="animate.css">

    <style>

        * {

            margin:0;

            padding:0;

        }

        .box {

            width: 400px;

            height: 400px;

            border:1px solid lightcyan;

            background-color: lightblue;

            margin:120px auto;

            font-size: 50px;

            line-height: 400px;

            text-align: center;

        }

        p  {

            width: 440px;

            height: 100px;

            position: absolute;

            top: 0;

            left: 500px;

            font-size:30px;

        }

        label {

            display: block;

        }

        input {

            width: 98%;

            height: 50px;

            font-size:30px;

        }

        button {

            width: 200px;

            height: 50px;

            font-weight: bold;

            position: fixed;

            bottom:120px;

            left: 620px;

        }

    </style>

</head>

<body>

    <div class="box">

        <div class="animated test">hello,world!</div>

    </div>

    <p>

        <label for="list">

            请输入动画效果名称:

        </label>

        <input type="text" placeholder="动画名称" id="list" >

    </p>

    <button onclick="fn1()">执行动画</button>

</body>

<script src="https://upcdn.b0.upaiyun.com/libs/jquery/jquery-2.0.2.min.js"></script>

<script>

    let fn1 = ()=> {

        let oInput = $('#list').val();

        $(".test").addClass(oInput).one('webkitAnimationEnd mozAnimationEnd MSAnimationEnd oanimationend',function(){

            $('.test').removeClass(oInput);

        });

    }

</script>

</html>
CSS3基础入门03的更多相关文章
- CSS3基础入门02
CSS3 基础入门02 边框相关属性 border-radius 通过这个属性我们可以设置边框圆角,即可以将四个角设置为统一的圆角,也可以单独的设置具体的某一个角的圆角. grammer: borde ...
- CSS3基础入门01
CSS3 基础入门 01 前言 相对于css2来说,css3更新了很多的内容,其中包括选择器.颜色.阴影.背景.文本.边框.新的布局方案.2d.3d.动画等等. 而如果想要学习css3的诸多部分,不妨 ...
- C#零基础入门03:打老鼠初级
一:在源码管理器中打开VS 注意,下文这样的打开方式是在 TFS 的源码服务器中打开解决方案.如果我们使用 SVN,则直接在硬盘上打开解决方案就可以了. 打开VS: 然后按上图中的步骤1和2(双击2处 ...
- # 095 01 Android 零基础入门 02 Java面向对象 02 Java封装 01 封装的实现 03 # 088 01 Android 零基础入门 02 Java面向对象 02 Java封装 03 封装总结 01 封装知识点总结
095 01 Android 零基础入门 02 Java面向对象 02 Java封装 01 封装的实现 03 # 088 01 Android 零基础入门 02 Java面向对象 02 Java封装 ...
- 094 01 Android 零基础入门 02 Java面向对象 02 Java封装 01 封装的实现 03 # 088 01 Android 零基础入门 02 Java面向对象 02 Java封装 02 static关键字 04 static关键字(续)
094 01 Android 零基础入门 02 Java面向对象 02 Java封装 01 封装的实现 03 # 088 01 Android 零基础入门 02 Java面向对象 02 Java封装 ...
- 093 01 Android 零基础入门 02 Java面向对象 02 Java封装 01 封装的实现 03 # 088 01 Android 零基础入门 02 Java面向对象 02 Java封装 02 static关键字 03 static关键字(下)
093 01 Android 零基础入门 02 Java面向对象 02 Java封装 01 封装的实现 03 # 088 01 Android 零基础入门 02 Java面向对象 02 Java封装 ...
- 092 01 Android 零基础入门 02 Java面向对象 02 Java封装 01 封装的实现 03 # 088 01 Android 零基础入门 02 Java面向对象 02 Java封装 02 static关键字 02 static关键字(中)
092 01 Android 零基础入门 02 Java面向对象 02 Java封装 01 封装的实现 03 # 088 01 Android 零基础入门 02 Java面向对象 02 Java封装 ...
- 091 01 Android 零基础入门 02 Java面向对象 02 Java封装 01 封装的实现 03 # 088 01 Android 零基础入门 02 Java面向对象 02 Java封装 02 static关键字 01 static关键字(上)
091 01 Android 零基础入门 02 Java面向对象 02 Java封装 01 封装的实现 03 # 088 01 Android 零基础入门 02 Java面向对象 02 Java封装 ...
- 090 01 Android 零基础入门 02 Java面向对象 02 Java封装 01 封装的实现 03 # 088 01 Android 零基础入门 02 Java面向对象 02 Java封装 01 封装的实现 04 使用包进行类管理(2)——导入包
090 01 Android 零基础入门 02 Java面向对象 02 Java封装 01 封装的实现 03 # 088 01 Android 零基础入门 02 Java面向对象 02 Java封装 ...
随机推荐
- AspNetCore+Swagger 生成Model 描述
AspNetCore+Swagger 生成Model 描述 前言: 本篇文章实现是基于上一篇文章,进下补充:多余的就不多说了,只是为了实现Model的描述生成:有兴趣的可以结合上一篇的进行实现:如有更 ...
- 1.常用turtle功能函数
#turtle常用命令汇总,括号中的参数仅仅作为举例使用,可根据需要修改 #设置画面背景色 turtle.bgcolor("black") #设置窗口大小和在屏幕上的坐标 turt ...
- jQuery事件绑定,解绑,触发
事件绑定 1.bind(type,[data],fn) --type: 含有一个或多个事件类型的字符串,由空格分隔多个事件.比如"click"或"submit" ...
- Android 注解框架对比
Java的注解(Annotation)相当于一种标记,在程序中加入注解就等于为程序打上某种标记,标记可以加在包,类,属性,方法,本地变量上.然后你可以写一个注解处理器去解析处理这些注解(人称编译时注解 ...
- 再议Java中的static关键字
再议Java中的static关键字 java中的static关键字在很久之前的一篇博文中已经讲到过了,感兴趣的朋友可以参考:<Java中的static关键字解析>. 今天我们再来谈一谈st ...
- AngularJS学习之旅—AngularJS 事件(十四)
1.AngularJS 事件 ng-click ( 适用标签 :所有,触发事件:单击): ng-dblclick( 适用标签 :所有,触发事件:双击): ng-blur(适用标签 : a,input, ...
- python学习_1
1.python2和python3 从宏观上讲,python2源码不标准.混乱.重复,和龟叔的理念背道而驰. 在python3上,实现了源码的统一化和标准化,去除了重复的代码. 2.编译型语言和解释型 ...
- VS与Windbg调试
原文 : https://blog.csdn.net/fin86889003/article/details/20126593 原文 : https://blog.csdn.net/u014339 ...
- Linux新手随手笔记1.6
RAID磁盘冗余阵列 1.I/O 速度 2.数据安全性 RAID 0 负载均衡.速度乘以二,但是数据安全性不行,任何一块盘损坏数据都会丢失. RAID 1 安全性性提升2倍,任何一个损坏另一个都有 ...
- java中的超类是什么
超类(SuperClass) :用java术语来讲,被继承的类称为超类(SuperClass),也有叫做父类,继承的类称为子类.
