【framework】View添加过程
1 前言
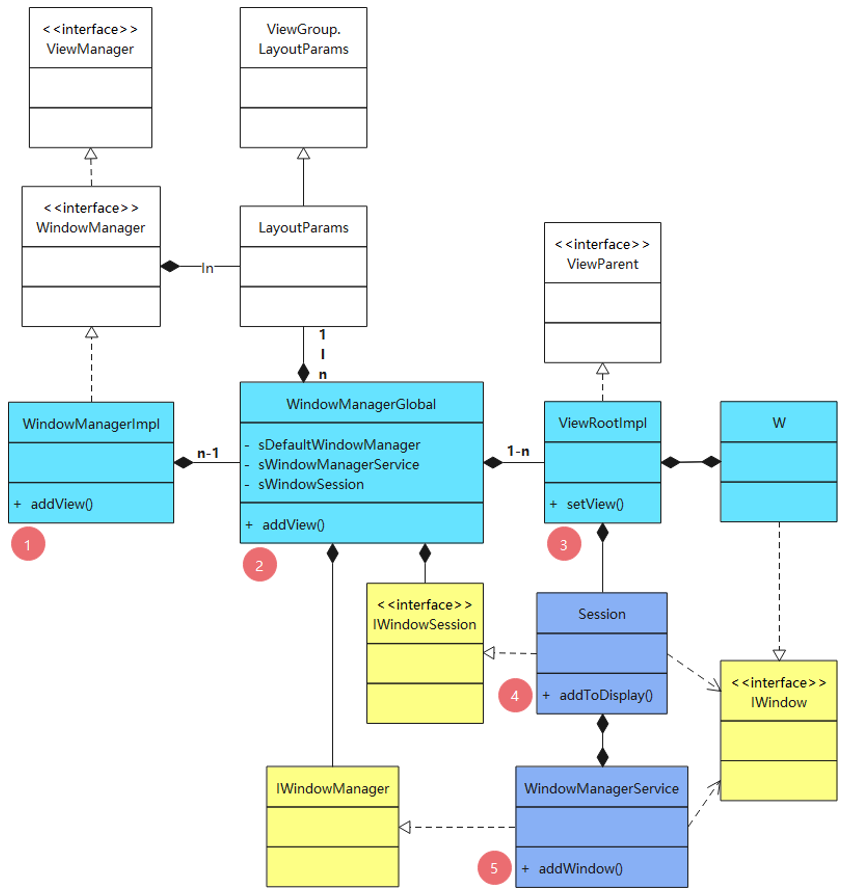
WMS启动流程 中介绍了 WindowManagerService 的启动流程,本文将介绍 View 的添加流程,按照进程分为以下2步:
- 应用进程:介绍从 WindowManagerImpl(addView 方法)到 Session(addToDisplay 方法)的调用流程;
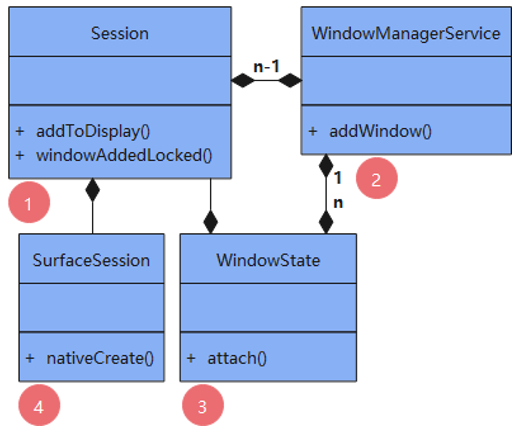
- system_server 进程:介绍从 Session(addToDisplay 方法)到 SurfaceSession(构造方法)的调用流程;
为区分不同进程,将应用进程、system_server 进程分别标识为浅蓝色、深蓝色。
2 View 添加过程
2.1 从 WindowManagerImpl 到 Session
如图,浅蓝色的类是应用进程中执行的,深蓝色的类是在 system_server 进程中执行的,黄色的类是指 AIDL 文件生成的接口(用于跨进程)。

注意事项:
- WMS 在 system_server 进程中单例运行,WindowManagerGlobal 在应用进程中单例运行,但是应用进程一般有多个,而进程之间内存隔离,因此每个应用进程中有且仅一个 WindowManagerGlobal 对象,并且会与一个 Session 对象一一对应。
- 一个窗口对应一个根 View,在添加根 View 时,会创建一个 ViewRootImpl、W、WindowState 对象与之一一对应。
(1)addView
/frameworks/base/core/java/android/view/WindowManagerImpl.java
public void addView(View view, ViewGroup.LayoutParams params) {

	applyDefaultToken(params);

	mGlobal.addView(view, params, mContext.getDisplay(), mParentWindow);

}
(2)addView
/frameworks/base/core/java/android/view/WindowManagerGlobal.java
public void addView(View view, ViewGroup.LayoutParams params, Display display, Window parentWindow) {

	...

	final WindowManager.LayoutParams wparams = (WindowManager.LayoutParams) params;

	...

	ViewRootImpl root;

	View panelParentView = null; //父窗口的根 View

	synchronized (mLock) {

		...

		//如果是子窗口,则通过 token 寻找父窗口的根 View

		if (wparams.type >= WindowManager.LayoutParams.FIRST_SUB_WINDOW && wparams.type <= WindowManager.LayoutParams.LAST_SUB_WINDOW) {

			final int count = mViews.size();

			for (int i = 0; i < count; i++) {

				if (mRoots.get(i).mWindow.asBinder() == wparams.token) {

					panelParentView = mViews.get(i); //mViews = new ArrayList<View>(),存储了所有窗口的根 View

				}

			}

		}

		//每个窗口对应一个 ViewRootImpl 对象

		root = new ViewRootImpl(view.getContext(), display);

		view.setLayoutParams(wparams);

		//存留 view、root、params信息

		mViews.add(view);

		mRoots.add(root);

		mParams.add(wparams);

		try {

			root.setView(view, wparams, panelParentView);

		}

		...

	}

}
可以看到,每个根 View,都与一个 LayoutParams 和一个 ViewRootImpl 一一对应。
(3)setView
/frameworks/base/core/java/android/view/ViewRootImpl.java
在 WindowManagerGlobal 的 addView() 方法中创建了 ViewRootImpl 对象,因此,先看看 ViewRootImpl 的构造方法。
public ViewRootImpl(Context context, Display display) {

	mContext = context;

    //IWindowSession 类型,单例对象,getWindowSession() 方法调用 WMS 的 openSession() 方法,new 一个 Session 对象

	mWindowSession = WindowManagerGlobal.getWindowSession();

	mDisplay = display;

	...

	mWindow = new W(this); //IWindow.Stub 的实现类

	...

    mAttachInfo = new View.AttachInfo(mWindowSession, mWindow, display, this, mHandler, this, context); //View.AttachInfo 类型

    ...

	mDisplayManager = (DisplayManager)context.getSystemService(Context.DISPLAY_SERVICE);

    ...

}
注意:在创建 ViewRootImpl 时,也创建了 W,进一步说明每个 根 View 都与一个 W 一一对应,即 mWindow.asBinder() 可以作为 根 View (或窗口)的身份标识。
再看看 ViewRootImpl 的 setView 方法。
public void setView(View view, WindowManager.LayoutParams attrs, View panelParentView) {

	synchronized (this) {

		if (mView == null) {

			mView = view;

            ...

			mWindowAttributes.copyFrom(attrs);

			...

			mAttachInfo.mRootView = view;

			...

			if (panelParentView != null) {

				mAttachInfo.mPanelParentWindowToken = panelParentView.getApplicationWindowToken();

			}

            ...

			if ((mWindowAttributes.inputFeatures & WindowManager.LayoutParams.INPUT_FEATURE_NO_INPUT_CHANNEL) == 0) {

				mInputChannel = new InputChannel();

			}

			...

            //请求显示 View

            requestLayout();

            ...

			try {

				...

				res = mWindowSession.addToDisplay(mWindow, mSeq, mWindowAttributes, getHostVisibility(),

					mDisplay.getDisplayId(), mTmpFrame, mAttachInfo.mContentInsets, mAttachInfo.mStableInsets,

					mAttachInfo.mOutsets, mAttachInfo.mDisplayCutout, mInputChannel, mTempInsets);

				setFrame(mTmpFrame);

			}

			...

		}

	}

}
2.2 从 Session 到 SurfaceSession

注意事项:每个应用进程对应一个 Session 对象和一个 SurfaceSession 对象, 每个窗口对应一个 WindowState 对象。
(1)Session 的创建过程
在 ViewRootImpl 的构造方法中,调用了 WindowManagerGlobal 的 getWindowSession() 方法中获取了 Session 对象,因此,先看看 Session 对象的创建过程。
/frameworks/base/core/java/android/view/WindowManagerGlobal.java
public static IWindowSession getWindowSession() {

	synchronized (WindowManagerGlobal.class) {

		if (sWindowSession == null) {

			try {

				...

				IWindowManager windowManager = getWindowManagerService(); //获取 WMS

				sWindowSession = windowManager.openSession(

						new IWindowSessionCallback.Stub() {

							@Override

							public void onAnimatorScaleChanged(float scale) {

								ValueAnimator.setDurationScale(scale);

							}

						});

			}

			...

		}

		return sWindowSession; //private static IWindowSession sWindowSession,单例对象

	}

}
/frameworks/base/services/core/java/com/android/server/wm/WindowManagerService.java
public IWindowSession openSession(IWindowSessionCallback callback) {

	return new Session(this, callback);

}
/frameworks/base/services/core/java/com/android/server/wm/Session.java
public Session(WindowManagerService service, IWindowSessionCallback callback) {

	mService = service;

	mCallback = callback;

	mUid = Binder.getCallingUid();

	mPid = Binder.getCallingPid();

	...

	try {

		mCallback.asBinder().linkToDeath(this, 0);

	}

	...

}
(2)addToDisplay
/frameworks/base/services/core/java/com/android/server/wm/Session.java
public int addToDisplay(IWindow window, int seq, WindowManager.LayoutParams attrs, int viewVisibility,

		int displayId, Rect outFrame, Rect outContentInsets, Rect outStableInsets, Rect outOutsets,

		DisplayCutout.ParcelableWrapper outDisplayCutout, InputChannel outInputChannel, InsetsState outInsetsState) {

    //mService 为 WMS

	return mService.addWindow(this, window, seq, attrs, viewVisibility, displayId, outFrame, outContentInsets,

			outStableInsets, outOutsets, outDisplayCutout, outInputChannel, outInsetsState);

}
(3)addWindow
/frameworks/base/services/core/java/com/android/server/wm/WindowManagerService.java
public int addWindow(Session session, IWindow client, int seq, LayoutParams attrs, int viewVisibility,

		int displayId, Rect outFrame, Rect outContentInsets, Rect outStableInsets, Rect outOutsets,

		DisplayCutout.ParcelableWrapper, InputChannel outInputChannel, InsetsState outInsetsState) {

	...

	//检查权限,不通过则直接返回

	...

	WindowState parentWindow = null; //父窗口的 WindowState

	...

	final int type = attrs.type;

	synchronized (mGlobalLock) {

		//获取 DisplayContent,不存在就创建,按照以下顺序创建,不为空就返回:

		//mRoot.getWindowToken(attrs.token).getDisplayContent()

		//mRoot.getDisplayContent(displayId)

		//mRoot.createDisplayContent(mDisplayManager.getDisplay(displayId), null)

		final DisplayContent displayContent = getDisplayContentOrCreate(displayId, attrs.token);

		...

		if (type >= FIRST_SUB_WINDOW && type <= LAST_SUB_WINDOW) { //待添加的窗口是 sub_win

			parentWindow = windowForClientLocked(null, attrs.token, false); //parentWindow = mWindowMap.get(attrs.token)

			...

		}

		...

		//过滤:1.type=sub_win、parentWindow=null; 2.type = sub_win = parentWindow 等

		...

		AppWindowToken atoken = null;

		final boolean hasParent = parentWindow != null;

		//获取 WindowToken(有父窗口,则获取父窗口的)

		WindowToken token = displayContent.getWindowToken(hasParent ? parentWindow.mAttrs.token : attrs.token);

		//获取窗口 type(有父窗口,则获取父窗口的)

		final int rootType = hasParent ? parentWindow.mAttrs.type : type;

		...

		if (token == null) { //如果 parentWindow != null, 则 token != null。因此,token = null,则 parentWindow = null,即此时的 token 和 rootType 是当前窗口的

			...

			//过滤:1.rootType=app_win; 2.rootType=ime_win; 3.rootType=wallpaper_win; rootType=toast_win 等,即不允许上述窗口的 token 为 null

			...

			final IBinder binder = attrs.token != null ? attrs.token : client.asBinder();

			...

			//前面没有过滤 sub_win,说明 sub_win 的 token 可以不用提前赋值,这里也会创建

			token = new WindowToken(this, binder, type, false, displayContent, session.mCanAddInternalSystemWindow, isRoundedCornerOverlay);

		} else if (rootType >= FIRST_APPLICATION_WINDOW && rootType <= LAST_APPLICATION_WINDOW) { //rootType=app_win

			atoken = token.asAppWindowToken(); //atoken 不能为空,否则会返回错误码

			...

		}

		...

		//过滤:1.rootType = ime_win != token.windowType; 2.rootType = wallpaper_win != oken.windowType 等

		...

		else if (type == TYPE_TOAST) {

			//若 token.windowType!=toast_win,可能会被过滤,即返回错误码

			...

		}

		...

		else if (token.asAppWindowToken() != null) { //AppWindowToken 是 WindowToken 的子类

			attrs.token = null;

			token = new WindowToken(this, client.asBinder(), type, false, displayContent, session.mCanAddInternalSystemWindow);

		}

		//创建 WindowState,说明每个根 View,都与一个 WindowState 一一对应

		final WindowState win = new WindowState(this, session, client, token, parentWindow, appOp[0],

				seq, attrs, viewVisibility, session.mUid, session.mCanAddInternalSystemWindow);

		...

		final DisplayPolicy displayPolicy = displayContent.getDisplayPolicy();

		displayPolicy.adjustWindowParamsLw(win, win.mAttrs, Binder.getCallingPid(), Binder.getCallingUid());

		win.setShowToOwnerOnlyLocked(mPolicy.checkShowToOwnerOnly(attrs));

		//前面已排除一些异常可能,接下来的代码不会有异常情况

		res = displayPolicy.prepareAddWindowLw(win, attrs);

		...

		win.attach(); //mSessions.add(win.mSession)

		mWindowMap.put(client.asBinder(), win);

		...

		win.mToken.addWindow(win); //win.mToken.addChild(win, mWindowComparator)

		...

	}

	...

	return res;

}
特别提醒:请重点关注 WindowToken、WindowState 的创建过程。
(4)构造方法
/frameworks/base/services/core/java/com/android/server/wm/WindowState.java
WindowState(WindowManagerService service, Session s, IWindow c, WindowToken token, WindowState parentWindow, int appOp,

		int seq, WindowManager.LayoutParams a, int viewVisibility, int ownerId, boolean ownerCanAddInternalSystemWindow) {

	this(service, s, c, token, parentWindow, appOp, seq, a, viewVisibility, ownerId,

			ownerCanAddInternalSystemWindow, new PowerManagerWrapper(){...});

}

WindowState(WindowManagerService service, Session s, IWindow c, WindowToken token, WindowState parentWindow, int appOp,

		int seq, WindowManager.LayoutParams a, int viewVisibility, int ownerId, boolean ownerCanAddInternalSystemWindow,

		PowerManagerWrapper powerManagerWrapper) {

	super(service); //mWmService = service

	mSession = s;

	mClient = c;

	...

	mToken = token;

	mAppToken = mToken.asAppWindowToken();

	...

	mAttrs.copyFrom(a);

	...

	mPolicy = mWmService.mPolicy;

	mContext = mWmService.mContext;

	...

	if (mAttrs.type >= FIRST_SUB_WINDOW && mAttrs.type <= LAST_SUB_WINDOW) { //计算子窗口图层

		mBaseLayer = mPolicy.getWindowLayerLw(parentWindow) * TYPE_LAYER_MULTIPLIER + TYPE_LAYER_OFFSET;

		mSubLayer = mPolicy.getSubWindowLayerFromTypeLw(a.type);

		...

		parentWindow.addChild(this, sWindowSubLayerComparator);

		...

	} else { //计算窗口图层

		mBaseLayer = mPolicy.getWindowLayerLw(this) * TYPE_LAYER_MULTIPLIER + TYPE_LAYER_OFFSET;

		mSubLayer = 0;

		...

	}

	...

    mWinAnimator = new WindowStateAnimator(this);

    ...

}
(5)attach
/frameworks/base/services/core/java/com/android/server/wm/WindowState.java
void attach() {

	...

	mSession.windowAddedLocked(mAttrs.packageName);

}
(6)windowAddedLocked
/frameworks/base/services/core/java/com/android/server/wm/Session.java
void windowAddedLocked(String packageName) {

    //绑定应用进程包名

	mPackageName = packageName;

	...

	if (mSurfaceSession == null) {

		...

		mSurfaceSession = new SurfaceSession();

		...

		//将 Session 添加到 WMS 中

		mService.mSessions.add(this);

		...

	}

	mNumWindow++;

}
说明: Session 和 SurfaceSession 都与应用进程一一对应,SurfaceSession 持有 SurfaceComposerClient,作为跟 SurfaceFlinger 通信的代理对象。
(7)SurfaceSession
/frameworks/base/core/java/android/view/SurfaceSession.java
public final class SurfaceSession {

	// SurfaceComposerClient

	private long mNativeClient;

	...

	public SurfaceSession() {

        //创建 SurfaceComposerClient

		mNativeClient = nativeCreate();

	}

    ...

}
说明: SurfaceComposerClient 是 ISurfaceComposer 的代理类,SurfaceFlinger 是 ISurfaceComposer 的实现类,它们通过 Binder 实现跨进程通讯。
3 添加 View 的场景
看到这里,读者也许会疑惑,什么样的 View 会通过 WindowManager 的 addView() 走完上述流程?布局中的 TextView 组件的添加会走上述流程么?带着这些疑问,笔者列举了系统中 3 个 View的添加场景应用,分别是:Activity、Dialog、Toast 中 View 的添加,这些 View 一般命名为 mDecor(也有例外),它们一般是根 View。
(1)Activity
/frameworks/base/core/java/android/app/Activity.java
Activity extends ContextThemeWrapper implements ... {

    private WindowManager mWindowManager;

    private Window mWindow

    View mDecor = null;

	void makeVisible() {

		if (!mWindowAdded) {

			ViewManager wm = getWindowManager(); //mWindowManager

			//通过 WindowManager 添加 View

			wm.addView(mDecor, getWindow().getAttributes());

			...

		}

		...

    }

}
(2)Dialog.java
/frameworks/base/core/java/android/app/Dialog.java
public class Dialog implements DialogInterface ... {

	private final WindowManager mWindowManager;

	final Window mWindow;

    View mDecor;

	public void show() {

        ...

        mDecor = mWindow.getDecorView();

		...

        WindowManager.LayoutParams l = mWindow.getAttributes();

        ...

        //通过 WindowManager 添加 View

        mWindowManager.addView(mDecor, l);

        ...

    }

}
(3)Toast
/frameworks/base/core/java/android/widget/Toast.java
public class Toast {

	WindowManager mWM;

	View mView;

	public void handleShow(IBinder windowToken) {

		...

		if (mView != mNextView) {

			...

			mWM = (WindowManager)context.getSystemService(Context.WINDOW_SERVICE);

			...

			try {

                //通过 WindowManager 添加 View

				mWM.addView(mView, mParams);

				...

			}

			...

		}

	}

}
4 WindowManager
WindowManager 是 View 添加的起点,其具体实现是 WindowManagerImpl。在获取 WindowManager 对象时,一般使用如下代码:
//Context 的具体实现是 ContextImpl

WindowManager wm = (WindowManager)context.getSystemService(Context.WINDOW_SERVICE); //"window"
下面跟踪一下上述代码。

/frameworks/base/core/java/android/app/ContextImpl.java
public Object getSystemService(String name) {

	return SystemServiceRegistry.getSystemService(this, name);

}
/frameworks/base/core/java/android/app/SystemServiceRegistry.java
final class SystemServiceRegistry {

	...

	//<serviceName, serviceFetcher>

    private static final Map<String, ServiceFetcher<?>> SYSTEM_SERVICE_FETCHERS = new ArrayMap<String, ServiceFetcher<?>>();

	//服务缓存个数,每调用一次 registerService,服务个数+1,sServiceCacheSize 未被初始化,默认初值为 0

	private static int sServiceCacheSize;

	//在类被加载时,注册服务

    static {

		...

        registerService(Context.WINDOW_SERVICE, WindowManager.class,

                new CachedServiceFetcher<WindowManager>() {

            @Override

            public WindowManager createService(ContextImpl ctx) {

                return new WindowManagerImpl(ctx);

            }});

    }

	//创建缓存,在 ContextImpl 类初始化时调用:final Object[] mServiceCache = SystemServiceRegistry.createServiceCache()

	public static Object[] createServiceCache() {

        return new Object[sServiceCacheSize];

    }

    //获取服务

    public static Object getSystemService(ContextImpl ctx, String name) {

        ServiceFetcher<?> fetcher = SYSTEM_SERVICE_FETCHERS.get(name);

        return fetcher != null ? fetcher.getService(ctx) : null;

    }

    //注册服务

    private static <T> void registerService(String serviceName, Class<T> serviceClass, ServiceFetcher<T> serviceFetcher) {

        ...

        SYSTEM_SERVICE_FETCHERS.put(serviceName, serviceFetcher);

    }

	...

}
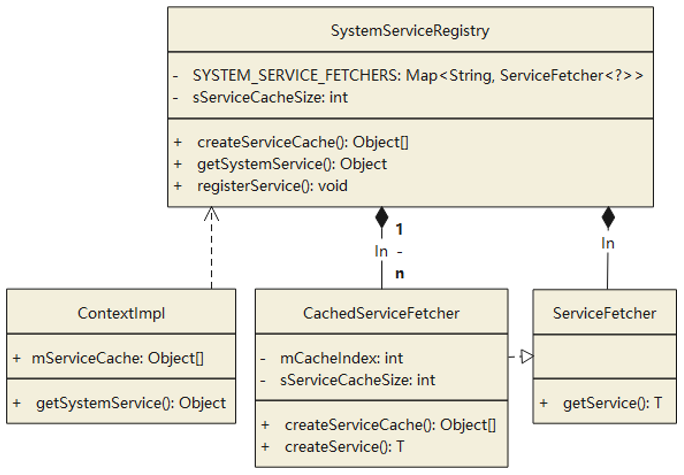
说明:CachedServiceFetcher 是 SystemServiceRegistry 的内部类,负责创建和缓存服务,每个服务对应一个缓存编号和 ServiceFetcher。在静态代码块里调用了 registerService() 方法,说明在 SystemServiceRegistry 类加载时就创建了一系列 ServiceFetcher,但是此时还没有创建服务,在第一次请求服务时才开始创建服务。
注意:SystemServiceRegistry 类被应用进程加载,系统中可能同时存在多个应用进程,而应用之间内存隔离,因此,每个应用进程在加载 SystemServiceRegistry 类时,都创建了一系列 ServiceFetcher。
/frameworks/base/core/java/android/app/SystemServiceRegistry.CachedServiceFetcher.java
static abstract interface ServiceFetcher<T> {

	T getService(ContextImpl ctx);

}

//服务拾取器(每个 service 对应一个 cacheIndex 和 serviceFetcher)

static abstract class CachedServiceFetcher<T> implements ServiceFetcher<T> {

	private final int mCacheIndex; //服务编号

	CachedServiceFetcher() {

		mCacheIndex = sServiceCacheSize++;

	}

	public final T getService(ContextImpl ctx) {

        //获取服务缓存数组,mServiceCache 属性在定义时就被初始化:mServiceCache = SystemServiceRegistry.createServiceCache()

		final Object[] cache = ctx.mServiceCache;

		...

		for (;;) {

			...

			synchronized (cache) {

				T service = (T) cache[mCacheIndex];

				if (service != null || gates[mCacheIndex] == ContextImpl.STATE_NOT_FOUND) {

					return service; //服务已存在,无需创建

				}

				...

			}

			if (doInitialize) {

				T service = null;

				...

				try {

					//创建服务

					service = createService(ctx);

					...

				}

				...

                } finally {

					synchronized (cache) {

						//缓存服务,保证服务在同一应用进程中以单例存在

						cache[mCacheIndex] = service;

						...

					}

				}

				return service;

			}

			...

		}

	}

	public abstract T createService(ContextImpl ctx) throws ServiceNotFoundException;

}
每个 ContextImpl 对象在初始化时创建了一个用于缓存服务的数组,每个服务在第一次请求时才被创建并缓存,因此,每个 Context 中都可能存在一个单例的 WindowManager 对象。
声明:本文转自【framework】View添加过程
【framework】View添加过程的更多相关文章
- View绘制过程理解
假期撸了几篇自定义View相关的东西,后两天下雨呆在家里还是效率太低Orz 每个Activity都包含一个Window对象,这个Window对象通常由PhoneWindow来实现[1],而每个Wi ...
- [原创]Android从xml加载到View对象过程解析
我们从Activity的setContentView()入手,开始源码解析, //Activity.setContentView public void setContentView(int layo ...
- Android解析WindowManager(三)Window的添加过程
前言 在此前的系列文章中我们学习了WindowManager体系和Window的属性,这一篇我们接着来讲Window的添加过程.建议阅读此篇文章前先阅读本系列的前两篇文章. 1.概述 WindowMa ...
- ZT 第9章 Framework的启动过程
所在位置: 图书 -> 在线试读 -> Android内核剖析 第9章 Framework的启动过程 9.3 zygote的启动 前面小节介绍了Framework的运行环境,以及Dalvi ...
- Android窗口系统第二篇---Window的添加过程
以前写过客户端Window的创建过程,大概是这样子的.我们一开始从Thread中的handleLaunchActivity方法开始分析,首先加载Activity的字节码文件,利用反射的方式创建一个Ac ...
- 给view添加类似系统上拉快捷菜单的手势
iOS7以后从屏幕最下方上划会滑出快捷菜单,感觉这个效果不错,就想做个类似的效果,这个东西技术含量不高,每次都写一遍的话就太浪费时间了,所以就把它写成了一个分类,用起来会方便一点. demo地址:ht ...
- android绘制view的过程
1 android绘制view的过程简单描述 简单描述可以解释为:计算大小(measure),布局坐标计算(layout),绘制到屏幕(draw): 下面看看每一步的动作到底是 ...
- 【转】Android绘制View的过程研究——计算View的大小
Android绘制View的过程研究——计算View的大小 转自:http://liujianqiao398.blog.163.com/blog/static/18182725720121023218 ...
- 如何在IOS开发中在自己的framework中添加.bunble文件
今天就跟大家介绍一下有关,如何在IOS开发中在自己的framework中添加.bunble文件,该文章我已经在IOS教程网(http://ios.662p.com)发布过来,个人觉得还是对大家有帮助的 ...
- 给View添加手势,防止点击View上其他视图触发点击效果
在开发过程中,我们可能会遇到这个问题. 当我们给一个view添加了手势,但是我们又不想点击view上面的视图也触发手势.如下图: 我们在红色view上添加了手势,但是又不想点击黄色view也触发.其实 ...
随机推荐
- QT启动问题--找不到python36.dll-cnblog
1.报错:找不到python36.dll 2.解决 通过该查询CSDN下载相应的python36.dll放到C:\Windows\System32目录下即可 https://blog.csdn.net ...
- [转帖]Oracle中有大量的sniped会话
https://www.cnblogs.com/abclife/p/15699959.html 1 2 3 4 5 6 7 SQL> select status ,count(*) from g ...
- [转帖]tidb-系统内核调优及对比
一.背景 验证系统调优对性能的影响,用sysbench做了一些简单的测试,具体调整方法可见官方文档 二.特殊说明 1.透明大页查看 # 查看透明大页是否开启,[]在always处表示开启,[]在nev ...
- [转帖]LOAD DATA INFILE 导入数据
https://www.jianshu.com/p/bcafd8f3ad8e LOAD DATA INFILE语句用于高速地从一个文本文件中读取行,并写入一个表中.文件名称必须为一个文字字符串.LOA ...
- [转帖]clickhouse存储机制以及底层数据目录分布
https://www.cnblogs.com/MrYang-11-GetKnow/p/15818141.html#:~:text=%E6%AF%8F%E4%B8%80%E4%B8%AA%E6%95% ...
- [转帖]高性能异步io机制:io_uring
文章目录 1.性能测试 1.1.FIO 1.2.rust_echo_benc 2.io_uring 2.1.io_uring_setup 2.2.io_uring_enter 2.3.io_uring ...
- 【转帖】淫技巧 | 如何查看已连接的wifi密码
主题使用方法:https://github.com/xitu/juejin-markdown-themes theme: juejin highlight: github 一.引言 在实际工作中,常常 ...
- [转帖]03-rsync传输模式(本地传输、远程方式传输、守护进程模式传输)
https://developer.aliyun.com/article/885801?spm=a2c6h.24874632.expert-profile.282.7c46cfe9h5DxWK 简介: ...
- 行云部署成长之路--慢SQL优化之旅 | 京东云技术团队
当项目的SQL查询慢得像蜗牛爬行时,用户的耐心也在一点点被消耗,作为研发,我们可不想看到这样的事.这篇文章将结合行云部署项目的实践经验,带你走进SQL优化的奇妙世界,一起探索如何让那些龟速的查询飞 ...
- 在Linux Ubuntu系统中部署C++环境与Visual Studio Code软件
本文介绍在Linux Ubuntu操作系统下,配置Visual Studio Code软件与C++代码开发环境的方法. 在文章VMware虚拟机部署Linux Ubuntu系统的方法中,我们介 ...
