iOS截屏并修改截图然后分享的功能实现
一. 实现的效果类似微博的截图分享
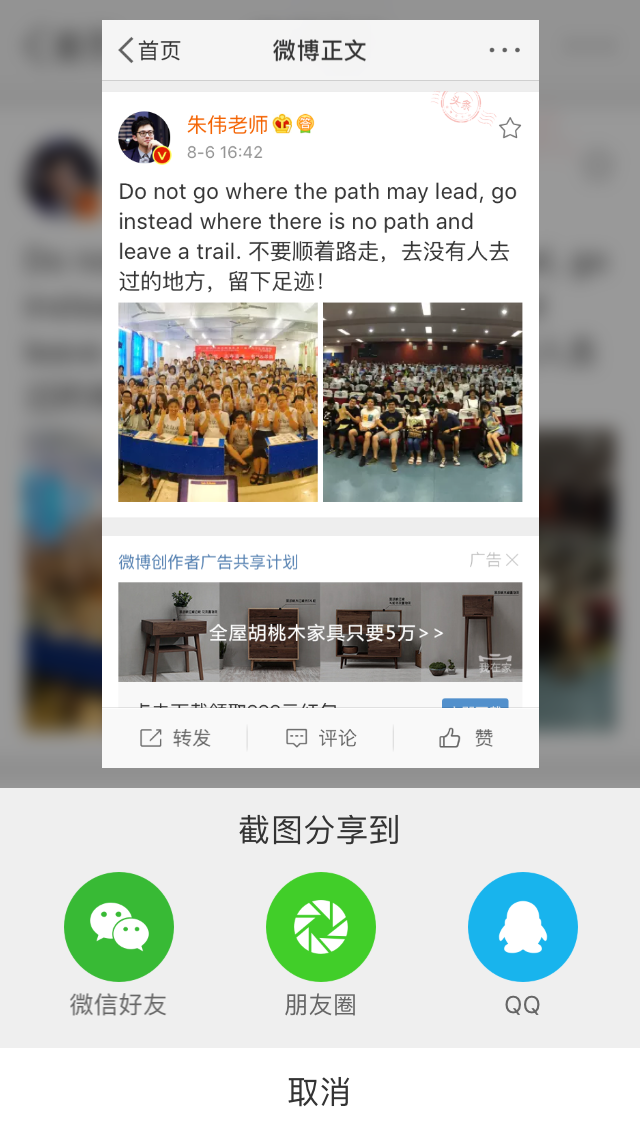

不仅截图分享的时候还进行图片的修改,增加自己的二维码
二.实现方式
苹果在ios7之后提供了一个新的通知类型:UIApplicationUserDidTakeScreenshotNotification,
这个通知会告知注册了此通知的对象已经发生了截屏事件,然后我们就可以在这个事件中实现自己的逻辑
1.注册通知
- (void)viewDidLoad {

    [super viewDidLoad];

    //注册用户的截屏操作通知

    [[NSNotificationCenter defaultCenter] addObserver:self

                                             selector:@selector(userDidTakeScreenshot:)

                                                 name:UIApplicationUserDidTakeScreenshotNotification object:nil];

}
2.接收通知 (获取截图并修改的图片,并展示,展示UI,可以自己修改)
//截屏响应

- (void)userDidTakeScreenshot:(NSNotification *)notification

{

    NSLog(@"检测到截屏");

    //人为截屏, 模拟用户截屏行为, 获取所截图片

    _testImg = [self imageWithScreenshot];

//    //添加显示

    UIImageView *imgvPhoto = [[UIImageView alloc]initWithImage:_testImg];

    imgvPhoto.frame = CGRectMake(, WIN_HEIGHT/, WIN_WIDTH/, WIN_HEIGHT/);

    imgvPhoto.backgroundColor = [UIColor orangeColor];

    imgvPhoto.userInteractionEnabled = YES;

    //添加边框

    CALayer * layer = [imgvPhoto layer];

    layer.borderColor = [[UIColor whiteColor] CGColor];

    layer.borderWidth = 5.0f;

    //添加四个边阴影

    imgvPhoto.layer.shadowColor = [UIColor blackColor].CGColor;

    imgvPhoto.layer.shadowOffset = CGSizeMake(, );

    imgvPhoto.layer.shadowOpacity = 0.5;

    imgvPhoto.layer.shadowRadius = 10.0;

    //添加两个边阴影

    imgvPhoto.layer.shadowColor = [UIColor blackColor].CGColor;

    imgvPhoto.layer.shadowOffset = CGSizeMake(, );

    imgvPhoto.layer.shadowOpacity = 0.5;

    imgvPhoto.layer.shadowRadius = 2.0;

    [self.view  addSubview:imgvPhoto];

    // 添加手势

    UITapGestureRecognizer *tap = [[UITapGestureRecognizer alloc]initWithTarget:self action:@selector(tapImgView:)];

    [imgvPhoto addGestureRecognizer:tap];

}
3. 截图并修改图片
/**

 *  截取当前屏幕 并修改

 *

 *  @return NSData *

 */

- (UIImage *)imageWithScreenshot

{

    CGSize imageSize = CGSizeZero;

    UIInterfaceOrientation orientation = [UIApplication sharedApplication].statusBarOrientation;

    if (UIInterfaceOrientationIsPortrait(orientation))

        imageSize = [UIScreen mainScreen].bounds.size;

    else

        imageSize = CGSizeMake([UIScreen mainScreen].bounds.size.height, [UIScreen mainScreen].bounds.size.width);

    UIGraphicsBeginImageContextWithOptions(imageSize, NO, );

    CGContextRef context = UIGraphicsGetCurrentContext();

    for (UIWindow *window in [[UIApplication sharedApplication] windows])

    {

        CGContextSaveGState(context);

        CGContextTranslateCTM(context, window.center.x, window.center.y);

        CGContextConcatCTM(context, window.transform);

        CGContextTranslateCTM(context, -window.bounds.size.width * window.layer.anchorPoint.x, -window.bounds.size.height * window.layer.anchorPoint.y);

        if (orientation == UIInterfaceOrientationLandscapeLeft)

        {

            CGContextRotateCTM(context, M_PI_2);

            CGContextTranslateCTM(context, , -imageSize.width);

        }else if (orientation == UIInterfaceOrientationLandscapeRight)

        {

            CGContextRotateCTM(context, -M_PI_2);

            CGContextTranslateCTM(context, -imageSize.height, );

        } else if (orientation == UIInterfaceOrientationPortraitUpsideDown) {

            CGContextRotateCTM(context, M_PI);

            CGContextTranslateCTM(context, -imageSize.width, -imageSize.height);

        }

        if ([window respondsToSelector:@selector(drawViewHierarchyInRect:afterScreenUpdates:)])

        {

            [window drawViewHierarchyInRect:window.bounds afterScreenUpdates:YES];

        }

        else

        {

            [window.layer renderInContext:context];

        }

        CGContextRestoreGState(context);

    }

    UIImage *image = UIGraphicsGetImageFromCurrentImageContext();

    UIGraphicsEndImageContext();

    // 修改图片

    NSData *imageData = UIImagePNGRepresentation(image);

    UIImage *LastImage = [UIImage imageWithData:imageData];

    UIImage *img = [UIImage imageNamed:@"ico_nursery.png"];

    CGImageRef imgRef = img.CGImage;

    CGFloat w = CGImageGetWidth(imgRef);

    CGFloat h = CGImageGetHeight(imgRef);

    //以1.png的图大小为底图

    UIImage *img1 = LastImage;

    CGImageRef imgRef1 = img1.CGImage;

    CGFloat w1 = CGImageGetWidth(imgRef1);

    CGFloat h1 = CGImageGetHeight(imgRef1);

    //以1.png的图大小为画布创建上下文

    UIGraphicsBeginImageContext(CGSizeMake(w1, h1 + ));

    [img1 drawInRect:CGRectMake(, , w1, h1)];//先把1.png 画到上下文中

    [img drawInRect:CGRectMake(, h1 + , , )];//再把小图放在上下文中

    UIImage *resultImg = UIGraphicsGetImageFromCurrentImageContext();//从当前上下文中获得最终图片

    UIGraphicsEndImageContext();//关闭上下文

    return  resultImg;

}
4.根据添加的事件进行分享 分享自己也可封装
// 点击图片改变imageView位置,打印图片信息 分享自己也可封装
- (void)tapImgView: (UITapGestureRecognizer *)tap { NSLog(@"点击了图片...");
// 微信
[MyAPIClient mobEvent:@"wechat"];
// [Helper shareImageName:_testImg type:SSDKPlatformSubTypeWechatSession];// 微信好友
[Helper shareImageName:_testImg type:SSDKPlatformSubTypeWechatTimeline];// 微信朋友圈
// [MyAPIClient mobEvent:@"QQ"];
// [Helper shareImageName:_testImg type:SSDKPlatformTypeQQ];// QQ }
5. 移除通知
- (void)dealloc

{

    [[NSNotificationCenter defaultCenter]removeObserver:self];

}
这样就可以了.展示一下测试
自身截图
截图修改分享图

ok,结束,需要补充的,欢迎大家留言讨论!
iOS截屏并修改截图然后分享的功能实现的更多相关文章
- iOS - 截屏,view截图的基本方法
推荐一个第三方好用的框架:SDScreenshotCapture #define SYSTEM_VERSION_GREATER_THAN_OR_EQUAL_TO(v) ([[[UIDevice cur ...
- iOS 截屏分享(包含状态栏与不包含状态栏)
iOS8以上的新方法PhotoKit 监听截图相册变化,取最后一张图片:http://www.hangge.com/blog/cache/detail_1515.html PhotoKit 获取本机相 ...
- Android 截屏与 WebView 长图分享经验总结
最近在做新业务需求的同时,我们在 Android 上遇到了一些之前没有碰到过的问题,截屏分享. WebView 生成长图以及长图在各个分享渠道分享时图片模糊甚至分享失败等问题,在这过程中踩了很多坑,到 ...
- ios截屏代码[转]
http://www.cnblogs.com/chenxiangxi/p/3547974.html 这位博主的连接中将ios自定义大小位置的截屏代码写的很不错,马上就能用的方法,对于只想马上用的程序员 ...
- iOS截屏代码
转载自:http://m.open-open.com/m/code/view/1420469506375 1.普通界面 /** *截图功能 */ -(void)screenShot{ UIGraphi ...
- iOS截屏保存至相册
#pragma mark 截屏并保存至相册 -(void)screenShotsComplete:(void(^)(UIImage * img)) complete { CGSize imageSiz ...
- iOS截屏方法
//获取屏幕截屏方法 - (UIImage *)capture { // 创建一个context UIGraphicsBeginImageContextWithOptions(self.view.bo ...
- iOS截屏功能
代码: - (void)viewDidLoad { [super viewDidLoad]; // Do any additional setup after loading the view. // ...
- IOS 截屏(保存到相册中)
@interface NJViewController () /** * 点击截屏按钮 */ - (IBAction)captureView:(UIButton *)sender; /** * 白色v ...
随机推荐
- C#常见金额优选类型及其三种常用的取整方式
这两天一直在做一个商城后台的对账方面的工作,忽然发现C#真的有很多值的学习的东西: 一.C#常用的三种取整方式(主要适用于double.decimal.float这一类型的数据): Math.Roun ...
- 进行API开发选gRPC还是HTTP APIs?
上一篇文章我带着大家体验了一把<ASP.NET Core 3.0 上的gRPC服务模板初体验(多图)>,如果有兴趣的可以点击链接进行查看,相信跟着做的你,也是可以跑起来的.这篇文章我们将一 ...
- DotNetCore跨平台~为debain系统添加阿里云加速
回到目录 直接把它阿里云的镜像覆盖到原来的/etc/apt/sources.list文件 cat > /etc/apt/sources.list << EOF deb http:// ...
- Python:strip 函数踩坑
S.strip(chars=None) strip 函数用于去除字符串首尾的空格,当 chars 不为 None 时,则删除字符串首尾的 chars 中的字符. 当 chars=None 时,去除首尾 ...
- WebApiClient的JsonPatch局部更新
1. 文章目的 随着WebApiClient的不断完善,越来越多开发者选择WebApiClient替换原生的HttpClient,本文将介绍使用WebApiClient来完成JsonPatch提交的新 ...
- Python编程从入门到实践笔记——文件
Python编程从入门到实践笔记——文件 #coding=gbk #Python编程从入门到实践笔记——文件 #10.1从文件中读取数据 #1.读取整个文件 file_name = 'pi_digit ...
- Springboot 系列(十二)使用 Mybatis 集成 pagehelper 分页插件和 mapper 插件
前言 在 Springboot 系列文章第十一篇里(使用 Mybatis(自动生成插件) 访问数据库),实验了 Springboot 结合 Mybatis 以及 Mybatis-generator 生 ...
- DS控件库 DS开放式下拉列表
在一些场合中,需要使用组合式下拉列表控件,比如带treeivew的combobox,但是代码较多,使用不便.为此,本人制作了一个超级易用的DS开放式下拉列表. 以下演示使用过程. Private Su ...
- Asp.Net MVC Unobtrusive Ajax
1. Unobtrusive JavaScript介绍 说到Unobtrusive Ajax,就要谈谈UnobtrusiveJavaScript了,所谓Unobtrusive JavaScript ...
- 外观模式 门面模式 Facade 结构型 设计模式(十三)
外观模式(FACADE) 又称为门面模式 意图 为子系统中的一组接口提供一个一致的界面 Facade模式定义了一个高层接口,这一接口使得这一子系统更加易于使用. 意图解析 随着项目的持续发展,系统 ...