引入Activiti配置文件activiti.cfg.xml
前面我们用代码实现了生成25张activiti表,今天我们用Activiti提供的activiti.cfg.xml配置文件来简化实现前面的功能;
官方文档参考地址:http://activiti.org/userguide/index.html#configuration
我们先在src/test/resources下创建一个xml文件 名字是:activiti.cfg.xml
然后我们从官方文档贴下参考的xml代码:
|
1
2
3
4
5
6
7
8
9
10
11
12
13
14
15
16
17
18
19
20
21
22
|
<beans xmlns="http://www.springframework.org/schema/beans" xmlns:xsi="http://www.w3.org/2001/XMLSchema-instance" xsi:schemaLocation="http://www.springframework.org/schema/beans http://www.springframework.org/schema/beans/spring-beans.xsd"> <bean id="processEngineConfiguration" class="org.activiti.engine.impl.cfg.StandaloneProcessEngineConfiguration"> <property name="jdbcUrl" value="jdbc:h2:mem:activiti;DB_CLOSE_DELAY=1000" /> <property name="jdbcDriver" value="org.h2.Driver" /> <property name="jdbcUsername" value="sa" /> <property name="jdbcPassword" value="" /> <property name="databaseSchemaUpdate" value="true" /> <property name="jobExecutorActivate" value="false" /> <property name="asyncExecutorEnabled" value="true" /> <property name="asyncExecutorActivate" value="false" /> <property name="mailServerHost" value="mail.my-corp.com" /> <property name="mailServerPort" value="5025" /> </bean></beans> |
这里的话,我们要根据我们的项目 修改jdbcUrl jdbcDriver jdbcUsername jdbcPassword 当然还有下面的配置我们可以去掉一些 后面会降到这些配置的用途;
修改完后的xml如下:
|
1
2
3
4
5
6
7
8
9
10
11
12
13
14
15
16
17
|
<?xml version="1.0" encoding="UTF-8"?><beans xmlns="http://www.springframework.org/schema/beans" xmlns:xsi="http://www.w3.org/2001/XMLSchema-instance" xsi:schemaLocation="http://www.springframework.org/schema/beans http://www.springframework.org/schema/beans/spring-beans.xsd"> <bean id="processEngineConfiguration" class="org.activiti.engine.impl.cfg.StandaloneProcessEngineConfiguration"> <property name="jdbcUrl" value="jdbc:mysql://localhost:3306/db_activiti" /> <property name="jdbcDriver" value="com.mysql.jdbc.Driver" /> <property name="jdbcUsername" value="root" /> <property name="jdbcPassword" value="123456" /> <property name="databaseSchemaUpdate" value="true" /> </bean></beans> |
接下来我们就是要通过代码来读取配置文件,然后获取工作流引擎实例:
代码如下:
|
1
2
3
4
5
6
7
8
9
10
|
/** * 使用xml配置 简化 */@Testpublic void testCreateTableWithXml(){ // 引擎配置 ProcessEngineConfiguration pec=ProcessEngineConfiguration.createProcessEngineConfigurationFromResource("activiti.cfg.xml"); // 获取流程引擎对象 ProcessEngine processEngine=pec.buildProcessEngine();} |
然后我们测试的时候 先把前面db_activiti数据下的表 全部删除;
然后运行上面的测试类,我们会发现 表自动生成了:
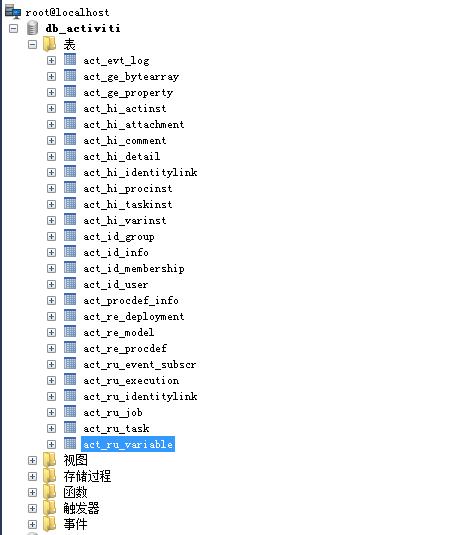
表依然是前面的25张表;
我们会发现,使用xml配置会简化很多东西。。
完整代码打包下载:http://pan.baidu.com/s/1nuSJ3kd
引入Activiti配置文件activiti.cfg.xml的更多相关文章
- 1-2 hibernate主配置文件hibernate.cfg.xml详解
详 http://www.cnblogs.com/biehongli/p/6531575.html Hibernate的主配置文件hibernate.cfg.xml 1:Hibernate的主配置文件 ...
- Hibernate的配置文件,hibernate.cfg.xml
单纯的只针对持久层框架 Hibernate 配置文件的一些总结 一.Hibernate底层原理 1. Hibernate保存原理 目的:把domain对象保存到数据库的表,形成一条记录. sql: i ...
- Hibernate框架 主配置文件 Hibernate.cfg.xml 映射配置 说明
1 主配置文件 Hibernate.cfg.xml 主配置文件中主要配置:数据库连接信息.其他参数.映射信息! 常用配置查看源码: hibernate-distribution-3.6.0.Final ...
- hibernate配置文件hibernate.cfg.xml和.hbm.xml的详细解释
原文地址:http://blog.csdn.net/qiaqia609/article/details/9456489 hibernate.cfg.xml -标准的XML文件的起始行,version= ...
- hibernate配置文件hibernate.cfg.xml的详细解释
<!--标准的XML文件的起始行,version='1.0'表明XML的版本,encoding='gb2312'表明XML文件的编码方式--> <?x ...
- hibernate篇章三-- hibernate配置文件hibernate.cfg.xml的详细解释
<!--标准的XML文件的起始行,version='1.0'表明XML的版本,encoding='gb2312'表明XML文件的编码方式--> <?xml version='1.0' ...
- Hibernate 配置文件hibernate.cfg.xml的详细
<!--标准的XML文件的起始行,version='1.0'表明XML的版本,encoding='gb2312'表明XML文件的编码方式--> <?xml ...
- 转: hibernate配置文件hibernate.cfg.xml和.hbm.xml的详细解释
http://blog.csdn.net/yuhui123999/article/details/51886531 hibernate.cfg.xml -标准的XML文件的起始行,version='1 ...
- Hibernate(3)配置文件hibernate.cfg.xml
5.配置文件 Hibernate 配置文件主要用于配置数据库连接和 Hibernate 运行时所需的各种属性,每个 Hibernate 配置文件对应一个 Configuration 对象 Hibern ...
随机推荐
- 「洛谷P1080」「NOIP2012提高组」国王游戏 解题报告
P1080 国王游戏 题目描述 恰逢 \(H\)国国庆,国王邀请\(n\)位大臣来玩一个有奖游戏.首先,他让每个大臣在左.右手上面分别写下一个整数,国王自己也在左.右手上各写一个整数.然后,让这 \( ...
- 12款好用的Visual Studio插件,最后一款良心推荐
目录 01 CodeMaid 02 Markdown Editor 03 ReSharper 04 GitHub Extension for Visual Studio 05 ZenCoding 06 ...
- structs2的048漏洞复现 2.3.32版本
S2-048 远程代码执行漏洞 影响版本: 2.0.0 - 2.3.32 之前在网上说只要时2.3.*的版本都有这个漏洞,自己装了个2.3.34的试了几次都没有执行 然后下载了找到了这篇文章才知道影响 ...
- Persistence.beans
SF_USERS user = new SF_USERS(); user.setCTIME("20170103"); String ids = "fish,water&q ...
- bash shell-linux的预设shell
1.bash 是GNU 计划中重要的工具软件之一,目前也是Linux distributions 的标准shell.其主要功能如下: (1)命令记忆和历史功能,可以通过history查询,存储位置在~ ...
- Atom + Texlive 配置 Latex 环境
Atom + Texlive 配置 Latex 环境 步骤1: 安装TexliveTexlive点击 "Download" 下载,然后安装,等待安装完成即可 步骤2: 安装Atom ...
- 比特币学习笔记(一)---在windows下编译搭建比特币环境
最近打算研究下比特币源码,却发现这套源码正常情况下得在linux下编译运行,而我的机器是windows的. 怎么办呢? 起初打算用mingw和cygwin搞搞看,试了许久后发现行不通,必须转到linu ...
- 全流程开发 TP6.0实战高并发电商服务系统*完
在TP6框架中我们可以学到TP整体知识,如下图一所示: 图一:TP6整体知识点 这些内容都会在实战课程中一一涵盖,并且在课程中我们会用到五层架构思想(如图二),和传统的MVC架构有所不一样,这样做可以 ...
- Deferred shading rendering path翻译
Overview 概述 When using deferred shading, there is no limit on the number of lights that can affect a ...
- Java List集合的介绍与常用方法
List接口的介绍 List接口简介: java.util.List接口继承自Collection接口,是单列集合的一个重要分支,习惯性地会将实现了List接口的对象称为List集合. 在List集合 ...