SpringJDBC的使用(转载)
转载自 https://www.yiibai.com/spring/maven-spring-jdbc-example.html
工具: eclipse4.7.2及mysql-8.0.13
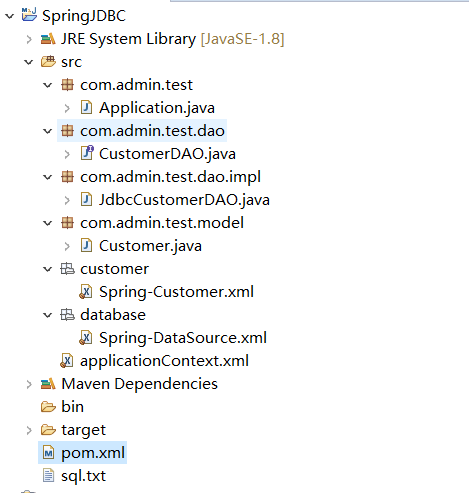
项目最终结构为:

1、首先新建java project,命名为SpringJDBC,然后选中项目,右键-Configure-Convert to maven project, 就会有src、bin、target三个文件夹以及pom.xml文件。
修改pom.xml文件,引入jar包,其中mysql-connector-java与mysql版本版本要相互对应
<project xmlns="http://maven.apache.org/POM/4.0.0" xmlns:xsi="http://www.w3.org/2001/XMLSchema-instance"

	xsi:schemaLocation="http://maven.apache.org/POM/4.0.0 http://maven.apache.org/xsd/maven-4.0.0.xsd">

	<modelVersion>4.0.0</modelVersion>

	<groupId>com.admin</groupId>

	<artifactId>SpringJDBC</artifactId>

	<version>0.0.1-SNAPSHOT</version>

	<properties>

		<spring.version>3.1.1.RELEASE</spring.version>

	</properties>

	<build>

		<sourceDirectory>src</sourceDirectory>

		<plugins>

			<plugin>

				<artifactId>maven-compiler-plugin</artifactId>

				<version>3.7.0</version>

				<configuration>

					<source>1.8</source>

					<target>1.8</target>

				</configuration>

			</plugin>

		</plugins>

	</build>

	<dependencies>

		<dependency>

			<groupId>org.springframework</groupId>

			<artifactId>spring-core</artifactId>

			<version>${spring.version}</version>

		</dependency>

		<dependency>

			<groupId>org.springframework</groupId>

			<artifactId>spring-context</artifactId>

			<version>${spring.version}</version>

		</dependency>

		<dependency>

			<groupId>org.springframework</groupId>

			<artifactId>spring-context</artifactId>

			<version>${spring.version}</version>

		</dependency>

		<!-- https://mvnrepository.com/artifact/org.springframework/spring-jdbc -->

		<dependency>

			<groupId>org.springframework</groupId>

			<artifactId>spring-jdbc</artifactId>

			<version>5.1.2.RELEASE</version>

		</dependency>

		<dependency>

			<groupId>mysql</groupId>

			<artifactId>mysql-connector-java</artifactId>

			<version>8.0.12</version>

		</dependency>

		<!-- https://mvnrepository.com/artifact/com.alibaba/fastjson -->

		<dependency>

			<groupId>com.alibaba</groupId>

			<artifactId>fastjson</artifactId>

			<version>1.2.51</version>

		</dependency>

	</dependencies>

</project>
2、选中src,右键- new- Other- General- Folder, 新建两个文件夹customer、database,new- Other- General- File分别再新建两个文件Spring-Customer.xml、Spring-DataSource.xml
Spring-Customer.xml
<beans xmlns="http://www.springframework.org/schema/beans"

    xmlns:xsi="http://www.w3.org/2001/XMLSchema-instance"

    xsi:schemaLocation="http://www.springframework.org/schema/beans

    http://www.springframework.org/schema/beans/spring-beans-2.5.xsd">

    <bean id="customerDAO" class="com.admin.test.dao.impl.JdbcCustomerDAO">

        <property name="dataSource" ref="dataSource" />

    </bean>

</beans>
Spring-DataSource.xml
<beans xmlns="http://www.springframework.org/schema/beans"
xmlns:xsi="http://www.w3.org/2001/XMLSchema-instance"
xsi:schemaLocation="http://www.springframework.org/schema/beans
http://www.springframework.org/schema/beans/spring-beans-2.5.xsd"> <bean id="dataSource"
class="org.springframework.jdbc.datasource.DriverManagerDataSource"> <property name="driverClassName" value="com.mysql.cj.jdbc.Driver" />
<property name="url" value="jdbc:mysql://localhost:3306/test?useUnicode=true&characterEncoding=utf8&serverTimezone=GMT%2B8&allowPublicKeyRetrieval=true&useSSL=false" />
<property name="username" value="********" />
<property name="password" value="********" />
</bean>
</beans>
其中Spring-Customer.xml中class要与步骤3中的类相对应,Spring-DataSource.xml中driverClassName对应的value,maven dependencies引用的jar包mysql-connector-java 6及以后的版本对应为com.mysql.cj.jdbc.Driver,之前的版本为com.mysql.jdbc.Driver,url对应的value值jdbc:mysql://localhost:3306/后的test为mysql的database名,username和password分别填写mysql的用户名和密码。
在src中新建一个文件applicationContext.xml,引用两个资源文件。
<beans xmlns="http://www.springframework.org/schema/beans"

    xmlns:context="http://www.springframework.org/schema/context"

    xmlns:xsi="http://www.w3.org/2001/XMLSchema-instance"

    xsi:schemaLocation="

    http://www.springframework.org/schema/beans

    http://www.springframework.org/schema/beans/spring-beans-3.0.xsd

    http://www.springframework.org/schema/context

    http://www.springframework.org/schema/context/spring-context-3.0.xsd">

    <import resource="database/Spring-Datasource.xml"/>

    <import resource="customer/Spring-Customer.xml"/>

</beans>
3、新建com.admin.test、com.admin.test.dao、com.admin.test.dao.impl、com.admin.test.model四个包(Package),分别新建四个类Application.java、CustomerDao.java、JdbcCustomerDAO.java、
Customer.java。
Application.java
package com.admin.test;

import org.springframework.context.ApplicationContext;

import org.springframework.context.support.ClassPathXmlApplicationContext;

import com.admin.test.dao.CustomerDAO;

import com.admin.test.model.Customer;

public class Application {

    public static void main(String[] args) {

        ApplicationContext context =

                new ClassPathXmlApplicationContext("applicationContext.xml");

            CustomerDAO customerDAO = (CustomerDAO) context.getBean("customerDAO");

            Customer customer = new Customer(3, "admin",29);

            try {

                customerDAO.insert(customer);

            } catch (Exception e) {

                e.printStackTrace();

            }

            Customer customer1 = customerDAO.findByCustomerId(3);

            System.out.println(customer1);

    }

}
CustomerDAO.java
package com.admin.test.dao;

import com.admin.test.model.Customer;

public interface CustomerDAO {

    public void insert(Customer customer);

    public Customer findByCustomerId(int custId);

}
JdbcCustomerDAO.java
package com.admin.test.dao.impl;

import java.sql.Connection;

import java.sql.PreparedStatement;

import java.sql.ResultSet;

import java.sql.SQLException;

import javax.sql.DataSource;

import com.admin.test.dao.CustomerDAO;

import com.admin.test.model.Customer;

public class JdbcCustomerDAO implements CustomerDAO {

    private DataSource dataSource;

    public void setDataSource(DataSource dataSource) {

        this.dataSource = dataSource;

    }

    public void insert(Customer customer){

        String sql = "INSERT INTO CUSTOMER " +

                "(CUST_ID, NAME, AGE) VALUES (?, ?, ?)";

        Connection conn = null;

        try {

            conn = dataSource.getConnection();

            PreparedStatement ps = conn.prepareStatement(sql);

            ps.setInt(1, customer.getCustId());

            ps.setString(2, customer.getName());

            ps.setInt(3, customer.getAge());

            ps.executeUpdate();

            ps.close();

        } catch (SQLException e) {

            throw new RuntimeException(e);

        } finally {

            if (conn != null) {

                try {

                    conn.close();

                } catch (SQLException e) {}

            }

        }

    }

    public Customer findByCustomerId(int custId){

        String sql = "SELECT * FROM CUSTOMER WHERE CUST_ID = ?";

        Connection conn = null;

        try {

            conn = dataSource.getConnection();

            PreparedStatement ps = conn.prepareStatement(sql);

            ps.setInt(1, custId);

            Customer customer = null;

            ResultSet rs = ps.executeQuery();

            if (rs.next()) {

                customer = new Customer(

                    rs.getInt("CUST_ID"),

                    rs.getString("NAME"),

                    rs.getInt("Age")

                );

            }

            rs.close();

            ps.close();

            return customer;

        } catch (SQLException e) {

            throw new RuntimeException(e);

        } finally {

            if (conn != null) {

                try {

                conn.close();

                } catch (SQLException e) {}

            }

        }

    }

}
Customer.java
package com.admin.test.model;

import com.alibaba.fastjson.JSON;

public class Customer {

    int custId;

    String name;

    int age;

    public Customer(int custId, String name, int age) {

        this.custId = custId;

        this.name = name;

        this.age = age;

    }

    public int getCustId() {

        return custId;

    }

    public void setCustId(int custId) {

        this.custId = custId;

    }

    public String getName() {

        return name;

    }

    public void setName(String name) {

        this.name = name;

    }

    public int getAge() {

        return age;

    }

    public void setAge(int age) {

        this.age = age;

    }

    @Override

    public String toString() {

        try {

            return JSON.toJSONString(this);

        } catch (Exception e) {

            e.printStackTrace();

        }

        return "";

    }

}
4、登录mysql后执行以下语句,注意`不是单引号,是反单引号,英文状态下tab键上面一个键输入
drop database if exists test;

create database test;

use test;

CREATE TABLE `customer` (

  `CUST_ID` int(10) unsigned NOT NULL AUTO_INCREMENT,

  `NAME` varchar(100) NOT NULL,

  `AGE` int(10) unsigned NOT NULL,

  PRIMARY KEY (`CUST_ID`)

) ENGINE=InnoDB AUTO_INCREMENT=1 DEFAULT CHARSET=utf8;
数据库test与Spring-DataSource.xml中url的value中test相对应,表customer与JdbcCustomerDAO.java中插入语句、查询语句的customer相对应。
5、Run- RunConfigurations- java application- 右键 - new,填写Project为SpringJDBC、Main class为com.admin.test.Application,Name随便,apply确定。
run----> run as---> java application, 即可在console中看到Application.java中的输出。
SpringJDBC的使用(转载)的更多相关文章
- 转载:Spring+EhCache缓存实例
转载来自:http://www.cnblogs.com/mxmbk/articles/5162813.html 一.ehcahe的介绍 EhCache 是一个纯Java的进程内缓存框架,具有快速.精干 ...
- Mybatis与Spring整合,使用了maven管理项目,作为初学者觉得不错,转载下来
转载自:http://www.cnblogs.com/xdp-gacl/p/4271627.html 一.搭建开发环境 1.1.使用Maven创建Web项目 执行如下命令: mvn archetype ...
- SSM框架——详细整合教程(Spring+SpringMVC+MyBatis)【转载】
最近在学习Spring+SpringMVC+MyBatis的整合.以下是参考网上的资料自己实践操作的详细步骤. 1.基本概念 1.1.Spring Spring是一个开源框架,Spring是于20 ...
- [转载] 【Shiro】Apache Shiro架构之实际运用(整合到Spring中)
写在前面:前面陆陆续续对Shiro的使用做了一些总结,如题,这篇博文主要是总结一下如何将Shiro运用到实际项目中,也就是将Shiro整到Spring中进行开发.后来想想既然要整,就索性把Spring ...
- [转载,感觉写的非常详细]DUBBO配置方式详解
[转载,感觉写的非常详细]DUBBO配置方式详解 原文链接:http://www.cnblogs.com/chanshuyi/p/5144288.html DUBBO 是一个分布式服务框架,致力于提供 ...
- SSM三大框架整合详细教程(Spring+SpringMVC+MyBatis)(转载)
使用SSM(Spring.SpringMVC和Mybatis)已经有三个多月了,项目在技术上已经没有什么难点了,基于现有的技术就可以实现想要的功能,当然肯定有很多可以改进的地方.之前没有记录SSM整合 ...
- Crystal Clear Applied: The Seven Properties of Running an Agile Project (转载)
作者Alistair Cockburn, Crystal Clear的7个成功要素,写得挺好. 敏捷方法的关注点,大家可以参考,太激动所以转载了. 原文:http://www.informit.com ...
- RTP与RTCP协议介绍(转载)
RTSP发起/终结流媒体.RTP传输流媒体数据 .RTCP对RTP进行控制,同步.RTP中没有连接的概念,本身并不能为按序传输数据包提供可靠的保证,也不提供流量控制和拥塞控制,这些都由RTCP来负责完 ...
- 《Walking the callstack(转载)》
本文转载自:https://www.codeproject.com/articles/11132/walking-the-callstack Download demo project with so ...
随机推荐
- Python从文件中读取内容,包含中文和英文
读取文件内容使要和保存文件时的格式一致 以UTF-8格式保存文件,如: 读取: 在.py起始行写入:#-*- coding:utf-8 -*- filename = raw_input(u" ...
- HDFS Concepts-blocks
- 【codeforces 520A】Pangram
[题目链接]:http://codeforces.com/problemset/problem/520/A [题意] 给你一个字符串. 统计里面有没有出现所有的英文字母->'a'..'z' 每个 ...
- javascript 宽度和高度
宽度和高度 对于编写css代码时,宽度和高度就是width和height 但是在JavaScript中,还有其他的宽度和高度,比如offsetWidth,offsetHeight,clientX,cl ...
- 2019-10-5-dotnet-core-获取-MacAddress-地址方法
title author date CreateTime categories dotnet core 获取 MacAddress 地址方法 lindexi 2019-10-05 10:44:10 + ...
- springboot 项目打包可运行jar文件
eclipse 运行run as maven bulid ,填入package ,运行打包 java -jar xxx.jar
- 【BZOJ 1004】 [HNOI2008]Cards
[题目链接]:http://www.lydsy.com/JudgeOnline/problem.php?id=1004 [题意] 给你sr+sb+sg张牌,(令n=sr+sb+sg),让你把这n张牌染 ...
- python基础五之字典
python数据的可变性 通过数据的可变性,可将数据分为可变数据类型和不可变数据类型. 可变数据类型:list,dict (不可哈希) 不可变数据类型:元祖,bool,int,str (可哈希) py ...
- springSecurity安全框架的学习和原理解读
最近在公司的项目中使用了spring security框架,所以有机会来学习一下,公司的项目是使用springboot搭建 springBoot版本1.59 spring security 版本4.2 ...
- H3C 配置路由器作为FTP服务器端
