kaggle 实战 (1): PCA + KNN 手写数字识别
本文采用PCA+KNN的方法进行kaggle手写数字识别,训练数据共有42000行,每行代表一幅数字图片,共有784列(一副数字图像是28*28像素,将一副图像展开为一行即784),更多关于Digit Recognizer项目的介绍https://www.kaggle.com/c/digit-recognizer
由于训练数据量太大,直接采用KNN非常耗时,采用PCA降维的方法,选取25个维度,跑完全部数据只需200秒左右。
加载package
# This Python 3 environment comes with many helpful analytics libraries installed

# It is defined by the kaggle/python docker image: https://github.com/kaggle/docker-python

# For example, here's several helpful packages to load in

import numpy as np # linear algebra

import pandas as pd # data processing, CSV file I/O (e.g. pd.read_csv)

import matplotlib.pyplot as plt # import de Matplotlib

from IPython.display import display

from PIL import Image

# Input data files are available in the "../input/" directory.

# For example, running this (by clicking run or pressing Shift+Enter) will list the files in the input directory

import os

print(os.listdir("../input"))

# Any results you write to the current directory are saved as output.
read data
train=pd.read_csv('../input/train.csv')

train.shape

submission = pd.read_csv('../input/test.csv')

test=pd.read_csv('../input/test.csv')

test.shape

y_train = train['label']

y_train.head()

x_train=train.drop(['label'], axis=1)

x_train.head() # affiche le tableau ci-dessous

X_submission =test
PCA 降维探索
pca = PCA(200)

pca_full = pca.fit(x_train)

plt.plot(np.cumsum(pca_full.explained_variance_ratio_))

plt.xlabel('# of components')

plt.ylabel('Cumulative explained variance')

选择50维度, 拆分数据为训练集,测试机
pca = PCA(n_components=50)

X_train_transformed = pca.fit_transform(x_train)

X_submission_transformed = pca.transform(x_test)

from sklearn.model_selection import train_test_split

X_train_pca, X_test_pca, y_train_pca, y_test_pca = train_test_split(X_train_transformed, y_train, test_size=0.2, random_state=13)
KNN PCA降维和K值筛选
components = [5, 10, 15, 20, 25, 30, 35, 40, 45, 50]

neighbors = [1, 2, 3, 4, 5, 6, 7]

scores = np.zeros( (components[len(components)-1]+1, neighbors[len(neighbors)-1]+1 ) )
from sklearn.neighbors import KNeighborsClassifier

for component in components:

    for n in neighbors:

        knn = KNeighborsClassifier(n_neighbors=n)

        knn.fit(X_train_pca[:,:component], y_train_pca)

        score = knn.score(X_test_pca[:,:component], y_test_pca)

        #predict = knn.predict(X_test_pca[:,:component])

        scores[component][n] = score

        print('Components = ', component, ', neighbors = ', n,', Score = ', score)

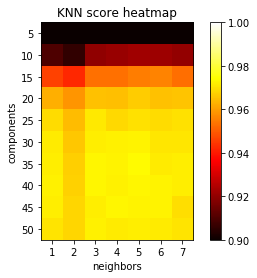
k 值的意义:

分析k & 维度 vs 精度
scores = np.reshape(scores[scores != 0], (len(components), len(neighbors)))

x = [0, 1, 2, 3, 4, 5, 6]

y = [0, 1, 2, 3, 4, 5, 6, 7, 8, 9]

plt.rcParams["axes.grid"] = False

fig, ax = plt.subplots()

plt.imshow(scores, cmap='hot', interpolation='none', vmin=.90, vmax=1)

plt.xlabel('neighbors')

plt.ylabel('components')

plt.xticks(x, neighbors)

plt.yticks(y, components)

plt.title('KNN score heatmap')

plt.colorbar()

plt.show()

预测
knn = KNeighborsClassifier(n_neighbors=5)

knn.fit(X_train_pca[:, :35], y_train_pca)

predict_labels = knn.predict(X_submission_transformed[:, :35])
对于PCA维度的选取:在多次尝试后,采用35个维度,效果较好。需要注意的是,PCA处理后的训练数据和原始数据是不同的,所以采用PCA处理数据后,并不是选取的维度越多精确度就越好。k 选5 可以达到很好效果
生成提交文件
Submission = pd.DataFrame({

        "ImageId": range(1, predict_labels.shape[0]+1),

        "Label": predict_labels

    })

Submission.to_csv("KnnMnistSubmission.csv", index=False)

Submission.head(5)
kaggle 实战 (1): PCA + KNN 手写数字识别的更多相关文章
- 机器学习(二)-kNN手写数字识别
一.kNN算法是机器学习的入门算法,其中不涉及训练,主要思想是计算待测点和参照点的距离,选取距离较近的参照点的类别作为待测点的的类别. 1,距离可以是欧式距离,夹角余弦距离等等. 2,k值不能选择太大 ...
- 10,knn手写数字识别
# 导包 import numpy as np import matplotlib.pyplot as plt from sklearn.neighbors import KNeighborsClas ...
- KNN手写数字识别
import numpy as np import matplotlib .pyplot as plt from sklearn.neighbors import KNeighborsClassifi ...
- 一看就懂的K近邻算法(KNN),K-D树,并实现手写数字识别!
1. 什么是KNN 1.1 KNN的通俗解释 何谓K近邻算法,即K-Nearest Neighbor algorithm,简称KNN算法,单从名字来猜想,可以简单粗暴的认为是:K个最近的邻居,当K=1 ...
- Kaggle竞赛丨入门手写数字识别之KNN、CNN、降维
引言 这段时间来,看了西瓜书.蓝皮书,各种机器学习算法都有所了解,但在实践方面却缺乏相应的锻炼.于是我决定通过Kaggle这个平台来提升一下自己的应用能力,培养自己的数据分析能力. 我个人的计划是先从 ...
- K近邻实战手写数字识别
1.导包 import numpy as np import operator from os import listdir from sklearn.neighbors import KNeighb ...
- 深度学习之PyTorch实战(3)——实战手写数字识别
上一节,我们已经学会了基于PyTorch深度学习框架高效,快捷的搭建一个神经网络,并对模型进行训练和对参数进行优化的方法,接下来让我们牛刀小试,基于PyTorch框架使用神经网络来解决一个关于手写数字 ...
- KNN实现手写数字识别
KNN实现手写数字识别 博客上显示这个没有Jupyter的好看,想看Jupyter Notebook的请戳KNN实现手写数字识别.ipynb 1 - 导入模块 import numpy as np i ...
- 用MXnet实战深度学习之一:安装GPU版mxnet并跑一个MNIST手写数字识别
用MXnet实战深度学习之一:安装GPU版mxnet并跑一个MNIST手写数字识别 http://phunter.farbox.com/post/mxnet-tutorial1 用MXnet实战深度学 ...
随机推荐
- Java缓冲区读写
缓冲区读 有两种方法从缓冲区读取数据: 绝对位置 相对位置 使用四个版本重载的get()方法用于从缓冲区读取数据. get(int index)返回给定索引处的数据. get()从缓冲区中的当前位置返 ...
- Nginx学习——proxy_pass
参考官网:http://nginx.org/en/docs/http/ngx_http_proxy_module.html#proxy_pass 定义:用来设置被代理服务器的协议(http或https ...
- html5本地存储(三)--- 本地数据库 indexedDB
html5内置了2种本地数据库,一是被称为“SQLLite”,可以通过SQL语言来访问文件型SQL数据库.二是被称为“indexedDB” 的NoSQL类型的数据库,本篇主要讲indexedDB数据库 ...
- html5本地存储(二)--- SQLList
html5内置了2种本地数据库,一是被称为“SQLLite”,可以通过SQL语言来访问文件型SQL数据库.二是被称为“indexedDB” 的NoSQL类型的数据库 这篇主要讲SQLLite 在js中 ...
- P3224 [HNOI2012]永无乡(平衡树合并)
题目描述 永无乡包含 nn 座岛,编号从 11 到 nn ,每座岛都有自己的独一无二的重要度,按照重要度可以将这 nn 座岛排名,名次用 11 到 nn 来表示.某些岛之间由巨大的桥连接,通过桥可以从 ...
- Warshall算法和Floyd算法
不用说这两位都是冷门算法……毕竟O(n^3)的时间复杂度算法在算法竞赛里基本算是被淘汰了……而且也没有在这个算法上继续衍生出其他的算法… 有兴趣的话:click here.. 话说学离散的时候曾经有个 ...
- Eureka配置详解(转)
Eureka客户端配置 1.RegistryFetchIntervalSeconds 从eureka服务器注册表中获取注册信息的时间间隔(s),默认为30秒 2.InstanceInfoR ...
- 【学术篇】luogu3768 简单的数学题(纯口胡无代码)
真是一道"简单"的数学题呢~ 反演题, 化式子. \[ ans=\sum_{i=1}^n\sum_{j=1}^nijgcd(i,j) \\ =\sum_{i=1}^n\sum_{j ...
- 爬虫那些事儿--Http返回码
由于爬虫的抓取也是使用http协议交互.因此需要了解Http的各种返回码所代表的意义,才能判断爬虫的执行结果. 返回码如下: 100 Continue 初始的请求已经接受,客户应当继续发送请求的其余部 ...
- Java SE(3)
紧接着上一期内容,继续来复习一下java基础的知识点,主要来复习一下有关线程的内容吧! 1.向上转型:Animal a = new Cat();//自动类型提升,猫对象提升为动物类型,但是特有的功能无 ...
