faster-rcnn代码阅读-rpn-data层
这一节讲述rpn-data层,和这一层有关的结构图如下:
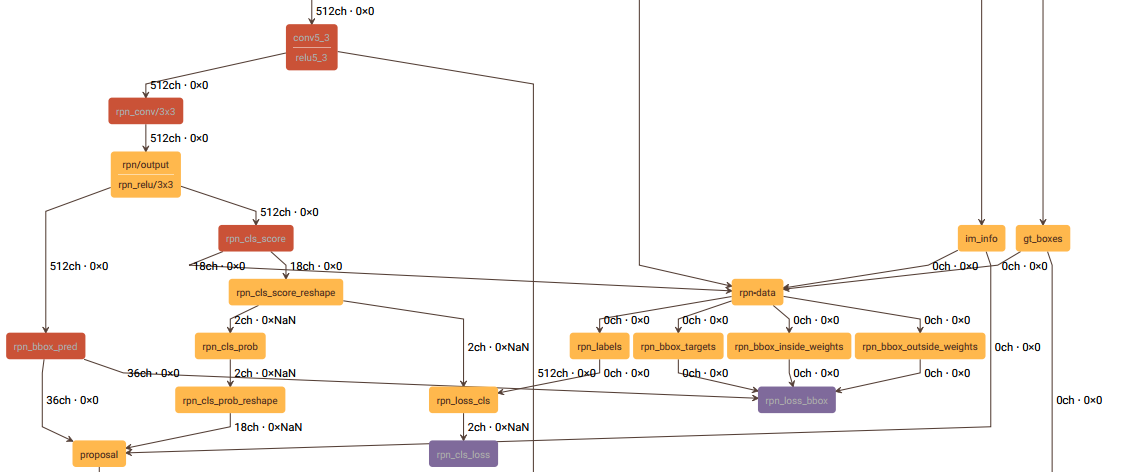
rpn-data层的prototxt定义如下:
layer {

  name: 'rpn-data'

  type: 'Python'

  bottom: 'rpn_cls_score'

  bottom: 'gt_boxes'

  bottom: 'im_info'

  bottom: 'data'

  top: 'rpn_labels'

  top: 'rpn_bbox_targets'

  top: 'rpn_bbox_inside_weights'

  top: 'rpn_bbox_outside_weights'

  python_param {

    module: 'rpn.anchor_target_layer'

    layer: 'AnchorTargetLayer'

    param_str: "'feat_stride': 16"

  }

}
这一层的主要工作如下:
一、生成anchor,并将超出图像区域的anchor去除,得到有效的anchor;
二、给每一个anchor分配label,-1表示忽略该anchor,0表示背景,1表示前景(物体),得到labels;
三、计算RPN阶段的回归目标bbox_targets;
四、计算bbox_inside_weights、bbox_outside_weights,在计算SmoothL1Loss时用于加权;
五、上述过程得到的labels, bbox_targets, bbox_inside_weights, bbox_outside_weights,它们第一个维度的长度和有效anchor的个数是相同的,最后对它们进行扩充,将无效的anchor所对应的labels, bbox_targets, bbox_inside_weights, bbox_outside_weights分别加入其中,使这四个输出第一个维度的长度等于生成anchor的个数。
下面分别介绍这5个部分。
一、生成anchor
1、先生成一个base_anchor,长宽都为16,得出base_anchor的宽高和中心点:w, h, x_ctr, y_ctr;
2、由基准尺度(base_size=16)和3种长宽比0.5, 1, 2计算出3种宽高,再由步骤1得到的中心点计算出3个anchor的坐标;
3、再将3种尺度8, 16, 32和步骤2所得anchor的尺度相乘,得出9种宽高,结合步骤1所得中心点坐标,最终得到9个anchor的坐标。
4、使backbone输出的feature map的每一个位置的坐标间隔为feature map的降采样率(VGG为16),这样,feature map像素坐标的尺度就和输入网络的图像像素的坐标尺度一样了。将步骤3所得到的9个anchor的中心点分别移动到feature map每个像素的坐标位置上,便得到了最终的anchor。
二、分配label
1、构建一个label数组,长度有效anchor的数量,每个元素都初始化为-1;
2、计算每个anchor和所有gt的交并比;
3、将和所有gt的交并比都小于0.3的anchor,label分配为0,即为背景;
4、将和每一个gt交并比最大的anchor,label分配为1,即为前景;
5、将和任意一个gt交并比能大于0.7的anchor,label分配为1,即为前景;
6、RPN阶段的batchsize为256,前景anchor占比为0.5,因此有128个。如果前面得到的前景anchor的数量超过了128,则随机剔除多余的anchor,剔除的部分label置为-1;
7、batchsize为256,除去前景anchor的数量,剩余的即为背景anchor的数量。若背景anchor数量过多,则随机剔除多余的背景,剔除的部分label仍置为-1。
三、计算RPN阶段的回归目标
回归目标其实就是anchor的中心点坐标、宽、高和与之交并比最大的gt的偏差dx, dy, dw, dh,这些偏差不是二者直接作差得到的,而是经过一些转换才得到的,具体见下面的代码:
def bbox_transform(ex_rois, gt_rois):

    ex_widths = ex_rois[:, 2] - ex_rois[:, 0] + 1.0

    ex_heights = ex_rois[:, 3] - ex_rois[:, 1] + 1.0

    ex_ctr_x = ex_rois[:, 0] + 0.5 * ex_widths

    ex_ctr_y = ex_rois[:, 1] + 0.5 * ex_heights

    gt_widths = gt_rois[:, 2] - gt_rois[:, 0] + 1.0

    gt_heights = gt_rois[:, 3] - gt_rois[:, 1] + 1.0

    gt_ctr_x = gt_rois[:, 0] + 0.5 * gt_widths

    gt_ctr_y = gt_rois[:, 1] + 0.5 * gt_heights

    targets_dx = (gt_ctr_x - ex_ctr_x) / ex_widths

    targets_dy = (gt_ctr_y - ex_ctr_y) / ex_heights

    targets_dw = np.log(gt_widths / ex_widths)

    targets_dh = np.log(gt_heights / ex_heights)

    targets = np.vstack(

        (targets_dx, targets_dy, targets_dw, targets_dh)).transpose()

    return targets
四、计算一些权重,用于SmoothL1Loss的计算
1、bbox_inside_weights:将label为1的anchor权重赋为1,其他的都赋为0;
2、bbox_outside_weights:将前景和背景anchor的总数记为n,则前景和背景anchor权重都赋为1/n,其它的anchor权重都赋为0。
五、结果扩充
这一步的目的是为了使这一层的输出结果的维度和其它层的结果相匹配,直接能和其它层的输出结合起来,一起参与网络的前向和反向计算。
最后给出SmoothL1Loss的主要代码:
template <typename Dtype>

void SmoothL1LossLayer<Dtype>::LayerSetUp(

  const vector<Blob<Dtype>*>& bottom, const vector<Blob<Dtype>*>& top) {

  SmoothL1LossParameter loss_param = this->layer_param_.smooth_l1_loss_param();

  sigma2_ = loss_param.sigma() * loss_param.sigma();

  has_weights_ = (bottom.size() >= );

  if (has_weights_) {

    CHECK_EQ(bottom.size(), ) << "If weights are used, must specify both "

      "inside and outside weights";

  }

}

template <typename Dtype>

void SmoothL1LossLayer<Dtype>::Reshape(

  const vector<Blob<Dtype>*>& bottom, const vector<Blob<Dtype>*>& top) {

  LossLayer<Dtype>::Reshape(bottom, top);

  CHECK_EQ(bottom[]->channels(), bottom[]->channels());

  CHECK_EQ(bottom[]->height(), bottom[]->height());

  CHECK_EQ(bottom[]->width(), bottom[]->width());

  if (has_weights_) {

    CHECK_EQ(bottom[]->channels(), bottom[]->channels());

    CHECK_EQ(bottom[]->height(), bottom[]->height());

    CHECK_EQ(bottom[]->width(), bottom[]->width());

    CHECK_EQ(bottom[]->channels(), bottom[]->channels());

    CHECK_EQ(bottom[]->height(), bottom[]->height());

    CHECK_EQ(bottom[]->width(), bottom[]->width());

  }

  diff_.Reshape(bottom[]->num(), bottom[]->channels(),

      bottom[]->height(), bottom[]->width());

  errors_.Reshape(bottom[]->num(), bottom[]->channels(),

      bottom[]->height(), bottom[]->width());

  // vector of ones used to sum

  ones_.Reshape(bottom[]->num(), bottom[]->channels(),

      bottom[]->height(), bottom[]->width());

  for (int i = ; i < bottom[]->count(); ++i) {

    ones_.mutable_cpu_data()[i] = Dtype();

  }

}

template <typename Dtype>

__global__ void SmoothL1Forward(const int n, const Dtype* in, Dtype* out,

    Dtype sigma2) {

  // f(x) = 0.5 * (sigma * x)^2          if |x| < 1 / sigma / sigma

  //        |x| - 0.5 / sigma / sigma    otherwise

  CUDA_KERNEL_LOOP(index, n) {

    Dtype val = in[index];

    Dtype abs_val = abs(val);

    if (abs_val < 1.0 / sigma2) {

      out[index] = 0.5 * val * val * sigma2;

    } else {

      out[index] = abs_val - 0.5 / sigma2;

    }

  }

}

template <typename Dtype>

void SmoothL1LossLayer<Dtype>::Forward_gpu(const vector<Blob<Dtype>*>& bottom,

    const vector<Blob<Dtype>*>& top) {

  int count = bottom[]->count();

  caffe_gpu_sub(

      count,

      bottom[]->gpu_data(),

      bottom[]->gpu_data(),

      diff_.mutable_gpu_data());    // d := b0 - b1

  if (has_weights_) {

    // apply "inside" weights

    caffe_gpu_mul(

        count,

        bottom[]->gpu_data(),

        diff_.gpu_data(),

        diff_.mutable_gpu_data());  // d := w_in * (b0 - b1)

  }

  SmoothL1Forward<Dtype><<<CAFFE_GET_BLOCKS(count), CAFFE_CUDA_NUM_THREADS>>>(

      count, diff_.gpu_data(), errors_.mutable_gpu_data(), sigma2_);

  CUDA_POST_KERNEL_CHECK;

  if (has_weights_) {

    // apply "outside" weights

    caffe_gpu_mul(

        count,

        bottom[]->gpu_data(),

        errors_.gpu_data(),

        errors_.mutable_gpu_data());  // d := w_out * SmoothL1(w_in * (b0 - b1))

  }

  Dtype loss;

  caffe_gpu_dot(count, ones_.gpu_data(), errors_.gpu_data(), &loss);

  top[]->mutable_cpu_data()[] = loss / bottom[]->num();

}
其中:
1、bottom[0]为rpn_bbox_pred,即网络预测出的anchor与gt的偏差;
2、bottom[1]为rpn_bbox_targets,即为第三步计算出的anchor与gt的实际偏差;
3、bottom[2]为bbox_inside_weights;
4、bottom[3]为bbox_outside_weights。
这一层的代码链接见这里,此外涉及到的其它函数有generate_anchors,bbox_overlaps。
faster-rcnn代码阅读-rpn-data层的更多相关文章
- Faster RCNN代码理解(Python)
转自http://www.infocool.net/kb/Python/201611/209696.html#原文地址 第一步,准备 从train_faster_rcnn_alt_opt.py入: 初 ...
- Faster rcnn代码理解(4)
上一篇我们说完了AnchorTargetLayer层,然后我将Faster rcnn中的其他层看了,这里把ROIPoolingLayer层说一下: 我先说一下它的实现原理:RPN生成的roi区域大小是 ...
- Faster rcnn代码理解(2)
接着上篇的博客,咱们继续看一下Faster RCNN的代码- 上次大致讲完了Faster rcnn在训练时是如何获取imdb和roidb文件的,主要都在train_rpn()的get_roidb()函 ...
- Faster RCNN代码解析
1.faster_rcnn_end2end训练 1.1训练入口及配置 def train(): cfg.GPU_ID = 0 cfg_file = "../experiments/cfgs/ ...
- Faster R-CNN论文阅读摘要
论文链接: https://arxiv.org/pdf/1506.01497.pdf 代码下载: https://github.com/ShaoqingRen/faster_rcnn (MATLAB) ...
- Faster R-CNN代码例子
主要参考文章:1,从编程实现角度学习Faster R-CNN(附极简实现) 经常是做到一半发现收敛情况不理想,然后又回去看看这篇文章的细节. 另外两篇: 2,Faster R-CNN学习总结 ...
- Faster rcnn代码理解(3)
紧接着之前的博客,我们继续来看faster rcnn中的AnchorTargetLayer层: 该层定义在lib>rpn>中,见该层定义: 首先说一下这一层的目的是输出在特征图上所有点的a ...
- Faster rcnn代码理解(1)
这段时间看了不少论文,回头看看,感觉还是有必要将Faster rcnn的源码理解一下,毕竟后来很多方法都和它有相近之处,同时理解该框架也有助于以后自己修改和编写自己的框架.好的开始吧- 这里我们跟着F ...
- tensorflow faster rcnn 代码分析一 demo.py
os.environ["CUDA_VISIBLE_DEVICES"]=2 # 设置使用的GPU tfconfig=tf.ConfigProto(allow_soft_placeme ...
- 对faster rcnn代码讲解的很好的一个
http://www.cnblogs.com/houkai/p/6824455.html http://blog.csdn.net/u014696921/article/details/6032142 ...
随机推荐
- mac终端命令--自动补全
1.打开nano编辑器 输入命令 nano .inputrc,回车,打开nano编辑器 2.在nano编辑器中输入如下命令: set completion-ignore-case on set sho ...
- Python与JAVA的异同
--效率: 作为静态语言的JAVA执行效率比动态型语言的Python高 --语法: Python语句更精简. JAVA中的所有变量需要先声明(类型),才能使用,Python不需要声明变量类型 Pyth ...
- C循环
C 循环 有的时候,可能需要多次执行同一块代码.一般情况下,语句是顺序执行的:函数中的第一个语句先执行,接着是第二个语句,依此类推. 编程语言提供了允许更为复杂的执行路径的多种控制结构. 循环语句允许 ...
- 【LeetCode 17】电话号码的字母组合
题目链接 [题解] 用回溯法搞一下. 一搞就有~ 注意输入空串的时候别返回那个空串.. [代码] class Solution { public: string dic[10]; vector< ...
- 二维差分前缀和——cf1202D(好题)
直接枚举每个点作为左上角是可以做的,但是写起来较麻烦 有一种较为简单的做法是对一列或一行统计贡献 比如某一行的B存在的区间是L,R那么就有三种情况 1.没有这样的区间,即一行都是W,此时这行对答案的贡 ...
- BZOJ 3230: 相似子串(后缀数组)
传送门 解题思路 其实题目挺好想的.首先子串排名可以由后缀数组求得,因为不算重复的,所以后缀数组的每个后缀排名的去掉\(lcp\)的前缀排名为当前后缀的子串排名.这样就可以预处理出每个后缀的\(l,r ...
- HDU - 1712 (分组背包模板)
题目:http://acm.hdu.edu.cn/showproblem.php?pid=1712 题意:给你n个课程,每个课程有很多种学习方法,用的时间和取得的效果都不一样,现在你只有m天时间用来学 ...
- python实现收邮件判断模块poplib,email
一.代码 # 输入邮件地址, 口令和POP3服务器地址: import datetime import email import poplib import email.policy from ema ...
- 搭建单机版spark
二.下载软件 JDK,Scala,SBT,Maven 版本信息如下: JDK jdk-7u79-linux-x64.gz Scala scala-2.10.5.tgz 三.解压上述文件并进行环境变量配 ...
- 作用域 {}代码块 const修饰符 引用
简单分为:全局作用域.局部作用域.语句作用域 如果希望在局部变量的作用域内使用同名的全局变量,可以在该变量前加上“::” ::aver=20 #include<iostream> usin ...