jQuery操作标签
jQuery操作标签
样式操作:
对标签的样式进行修改,那么操作样式的方法是什么?
样式类:
addClass();// 添加指定的CSS类名。

removeClass();// 移除指定的CSS类名。

hasClass();// 判断样式存不存在。

toggleClass();// 切换CSS类名,如果有就移除,如果没有就添加。
我们可以通过一个模态框或者左侧菜单实例来进一步说明。
<!DOCTYPE html>

<html lang="en">

<head>

  <meta charset="UTF-8">

  <meta http-equiv="x-ua-compatible" content="IE=edge">

  <meta name="viewport" content="width=device-width, initial-scale=1">

  <title>左侧菜单示例</title>

  <link rel="stylesheet" href="jquery-3.3.1.js">

  <style>

    .left {

      position: fixed;

      left: 0;

      top: 0;

      width: 20%;

      height: 100%;

      background-color: rgb(47, 53, 61);

    }

    .right {

      width: 80%;

      height: 100%;

    }

    .menu {

      color: white;

    }

    .title {

      text-align: center;

      padding: 10px 15px;

      border-bottom: 1px solid #23282e;

    }

    .items {

      background-color: #181c20;

    }

    .item {

      padding: 5px 10px;

      border-bottom: 1px solid #23282e;

    }

    .hide {

      display: none;

    }

  </style>

</head>

<body>

<div class="left">

  <div class="menu">

    <div class="title">菜单一</div>

    <div class="items">

      <div class="item">111</div>

      <div class="item">222</div>

      <div class="item">333</div>

    </div>

    <div class="title">菜单二</div>

    <div class="items hide">

      <div class="item">111</div>

      <div class="item">222</div>

      <div class="item">333</div>

    </div>

    <div class="title">菜单三</div>

    <div class="items hide">

      <div class="item">111</div>

      <div class="item">222</div>

      <div class="item">333</div>

    </div>

  </div>

</div>

<div class="right"></div>

<script src="jquery-3.3.1.js"></script>

<script>

  $(".title").click(function (){  // jQuery绑定事件

    // 隐藏所有class里有.items的标签

    $(".items").addClass("hide");  //批量操作

    $(this).next().removeClass("hide");

  });

</script>
左侧菜单实例
那么同样是对样式类进行操作我们比较下CSS与jQuery的区别:
CSS操作:

css("color","red")//DOM操作:tag.style.color="red"

jQuery操作:

$("p").css("color", "red"); //将所有p标签的字体设置为红色


样式类对应元素的位置:
offset()// 获取匹配元素在当前窗口的相对偏移或设置元素位置

position()// 获取匹配元素相对父元素的偏移
.offset()方法允许我们检索一个元素相对于文档(document)的当前位置。

和 .position()的差别在于: .position()是相对于相对于父级元素的位移。
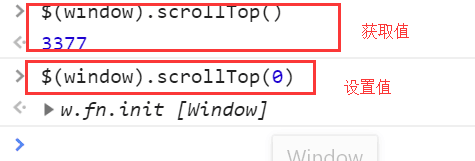
scrollTop()// 获取匹配元素相对滚动条顶部的偏移

scrollLeft()// 获取匹配元素相对滚动条左侧的偏移


我们通过一个返回顶部实例进一步了解位置问题:
<!DOCTYPE html>

<html lang="zh-CN">

<head>

  <meta charset="UTF-8">

  <meta http-equiv="x-ua-compatible" content="IE=edge">

  <meta name="viewport" content="width=device-width, initial-scale=1">

  <title>位置相关示例之返回顶部</title>

  <style>

    .c1 {

      width: 100px;

      height: 200px;

      background-color: red;

    }

    .c2 {

      height: 50px;

      width: 50px;

      position: fixed;

      bottom: 15px;

      right: 15px;

      background-color: #2b669a;

    }

    .hide {

      display: none;

    }

    .c3 {

      height: 100px;

    }

  </style>

</head>

<body>

<button id="b1" class="btn btn-default">点我</button>

<div class="c1"></div>

<div class="c3">1</div>

<div class="c3">2</div>

<div class="c3">3</div>

<div class="c3">4</div>

<div class="c3">5</div>

<div class="c3">6</div>

<div class="c3">7</div>

<div class="c3">8</div>

<div class="c3">9</div>

<div class="c3">10</div>

<div class="c3">11</div>

<div class="c3">12</div>

<div class="c3">13</div>

<div class="c3">14</div>

<div class="c3">15</div>

<div class="c3">16</div>

<div class="c3">17</div>

<div class="c3">18</div>

<div class="c3">19</div>

<div class="c3">20</div>

<div class="c3">21</div>

<div class="c3">22</div>

<div class="c3">23</div>

<div class="c3">24</div>

<div class="c3">25</div>

<div class="c3">26</div>

<div class="c3">27</div>

<div class="c3">28</div>

<div class="c3">29</div>

<div class="c3">30</div>

<div class="c3">31</div>

<div class="c3">32</div>

<div class="c3">33</div>

<div class="c3">34</div>

<div class="c3">35</div>

<div class="c3">36</div>

<div class="c3">37</div>

<div class="c3">38</div>

<div class="c3">39</div>

<div class="c3">40</div>

<div class="c3">41</div>

<div class="c3">42</div>

<div class="c3">43</div>

<div class="c3">44</div>

<div class="c3">45</div>

<div class="c3">46</div>

<div class="c3">47</div>

<div class="c3">48</div>

<div class="c3">49</div>

<div class="c3">50</div>

<div class="c3">51</div>

<div class="c3">52</div>

<div class="c3">53</div>

<div class="c3">54</div>

<div class="c3">55</div>

<div class="c3">56</div>

<div class="c3">57</div>

<div class="c3">58</div>

<div class="c3">59</div>

<div class="c3">60</div>

<div class="c3">61</div>

<div class="c3">62</div>

<div class="c3">63</div>

<div class="c3">64</div>

<div class="c3">65</div>

<div class="c3">66</div>

<div class="c3">67</div>

<div class="c3">68</div>

<div class="c3">69</div>

<div class="c3">70</div>

<div class="c3">71</div>

<div class="c3">72</div>

<div class="c3">73</div>

<div class="c3">74</div>

<div class="c3">75</div>

<div class="c3">76</div>

<div class="c3">77</div>

<div class="c3">78</div>

<div class="c3">79</div>

<div class="c3">80</div>

<div class="c3">81</div>

<div class="c3">82</div>

<div class="c3">83</div>

<div class="c3">84</div>

<div class="c3">85</div>

<div class="c3">86</div>

<div class="c3">87</div>

<div class="c3">88</div>

<div class="c3">89</div>

<div class="c3">90</div>

<div class="c3">91</div>

<div class="c3">92</div>

<div class="c3">93</div>

<div class="c3">94</div>

<div class="c3">95</div>

<div class="c3">96</div>

<div class="c3">97</div>

<div class="c3">98</div>

<div class="c3">99</div>

<div class="c3">100</div>

<button id="b2" class="btn btn-default c2 hide">返回顶部</button>

<script src="jquery-3.2.1.min.js"></script>

<script>

  $("#b1").on("click", function () {

    $(".c1").offset({left: 200, top:200});

  });

  $(window).scroll(function () {

    if ($(window).scrollTop() > 100) {

      $("#b2").removeClass("hide");

    }else {

      $("#b2").addClass("hide");

    }

  });

  $("#b2").on("click", function () {

    $(window).scrollTop(0);

  })

</script>

</body>

</html>

返回顶部示例
返回顶部
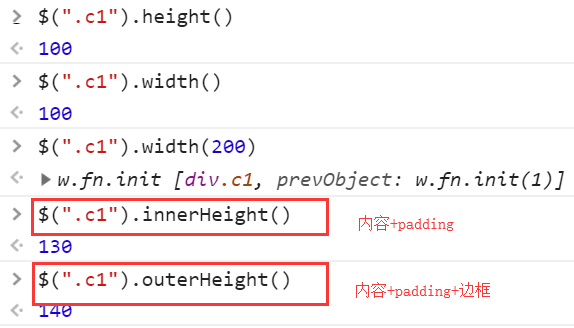
尺寸:
height()###相当于我们的文本内容的高度

width()   #文本内容的宽度

innerHeight()  #内容+padding

innerWidth()

outerHeight()  #内容++padding++边框

outerWidth()

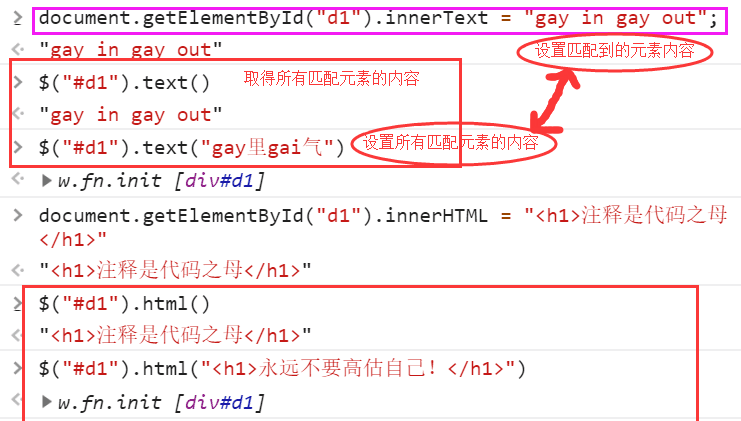
文本操作:
HTML代码:
html()// 取得第一个匹配元素的html内容

html(value)// 设置所有匹配元素的html内容
文本值:
text()// 取得所有匹配元素的内容

text(value)// 设置所有匹配元素的内容

值:
val()// 取得第一个匹配元素的当前值

val(val)// 设置所有匹配元素的值

val([val1, val2])// 设置checkbox、select的值
示例:
获取被选中的checkbox或radio的值:
<label for="c1">女</label>

<input name="gender" id="c1" type="radio" value="0">

<label for="c2">男</label>

<input name="gender" id="c2" type="radio" value="1">
可以使用:
$("input[name='gender']:checked").val() #取值

我们通过一个自定义登录程序了解下文本操作的用法:
<!DOCTYPE html>

<html lang="zh-CN">

<head>

  <meta charset="UTF-8">

  <meta http-equiv="x-ua-compatible" content="IE=edge">

  <meta name="viewport" content="width=device-width, initial-scale=1">

  <title>文本操作之登录验证</title>

  <style>

    .error {

      color: red;

    }

  </style>

</head>

<body>

<form action="">

  <div>

    <label for="input-name">用户名</label>

    <input type="text" id="input-name" name="name">

    <span class="error"></span>

  </div>

  <div>

    <label for="input-password">密码</label>

    <input type="password" id="input-password" name="password">

    <span class="error"></span>

  </div>

  <div>

    <input type="button" id="btn" value="提交">

  </div>

</form>

<script src="https://cdn.bootcss.com/jquery/3.2.1/jquery.min.js"></script>

<script>

  $("#btn").click(function () {

    var username = $("#input-name").val();

    var password = $("#input-password").val();

    if (username.length === 0) {

      $("#input-name").siblings(".error").text("用户名不能为空");

    }

    if (password.length === 0) {

      $("#input-password").siblings(".error").text("密码不能为空");

    }

  })

</script>

</body>

</html>

自定义登录校验示例
文本操作-登录验证
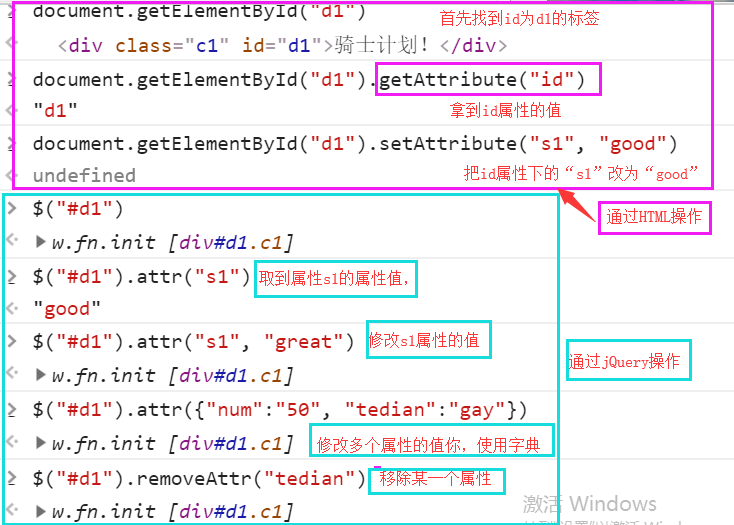
属性操作:
属性操作我们一般用于ID,Class等或自定义属性:
attr(attrName)// 返回第一个匹配元素的属性值

attr(attrName, attrValue)// 为所有匹配元素设置一个属性值

attr({k1: v1, k2:v2})// 为所有匹配元素设置多个属性值

removeAttr()// 从每一个匹配的元素中删除一个属性

用于checkbox和radio
prop() // 获取属性

removeProp() // 移除属性
<input type="checkbox" value="1">

<input type="radio" value="2">

<script>

  $(":checkbox[value='1']").prop("checked", true);

  $(":radio[value='2']").prop("checked", true);

</script>
注意:
在1.x及2.x版本的jQuery中使用attr对checkbox进行赋值操作时会出bug,在3.x版本的jQuery中则没有这个问题。为了兼容性,我们在处理checkbox和radio的时候尽量使用特定的prop(),不要使用attr("checked", "checked")。
<input type="checkbox" value="1">

<input type="radio" value="2">

<script>

  $(":checkbox[value='1']").prop("checked", true);

  $(":radio[value='2']").prop("checked", true);

</script>
示例:全选、反选、取消
<body>

<button id="b1">全选</button>

<button id="b2">取消</button>

<button id="b3">反选</button>

<table border="">

    <thead>

    <tr>

        <th>#</th>

        <th>姓名</th>

        <th>爱好</th>

    </tr>

    </thead>

    <tbody>

    <tr>

        <td><input type="checkbox"></td>

        <td>Egon</td>

        <td>喊麦</td>

    </tr>

    <tr>

        <td><input type="checkbox"></td>

        <td>Alex</td>

        <td>吹牛逼</td>

    </tr>

    <tr>

        <td><input type="checkbox"></td>

        <td>Yuan</td>

        <td>不洗头</td>

    </tr>

    </tbody>

</table>

<script src="jquery-3.3.1.min.js"></script>

<script>

    // 全选

    $("#b1").click(function () {

        // 让所有的checkbox选中

        $("table :checkbox").prop("checked", true)

    });

    // 取消

    $("#b2").click(function () {

        // 让所有的checkbox取消选中

        $("table :checkbox").prop("checked", false)

    });

    // 反选

    $("#b3").click(function () {

//        // 找到没有选中的让它们选中

//        $("table input:not(:checked)").prop("checked", true);

//        // 找到所有选中的让它们取消选中

//        $("table input:checked").prop("checked", false);

        // 方法1:循环

        var $checkboxs = $("table input:checkbox");

//        for (let i=0;i<$checkboxs.length;i++){

//            var $currentCheckbox = $($checkboxs[i]);

//            if ($currentCheckbox.prop("checked")){

//                // 如果之前是选中的

//                $currentCheckbox.prop("checked", false);

//            }else {

//                // 之前没有选中

//                $currentCheckbox.prop("checked", true);

//            }

//        }

        for (let i=0;i<$checkboxs.length;i++){

            var $currentCheckbox = $($checkboxs[i]);

            var flag = $currentCheckbox.prop("checked");

            $currentCheckbox.prop("checked", !flag)

        }

    });

</script>

</body>
全选,取消,反选
文档处理:
添加到指定元素内部的后面
$(A).append(B)// 把B追加到A,在A的后面追加B。

$(A).appendTo(B)// 把A追加到B,也就是在B的后面追加A。

添加到指定元素内部的前面
$(A).prepend(B)// 把B前置到A

$(A).prependTo(B)// 把A前置到B

添加到指定元素外部的后面
$(A).after(B)// 把B放到A的后面

$(A).insertAfter(B)// 把A放到B的后面

添加到指定元素外部的前面
$(A).before(B)// 把B放到A的前面

$(A).insertBefore(B)// 把A放到B的前面

移除和清空元素
remove()// 从DOM中删除所有匹配的元素。
remove会将标签连同标签内部的所有元素都清除。

empty()// 删除匹配的元素集合中所有的子节点。
清空顾名思义就是把元素内部清空,只是把标签内部清空。
例子:
点击按钮在表格添加一行数据。
点击每一行的删除按钮删除当前行数据。
替换
replaceWith()

replaceAll()

克隆
clone()// 参数
<!DOCTYPE html>

<html lang="zh-CN">

<head>

  <meta charset="UTF-8">

  <meta http-equiv="x-ua-compatible" content="IE=edge">

  <meta name="viewport" content="width=device-width, initial-scale=1">

  <title>克隆</title>

  <style>

    #b1 {

      background-color: deeppink;

      padding: 5px;

      color: white;

      margin: 5px;

    }

    #b2 {

      background-color: dodgerblue;

      padding: 5px;

      color: white;

      margin: 5px;

    }

  </style>

</head>

<body>

<button id="b1">屠龙宝刀,点击就送</button>

<hr>

<button id="b2">屠龙宝刀,点击就送</button>

<script src="jquery-3.2.1.min.js"></script>

<script>

  // clone方法不加参数true,克隆标签但不克隆标签带的事件

  $("#b1").on("click", function () {

    $(this).clone().insertAfter(this);

  });

  // clone方法加参数true,克隆标签并且克隆标签带的事件

  $("#b2").on("click", function () {

    $(this).clone(true).insertAfter(this);

  });

</script>

</body>

</html>

点击复制按钮
克隆事例
jQuery操作标签的更多相关文章
- jQuery操作标签,jQuery事件操作,jQuery动画效果,前端框架
jQuery操作标签 jQuery代码查找标签绑定的变量名推荐使用 $xxxEle 样式类操作 addClass();// 添加指定的CSS类名. removeClass();// 移除指定的CSS类 ...
- jQuery操作标签--样式、文本、属性操作, 文档处理
1.样式 2.文本 3.属性操作 全选,反选效果 4.文档处理 操作标签 一.样式操作 样式类: addClass(); // 添加指定的css类名 removeClass(); //移除指定的css ...
- 前端基础之jQuery操作标签
一.样式操作 样式类 addClass(); // 添加指定的CSS类名. removeClass(); // 移除指定的CSS类名. hasClass(); // 判断样式存不存在 toggleCl ...
- web前端----jQuery操作标签
样式操作 样式类 addClass();// 添加指定的CSS类名. removeClass();// 移除指定的CSS类名. hasClass();// 判断样式存不存在 toggleClass() ...
- 13-4 jquery操作标签(文本,属性,class,value)
一 文本操作 $().html() $().text() 文本赋值操作 $().html("") $().text("") 二 属性操作 $().attr(属性 ...
- jQuery对标签、类样式、值、文档、DOM对象的操作
jquery的标签属性操作 使用attr()方法对html标签属性进行操作,attr如果参数是一个参数,表示获取html标签的属性值,如果是两个参数则是设置标签属性名以及对象的属性值 .prop()适 ...
- day52——jquery引入与下载、标签查找、操作标签
day52 jquery引入 下载链接:jQuery官网 https://jquery.com/ 中文文档:jQuery AP中文文档 http://jquery.cuishifeng.cn/ < ...
- DOM操作标签、事件绑定、jQuery框架/类库
DOM操作标签 ''' 在起变量名的时候 如果该变量指向的是一个标签 那么建议使用 xxxEle eg:aEle\pEle\divEle\spanEle ''' # 动态创建一个a标签并添加到页面指定 ...
- DOM操作标签,事件绑定,jQuery框架
DOM操作标签 ''' 在起变量名的时候 如果该变量指向的是一个标签 那么建议使用 xxxEle eg:aEle\pEle\divEle\spanEle ''' 基本使用 动态创建一个标签 var 变 ...
随机推荐
- splitChunks. cacheGroups 里面的 maxInitialRequests 含义
entry文件请求的chunks不应该超过此值(请求过多,耗时) 出处:https://ymbo.github.io/2018/05/21/webpack%E9%85%8D%E7%BD%AE%E4%B ...
- Zookeeper Ha集群简介+jdbcClient访问Ha集群环境
Hadoop-HA机制HA概述high available(高可用) 所谓HA(high available),即高可用(7*24小时不中断服务). 实现高可用最关键的策略是消除单点故障.HA严格来说 ...
- 菜鸟如何使用hanlp做分词的过程记录
菜鸟如何使用hanlp做分词的过程记录 最近在学习hanlp的内容,准备在节后看看有没有时间整理一波hanlp分享下,应该还是会像之前分享DKHadoop一样的方式吧.把整个学习的过程中截图在配文字的 ...
- java强制删除文件机制
//启动资源强制回收机制 System.gc(); 然后就可以删除了
- sqlalchemy操作----多表关联
有二张表,一张作者表,一张书表,一个作者写多本书,一本书可以由多个作者写,与是通过新加一张关系表把他们联系起来 #!/usr/bin/env python # -*- coding: utf-8 -* ...
- mysql 事务学习
1.事务 逻辑上的一组操作,组成这组操作的各个逻辑单元要么一起成功,要么一起失败. 2.事务特性 原子性:强调事务的不可分割.一致性:强调的是事务的执行的前后,数据的完整性要保持一致.隔离性:一个事务 ...
- 【java】之类加载机制
类加载: 类加载机制是指.class文件加载到jvm,并形成Class对象的机制,之后的应用就可对Class对象进行实例化并调用,类加载机制可在运行时动态加载外部的类,远程网络下载过来的class文件 ...
- apk重签名方法
转载(http://www.51testing.com/?uid-115892-action-viewspace-itemid-223023) 1. 生成Android APK包签名证书 1 ...
- 《Java并发编程实战》笔记-OneValueCache与原子引用技术
/** * NumberRange * <p/> * Number range class that does not sufficiently protect its invariant ...
- 身高安排方法(基础dfs)
P1085 时间限制: 0 Sec 内存限制: 128 MB提交: 64 解决: 44[提交][状态][讨论版][命题人:外部导入] 题目描述 Matrix67发现身高接近的人似乎更合得来.Mat ...

