Android之一种很有趣的界面跳动提示动画
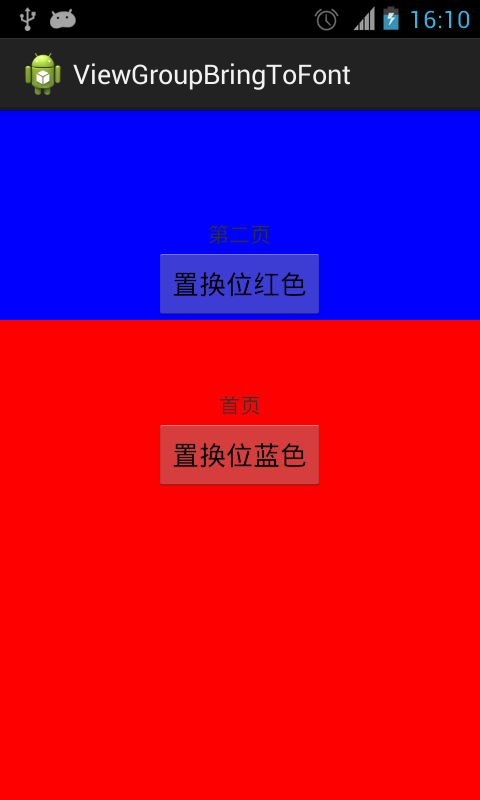
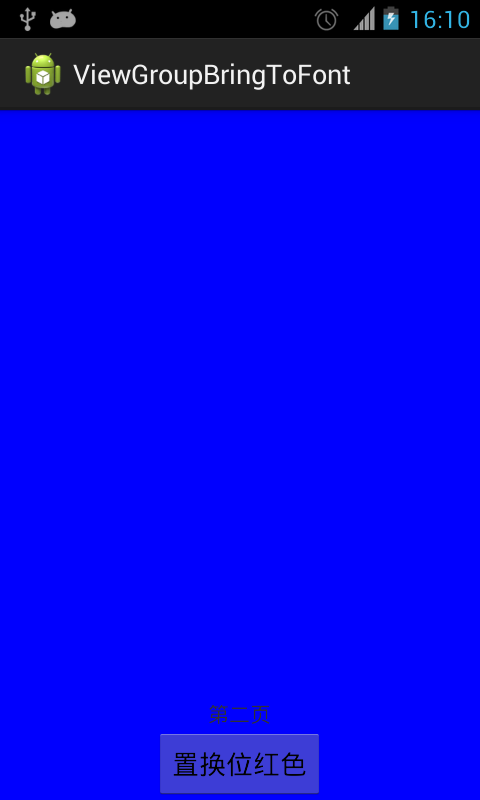
上一个效果图:

====================================

先上布局:
<RelativeLayout xmlns:android="http://schemas.android.com/apk/res/android"

    xmlns:tools="http://schemas.android.com/tools"

    android:layout_width="match_parent"

    android:layout_height="match_parent" >

    <RelativeLayout

        android:id="@+id/red"

        android:layout_width="match_parent"

        android:layout_height="match_parent"

        android:background="#ff0000" >

        <TextView

            android:layout_width="wrap_content"

            android:layout_height="wrap_content"

            android:layout_above="@+id/switch2blue"

            android:layout_centerHorizontal="true"

            android:text="首页" />

        <Button

            android:id="@+id/switch2blue"

            android:layout_width="wrap_content"

            android:layout_height="wrap_content"

            android:layout_centerInParent="true"

            android:text="置换位蓝色" />

    </RelativeLayout>

    <RelativeLayout

        android:id="@+id/blue"

        android:layout_width="match_parent"

        android:layout_height="match_parent"

        android:background="#0000ff" >

        <TextView

            android:layout_width="wrap_content"

            android:layout_height="wrap_content"

            android:layout_above="@+id/switch2red"

            android:layout_centerHorizontal="true"

            android:text="第二页" />

        <Button

            android:id="@+id/switch2red"

            android:layout_width="wrap_content"

            android:layout_height="wrap_content"

            android:layout_alignParentBottom="true"

            android:layout_centerHorizontal="true"

            android:text="置换位红色" />

    </RelativeLayout>

</RelativeLayout>
代码:
import java.lang.reflect.Field;

import android.app.Activity;

import android.os.Bundle;

import android.os.Handler;

import android.util.DisplayMetrics;

import android.view.GestureDetector;

import android.view.MotionEvent;

import android.view.View;

import android.view.GestureDetector.OnGestureListener;

import android.view.View.OnClickListener;

import android.view.View.OnTouchListener;

import android.view.animation.AccelerateDecelerateInterpolator;

import android.view.animation.AccelerateInterpolator;

import android.view.animation.Animation;

import android.view.animation.AnimationSet;

import android.view.animation.TranslateAnimation;

import android.view.animation.Animation.AnimationListener;

import android.widget.Button;

import android.widget.RelativeLayout;

public class MainActivity extends Activity implements OnClickListener,

        OnTouchListener, OnGestureListener {

    private RelativeLayout red, blue;

    private Button switch2blue, switch2red;

    private float thisDelta = 0.05f;

    private static boolean hasEverPulled = false;

    private boolean pulled = false;

    private static int height;

    private GestureDetector gestureDetector;

    private static int statusHeight = 0;

    @Override

    protected void onCreate(Bundle savedInstanceState) {

        super.onCreate(savedInstanceState);

        setContentView(R.layout.activity_main);

        DisplayMetrics metrics = getResources().getDisplayMetrics();

        height = metrics.heightPixels;

        statusHeight = getStatusHeight();

        initView();

        // 跳动提示可以上拉

        final Handler handler = new Handler();

        handler.postDelayed(new Runnable() {

            @Override

            public void run() {

                jump(thisDelta);

                // handler.postDelayed(this, 3000);

            }

        }, 3000);

    }

    private void initView() {

        red = (RelativeLayout) findViewById(R.id.red);

        blue = (RelativeLayout) findViewById(R.id.blue);

        switch2blue = (Button) findViewById(R.id.switch2blue);

        switch2red = (Button) findViewById(R.id.switch2red);

        switch2blue.setOnClickListener(this);

        switch2red.setOnClickListener(this);

        blue.setOnTouchListener(this);

        blue.setLongClickable(true);

        gestureDetector = new GestureDetector(this, this);

    }

    @Override

    public void onClick(View arg0) {

        // TODO Auto-generated method stub

        switch (arg0.getId()) {

        case R.id.switch2blue:

            red2BlueUI();

            break;

        case R.id.switch2red:

            blue2RedUI();

            break;

        }

    }

    // 从红页面转到蓝页面

    private void red2BlueUI() {

        blue.bringToFront();

        blue.requestLayout();

        blue.invalidate();

    }

    // 从蓝页面转到红页面

    private void blue2RedUI() {

        red.bringToFront();

        red.requestLayout();

        red.invalidate();

    }

    // 获取状态栏的高度

    private int getStatusHeight() {

        Class<?> c = null;

        Object obj = null;

        Field field = null;

        int x = 0;

        int height = 0;

        try {

            c = Class.forName("com.android.internal.R$dimen");

            obj = c.newInstance();

            field = c.getField("status_bar_height");

            x = Integer.parseInt(field.get(obj).toString());

            height = getResources().getDimensionPixelSize(x);

        } catch (Exception e) {

            e.printStackTrace();

        }

        return height;

    }

    // 主页面跳动

    private void jump(float delta) {

        if (thisDelta - 0.03f < 0.001f) {

            thisDelta = 0.05f;

            return;

        }

        thisDelta = delta;

        if (hasEverPulled) {

            return;

        }

        playJumpAnimation(thisDelta);

    }

    // 上拉/下拉主页面

    private void pull(boolean upward) {

        if (upward && pulled) {

            return;

        }

        if (!upward && !pulled) {

            return;

        }

        float originalY;

        float finalY;

        if (!pulled) {

            originalY = 0;

            finalY = (float) (0 - height + 0.4 * height);

        } else {

            originalY = (float) (0 - height + 0.4 * height);

            finalY = 0;

        }

        pulled = !pulled;

        AnimationSet animationSet = new AnimationSet(true);

        animationSet.addAnimation(new TranslateAnimation(0, 0, originalY,

                finalY));

        animationSet.setDuration(300);

        animationSet.setInterpolator(new AccelerateDecelerateInterpolator());

        animationSet.setFillAfter(true);

        animationSet.setAnimationListener(new AnimationListener() {

            @Override

            public void onAnimationStart(Animation animation) {

                if (!pulled) {

                    red2BlueUI();

                }

            }

            @Override

            public void onAnimationRepeat(Animation animation) {

            }

            @Override

            public void onAnimationEnd(Animation animation) {

                // if (pulled) {

                // blue2RedUI();

                // }

            }

        });

        blue.startAnimation(animationSet);

        hasEverPulled = true;

    }

    // 跳起动画

    private void playJumpAnimation(final float delta) {

        float originalY = 0;

        float finalY = 0 - height * delta;

        AnimationSet animationSet = new AnimationSet(true);

        animationSet.addAnimation(new TranslateAnimation(0, 0, originalY,

                finalY));

        animationSet.setDuration(300);

        animationSet.setInterpolator(new AccelerateDecelerateInterpolator());

        animationSet.setFillAfter(true);

        animationSet.setAnimationListener(new AnimationListener() {

            @Override

            public void onAnimationStart(Animation animation) {

            }

            @Override

            public void onAnimationRepeat(Animation animation) {

            }

            @Override

            public void onAnimationEnd(Animation animation) {

                playLandAnimation(delta);

            }

        });

        blue.startAnimation(animationSet);

    }

    // 落下动画

    private void playLandAnimation(final float delta) {

        float originalY = 0 - height * delta;

        float finalY = 0;

        AnimationSet animationSet = new AnimationSet(true);

        animationSet.addAnimation(new TranslateAnimation(0, 0, originalY,

                finalY));

        animationSet.setDuration(200);

        animationSet.setInterpolator(new AccelerateInterpolator());

        animationSet.setFillAfter(true);

        animationSet.setAnimationListener(new AnimationListener() {

            @Override

            public void onAnimationStart(Animation animation) {

            }

            @Override

            public void onAnimationRepeat(Animation animation) {

            }

            @Override

            public void onAnimationEnd(Animation animation) {

                jump(0.03f);

            }

        });

        blue.startAnimation(animationSet);

    }

    @Override

    public boolean onDown(MotionEvent e) {

        pull(false);

        return false;

    }

    @Override

    public boolean onFling(MotionEvent e1, MotionEvent e2, float velocityX,

            float velocityY) {

        // 手势滑动达到100才触发

        if (e1.getY() - e2.getY() > 100) {

            pull(true);

        } else if (e2.getY() >= e1.getY()) {

            pull(false);

        }

        return false;

    }

    @Override

    public void onLongPress(MotionEvent e) {

    }

    @Override

    public boolean onScroll(MotionEvent e1, MotionEvent e2, float distanceX,

            float distanceY) {

        return false;

    }

    @Override

    public void onShowPress(MotionEvent e) {

    }

    @Override

    public boolean onSingleTapUp(MotionEvent e) {

        return false;

    }

    @Override

    public boolean onTouch(View v, MotionEvent event) {

        if (pulled) {

            // 首张页可触控点

            if (event.getY() > height * 0.4 - statusHeight) {

                return false;

            }

        }

        return gestureDetector.onTouchEvent(event);

    }

}
Android之一种很有趣的界面跳动提示动画的更多相关文章
- Android学习系列(23)--App主界面实现
在上篇文章<Android学习系列(22)--App主界面比较>中我们浅略的分析了几个主界面布局,选了一个最大众化的经典布局.今天我们就这个经典布局,用代码具体的实现它. 1.预览图先看下 ...
- Android系统编程入门系列之界面Activity绘制展示
上篇文章介绍了界面Activity的启动方式和生命周期,本篇将继续介绍在界面Activity中的内容是如何绘制展示给用户的. 在Android系统上运行新创建的界面Activtiy,给用户展示的是空白 ...
- Android 三种动画详解
[工匠若水 http://blog.csdn.net/yanbober 转载请注明出处.点我开始Android技术交流] 1 背景 不能只分析源码呀,分析的同时也要整理归纳基础知识,刚好有人微博私信让 ...
- Android五种数据存储方式
android 五种数据存储 :SharePreferences.SQLite.Contert Provider.File.网络存储 Android系统提供了四种存储数据方式.分别为:SharePre ...
- (转) 机器学习很有趣Part6:怎样使用深度学习进行语音识别
本文转自:http://www.jiqizhixin.com/article/2321 机器学习很有趣Part6:怎样使用深度学习进行语音识别 2017-02-19 13:20:47 机器学习 ...
- iOS中三种方式实现登录界面播放视频或gif效果
现在app都做的越来越炫酷,各种动画效果,各种特效很好的提高了用户的体验.很多app在登录界面都使用了动画效果,比如Uber,Keep,QQ等等.这些动画效果基本都是使用gif或者MP4来实现的. 效 ...
- Android studio 开发一个用户登录界面
Android studio 开发一个用户登录界面 activity_main.xml <?xml version="1.0" encoding="utf-8&qu ...
- Android 四种加载方式详解(standard singleTop singleTask singleInstance) .
Android之四种加载方式 (http://marshal.easymorse.com/archives/2950 图片) 在多Activity开发中,有可能是自己应用之间的Activity跳转,或 ...
- Android系统编程入门系列之界面Activity响应丝滑的传统动画
上篇文章介绍了应用程序内对用户操作响应的相关方法位置,简单的响应逻辑可以是从一个界面Activity跳转到另一个界面Activity,也可以是某些视图View的相对变化.然而不管是启动一个界面执行新界 ...
随机推荐
- 第三届CCF软件能力认证
1.门禁系统 问题描述 涛涛最近要负责图书馆的管理工作,需要记录下每天读者的到访情况.每位读者有一个编号,每条记录用读者的编号来表示.给出读者的来访记录,请问每一条记录中的读者是第几次出现. 输入格式 ...
- 历数依赖注入的N种玩法
历数依赖注入的N种玩法 在对ASP.NET Core管道中关于依赖注入的两个核心对象(ServiceCollection和ServiceProvider)有了足够的认识之后,我们将关注的目光转移到编程 ...
- HDU 6249 Alice’s Stamps
[题目链接] 题目大意: 说有$m$个区间,要求选出不超过$k$个区间,使这些区间覆盖的长度最长,问最长长度是多少. 题解: 所有区间按$R$从小到大排序之后可以进行$dp$. $dp[i][j]$表 ...
- P1203 [USACO1.1]坏掉的项链Broken Necklace
P1203 [USACO1.1]坏掉的项链Broken Necklace不错的断环为链的模拟题,开成三倍,有很多细节要考虑,比如总长度要<=n,开头第一个是w等等. #include<bi ...
- wdatepicker默认时间为当前时间
$(document).ready(function() { alert(today()); document.getElementById("serviceTime").valu ...
- webpack1.x环境配置与打包基础【附带各种 "坑" 与解决方案!持续更新中...】
首先介绍传统模块化开发的主流方案: 1.基与CMD的sea.js,玉伯提出的解决方案,据说原来京东团队在使用.用时才定义,就近加载. 2.基于AMD的require.js,之前在用.提前声明与定义.国 ...
- android 四大组件
韩梦飞沙 韩亚飞 313134555@qq.com yue31313 han_meng_fei_sha 活动,服务,广播接受者,内容提供者. 活动 能够提供 用户界面.服务 没有用户界面.广 ...
- BZOJ.2668.[CQOI2012]交换棋子(费用流zkw)
题目链接 首先黑白棋子的交换等价于黑棋子在白格子图上移动,都到达指定位置. 在这假设我们知道这题用网络流做. 那么黑棋到指定位置就是一条路径,考虑怎么用流模拟出这条路径. 我们发现除了路径的起点和终点 ...
- SPOJ.1812.LCS2(后缀自动机)
题目链接 \(Description\) 求最多10个串的LCS(最长公共子序列). \(Solution\) 类比上题,对一个串建SAM,我们可以逐串地求出其在每个节点所能匹配的最大长度mx[i]. ...
- notepad++ 如何选择10000行-20000行之间的文本?
最近要上传导入一批数据,但是数据太多,一次上传不了,所以就要分批上传,而且数据全部在一个txt里面,这时就想一次复制一部分出来导入,直到导入完成,但是问题来了,数据太多,选择1到10000行,鼠标要拉 ...
