TorchVision Faster R-CNN 微调,实战 Kaggle 小麦检测
本文将利用 TorchVision Faster R-CNN 预训练模型,于 Kaggle: 全球小麦检测 上实践迁移学习中的一种常用技术:微调(fine tuning)。
本文相关的 Kaggle Notebooks 可见:
如果你没有 GPU ,也可于 Kaggle 上在线训练。使用介绍:
那么,我们开始吧
准备数据
import os

import numpy as np

import pandas as pd

import seaborn as sns

from matplotlib import pyplot as plt

from PIL import Image
下载数据
Kaggle: 全球小麦检测 Data 页下载数据,内容如下:
- train.csv - the training data
- sample_submission.csv - a sample submission file in the correct format
- train.zip - training images
- test.zip - test images
DIR_INPUT = 'global-wheat-detection'

DIR_TRAIN = f'{DIR_INPUT}/train'

DIR_TEST = f'{DIR_INPUT}/test'
读取数据
读取 train.csv 内容:
train_df = pd.read_csv(f'{DIR_INPUT}/train.csv')

train_df.head()
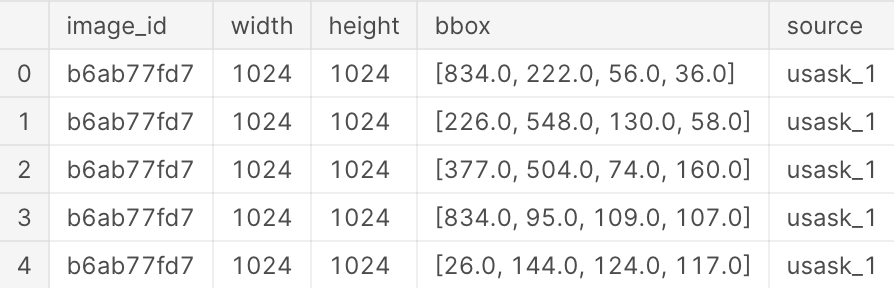
- image_id - the unique image ID
- width, height - the width and height of the images
- bbox - a bounding box, formatted as a Python-style list of [xmin, ymin, width, height]
- etc.
把 bbox 替换成 x y w h:
train_df[['x','y','w','h']] = 0

train_df[['x','y','w','h']] = np.stack(train_df['bbox'].apply(lambda x: np.fromstring(x[1:-1], sep=','))).astype(np.float)

train_df.drop(columns=['bbox'], inplace=True)

train_df.head()

分析数据
训练数据大小:
train_df.shape
(147793, 8)
唯一 image_id 数量:
train_df['image_id'].nunique()
3373
train 目录下图片数量:
len(os.listdir(DIR_TRAIN))
3423
说明有 3422-3373=49 张图片没有标注。
训练数据,图片大小:
train_df['width'].unique(), train_df['height'].unique()
(array([1024]), array([1024]))
都是 1024x1024 的。
查看标注数量的分布情况:
counts = train_df['image_id'].value_counts()

print(f'number of boxes, range [{min(counts)}, {max(counts)}]')

sns.displot(counts, kde=False)

plt.xlabel('boxes')

plt.ylabel('images')

plt.title('boxes vs. images')

plt.show()
number of boxes, range [1, 116]
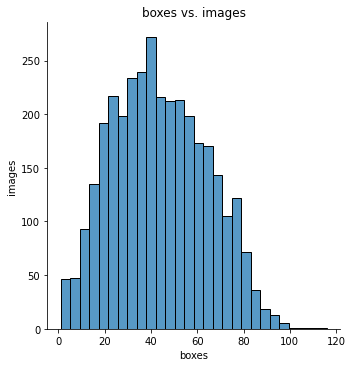
一张图最多的有 116 个标注。
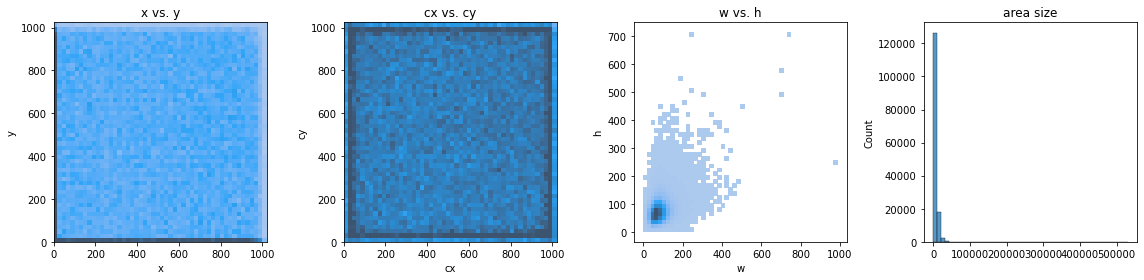
查看标注坐标和宽高的分布情况:
train_df['cx'] = train_df['x'] + train_df['w'] / 2

train_df['cy'] = train_df['y'] + train_df['h'] / 2

ax = plt.subplots(1, 4, figsize=(16, 4), tight_layout=True)[1].ravel()

ax[0].set_title('x vs. y')

ax[0].set_xlim(0, 1024)

ax[0].set_ylim(0, 1024)

ax[1].set_title('cx vs. cy')

ax[1].set_xlim(0, 1024)

ax[1].set_ylim(0, 1024)

ax[2].set_title('w vs. h')

ax[3].set_title('area size')

sns.histplot(data=train_df, x='x', y='y', ax=ax[0], bins=50, pmax=0.9)

sns.histplot(data=train_df, x='cx', y='cy', ax=ax[1], bins=50, pmax=0.9)

sns.histplot(data=train_df, x='w', y='h', ax=ax[2], bins=50, pmax=0.9)

sns.histplot(train_df['w'] * train_df['h'], ax=ax[3], bins=50, kde=False)

plt.show()
把数据集分为训练集和验证集,比例 8:2:
image_ids = train_df['image_id'].unique()

split_len = round(len(image_ids)*0.8)

train_ids = image_ids[:split_len]

valid_ids = image_ids[split_len:]

train = train_df[train_df['image_id'].isin(train_ids)]

valid = train_df[train_df['image_id'].isin(valid_ids)]

train.shape, valid.shape
((122577, 10), (25216, 10))
预览数据
定义下辅助函数:
def show_images(imgs, num_rows, num_cols, titles=None, scale=1.5):

  figsize = (num_cols * scale, num_rows * scale)

  _, axes = plt.subplots(num_rows, num_cols, figsize=figsize)

  axes = axes.flatten()

  for i, (ax, img) in enumerate(zip(axes, imgs)):

    ax.imshow(img)

    ax.axes.get_xaxis().set_visible(False)

    ax.axes.get_yaxis().set_visible(False)

    if titles and len(titles) > i:

      ax.set_title(titles[i])

  return axes

def show_bboxes(axes, bboxes, labels=None, colors=None):

  def _make_list(obj, default_values=None):

    if obj is None:

      obj = default_values

    elif not isinstance(obj, (list, tuple)):

      obj = [obj]

    return obj

  labels = _make_list(labels)

  colors = _make_list(colors, ['b', 'g', 'r', 'm', 'c'])

  for i, bbox in enumerate(bboxes):

    color = colors[i % len(colors)]

    rect = plt.Rectangle(

      xy=(bbox[0], bbox[1]),

      width=bbox[2] - bbox[0],

      height=bbox[3] - bbox[1],

      fill=False,

      edgecolor=color,

      linewidth=2)

    axes.add_patch(rect)

    if labels and len(labels) > i:

      text_color = 'k' if color == 'w' else 'w'

      axes.text(rect.xy[0], rect.xy[1], labels[i], va='center',

                ha='center', fontsize=9, color=text_color,

                bbox=dict(facecolor=color, lw=0))

# https://github.com/d2l-ai/d2l-en/blob/master/d2l/torch.py
预览图片,不加标注:
num_rows, num_cols = 2, 4

imgs = [plt.imread(f'{DIR_TRAIN}/{n}.jpg') for n in train_df['image_id'].unique()[:num_rows*num_cols]]

show_images(imgs, num_rows, num_cols, scale=4)

plt.show()

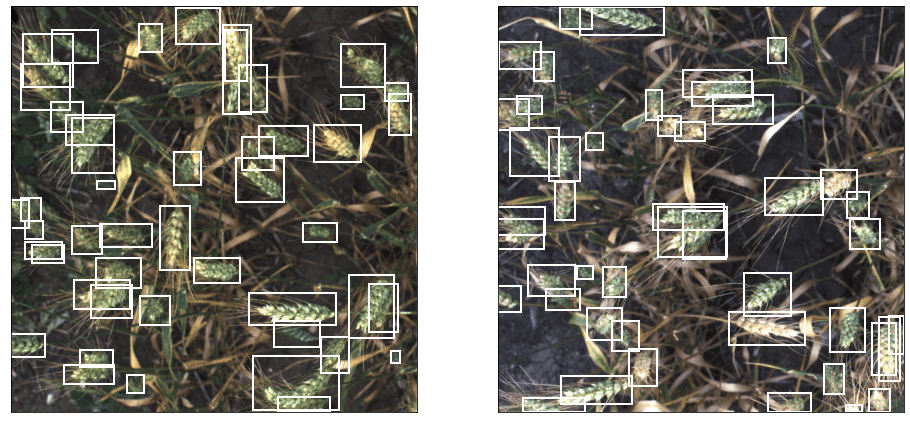
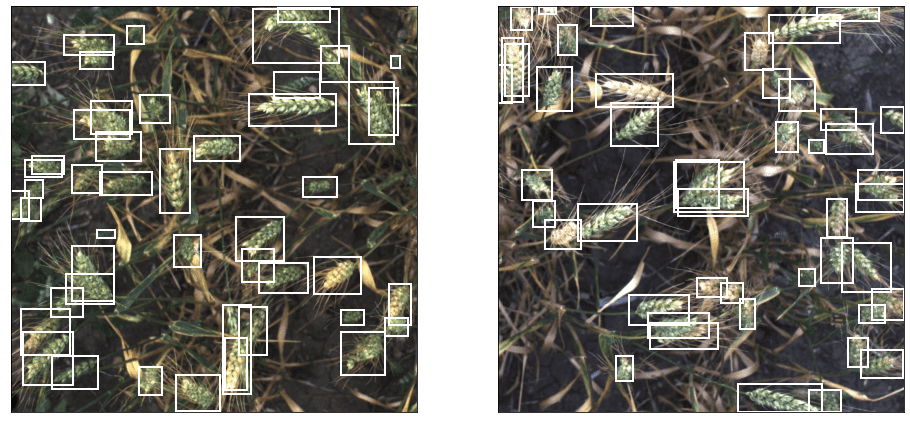
预览图片,加上标注:
num_rows, num_cols = 1, 2

ids = train_df['image_id'].unique()[:num_rows*num_cols]

imgs = [plt.imread(f'{DIR_TRAIN}/{n}.jpg') for n in ids]

axes = show_images(imgs, num_rows, num_cols, scale=8)

for ax, id in zip(axes, ids):

  datas = train_df[train_df['image_id'] == id]

  bboxes = [(d['x'], d['y'], d['x']+d['w'], d['y']+d['h']) for _, d in datas.iterrows()]

  show_bboxes(ax, bboxes, labels=None, colors=['w'])

plt.show()
创建 Dataset
继承 torch.utils.data.Dataset 抽象类,实现 __len__ __getitem__ 。且 __getitem__ 返回数据为:
- image: a
numpy.ndarrayimage - target: a dict containing the following fields
boxes(FloatTensor[N, 4]): the coordinates of theNbounding boxes in[x0, y0, x1, y1]format, ranging from0toWand0toHlabels(Int64Tensor[N]): the label for each bounding boximage_id(Int64Tensor[1]): an image identifier. It should be unique between all the images in the dataset, and is used during evaluationarea(Tensor[N]): The area of the bounding box. This is used during evaluation with the COCO metric, to separate the metric scores between small, medium and large boxes.iscrowd(UInt8Tensor[N]): instances withiscrowd=Truewill be ignored during evaluation.
import cv2 as cv

import numpy as np

import albumentations as A

from albumentations.pytorch.transforms import ToTensorV2

import torch

from torch.utils.data import Dataset

class Wheat(Dataset):

  def __init__(self, dataframe, image_dir, transforms=None):

    super().__init__()

    self.image_ids = dataframe['image_id'].unique()

    self.df = dataframe

    self.image_dir = image_dir

    self.transforms = transforms

  def __getitem__(self, idx: int):

    image_id = self.image_ids[idx]

    records = self.df[self.df['image_id'] == image_id]

    image = cv.imread(f'{self.image_dir}/{image_id}.jpg', cv.IMREAD_COLOR)

    image = cv.cvtColor(image, cv.COLOR_BGR2RGB).astype(np.float32)

    image /= 255.0

    boxes = records[['x', 'y', 'w', 'h']].values

    area = boxes[:, 2] * boxes[:, 3]

    area = torch.as_tensor(area, dtype=torch.float32)

    boxes[:, 2] = boxes[:, 0] + boxes[:, 2]

    boxes[:, 3] = boxes[:, 1] + boxes[:, 3]

    # there is only one class

    labels = torch.ones((records.shape[0],), dtype=torch.int64)

    # suppose all instances are not crowd

    iscrowd = torch.zeros((records.shape[0],), dtype=torch.uint8)

    target = {}

    target['boxes'] = boxes

    target['labels'] = labels

    target['image_id'] = torch.tensor([idx])

    target['area'] = area

    target['iscrowd'] = iscrowd

    if self.transforms:

      sample = {

        'image': image,

        'bboxes': target['boxes'],

        'labels': labels,

      }

      sample = self.transforms(**sample)

      image = sample['image']

      target['boxes'] = torch.stack(tuple(map(torch.tensor, zip(*sample['bboxes'])))).permute(1, 0)

    return image, target, image_id

  def __len__(self) -> int:

    return len(self.image_ids)

  # albumentations

  #  https://github.com/albumentations-team/albumentations

  @staticmethod

  def get_train_transform():

    return A.Compose([

      A.Flip(0.5),

      ToTensorV2(p=1.0)

    ], bbox_params={'format': 'pascal_voc', 'label_fields': ['labels']})

  @staticmethod

  def get_valid_transform():

    return A.Compose([

      ToTensorV2(p=1.0)

    ], bbox_params={'format': 'pascal_voc', 'label_fields': ['labels']})
albumentations 是一个优秀的图像增强的库,用它定义了 train valid 的转换方法。
现在创建 train valid 数据集:
train_dataset = Wheat(train, DIR_TRAIN, Wheat.get_train_transform())

valid_dataset = Wheat(valid, DIR_TRAIN, Wheat.get_valid_transform())
预览下数据集里的图片:
datas = [train_dataset[i] for i in range(2)]

imgs = [d[0].permute(1, 2, 0).numpy() for d in datas]

axes = show_images(imgs, 1, 2, scale=8)

for ax, (image, target, image_id) in zip(axes, datas):

  show_bboxes(ax, target['boxes'], labels=None, colors=['w'])

plt.show()
准备模型
import torchvision

from torchvision.models.detection.faster_rcnn import FastRCNNPredictor

from torchvision.models.detection import FasterRCNN

from torchvision.models.detection.rpn import AnchorGenerator
创建模型
创建一个 Faster R-CNN 预训练模型:
model = torchvision.models.detection.fasterrcnn_resnet50_fpn(pretrained=True)
微调模型
输出模型最后一层:
print(model.roi_heads.box_predictor)
FastRCNNPredictor(

  (cls_score): Linear(in_features=1024, out_features=91, bias=True)

  (bbox_pred): Linear(in_features=1024, out_features=364, bias=True)

)
替换该层,指明输出特征大小为 2:
num_classes = 2 # wheat or not(background)

# get number of input features for the classifier

in_features = model.roi_heads.box_predictor.cls_score.in_features

# replace the pre-trained model's head with a new one

model.roi_heads.box_predictor = FastRCNNPredictor(in_features, num_classes)
再次输出模型最后一层:
print(model.roi_heads.box_predictor)
FastRCNNPredictor(

  (cls_score): Linear(in_features=1024, out_features=2, bias=True)

  (bbox_pred): Linear(in_features=1024, out_features=8, bias=True)

)
训练模型
创建 DataLoader
from torch.utils.data import DataLoader

def collate_fn(batch):

  return tuple(zip(*batch))

train_data_loader = DataLoader(

  train_dataset,

  batch_size=4,

  shuffle=False,

  num_workers=4,

  collate_fn=collate_fn

)

valid_data_loader = DataLoader(

  valid_dataset,

  batch_size=4,

  shuffle=False,

  num_workers=4,

  collate_fn=collate_fn

)
创建参数
# train on the GPU or on the CPU, if a GPU is not available

device = torch.device('cuda') if torch.cuda.is_available() else torch.device('cpu')

# move model to the right device

model.to(device)

# create an optimizer

params = [p for p in model.parameters() if p.requires_grad]

optimizer = torch.optim.SGD(params, lr=0.005, momentum=0.9, weight_decay=0.0005)

# create a learning rate scheduler

# lr_scheduler = torch.optim.lr_scheduler.StepLR(optimizer, step_size=3, gamma=0.1)

lr_scheduler = None

# train it for 10 epochs

num_epochs = 10
开始训练
import time

from tqdm import tqdm

#from tqdm.notebook import tqdm as tqdm

itr = 1

total_train_loss = []

total_valid_loss = []

losses_value = 0

for epoch in range(num_epochs):

  start_time = time.time()

  # train ------------------------------

  model.train()

  train_loss = []

  pbar = tqdm(train_data_loader, desc='let\'s train')

  for images, targets, image_ids in pbar:

    images = list(image.to(device) for image in images)

    targets = [{k: v.to(device) for k, v in t.items()} for t in targets]

    loss_dict = model(images, targets)

    losses = sum(loss for loss in loss_dict.values())

    losses_value = losses.item()

    train_loss.append(losses_value)

    optimizer.zero_grad()

    losses.backward()

    optimizer.step()

    pbar.set_description(f"Epoch: {epoch+1}, Batch: {itr}, Loss: {losses_value}")

    itr += 1

  epoch_train_loss = np.mean(train_loss)

  total_train_loss.append(epoch_train_loss)

  # update the learning rate

  if lr_scheduler is not None:

    lr_scheduler.step()

  # valid ------------------------------

  with torch.no_grad():

    valid_loss = []

    for images, targets, image_ids in valid_data_loader:

      images = list(image.to(device) for image in images)

      targets = [{k: v.to(device) for k, v in t.items()} for t in targets]

      loss_dict = model(images, targets)

      losses = sum(loss for loss in loss_dict.values())

      loss_value = losses.item()

      valid_loss.append(loss_value)

  epoch_valid_loss = np.mean(valid_loss)

  total_valid_loss.append(epoch_valid_loss)

  # print ------------------------------

  print(f"Epoch Completed: {epoch+1}/{num_epochs}, Time: {time.time()-start_time}, "

        f"Train Loss: {epoch_train_loss}, Valid Loss: {epoch_valid_loss}")
Epoch: 1, Batch: 675, Loss: 0.8600306952323752: 100%|██████████| 675/675 [08:26<00:00,  1.33it/s]

Epoch Completed: 1/2, Time: 566.7130048274994, Train Loss: 0.909390335455138, Valid Loss: 0.8790632066434829

Epoch: 2, Batch: 1350, Loss: 0.8195391336080114: 100%|██████████| 675/675 [08:27<00:00,  1.33it/s]

Epoch Completed: 2/2, Time: 569.5055477619171, Train Loss: 0.8158109236268262, Valid Loss: 0.8743081629490502

...
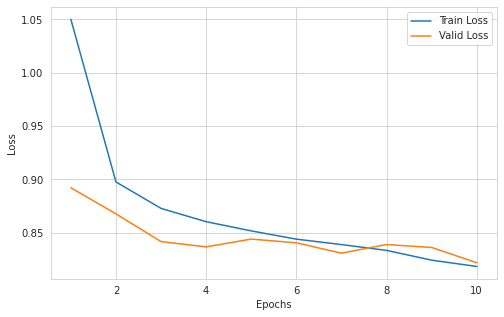
绘制 Loss
plt.figure(figsize=(8, 5))

sns.set_style(style="whitegrid")

sns.lineplot(x=range(1, len(total_train_loss)+1), y=total_train_loss, label="Train Loss")

sns.lineplot(x=range(1, len(total_train_loss)+1), y=total_valid_loss, label="Valid Loss")

plt.xlabel("Epochs")

plt.ylabel("Loss")

plt.show()
保存模型
torch.save(model.state_dict(), 'fasterrcnn_resnet50_fpn.pth')
模型预测
这里我们从头准备数据,再载入模型,进行预测。
准备数据
import os

import numpy as np

import pandas as pd

import seaborn as sns

from matplotlib import pyplot as plt

from PIL import Image

DIR_INPUT = 'global-wheat-detection'

DIR_TRAIN = f'{DIR_INPUT}/train'

DIR_TEST = f'{DIR_INPUT}/test'

WEIGHTS_FILE = 'fasterrcnn_resnet50_fpn.pth'
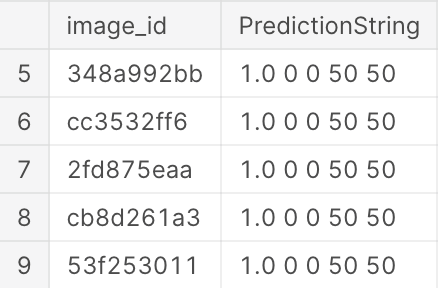
Submission 文件
用于提交结果的文件。一行内容,表示一个图片的预测结果。如下:
ce4833752,0.5 0 0 100 100
image_id ce4833752 的图片,预测出 x y w h 0 0 100 100 处是小麦,置信度 0.5。如果有多个预测框,能空格分隔。
test_df = pd.read_csv(f'{DIR_INPUT}/sample_submission.csv')

test_df.tail()
创建 Dataset
import cv2 as cv

import numpy as np

import albumentations as A

from albumentations.pytorch.transforms import ToTensorV2

import torch

from torch.utils.data import Dataset

class WheatTest(Dataset):

  def __init__(self, image_ids, image_dir, transforms=None):

    super().__init__()

    self.image_ids = image_ids

    self.image_dir = image_dir

    self.transforms = transforms

  def __getitem__(self, idx: int):

    image_id = self.image_ids[idx]

    image = cv.imread(f'{self.image_dir}/{image_id}.jpg', cv.IMREAD_COLOR)

    image = cv.cvtColor(image, cv.COLOR_BGR2RGB).astype(np.float32)

    image /= 255.0

    if self.transforms:

      sample = {

        'image': image,

      }

      sample = self.transforms(**sample)

      image = sample['image']

    return image, image_id

  def __len__(self) -> int:

    return len(self.image_ids)

  @staticmethod

  def get_test_transform():

    return A.Compose([

      ToTensorV2(p=1.0)

    ])
实例化测试数据集:
def get_image_ids(p):

  import glob

  image_ids = []

  for p in glob.glob(f'{p}/*.jpg'):

    n, _ = os.path.splitext(os.path.basename(p))

    image_ids.append(n)

  return image_ids

# try more images for submission

#test_dataset = WheatTest(get_image_ids(DIR_TRAIN), DIR_TRAIN, WheatTest.get_test_transform())

test_dataset = WheatTest(test_df["image_id"].unique(), DIR_TEST, WheatTest.get_test_transform())
创建 DataLoader
from torch.utils.data import DataLoader

def collate_fn(batch):

  return tuple(zip(*batch))

test_data_loader = DataLoader(

  test_dataset,

  batch_size=2,

  shuffle=False,

  num_workers=4,

  drop_last=False,

  collate_fn=collate_fn

)
载入模型
import torchvision

from torchvision.models.detection.faster_rcnn import FastRCNNPredictor

from torchvision.models.detection import FasterRCNN

from torchvision.models.detection.rpn import AnchorGenerator

device = torch.device('cuda') if torch.cuda.is_available() else torch.device('cpu')

# create a Faster R-CNN model without pre-trained

model = torchvision.models.detection.fasterrcnn_resnet50_fpn(pretrained=False, pretrained_backbone=False)

num_classes = 2 # wheat or not(background)

# get number of input features for the classifier

in_features = model.roi_heads.box_predictor.cls_score.in_features

# replace the pre-trained model's head with a new one

model.roi_heads.box_predictor = FastRCNNPredictor(in_features, num_classes)

# load the trained weights

model.load_state_dict(torch.load(WEIGHTS_FILE, map_location=device))

model.eval()

# move model to the right device

_ = model.to(device)
开始预测
score_threshold = 0.7

image_outputs = []

for images, image_ids in test_data_loader:

  images = list(image.to(device) for image in images)

  outputs = model(images)

  for image_id, output in zip(image_ids, outputs):

    boxes = output['boxes'].data.cpu().numpy()

    scores = output['scores'].data.cpu().numpy()

    mask = scores >= score_threshold

    boxes = boxes[mask].astype(np.int32)

    scores = scores[mask]

    image_outputs.append((image_id, boxes, scores))
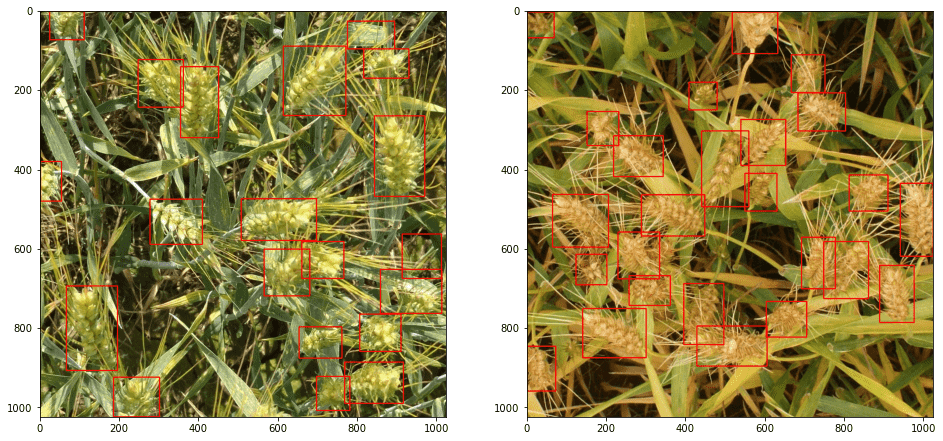
预览结果
num_rows, num_cols = 1, 2

scale = 16

figsize = (num_rows * scale, num_cols * scale)

_, axes = plt.subplots(num_rows, num_cols, figsize=figsize)

axes = axes.flatten()

fig_n = num_rows * num_cols

fig_i = 0

for i in range(1, 1+fig_n):

  image, image_id = test_dataset[i]

  _, boxes, scores = image_outputs[i]

  sample = image.permute(1, 2, 0).cpu().numpy()

  for box in boxes:

    cv.rectangle(sample, (box[0], box[1]), (box[2], box[3]), (220, 0, 0), 2)

  axes[fig_i].imshow(sample)

  fig_i += 1
保存结果
def format_prediction_string(boxes, scores):

  pred_strings = []

  for score, box in zip(scores, boxes):

    pred_strings.append(round(score, 4))

    pred_strings.extend(box)

  return ' '.join(map(str, pred_strings))

results = []

for image_id, boxes, scores in image_outputs:

  #boxes = boxes_.copy()

  boxes[:, 2] = boxes[:, 2] - boxes[:, 0]

  boxes[:, 3] = boxes[:, 3] - boxes[:, 1]

  result = {

    'image_id': image_id,

    'PredictionString': format_prediction_string(boxes, scores)

  }

  results.append(result)

results[0]
{'image_id': 'aac893a91',
'PredictionString': '0.9928 72 2 96 166 0.9925 553 528 123 203 0.9912 613 921 85 102 0.9862 691 392 125 193 0.9855 819 708 105 204 0.9842 356 531 100 88 0.982 586 781 100 119 0.9795 739 768 82 122 0.9779 324 662 126 160 0.9764 27 454 102 156 0.9763 545 76 145 182 0.9736 450 858 90 95 0.9626 241 91 137 146 0.9406 306 0 75 68 0.9404 89 618 128 80 0.9366 177 576 114 182 0.9363 234 845 144 91 0.9265 64 857 115 69 0.824 822 630 90 124 0.7516 815 921 134 100'}
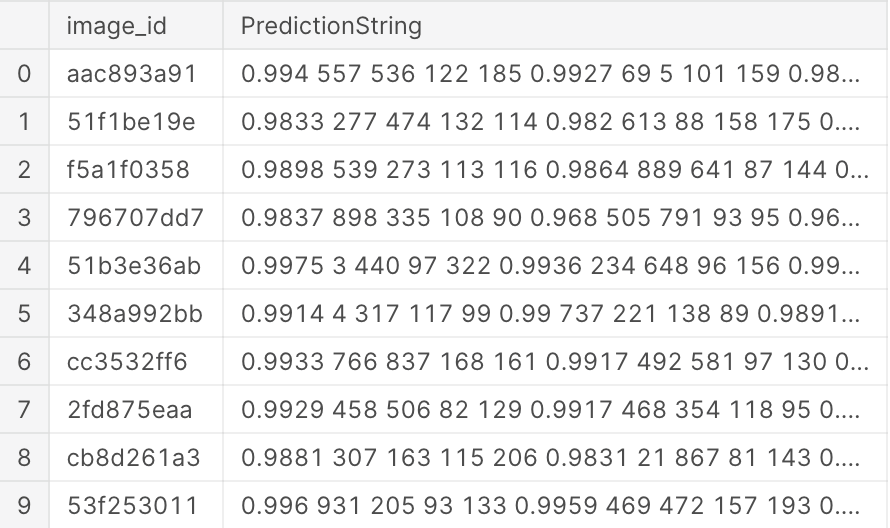
test_df = pd.DataFrame(results, columns=['image_id', 'PredictionString'])

test_df
test_df.to_csv('submission.csv', index=False)
提交结果

这就是 baseline 了,可以试着继续调优
参考
GoCoding 个人实践的经验分享,可关注公众号!
TorchVision Faster R-CNN 微调,实战 Kaggle 小麦检测的更多相关文章
- 使用java实现CNN的实战
使用java实现CNN的实战 1.要实现CNN,其中包括 卷积.池化(下采样).分类器.优化方法.分类器.反向传播 2.可以使用一个三维数组来表示一张图片(通道.行.列) 3.卷积,卷积的方式有三种: ...
- R语言预测实战(游浩麟)笔记2
特征构建技术 特征变换,对原始的某个特征通过一定的规则或映射得到新特征的方法,主要方法包括概念分层.标准化.离散化.函数变换以及深入表达.特征变换主要由人工完成,属于比较基础的特征构建方法. 概念分层 ...
- R语言预测实战(游浩麟)笔记1
预测流程 确定主题.指标.主体.精度.周期.用户.成本和数据七要素. 收集数据.内容划分.收集原则. 选择方法.主要方法有自相关分析.偏相关分析.频谱分析.趋势分析.聚类分析.关联分析.相关分析.互相 ...
- R语言预测实战(第二章--预测方法论)
2.1预测流程 从确定预测主题开始,一次进行数据收集.选择方法.分析规律.建立模型.评估效果直到发布模型. 2.2.1确定主题 (1)指标:表达的是数量特征,预测的结果也通常是通过指标的取值来体现. ...
- R语言预测实战(第一章)
本例使用forecast包中自带的数据集wineind,它表示从1980年1月到1994年8月, 由葡萄酒生产商销售的容量不到1升的澳大利亚酒的总量.数据示意如下: #观察曲线簇 len=1993-1 ...
- 小白学习之pytorch框架(7)之实战Kaggle比赛:房价预测(K折交叉验证、*args、**kwargs)
本篇博客代码来自于<动手学深度学习>pytorch版,也是代码较多,解释较少的一篇.不过好多方法在我以前的博客都有提,所以这次没提.还有一个原因是,这篇博客的代码,只要好好看看肯定能看懂( ...
- 基于CNN的人脸相似度检测
人脸相似度检测主要是检测两张图片中人脸的相似度,从而判断这两张图片的对象是不是一个人. 在上一篇文章中,使用CNN提取人脸特征,然后利用提取的特征进行分类.而在人脸相似度检测的工作中,我们也可以利用卷 ...
- Twitter基于R语言的时序数据突变检测(BreakoutDetection)
Twitter开源的时序数据突变检测(BreakoutDetection),基于无参的E-Divisive with Medians (EDM)算法,比传统的E-Divisive算法快3.5倍以上,并 ...
- 【目标检测实战】目标检测实战之一--手把手教你LMDB格式数据集制作!
文章目录 1 目标检测简介 2 lmdb数据制作 2.1 VOC数据制作 2.2 lmdb文件生成 lmdb格式的数据是在使用caffe进行目标检测或分类时,使用的一种数据格式.这里我主要以目标检测为 ...
随机推荐
- 【poj 1061】青蛙的约会(数论--拓展欧几里德 求解同余方程)
题意:已知2只青蛙的起始位置 a,b 和跳跃一次的距离 m,n,现在它们沿着一条长度为 l 的纬线(圈)向相同方向跳跃.问它们何时能相遇?(好有聊的青蛙 (΄◞ิ౪◟ิ‵) *)永不相遇就输出&quo ...
- Codeforces Round #479 (Div. 3) D. Divide by three, multiply by two (DFS)
题意:给你一个长度为\(n\)的序列\(a\).对它重新排列,使得\(a_{i+1}=a_{i}/3\)或\(a_{i+1}=2*a_{i}\).输出重新排列后的序列. 题解:经典DFS,遍历这个序列 ...
- 牛客编程巅峰赛S1第6场 - 黄金&钻石&王者 B.牛牛摆放花 (贪心)
题意;将一组数重新排序,使得相邻两个数之间的最大差值最小. 题解:贪心,现将所有数sort一下,然后正向遍历,将数分配到新数组的两端,然后再遍历一次维护一个最大值即可. 代码: class Solut ...
- 远程连接 出现身份验证错误,要求的函数不受支持(这可能是由于CredSSP加密Oracle修正)
修改本地组策略: 计算机配置>管理模板>系统>凭据分配>加密Oracle修正 选择启用并选择"易受攻击". 原文:https://blog.csdn.net ...
- 一篇文章图文并茂地带你轻松实践 HTML5 history api
HTML5 history api 前言 由于笔者在网络上没有找到比较好的关于 history api 的实践案例,有的案例过于杂乱,没有重点,有些案例只是告诉读者 api 是什么,却没告诉怎么用,本 ...
- 手工数据结构系列-C语言模拟栈 hdu1022
这个题我一开始是这么想的.. 爆搜所有可能的出栈序列 然后对输入进行匹配 这样我感觉太慢 然后我们可以想到直接通过入栈序列对出栈序列进行匹配 但是我犯了一个错误..那就是出栈序列一定到入栈序列里找.. ...
- u-boot 移植 --->4、Tiny210核心板的DDR初始化下详解
RAM的原理简单学习 DDR是RAM的一种,RAM常见的类型有SRAM,SDRAM,DDR他们的共同特点是,随机存储意味着读写速度快,掉电后数据丢失,所以常用来存储程序中的变量. SRAM 静态随机存 ...
- Ubuntu pppoeconf失败
之前是通过sudo pppoeconf一路yes就可以连通有线网络(dsl和ethernet)的, 系统再次瘫痪后终于进入图形界面, 有线网络丢失, sudo pppoeconf也fail了, 其实加 ...
- SCSS 复用 class 样式
SCSS 复用 class 样式 @mixin & @include 复用的变量名称,不可以是 .class 开头️ css-varibale-name .css-class-name Mix ...
- cocos2d-x & cocos2d-js
cocos2d-x & cocos2d-js cocos2d-x new https://github.com/cocos2d/cocos2d-x cocos2d-x is a multi-p ...