solr 文档一
[在此处输入文章标题]
参考博客:
http://blog.csdn.net/matthewei6/article/details/50620600
基础环境搭建
solr版本5.5.5:
一、solr5.5.5可以独立部署,使用默认的Jetty启动
1、准备条件:
环境:JDK需要1.7以上,最好是1.8
下载软件包:
使用清华大学的镜像包:
https://mirrors.tuna.tsinghua.edu.cn/apache/lucene/solr/5.5.5/solr-5.5.5.tgz
命令:curl https://mirrors.tuna.tsinghua.edu.cn/apache/lucene/solr/5.5.5/solr-5.5.5.tgz
或者wget https://mirrors.tuna.tsinghua.edu.cn/apache/lucene/solr/5.5.5/solr-5.5.5.tgz
2、解压:
tar -zxvf solr-5.5.5.tgz
3、启动服务器:
bin/solr start
4、验证服务是否启动:
在浏览器中输入:http://IP:8983/solr/ 端口默认是8983 要想修改的话,启动的时候加上参数 -p 8983
5、创建core:
bin/solr create -c mycore
bin/solr delete -c testcore -------删除已创建的core
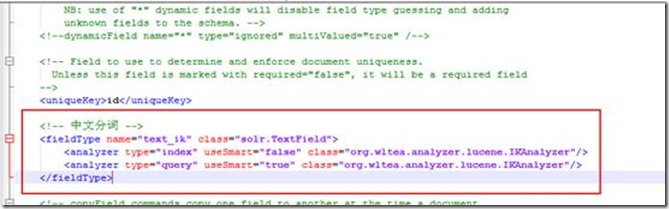
5、添加中文分词器:
这里采用的是IK分词器,添加分词器是在刚刚创建的core中添加:
位置:${PATH}\server\solr\mycore\conf\managed-schema
添加下面的内容:
<!-- 中文分词 -->
<fieldType name="text_ik" class="solr.TextField">
<analyzer type="index" useSmart="false" class="org.wltea.analyzer.lucene.IKAnalyzer"/>
<analyzer type="query" useSmart="true" class="org.wltea.analyzer.lucene.IKAnalyzer"/>
</fieldType>
并且把jar包添加到:(注意这里的jar一定要版本对应)
${PATH}\server\solr-webapp\webapp\WEB-INF\lib 目录下

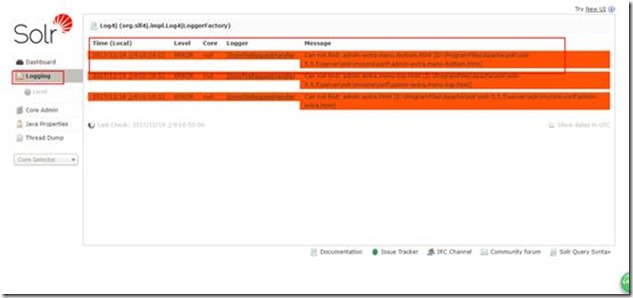
验证IK是否安装成功。没有安装成功的话会提示mycore 的core有问题。也可以查看solr的日志。
重启服务器:
bin/solr restart -p 8983 注意重启要指定端口要不然报错
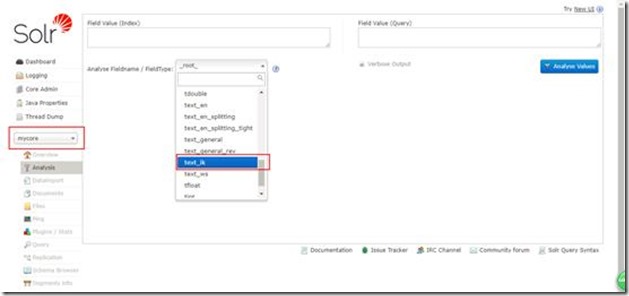
然后看看分词效果:
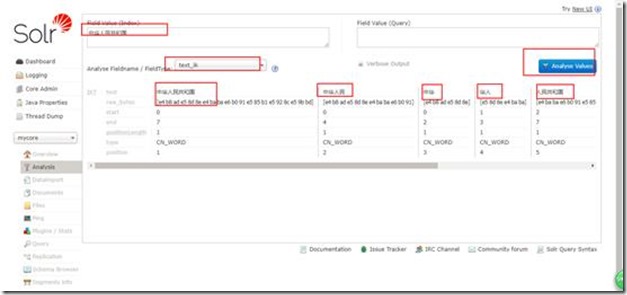
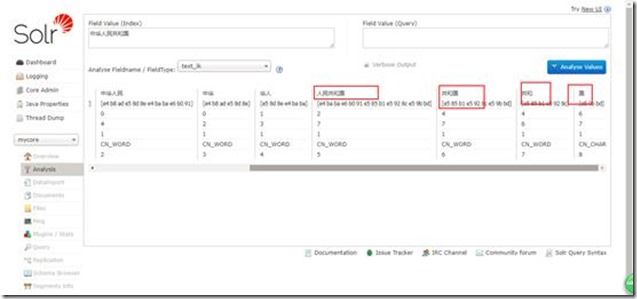
效果还是不错的。
建立数据库连接并对数据表字段建索引分词
http://blog.csdn.net/u011518678/article/details/51871925 基础说明参考
6、copy一个oracle驱动包到E:\solr\solr-5.5.5\server\solr-webapp\webapp\WEB-INF\lib下,
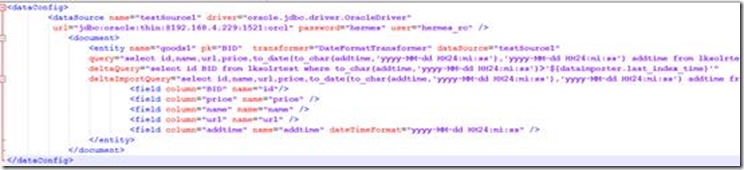
并在E:\solr\solr-5.5.5\server\solr\liukuncore\conf (liukuncor为我自己新建的一个core)下创建data-config.xml文件,添加内容如下:
<dataConfig>
<dataSource name="testSource1" driver="oracle.jdbc.driver.OracleDriver"
url="jdbc:oracle:thin:@192.168.4.229:1521:orcl" password="hermes" user="hermes_rc" />
<document>
<entity name="goods1" pk="BID" transformer="DateFormatTransformer" dataSource="testSource1"
query="select id,name,url,price,to_date(to_char(addtime,'yyyy-MM-dd HH24:mi:ss'),'yyyy-MM-dd HH24:mi:ss') addtime from lksolrtest"
deltaQuery="select id BID from lksolrtest where to_char(addtime,'yyyy-MM-dd HH24:mi:ss')>'${dataimporter.last_index_time}'"
deltaImportQuery="select id,name,url,price,to_date(to_char(addtime,'yyyy-MM-dd HH24:mi:ss'),'yyyy-MM-dd HH24:mi:ss') addtime from lksolrtest where id = '${dataimporter.delta.BID}'">
<field column="BID" name="id"/>
<field column="price" name="price" />
<field column="name" name="name" />
<field column="url" name="url" />
<field column="addtime" name="addtime" dateTimeFormat="yyyy-MM-dd HH24:mi:ss" />
</entity>
</document>
</dataConfig>
有点乱,在文本中如图所示:
这里面有几点需要注意的地方:
(1) .pk尽量使用deltaQuery中查询出的主键重命名后的名称,否则会有问题(索引建成功,查询不到内容)
(2) .${dataimporter.last_index_time}代表上次创建完索引的时间,是一个字符串,这个值可以在E:\solr\solr-5.5.5\server\solr\liukuncore\conf\dataimport.properties文件中看到
(3) .${dataimporter.delta.BID}是deltaQuery中查询到的主键值
(4) dateTimeFormat="yyyy-MM-dd HH24:mi:ss"是对数据库中日期格式的转换(转成solr中的日期格式)
7、添加solr-dataimporthandler-5.5.5.jar、solr-dataimporthandler-extras-5.5.5.jar和
mydataimportscheduler.jar三个到E:\solr\solr-5.5.5\server\solr-webapp\webapp\WEB-INF\lib下
并在E:\solr\solr-5.5.5\server\solr\liukuncore\conf\solrconfig.xml对应位置添加
<lib dir="./lib" regex=".*\.jar" />
<requestHandler name="/dataimport" class="solr.DataImportHandler">
<lst name="defaults">
<str name="config">data-config.xml</str>
</lst>
</requestHandler>
接着注释掉下面的内容,防止id默认为String类型
<!--
<searchComponent name="elevator" class="solr.QueryElevationComponent" >
<str name="queryFieldType">string</str>
<str name="config-file">elevate.xml</str>
</searchComponent>
-->
8、在E:\solr\solr-5.5.5\server\solr\liukuncore\conf\managed-schema文件中定义与数据库对应的字段变量
<field name="id" type="int" indexed="true" stored="true" required="true" multiValued="false" />
<field name="name" type = "text_ik" indexed="true" stored="true" />
<field name="price" type = "float" indexed="true" stored="true" />
<field name="url" type = "text_ik" indexed="true" stored="true" />
<field name="addtime" type = "date" indexed="true" stored="true" />
<uniqueKey>id</uniqueKey>
9、E:\solr\solr-5.5.5\server\solr\下创建文件夹conf,并新建文件dataimport.properties,添加如下内容:(这是设置定时增量更新的配置)
#################################################
# #
# dataimport scheduler properties #
# #
#################################################
# to sync or not to sync
# 1 - active; anything else - inactive
syncEnabled=1
# which cores to schedule
# in a multi-core environment you can decide which cores you want syncronized
# leave empty or comment it out if using single-core deployment
#syncCores=liukuncore,liukuncore1
syncCores=liukuncore
# solr server name or IP address
# [defaults to localhost if empty]
server=localhost
# solr server port
# [defaults to 80 if empty]
port=8983
# application name/context
# [defaults to current ServletContextListener's context (app) name]
webapp=solr
# URL params [mandatory]
# remainder of URL
#params=/deltaimport?command=delta-import&clean=false&commit=true
params=/dataimport?command=delta-import&clean=false&commit=true
# schedule interval
# number of minutes between two runs
# [defaults to 30 if empty]
interval=1
# 重做索引的时间间隔,单位分钟,默认7200,即1天;
# 为空,为0,或者注释掉:表示永不重做索引
reBuildIndexInterval=7200
# 重做索引的参数
#reBuildIndexParams=/deltaimport?command=full-import&clean=true&commit=true
reBuildIndexParams=/dataimport?command=full-import&clean=true&commit=true
# 重做索引时间间隔的计时开始时间,第一次真正执行的时间#=reBuildIndexBeginTime+reBuildIndexInterval*60*1000;
# 两种格式:2012-04-11 03:10:00 或者 03:10:00,后一种会自动补全日期部分为服务启动时的日期
reBuildIndexBeginTime=18:50:00
10、在E:\solr\solr-5.5.5\server\solr-webapp\webapp\WEB-INF\web.xml文件中添加监听器
<listener>
<listener-class>
org.apache.solr.handler.dataimport.scheduler.ApplicationListener
</listener-class>
</listener>
到此数据库和定时增量更新索引配置的东西已全部完成
多表关联定时更新索引
1. 多表关联索引说明以及场景
上面说到单表索引定时增量更新是针对一张表的数据发生变化的时候更新或者增量添加索引,对于多表而言类似(具体需求为人口库法人库后台检索),多表关联可以理解为用一张主表去关联多个子表,当主表或者子表中的数据发生变化(即数据更改或者数据添加---这里先不做删除,因为删除需要表中有一个字段来表示数据是否为删除状态),需要对索引进行更新。
这里存在两种情况:1.数据修改;2.数据增加。---(这两者都需要表中存在更新时间字段)。 数据修改是由于solr内部的实现机制,当数据发生修改时,我们需要更新修改这部分数据的索引,实质上是直接生成新的索引,在solr内部生成索引时需要指定一个主键id来表示索引的唯一,当下一次生成一个重复的索引时会自动覆盖掉上次生成的索引,保证索引出的数据与数据库数据相同。
数据增加指主表增加了数据或者其子表数据增加再或者两张表数据同时增加,这时需要生成新的索引(不生成新索引,新添加的数据查询不到),下面提供两种方式来生成。
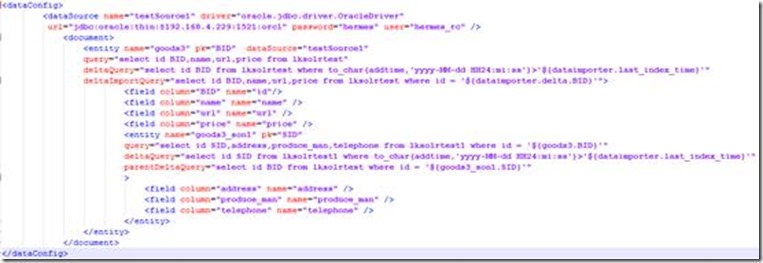
2. 主要配置文件data-config.xml
配置文件内容如下:
<dataConfig>
<dataSource name="testSource1" driver="oracle.jdbc.driver.OracleDriver"
url="jdbc:oracle:thin:@192.168.4.229:1521:orcl" password="hermes" user="hermes_rc" />
<document>
<entity name="goods3" pk="BID" dataSource="testSource1"
query="select id BID,name,url,price from lksolrtest"
deltaQuery="select id BID from lksolrtest where to_char(addtime,'yyyy-MM-dd HH24:mi:ss')>'${dataimporter.last_index_time}'"
deltaImportQuery="select id BID,name,url,price from lksolrtest where id = '${dataimporter.delta.BID}'">
<field column="BID" name="id"/>
<field column="name" name="name" />
<field column="url" name="url" />
<field column="price" name="price" />
<entity name="goods3_son1" pk="SID"
query="select id SID,address,produce_man,telephone from lksolrtest1 where id = '${goods3.BID}'"
deltaQuery="select id SID from lksolrtest1 where to_char(addtime,'yyyy-MM-dd HH24:mi:ss')>'${dataimporter.last_index_time}'"
parentDeltaQuery="select id BID from lksolrtest where id = '${goods3_son1.SID}'"
>
<field column="address" name="address" />
<field column="produce_man" name="produce_man" />
<field column="telephone" name="telephone" />
</entity>
</entity>
</document>
</dataConfig>
这里主要解释一下增量更新部分的属性:
query是获取全部数据的SQL
deltaImportQuery是获取增量数据时使用的SQL
deltaQuery是获取增量pk的SQL
parentDeltaQuery是获取父Entity的pk的SQL
Full Import工作原理:
执行本Entity的Query,获取所有数据;
针对每个行数据Row,获取pk,组装子Entity的Query;
执行子Entity的Query,获取子Entity的数据。
Delta Import工作原理:
查找子Entity,直到没有为止;
执行Entity的deltaQuery,获取变化数据的pk;
合并子Entity parentDeltaQuery得到的pk;
针对每一个pk Row,组装父Entity的parentDeltaQuery;
执行parentDeltaQuery,获取父Entity的pk;
执行deltaImportQuery,获取自身的数据;
如果没有deltaImportQuery,就组装Query
限制:
子Entity的query必须引用父Entity的pk
子Entity的parentDeltaQuery必须引用自己的pk
子Entity的parentDeltaQuery必须返回父Entity的pk
deltaImportQuery引用的必须是自己的pk
文件索引创建
文件索引创建未能在界面上成功操作,是通过程序创建,查询结果可以在界面看到,也可以通过程序实现。
1. 创建一个自定义的core--------怎样创建在上面已经提到过
2. 在新生成的core/conf/managed-schema文件中添加IK分词器,
<fieldType name="text_ik" class="solr.TextField">
<analyzer type="index" useSmart="false" class="org.wltea.analyzer.lucene.IKAnalyzer"/>
<analyzer type="query" useSmart="true" class="org.wltea.analyzer.lucene.IKAnalyzer"/>
</fieldType>
并将
<dynamicField name="attr_*" type="text_general" indexed="true" stored="true" multiValued="true"/>中的type改为text_ik,

3. 程序创建文件索引并查询
package com.boco.lk;
import java.io.File;
import java.io.IOException;
import org.apache.solr.client.solrj.SolrQuery;
import org.apache.solr.client.solrj.SolrServerException;
import org.apache.solr.client.solrj.request.AbstractUpdateRequest;
import org.apache.solr.client.solrj.impl.HttpSolrClient;
import org.apache.solr.client.solrj.request.ContentStreamUpdateRequest;
import org.apache.solr.client.solrj.response.QueryResponse;
import org.apache.solr.common.SolrDocument;
import org.apache.solr.common.SolrDocumentList;
public class DocumentSolr {
private static String URL = "http://localhost:8983/solr/liukuncore3";//指定core的访问路径
/**
* 创建索引方法
*/
public static void createIndex(){
HttpSolrClient client = null;
try {
client = new HttpSolrClient(URL);
ContentStreamUpdateRequest up = new ContentStreamUpdateRequest("/update/extract");
up.addFile(new File("E:\\solr文档--刘坤\\solr-word.pdf"),"application/pdf");
up.setParam("literal.id", "E:\\solr文档--刘坤\\solr-word.pdf");
up.setParam("fmap.content", "attr_test");//attr_*,只要是以attr_开头即可
up.setParam("fmap.content_type", "documentFormat");//这个content_type在managed-schema文件中有,此行意思是给content_type重命名
up.setAction(AbstractUpdateRequest.ACTION.COMMIT,true,true);
client.request(up);
client.commit();
} catch (Exception e) {
// TODO Auto-generated catch block
e.printStackTrace();
} finally {
try {
client.close();
} catch (IOException e) {
// TODO Auto-generated catch block
e.printStackTrace();
}
}
}
public static void queryIndex(){
HttpSolrClient client = null;
try {
client = new HttpSolrClient(URL);
SolrQuery query = new SolrQuery();
query.setParam("q", "*:*");
// query.setParam("df", "attr_content");
// query.setParam("fl","id","attr_content","documentFormat");
QueryResponse rsp = client.query(query);
SolrDocumentList results = rsp.getResults();
System.out.println("查询到记录:"+results.getNumFound()+"条");
for (SolrDocument solrDocument : results) {
System.out.println(solrDocument.getFieldNames());
System.out.println(solrDocument.get("id"));
System.out.println(solrDocument.get("attr_test"));
System.out.println(solrDocument.get("documentFormat"));
System.out.println("**********************");
}
} catch (Exception e) {
// TODO Auto-generated catch block
e.printStackTrace();
} finally {
try {
client.close();
} catch (IOException e) {
// TODO Auto-generated catch block
e.printStackTrace();
}
}
}
public static void deletePlan(String id) {
HttpSolrClient server = null;
try {
server = new HttpSolrClient(URL);
server.deleteById(id);
server.commit();
} catch (SolrServerException | IOException e) {
e.printStackTrace();
} finally {
try {
server.close();
} catch (IOException e) {
// TODO Auto-generated catch block
e.printStackTrace();
}
}
}
public static void main(String[] args) {
deletePlan("E:\\solr文档--刘坤\\solr-word.pdf");
createIndex();
queryIndex();
}
}
solr 文档一的更多相关文章
- Solr记录-solr文档xml
Solr添加文档(XML) 在上一章中,我们学习解释了如何向Solr中添加JSON和.CSV文件格式的数据.在本章中,将演示如何使用XML文档格式在Apache Solr索引中添加数据. 示例数据 假 ...
- solr 文档二
SOLR 5.5.5文档 参考博文: http://blog.csdn.net/matthewei6/article/details/50620600 作者:毛平 时间:2018年1月15日 17:3 ...
- PHP搜索Solr文档(含高亮)
<?php $options = array ( 'hostname' => 'localhost', 'port' => '8080', 'path' => 'solr/he ...
- PHP删除Solr文档
<?php $options = array ( 'hostname' => 'localhost', 'port' => '8080', 'path'=>'solr/help ...
- Solr 18 - 通过SolrJ局部更新Solr中的文档 (原子操作、非覆盖操作)
目录 1 需求分析 2 需求实现 2.1 pom.xml依赖 2.2 Java代码示例 3 补充说明 3.1 关于文档中_version_的取值说明 3.2 store=true/false的区别 1 ...
- solr schema.xml文档节点配置
首先,讲解一下/usr/local/solr/collection1/conf/schema.xml的配置,此文档功能类似于配置索引数据库. Field:类似于数据库字段的属性(此文统一使用用“字段” ...
- JSON方式提交文档时SOLR报:AtomicUpdateDocumentMerger Unknown operation for the an atomic update, operation ignored
文档是数组转成的json 原数组: array( 0 =>3, 1 =>3, 2 =>4, 3 =>5, 4 =>5, 5 =>6) 用array_unique去掉 ...
- Solr开发参考文档(转)
Solr开发文档 Solr 是一种可供企业使用的.基于 Lucene 的搜索服务器,它支持层面搜索.命中醒目显示和多种输出格式.在这篇文章中,将介绍 Solr 并展示如何轻松地将其表现优异的全文本搜索 ...
- Solr 15 - Solr添加和更新索引的过程 (文档的路由细节)
目录 1 添加文档的细节 1.1 注册观察者 - watcher 1.2 文档的路由 - document route 1.2.1 路由算法 1.2.2 Solr路由的实现类 1.2.3 implic ...
随机推荐
- 065 01 Android 零基础入门 01 Java基础语法 08 Java方法 02 带参无返回值方法
065 01 Android 零基础入门 01 Java基础语法 08 Java方法 03 带参无返回值方法 本文知识点:带参无返回值方法 说明:因为时间紧张,本人写博客过程中只是对知识点的关键步骤进 ...
- CSG:清华大学提出通过分化类特定卷积核来训练可解释的卷积网络 | ECCV 2020 Oral
论文提出类特定控制门CSG来引导网络学习类特定的卷积核,并且加入正则化方法来稀疏化CSG矩阵,进一步保证类特定.从实验结果来看,CSG的稀疏性能够引导卷积核与类别的强关联,在卷积核层面产生高度类相关的 ...
- 加快ASP。NET Core WEB API应用程序。第3部分
下载source from GitHub 对ASP进行深度重构和优化.NET Core WEB API应用程序代码 介绍 第1部分.创建一个测试的RESTful WEB API应用程序. 第2部分.增 ...
- asp.net mvc核心、实体框架和simplepagin .js中的分页
下载demo - 516.1 KB , 介绍 这篇文章将解释如何在asp.net mvc核心应用程序中进行分页,目标是enity框架,并使用jquery模板simplepagin .js. 我的一个应 ...
- DX12龙书 02 - DirectXMath 库中与向量有关的类和函数
0x00 需要用到的头文件 #include <DirectXMath> #include <DirectXPackedVector.h> using namespace Di ...
- es6深层次数组深拷贝
let arr = [ { label: '1', children: [1, 2] } ] let a = [{...arr[0]}] ...
- 【C/C++编程入门学习】C语言结构体硬核玩法分享,一切皆是数据!
前言 对于结构体的应用太多了,今天这篇文章我主要为大家总结平时关于结构体的一些独特硬核小技巧,对于结构体更多优秀的编程表现,如果你对结构体的基础知识还不具备的话得回头看一下专栏教程或者自己找本书籍学习 ...
- .NET Core+MongoDB集群搭建与实战
目录 安装 MongoDB apt 直接安装(方法1) apt 仓库安装(方法2) 方法1.2启动 MongoDB 通过二进制包安装(方法3) 安装依赖 deb 安装 MongoDB tgz 安装 M ...
- harbor搭建与使用
前两天测试服务docker化并k8s布署时,出于方便,使用了docker hub.由于我们的代码是要放到镜像里的,通过运行容器,便能获取我们的全部代码,风险很大.所以我们决定进行私有化的镜像部 ...
- 面试官:为什么MySQL的索引要使用B+树,而不是其它树?比如B树?
InnoDB的一棵B+树可以存放多少行数据? 答案:约2千万 为什么是这么多? 因为这是可以算出来的,要搞清楚这个问题,先从InnoDB索引数据结构.数据组织方式说起. 计算机在存储数据的时候,有最小 ...