Unity做360度的全景照片
这里推荐两种方法,第一种是用鼠标滑动,第二种是用手机的陀螺仪进行全景查看
第一种:
1、新建一Sphere,然后为其赋予材质,注意材质的Shader类型为:Mobile/particles/Alpha Blended,然后将做好的全景图贴上去
2、在摄像机上附加以下脚本:代码来源参考自
 using UnityEngine;

 using System.Collections;

 using UnityEngine.UI;

 public class GyroController_01 : MonoBehaviour

 {

     public float moveSpeed = ;//物体旋转速度

     public GameObject target;

     private Vector2 oldPosition;

     private Vector2 oldPosition1;

     private Vector2 oldPosition2;

     private float distance = ;

     private bool flag = false;

     //摄像头的位置

     private float x = 0f;

     private float y = 0f;

     //左右滑动移动速度

     public float xSpeed = 250f;

     public float ySpeed = 120f;

     //缩放限制系数

     public float yMinLimit = -;

     public float yMaxLimit = ;

     //是否旋转

     private bool isRotate = true;

     //计数器

     private float count = ;

     //初始化游戏信息设置

     void Start()

     {

         Vector3 angles = transform.eulerAngles;

         x = angles.y;

         y = angles.x;

         if (GetComponent<Rigidbody>())

             GetComponent<Rigidbody>().freezeRotation = true;

     }

     // Update is called once per frame

     void Update()

     {

         if (isRotate)

         {

             target.transform.Rotate(Vector3.down, Time.deltaTime * moveSpeed, Space.World);

         }

         if (!isRotate)

         {

             count += Time.deltaTime;

             if (count > )

             {

                 count = ;

                 isRotate = true;

             }

         }

         //触摸类型为移动触摸

         if (Input.GetMouseButton())

         {

             //根据触摸点计算X与Y位置

             x += Input.GetAxis("Mouse X") * xSpeed * Time.deltaTime;

             y -= Input.GetAxis("Mouse Y") * ySpeed * Time.deltaTime;

             isRotate = false;

         }

         //判断鼠标滑轮是否输入

         float temp = Input.GetAxis("Mouse ScrollWheel");

         if (temp != )

         {

             if (temp > )

             {

                 // 这里的数据是根据我项目中的模型而调节的,大家可以自己任意修改

                 if (distance > -)

                 {

                     distance -= 0.5f;

                 }

             }

             if (temp < )

             {

                 // 这里的数据是根据我项目中的模型而调节的,大家可以自己任意修改

                 if (distance < )

                 {

                     distance += 0.5f;

                 }

             }

         }

     }

     //计算距离,判断放大还是缩小。放大返回true,缩小返回false

     bool IsEnlarge(Vector2 oP1, Vector2 oP2, Vector2 nP1, Vector2 nP2)

     {

         //old distance

         float oldDistance = Mathf.Sqrt((oP1.x - oP2.x) * (oP1.x - oP2.x) + (oP1.y - oP2.y) * (oP1.y - oP2.y));

         //new distance

         float newDistance = Mathf.Sqrt((nP1.x - nP2.x) * (nP1.x - nP2.x) + (nP1.y - nP2.y) * (nP1.y - nP2.y));

         if (oldDistance < newDistance)

         {

             //zoom+

             return true;

         }

         else

         {

             //zoom-

             return false;

         }

     }

     //每帧执行,在Update后

     void LateUpdate()

     {

         if (target)

         {

             //重置摄像机的位置

             y = ClampAngle(y, yMinLimit, yMaxLimit);

             var rotation = Quaternion.Euler(y, x, );

             var position = rotation * (new Vector3(0.0f, 0.0f, -distance)) + target.transform.position;

             transform.rotation = rotation;

             transform.position = position;

         }

     }

     float ClampAngle(float angle, float min, float max)

     {

         if (angle < -)

             angle += ;

         if (angle > )

             angle -= ;

         return Mathf.Clamp(angle, min, max);

     }

 }
3、然后在游戏运行的时候左右、上下滑动鼠标即可,也可以滚动鼠标滚轮
第二种:目前我没有测试,手上没有安卓机,有条件的可以进行测试一下。
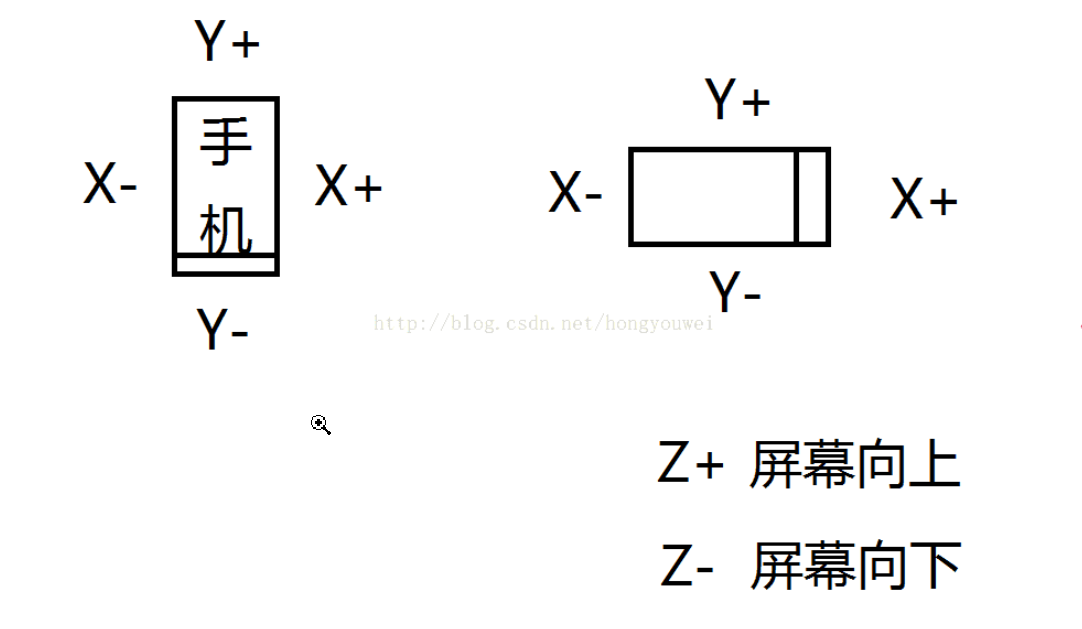
1、首先我们先了解移动端手机陀螺仪的向量方向。
Unity中重力感应的取值范围时 -1.0~1.0
X轴:home按键在下手机面朝天
向右旋转90度重力分量为1.0
向左旋转90度重力分量为-1.0
Y轴:Home按键在上手机背面朝自己重力分量为1.0
Home按键在下手机面朝自己重力分量为-1.0
Z轴:手机面朝地面重力分量为1.0
手机面朝天空重力分量为1.0
2、新建一Sphere,然后为其赋予材质,注意材质的Shader类型为:Mobile/particles/Alpha Blended,然后将做好的全景图贴上去
3、在摄像机上附加以下脚本,并将相机作为Sphere的子物体即可代码来源参考自
 // ***********************************************************

 // Written by Heyworks Unity Studio http://unity.heyworks.com/

 // ***********************************************************

 using UnityEngine;

 /// <summary>

 /// Gyroscope controller that works with any device orientation.

 /// </summary>

 public class GyroController : MonoBehaviour

 {

     #region [Private fields]

     private bool gyroEnabled = true;

     private const float lowPassFilterFactor = 0.2f;

     private readonly Quaternion baseIdentity =  Quaternion.Euler(, , );

     private readonly Quaternion landscapeRight =  Quaternion.Euler(, , );

     private readonly Quaternion landscapeLeft =  Quaternion.Euler(, , -);

     private readonly Quaternion upsideDown =  Quaternion.Euler(, , );

     private Quaternion cameraBase =  Quaternion.identity;

     private Quaternion calibration =  Quaternion.identity;

     private Quaternion baseOrientation =  Quaternion.Euler(, , );

     private Quaternion baseOrientationRotationFix =  Quaternion.identity;

     private Quaternion referanceRotation = Quaternion.identity;

     private bool debug = true;

     #endregion

     #region [Unity events]

     protected void Start ()

     {

         AttachGyro();

     }

     protected void Update()

     {

         if (!gyroEnabled)

             return;

         transform.rotation = Quaternion.Slerp(transform.rotation,

             cameraBase * ( ConvertRotation(referanceRotation * Input.gyro.attitude) * GetRotFix()), lowPassFilterFactor);

     }

     protected void OnGUI()

     {

         if (!debug)

             return;

         GUILayout.Label("Orientation: " + Screen.orientation);

         GUILayout.Label("Calibration: " + calibration);

         GUILayout.Label("Camera base: " + cameraBase);

         GUILayout.Label("input.gyro.attitude: " + Input.gyro.attitude);

         GUILayout.Label("transform.rotation: " + transform.rotation);

         if (GUILayout.Button("On/off gyro: " + Input.gyro.enabled, GUILayout.Height()))

         {

             Input.gyro.enabled = !Input.gyro.enabled;

         }

         if (GUILayout.Button("On/off gyro controller: " + gyroEnabled, GUILayout.Height()))

         {

             if (gyroEnabled)

             {

                 DetachGyro();

             }

             else

             {

                 AttachGyro();

             }

         }

         if (GUILayout.Button("Update gyro calibration (Horizontal only)", GUILayout.Height()))

         {

             UpdateCalibration(true);

         }

         if (GUILayout.Button("Update camera base rotation (Horizontal only)", GUILayout.Height()))

         {

             UpdateCameraBaseRotation(true);

         }

         if (GUILayout.Button("Reset base orientation", GUILayout.Height()))

         {

             ResetBaseOrientation();

         }

         if (GUILayout.Button("Reset camera rotation", GUILayout.Height()))

         {

             transform.rotation = Quaternion.identity;

         }

     }

     #endregion

     #region [Public methods]

     /// <summary>

     /// Attaches gyro controller to the transform.

     /// </summary>

     private void AttachGyro()

     {

         gyroEnabled = true;

         ResetBaseOrientation();

         UpdateCalibration(true);

         UpdateCameraBaseRotation(true);

         RecalculateReferenceRotation();

     }

     /// <summary>

     /// Detaches gyro controller from the transform

     /// </summary>

     private void DetachGyro()

     {

         gyroEnabled = false;

     }

     #endregion

     #region [Private methods]

     /// <summary>

     /// Update the gyro calibration.

     /// </summary>

     private void UpdateCalibration(bool onlyHorizontal)

     {

         if (onlyHorizontal)

         {

             var fw = (Input.gyro.attitude) * (-Vector3.forward);

             fw.z = ;

             if (fw == Vector3.zero)

             {

                 calibration = Quaternion.identity;

             }

             else

             {

                 calibration = (Quaternion.FromToRotation(baseOrientationRotationFix * Vector3.up, fw));

             }

         }

         else

         {

             calibration = Input.gyro.attitude;

         }

     }

     /// <summary>

     /// Update the camera base rotation.

     /// </summary>

     /// <param name='onlyHorizontal'>

     /// Only y rotation.

     /// </param>

     private void UpdateCameraBaseRotation(bool onlyHorizontal)

     {

         if (onlyHorizontal)

         {

             var fw = transform.forward;

             fw.y = ;

             if (fw == Vector3.zero)

             {

                 cameraBase = Quaternion.identity;

             }

             else

             {

                 cameraBase = Quaternion.FromToRotation(Vector3.forward, fw);

             }

         }

         else

         {

             cameraBase = transform.rotation;

         }

     }

     /// <summary>

     /// Converts the rotation from right handed to left handed.

     /// </summary>

     /// <returns>

     /// The result rotation.

     /// </returns>

     /// <param name='q'>

     /// The rotation to convert.

     /// </param>

     private static Quaternion ConvertRotation(Quaternion q)

     {

         return new Quaternion(q.x, q.y, -q.z, -q.w);

     }

     /// <summary>

     /// Gets the rot fix for different orientations.

     /// </summary>

     /// <returns>

     /// The rot fix.

     /// </returns>

     private Quaternion GetRotFix()

     {

 #if UNITY_3_5

         if (Screen.orientation == ScreenOrientation.Portrait)

             return Quaternion.identity;

         if (Screen.orientation == ScreenOrientation.LandscapeLeft || Screen.orientation == ScreenOrientation.Landscape)

             return landscapeLeft;

         if (Screen.orientation == ScreenOrientation.LandscapeRight)

             return landscapeRight;

         if (Screen.orientation == ScreenOrientation.PortraitUpsideDown)

             return upsideDown;

         return Quaternion.identity;

 #else

         return Quaternion.identity;

 #endif

     }

     /// <summary>

     /// Recalculates reference system.

     /// </summary>

     private void ResetBaseOrientation()

     {

         baseOrientationRotationFix = GetRotFix();

         baseOrientation = baseOrientationRotationFix * baseIdentity;

     }

     /// <summary>

     /// Recalculates reference rotation.

     /// </summary>

     private void RecalculateReferenceRotation()

     {

         referanceRotation = Quaternion.Inverse(baseOrientation)*Quaternion.Inverse(calibration);

     }

     #endregion

 }
Unity做360度的全景照片的更多相关文章
- 利用Canvas实现360度浏览
前言:最近几个月来到新公司,主要从事移动端方面的开发,有时候也挺忙挺累的,于是就好一段时间没写博客了.其实自己在这几个月里,自己对canvas以及createjs和egret都有了一定程度上的认识与掌 ...
- 使用Javascript来创建一个响应式的超酷360度全景图片查看幻灯效果
360度的全景图片效果常常可以用到给客户做产品展示,今天这里我们推荐一个非常不错的来自Robert Pataki的360全景幻灯实现教程,这里教程中将使用javascript来打造一个超酷的全景幻灯实 ...
- 基于mysql数据库集群的360度水平切割
1.why sharding? 我们都知道,信息行业发展日益迅速,积累下来的数据信息越来越多,互联网公司门要维护的数据日益庞大.设想一下,假如腾讯公司只用一个数据库的一张表格来存储所有qq注册用户的登 ...
- threesixty.min.js 和jquery.threesixty.js使用总结----实现360度展示
最近公司做一个项目需要360度展示汽车的外观,就用到了threesixty.min.js,自己总结一下使用方法: treesixty.min.js 源码: /*! threesixty-slider ...
- 安卓端360度全景图的html5实现
这里是一款旅游相关的安卓应用,其中虚拟旅游的功能采用html5的360度全景图技术实现,使用户能够身临其境的感受旅游景点的风光. 此处引入了ddpanorama插件,它的原理是在canvas上绘制全景 ...
- jQuery Panorama Viewer – 360度全景展示插件
jQuery Panorama Viewer 这款插件可以帮助你在网站中嵌入全景图片.要做到这一点,首先只需要在页面中引入最新的 jQuery 库,以及 jquery.panorama_viewer. ...
- html5人物图片360度立体旋转
体验效果:http://hovertree.com/texiao/html5/10.htm 下载:http://hovertree.com/hvtart/bjae/t16oddyt.htm 代码如下: ...
- C# 图片旋转360度程序
这几天开发一个程序,需要将一个图片旋转360度然后每一个角度保存下来.刚开始本来想着是让美工弄的,但是让一个美工手动转360度,她会喷你一脸. using System; using System.C ...
- [置顶] ios 360度旋转效果demo
demo功能:用UIimageView实现360度旋转效果. demo说明:iPhone6.1 测试成功.主要代码在:FVImageSequence.m中.在touchesMoved事件中,通过替换U ...
随机推荐
- 验证组件——FluentValidation
FluentValidation FluentValidation是与ASP.NET DataAnnotataion Attribute验证实体不同的数据验证组件,提供了将实体与验证分离开 ...
- CODE FESTIVAL 2017 qual B C - 3 Steps
Score : 500 points Problem Statement Rng has a connected undirected graph with N vertices. Currently ...
- [bzoj1002]轮状病毒-矩阵树定理
Brief Description 求外圈有\(n\)个点的, 形态如图所示的无向图的生成树个数. Algorithm Design \[f(n) = (3*f(n-1)-f(n-2)+2)\] Co ...
- dokuwiki安装部署
dokuwiki的地址:https://www.dokuwiki.org/dokuwiki# 1.部署dokuwiki 在D:\xampp\htdocs(xampp安装目录)新建一个doku文件夹,把 ...
- FreeRADIUS + MySQL 安装配置笔记
FreeRADIUS + MySQL 安装配置笔记 https://www.2cto.com/net/201110/106597.html
- MNIST数据集转化为二维图片
#coding: utf-8 from tensorflow.examples.tutorials.mnist import input_data import scipy.misc import o ...
- XMLDocument 方法中实现post发送消息
XMLDocument 方法中实现post发送消息
- dotnet core多平台开发体验(mac os x 、windows、linux)
前言 随着net core rc2的发布,园子里面关于net core的入门文章也也多了起来,但是大多数都是在一个平台上面来写几个简单的例子,或者是在解释代码本身,并没有体现说在一个平台上面创建一个项 ...
- addeventlistener监听scroll跟touch
这三个事件只在手机上生效 touchstart,手指开始触屏 touchmove,手指移动 touchend,手指触屏结束 这个事件在手机上跟在pc端都生效 scroll事件 addeve ...
- y=y||'world'与y=y?y:'world'
1.y=y||’world’ function log(x,y){ y=y||’world’; console.log(x,y) } log(‘hello’)===>hello world lo ...