4 关于word2vec的skip-gram模型使用负例采样nce_loss损失函数的源码剖析
tf.nn.nce_loss是word2vec的skip-gram模型的负例采样方式的函数,下面分析其源代码。
1 上下文代码
loss = tf.reduce_mean(

      tf.nn.nce_loss(weights=nce_weights,

                     biases=nce_biases,

                     labels=train_labels,

                     inputs=embed,

                     num_sampled=num_sampled,

                     num_classes=vocabulary_size))
其中,
train_inputs = tf.placeholder(tf.int32, shape=[batch_size])

train_labels = tf.placeholder(tf.int32, shape=[batch_size, 1])

embeddings = tf.Variable(

        tf.random_uniform([vocabulary_size, embedding_size], -1.0, 1.0))

embed = tf.nn.embedding_lookup(embeddings, train_inputs)
train_inputs中的就是中心词,train_label中的就是语料库中该中心词在滑动窗口内的上下文词。
所以,train_inputs中会有连续n-1(n为滑动窗口大小)个元素是相同的。即同一中心词。
embddings是词嵌入,就是要学习的词向量的存储矩阵。共有词汇表大小的行数,每一行对应一个词的向量。
# Construct the variables for the NCE loss

nce_weights = tf.Variable(

        tf.truncated_normal([vocabulary_size, embedding_size],

                            stddev=1.0 / math.sqrt(embedding_size)))

nce_biases = tf.Variable(tf.zeros([vocabulary_size]))
nce_weights就是用来存储如下负例采样公式中的
 、
、
sigmoid函数有一个对称特性:

故而上面的公式中,就没有出现1-XX的形式。用1-XX的形式,可能会更好理解。
具体解释如下:
- l #train_inputs中是中心词的单词编号,就是词汇表中对该单词的一个编号,一般按词频排列,用顺序进行编号。
- l #train_labels中是中心词的上下文中的单次编号,这些都算是正样本,注意和机器学习中的正样本的意思不一样,这里是做正确答案的意思。
- l #embedding_lookup就是取出某一行。下标从0开始。
- l #tf.truncated_normal从截断的正态分布中输出随机值。#生成的值服从具有指定平均值和标准偏差的正态分布,如果生成的值大于平均值2个标准偏差的值则丢弃重新选择。#标准差就是标准偏差,是方差的算术平均根。而上面的代码中对标准方差进行了限制的原因就是为了防止神经网络的参数过大。为什么embeddings中的参数没有进行限制呢?是因为最初初始化的时候,所有的词的词向量之间要保证一定的距离。然后通过学习,才能拉近某些词的关系,使得某些词的词向量更加接近。
- l #因为是单层神经网络,所以要限制参数过大。如果是深层神经网络,就不需要标准差除一一个embedding_size的平方根了。深层神经网络虽然也要进行参数的正则化限制,防止过拟合和梯度爆炸问题,但是很少看见,有直接对stddev进行限制的。
2 nce_loss源码
def nce_loss(weights,

             biases,

             labels,

             inputs,

             num_sampled,

             num_classes,

             num_true=1,

             sampled_values=None,

             remove_accidental_hits=False,

             partition_strategy="mod",

             name="nce_loss"):
logits, labels = _compute_sampled_logits(

      weights=weights,

      biases=biases,

      labels=labels,

      inputs=inputs,

      num_sampled=num_sampled,

      num_classes=num_classes,

      num_true=num_true,

      sampled_values=sampled_values,

      subtract_log_q=True,

      remove_accidental_hits=remove_accidental_hits,

      partition_strategy=partition_strategy,

      name=name)

  sampled_losses = sigmoid_cross_entropy_with_logits(

      labels=labels, logits=logits, name="sampled_losses")

  # sampled_losses is batch_size x {true_loss, sampled_losses...}

  # We sum out true and sampled losses.

  return _sum_rows(sampled_losses)
可以看出核心就在于传入sigmoid_cross_entropy_with_logits的参数。对于任何一个输出节点只有一个的二分类神经网络,用sigmoid_cross_entropy_with_logits是最好理解的。logits的维度是batch_size,1。labels的维度就是batch_size,元素取值为0或者1,
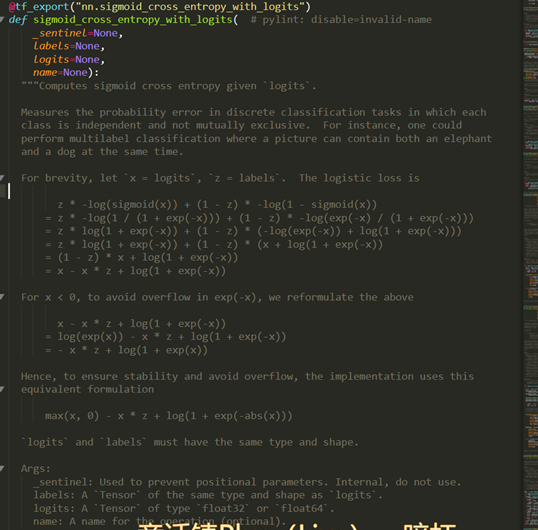
来看一下sigmoid_cross_entropy_with_logits函数

sigmoid_cross_entropy_with_logits的返回值是:
  Returns:

    A `Tensor` of the same shape as `logits` with the componentwise

    logistic losses.
也就是说:logits的维度是batch_size,1,其返回的维度也是batch_size,1。这个位置的元素就是用这个公式计算的loss:

但是在负例采样中,传入的logits的维度不是batch_size,1,而是[batch_size, num_true + num_sampled]`。主要观察一下_compute_sampled_logits函数的输出。其输出如下:
  Returns:

    out_logits: `Tensor` object with shape

        `[batch_size, num_true + num_sampled]`, for passing to either

        `nn.sigmoid_cross_entropy_with_logits` (NCE) or

        `nn.softmax_cross_entropy_with_logits` (sampled softmax).

    out_labels: A Tensor object with the same shape as `out_logits`.

  """
其传入参数的解释是:
    labels: A `Tensor` of type `int64` and shape `[batch_size,

        num_true]`. The target classes.  Note that this format differs from

        the `labels` argument of `nn.softmax_cross_entropy_with_logits`.

    inputs: A `Tensor` of shape `[batch_size, dim]`.  The forward

        activations of the input network.

    weights: A `Tensor` of shape `[num_classes, dim]`, or a list of `Tensor`

        objects whose concatenation along dimension 0 has shape

        `[num_classes, dim]`.  The (possibly-partitioned) class embeddings.
可以看出_compute_sampled_logits完成的是一个什么过程呢。就是对于每一个样本,计算出一个维度为[batch_size, num_true + num_sampled]的向量,向量的每个元素都同之前logits的每个元素的意义一样,是输出值。同时,返回一个维度为[batch_size, num_true + num_sampled]的向量labels。这个labels中只有一个元素为1。于是再看一下如下公式:

其实,此时的out_logits中对应(label位置为0)的元素就是 ,对应label位置为1)的元素就是
 。
。
然后再传给sigmoid_cross_entropy_with_logits,同样是对于每个元素位置的计算使用下面的公式:

所以,nce_loss中调用sigmoid_cross_entropy_with_logits后返回的是:[batch_size, num_true + num_sampled]的向量,其中每个元素都是一个用上述公式计算出loss。
nce_loss的最后一步是_sum_rows:
def _sum_rows(x):

  """Returns a vector summing up each row of the matrix x."""

  # _sum_rows(x) is equivalent to math_ops.reduce_sum(x, 1) when x is

  # a matrix.  The gradient of _sum_rows(x) is more efficient than

  # reduce_sum(x, 1)'s gradient in today's implementation. Therefore,

  # we use _sum_rows(x) in the nce_loss() computation since the loss

  # is mostly used for training.

  cols = array_ops.shape(x)[1]

  ones_shape = array_ops.stack([cols, 1])

  ones = array_ops.ones(ones_shape, x.dtype)

  return array_ops.reshape(math_ops.matmul(x, ones), [-1])
最后,再对nce_loss的返回结果用reduce_mean即可计算一个batch的平均损失。
关于_compute_sampled_logits中如何采样,如何计算的,这里就不再阐述,同文字理论是一样的。
我们将_compute_sampled_logits函数中的
# Construct output logits and labels. The true labels/logits start at col 0.

    out_logits = array_ops.concat([true_logits, sampled_logits], 1)

    # true_logits is a float tensor, ones_like(true_logits) is a float

    # tensor of ones. We then divide by num_true to ensure the per-example

    # labels sum to 1.0, i.e. form a proper probability distribution.

    out_labels = array_ops.concat([

        array_ops.ones_like(true_logits) / num_true,

        array_ops.zeros_like(sampled_logits)

    ], 1)
改为
    out_logits = array_ops.concat([true_logits, sampled_logits], 1,name="xiaojie_logits")

    # true_logits is a float tensor, ones_like(true_logits) is a float

    # tensor of ones. We then divide by num_true to ensure the per-example

    # labels sum to 1.0, i.e. form a proper probability distribution.

    out_labels = array_ops.concat([

        array_ops.ones_like(true_logits) / num_true,

        array_ops.zeros_like(sampled_logits)

], 1,name="xiaojie_labels")

然后由于这些代码位于:

  with ops.name_scope(name, "compute_sampled_logits",

                      weights + [biases, inputs, labels]):

ops指定的name下,name为“nce_loss”
我们在word2vec的程序训练迭代的过程中添加如下代码:

  for step in range(num_steps):

    batch_inputs, batch_labels = generate_batch(

        batch_size, num_skips, skip_window)

    feed_dict = {train_inputs : batch_inputs, train_labels : batch_labels}

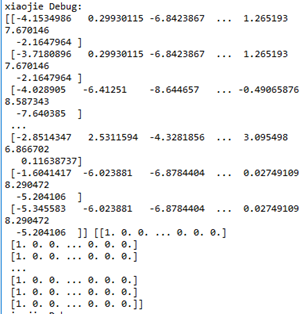
    print ("xiaojie Debug:")

    xiaojie_logits= session.graph.get_tensor_by_name("nce_loss/xiaojie_logits:0")

    xiaojie_labels = session.graph.get_tensor_by_name("nce_loss/xiaojie_labels:0")

    xiaojie_logits_value,xiaojie_labels_value=session.run([xiaojie_logits,xiaojie_labels],feed_dict=feed_dict)

print (xiaojie_logits_value,xiaojie_labels_value)

可以看出输出结果中传递给sigmoid_cross_entropy_with_logits函数的就是这么个玩意。
4 关于word2vec的skip-gram模型使用负例采样nce_loss损失函数的源码剖析的更多相关文章
- petite-vue源码剖析-沙箱模型
在解析v-if和v-for等指令时我们会看到通过evaluate执行指令值中的JavaScript表达式,而且能够读取当前作用域上的属性.而evaluate的实现如下: const evalCache ...
- Linux设备驱动模型简述(源码剖析)
1. Linux设备驱动模型和sysfs文件系统 Linux内核在2.6版本中引入设备驱动模型,简化了驱动程序的编写.Linux设备驱动模型包含设备(device).总线(bus).类(class)和 ...
- memcached源码剖析4:并发模型
memcached是一个典型的单进程系统.虽然是单进程,但是memcached内部通过多线程实现了master-worker模型,这也是服务端最常见的一种并发模型.实际上,除了master线程和wor ...
- PHP用抛物线的模型实现微信红包生成算法的程序源码
<?php /* *Author:Kermit *Time:2015-8-26 *Note:红包生成随机算法 */ header("Content-type:text/html;cha ...
- memcached源码剖析5:并发模型
网络连接建立与分发 前面分析了worker线程的初始化,以及主线程创建socket并监听的过程.本节会分析连接如何建立与分发. 初始状态 A,可以摸清楚master线程的大致逻辑: 1)初始化各个wo ...
- word2vec的Java源码【转】
一.核心代码 word2vec.java package com.ansj.vec; import java.io.*; import java.lang.reflect.Array; import ...
- [源码解析] 模型并行分布式训练 Megatron (3) ---模型并行实现
[源码解析] 模型并行分布式训练 Megatron (3) ---模型并行实现 目录 [源码解析] 模型并行分布式训练 Megatron (3) ---模型并行实现 0x00 摘要 0x01 并行Tr ...
- jQuery源码解析对象实例化与jQuery原型及整体构建模型分析(一)
//源码剖析都基于jQuery-2.0.3版本,主要考虑到兼容IE 一.关于jQuery对象实例化的逻辑: 整个jQuery程序被包裹在一个匿名自执行行数内: (function(window,und ...
- 谷歌BERT预训练源码解析(二):模型构建
目录前言源码解析模型配置参数BertModelword embeddingembedding_postprocessorTransformerself_attention模型应用前言BERT的模型主要 ...
随机推荐
- BZOJ - 2741 分块维护最大连续异或和
题意:给定\(a[l...r]\),多次询问区间\([l,r]\)中的最大连续异或和\(a_i⊕a_{i+1}⊕...⊕a_{j},l≤i≤j≤r\) 一眼过去认为是不可做的,但题目给出\(n=1.2 ...
- Vue项目中使用HighChart
记:初次在Vue项目中使用 HighChart 的时候要走的坑 感谢这位哥们的思路 传送门 Vue-cli项目使用 npm install highcharts --save 让我们看看 highch ...
- Oracle SQL Developer 查询时间格式
工具->首选项->数据库->NLS->日期格式: DD-MON-RR 修改为: YYYY-MM-DD HH24:MI:SS
- django Form数据读取问题
1.在我学习django的过程中,我学习到了一个关于表单验证的问题 2.我们从前端post一个表单,通过urls配置,传给对应的view方法 3.然后再传给Form验证 4.一开始我是很好奇,在vie ...
- 《WCF全面解析》-上册 1-3章 读书笔记
第一章.WCF简介 ESB全称为Enterprise Service Bus,即企业服务总线.把所有的服务统筹到一个总线里面请求和分发,方便管理. WCF(Windows Communication ...
- CDH集群安装配置(六)CDH agent
在线安装 sudo yum install cloudera-manager-agent cloudera-manager-daemons 离线安装 上传三个server的资源包到cdh1节点上(所有 ...
- 构建私有Docker Registry
1.设置insecure-registry: 可能会出现无法push镜像到私有仓库的问题. 这是因为我们启动的registry服务不是安全可信赖的. 1) sudo vim /etc/default/ ...
- vim实战:插件安装(Vundle,NerdTree)
一:插件管理器Vundle 1.简介 Vundle是vim的一个插件管理器, 同时它本身也是vim的一个插件.插件管理器用于方便.快速的安装.删除.Vim更新插件.vim Vundle插件官方地址:h ...
- C 标准库 - string.h之strspn使用
strspn Returns the length of the initial portion of str1 which consists only of characters that are ...
- wcf 登录认证 angular 认证重定向
自定义认证管理器,分为两级:1.登陆认证.2.权限认证.权限主要是用户.角色.角色用户关系.功能(系统资源).角色功能关系,5部分决定用户的权限(视图). 两层认证都通过后,更新session的最新交 ...
