iOS:绘图(18-01-25更)
目录
1、UIBezierPath(贝塞尔曲线)
1)、在重写 drawRect: 方法里使用
2)、在普通方法里使用,需要画布。
3)、 切圆角、指定位置圆角、任意形状。
4)、彩色的动画加载圆圈。
2、CGContext(上下文)
1)、在重写 drawRect: 方法里使用
3、UIGraphics(绘图)
1)、绘制输出image
补充:
N、CGPathRef、CGMutablePathRef(路径)
N+1、绘画
1)、Core Graphics,在 drawRect: 绘画。
2)、ShapeLayer,不断更新 Shape
附录:
CGContext 方法
0、写在前面
1)、LineCap(线头、笔头):一般有三种样式
1-1)、LineCapButt 默认。
1-2)、LineCapRound 笔头为圆形。如绘制直线的时候,结束为半圆。
1-3)、LineCapSquare 笔头为方形。如绘制直线的时候,结束为方形,与默认Butt相似。
2)、LineJoin(线与线连接处):一般有三种样式
2-1)、LineJoinMiter 默认为直角,miterLimit可设置最长宽度,超出即削平,效果如LineJoinBevel。
2-2)、LineJoinRound 连接处为弧形。
2-3)、LineJoinBevel 连接处削平。
3)、绘制:
3-1)、Stroke 路径绘制。
3-2)、Fill 颜色填充,有闭合填充闭合。没闭合,会自动连接起点、终点,再填充。
3-3)、strokeStart 绘制起始位置。
3-4)、strokeEnd 绘制结束位置,可添加定时器,或根据下载进度,重新绘制(setNeedDisplay)。
4)、触发绘图(drawRect: ):
4-1)、全区域重绘:setNeedsDisplay
4-2)、只绘制指定的区域:setNeedsDisplayInRect:
再判断,与重绘的地方是否相交,有需要才绘制,提高效率:
- (void)drawRect:(CGRect)rect

{

    if (CGRectIntersectsRect(rect, needDrawRect)) {

    }

}
5)、提高效率、性能:
5-0)、软件绘图通常是由Core Graphics框架来完成,软件绘图的代价昂贵,除非绝对必要,否则应该避免重绘你的视图。
5-1)、太多的几何结构。
5-2)、重绘 - 主要由重叠的半透明图层引起。
5-3)、离屏绘制 - 比如圆角,图层遮罩,阴影或者是图层光栅化都会强制Core Animation提前渲染图层的离屏绘制。
5-4)、过大的图片 - 超出GPU支持的2048x2048或者4096x4096尺寸。
1、UIBezierPath(贝塞尔曲线)
0)、写在前面
画完的贝塞尔曲线,可以通过变换,放大、缩小、旋转等。
(CGAffineTransform 的使用参照 “iOS:动画” -> “3、动画所需的变换” -> “3-1、view:CGAffineTransform(缩放、位移、旋转。二维变换)”)
- (void)applyTransform:(CGAffineTransform)transform;
1)、在重写 drawRect: 方法里使用
使用不难,看 UIBezierPath.h 基本都会用,值得注意的是,颜色设置如下:
//设置 线段、填充 颜色

[[UIColor redColor]set];

//设置 线段 颜色

[[UIColor orangeColor]setStroke];

//设置 填充 颜色

[[UIColor yellowColor]setFill];
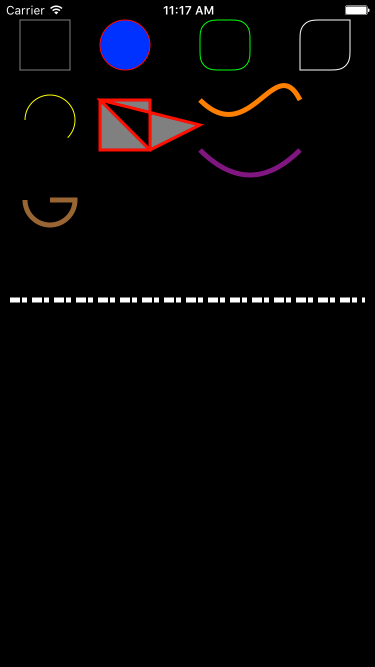
下面是学习过程中的代码
- (void)drawRect:(CGRect)rect

{

    //矩形

    UIBezierPath *path1 = [UIBezierPath bezierPathWithRect:CGRectMake(20, 20, 50, 50)];

    [[UIColor grayColor]setStroke];

    [path1 stroke];

    //内切圆

    UIBezierPath *path2 = [UIBezierPath bezierPathWithOvalInRect:CGRectMake(100, 20, 50, 50)];

    [[UIColor blueColor]setFill];

    [path2 fill];

    [[UIColor redColor]setStroke];

    [path2 stroke];

    //切4个圆角

    UIBezierPath *path3 = [UIBezierPath bezierPathWithRoundedRect:CGRectMake(200, 20, 50, 50) cornerRadius:15.0];

    [[UIColor greenColor]setStroke];

    [path3 stroke];

    //切1-4个圆角(最后一个参数cornerRadii,好像就size.width有效果?)

    UIBezierPath *path4 = [UIBezierPath bezierPathWithRoundedRect:CGRectMake(300, 20, 50, 50) byRoundingCorners:UIRectCornerTopLeft | UIRectCornerBottomRight  cornerRadii:CGSizeMake(15.0, 35.0)];

    [[UIColor whiteColor]setStroke];

    [path4 stroke];

    //弧形

    UIBezierPath *path5 = [UIBezierPath bezierPathWithArcCenter:CGPointMake(50, 120) radius:25.0 startAngle:M_PI endAngle:M_PI/4 clockwise:YES];

    [[UIColor yellowColor]setStroke];

    [path5 stroke];

    //画直线

    UIBezierPath *path6 = [UIBezierPath bezierPath];

    [path6 setLineWidth:3.0];

    [path6 moveToPoint:CGPointMake(100, 100)];

    [path6 addLineToPoint:CGPointMake(150, 100)];

    [path6 addLineToPoint:CGPointMake(150, 150)];

    [path6 addLineToPoint:CGPointMake(100, 150)];

    [path6 addLineToPoint:CGPointMake(100, 100)];

    [path6 addLineToPoint:CGPointMake(200, 125)];

    [path6 addLineToPoint:CGPointMake(150, 150)];

    [path6 closePath];

    path6.usesEvenOddFillRule = YES;

    [[UIColor grayColor]setFill];

    [path6 fill];

    [[UIColor redColor]setStroke];

    [path6 stroke];

    //贝塞尔曲线

    UIBezierPath *path7 = [UIBezierPath bezierPath];

    [path7 setLineWidth:5.0];

    [[UIColor orangeColor]setStroke];

    [path7 moveToPoint:CGPointMake(200, 100)];

    [path7 addCurveToPoint:CGPointMake(300, 100) controlPoint1:CGPointMake(250, 150) controlPoint2:CGPointMake(275, 50)];

    [path7 stroke];

    //贝塞尔曲线

    UIBezierPath *path8 = [UIBezierPath bezierPath];

    [path8 setLineWidth:5.0];

    [[UIColor purpleColor]setStroke];

    [path8 moveToPoint:CGPointMake(200, 150)];

    [path8 addQuadCurveToPoint:CGPointMake(300, 150) controlPoint:CGPointMake(250, 200)];

    [path8 stroke];

    //带圆心到起始角度线段的弧形

    UIBezierPath *path9 = [UIBezierPath bezierPath];

    [path9 setLineWidth:5.0];

    [[UIColor brownColor]setStroke];

    [path9 moveToPoint:CGPointMake(50, 200)];

    [path9 addArcWithCenter:CGPointMake(50, 200) radius:25.0 startAngle:0.0 endAngle:M_PI clockwise:YES];

    [path9 stroke];

    //虚线

    UIBezierPath *path10 = [UIBezierPath bezierPath];

    [path10 setLineWidth:5.0];

    [[UIColor whiteColor]setStroke];

    [path10 moveToPoint:CGPointMake(10, 300)];

    [path10 addLineToPoint:CGPointMake(SCREEN_WIDTH - 10, 300)];

    CGFloat lineDash[] = {10.0,2.0,5.0,5.0};

    //奇数实线,偶数虚线,phase起始偏移

    [path10 setLineDash:lineDash count:4 phase:0];

    [path10 stroke];

}

2)、在普通方法里使用,需要画布。配合 CAShapeLayer 。
注意:1、设置线宽、颜色、填充等,都由 CAShapeLayer 完成,UIBezierPath 只完成路径的绘画。
2、CAShapeLayer的大小,可以设成屏幕的大小 SCREEN.BOUNDS。UIBezierPath画完线条后,自动剪裁,如果没闭合,会自动连接起点、终点剪裁。
后续补充:1、其实CAShapeLayer的大小没必要设。。。它会根据贝塞尔曲线确定位置,下面的程序又重新注释掉了 。。。
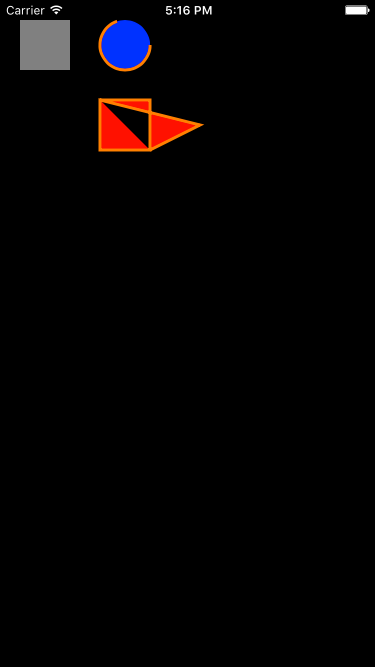
2、第三个图形,程序后来加上了线转角、线头为圆形,图片还是以前的图片。不想重新截图了。。。
3、之前以为,画完线条会自动闭合,结果发现是填充颜色的问题。。。把填充颜色设置为 clearColor 就行了。
下面是学习过程中的代码
- (void)drawTest

{

    //矩形

    CGRect rect1 = {20, 20, 50, 50};

    UIBezierPath *path1 = [UIBezierPath bezierPathWithRect:rect1];

    CAShapeLayer *shapeLayer1 = [[CAShapeLayer alloc]init];

//    shapeLayer1.position = self.layer.position;

//    shapeLayer1.bounds = self.layer.bounds;

    shapeLayer1.path = path1.CGPath;

    shapeLayer1.fillColor = [UIColor grayColor].CGColor;

    [self.layer addSublayer:shapeLayer1];

    //内切圆

    CGRect rect2 = {100, 20, 50, 50};

    UIBezierPath *path2 = [UIBezierPath bezierPathWithOvalInRect:rect2];

    CAShapeLayer *shapeLayer2 = [[CAShapeLayer alloc]init];

//    shapeLayer2.position = self.layer.position;

//    shapeLayer2.bounds = self.layer.bounds;

    shapeLayer2.path = path2.CGPath;

    shapeLayer2.fillColor = [UIColor blueColor].CGColor;

    shapeLayer2.strokeColor = [UIColor orangeColor].CGColor;

    shapeLayer2.strokeStart = 0.0;

    shapeLayer2.strokeEnd = 0.7;

    shapeLayer2.lineWidth = 3.0;

    [self.layer addSublayer:shapeLayer2];

    //画线

    UIBezierPath *path3 = [UIBezierPath bezierPath];

    [path3 moveToPoint:CGPointMake(100, 100)];

    [path3 addLineToPoint:CGPointMake(150, 100)];

    [path3 addLineToPoint:CGPointMake(150, 150)];

    [path3 addLineToPoint:CGPointMake(100, 150)];

    [path3 addLineToPoint:CGPointMake(100, 100)];

    [path3 addLineToPoint:CGPointMake(200, 125)];

    [path3 addLineToPoint:CGPointMake(150, 150)];

    CAShapeLayer *shapeLayer3 = [[CAShapeLayer alloc]init];

//    shapeLayer3.position = self.layer.position;

//    shapeLayer3.bounds = self.layer.bounds;

    shapeLayer3.path = path3.CGPath;

    shapeLayer3.fillColor = [UIColor redColor].CGColor;

    shapeLayer3.strokeColor = [UIColor orangeColor].CGColor;

    shapeLayer3.lineWidth = 3.0;

    shapeLayer3.lineJoin = kCALineJoinRound;

    shapeLayer3.lineCap = kCALineCapRound;

    shapeLayer3.fillRule = kCAFillRuleEvenOdd;

    [self.layer addSublayer:shapeLayer3];

}

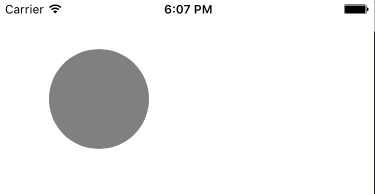
3)、 切圆角、指定位置圆角、任意形状。( 在 "2)" 的基础上,把 ShapeLayer 层给要切的 View.layer.mask )
    // 1、视图:要切的图片视图

    UIImageView *imgV = [[UIImageView alloc]initWithFrame:CGRectMake(50, 50, 100, 100)];

    imgV.backgroundColor = [UIColor grayColor];

    [self.view addSubview:imgV];

    // 2、路径:绘制imgV的内切圆

    UIBezierPath *path4 = [UIBezierPath bezierPathWithOvalInRect:imgV.bounds];

    // 3、绘制层:frame,可不用,他会根据路径。

    CAShapeLayer *shapeLayer4 = [[CAShapeLayer alloc]init];

//    shapeLayer4.frame = imgV.bounds;

    shapeLayer4.path = path4.CGPath;

    // 4、视图的蒙版:绘制完了,记得返回设置mask,也是最关键的一步

    imgV.layer.mask = shapeLayer4;

4)、彩色的动画加载圆圈。
在“3)、"的基础上,设置填充为clearColor、线段粗度,再配合strokeStart、strokeEnd、CAGradientLayer、mask。
2、CGContext(上下文)
1)、在重写 drawRect: 方法里使用
使用不难,看 CGContext.h 基本都会用,值得注意的是:
//开始绘图。在drawRect:有无都可以,有的话,从这里开始的路径才有效,无的话,全局的路径绘制都有效

CGContextBeginPath(context);

//绘制、填充都是相对上次的路径,用过一次,路径就变成最后的一个点,连着用有问题

CGContextStrokePath(context);

CGContextFillPath(context);

//用这个方法,可单独 绘制、填充 ,也可 绘制 + 填充,还有奇偶填充。

CGContextDrawPath(context, kCGPathFillStroke);

// 保存当前上下文的画笔颜色等状态,以便暂时使用别的颜色画其他线段,可恢复。

CGContextSaveGState

// 直接跳到新的上下文。

UIGraphicsPushContext
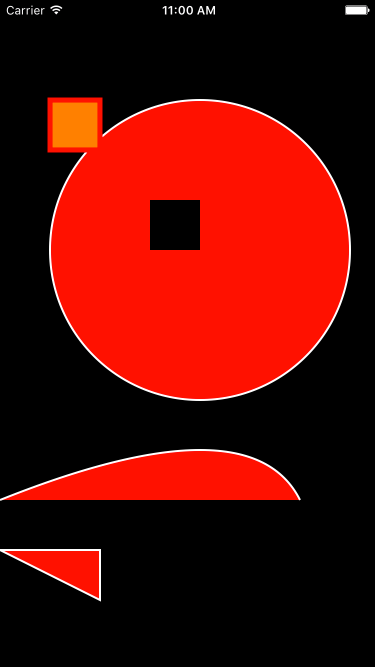
下面是学习过程中的代码
    //获取上下文

    CGContextRef context = UIGraphicsGetCurrentContext();

    //设置线宽

    CGContextSetLineWidth(context, 2.0);

    //设置颜色

    CGContextSetStrokeColorWithColor(context, [[UIColor whiteColor] CGColor]);

    //设置填充颜色

    CGContextSetFillColorWithColor(context, [[UIColor redColor] CGColor]);

    //矩形内切圆路径

    CGContextAddEllipseInRect(context, CGRectMake(50, 100, 300, 300));

    //画线且填充

    CGContextDrawPath(context, kCGPathFillStroke);

    //在这里面变换线粗、颜色等,不会影响外面的。

    CGContextSaveGState(context);

    {

        //设置线宽

        CGContextSetLineWidth(context, 5.0);

        //设置颜色

        CGContextSetStrokeColorWithColor(context, [[UIColor redColor] CGColor]);

        //设置填充颜色

        CGContextSetFillColorWithColor(context, [[UIColor orangeColor] CGColor]);

        //开始

        CGContextMoveToPoint(context, 50, 100);

        CGContextAddLineToPoint(context, 100, 100);

        CGContextAddLineToPoint(context, 100, 150);

        CGContextAddLineToPoint(context, 50, 150);

        CGContextClosePath(context);

        //绘画方法

        CGContextDrawPath(context, kCGPathFillStroke);

    }

    CGContextRestoreGState(context);

    //移到下面

    CGContextMoveToPoint(context, 0 , 500);

    //添加贝塞尔

    CGContextAddQuadCurveToPoint(context, 250, 400, 300, 500);

    //绘画方法

    CGContextDrawPath(context, kCGPathFillStroke);

    //移到下面

    CGContextMoveToPoint(context, 0 , 550);

    //添加线

    CGContextAddLineToPoint(context, 100, 550);

    //添加线

    CGContextAddLineToPoint(context, 100, 600);

    //闭合路径

    CGContextClosePath(context);

    //绘画方法

    CGContextDrawPath(context, kCGPathFillStroke);

    //清空该区域

    CGContextClearRect(context, CGRectMake(150, 200, 50, 50));

3、UIGraphics(绘图)
1)、绘制输出image
1、开始图片绘制,需要设置大小

    //基于位图的上下文

    UIGraphicsBeginImageContext(CGSizeMake(32, 32));

2、CGContext的内容,略

//    //获取位图上下文

//    CGContextRef context1 = UIGraphicsGetCurrentContext();

//    //画椭圆

//    CGContextAddEllipseInRect(context1, CGRectMake(0, 0, 30, 30));

//    //绘画颜色

//    CGContextSetStrokeColorWithColor(context1, [[UIColor orangeColor] CGColor]);

//    //填充颜色

//    CGContextSetFillColorWithColor(context1, [[UIColor grayColor] CGColor]);

//    //设置线宽

//    CGContextSetLineWidth(context1, 2.0);

//    //绘画方式

//    CGContextDrawPath(context1, kCGPathFillStroke);

3、绘画完后提取图片、结束操作

    //获取图片

    UIImage *image = UIGraphicsGetImageFromCurrentImageContext();

    //结束图片上下文

    UIGraphicsEndImageContext();
补充:通常,是为了绘制、压缩图片。
补充:
N、CGPathRef、CGMutablePathRef(路径)
// 矩形路径

CGMutablePathRef squarePath = CGPathCreateMutable();

CGPathAddRect(squarePath, NULL, self.view1.bounds);

// 矩形内切圆路径

CGMutablePathRef circlePath = CGPathCreateMutable();

CGPathAddEllipseInRect(circlePath, NULL, self.view2.bounds);
N+1、绘画
1、Core Graphics,在 drawRect: 绘画。
-(UIBezierPath *)path{

    if (!_path) {

        _path = [[UIBezierPath alloc]init];

    }

    return _path;

}

- (void)touchesBegan:(NSSet *)touches withEvent:(UIEvent *)event

{

    CGPoint point = [[touches anyObject] locationInView:self];

    [self.path moveToPoint:point];

}

- (void)touchesMoved:(NSSet *)touches withEvent:(UIEvent *)event

{

    CGPoint point = [[touches anyObject] locationInView:self];

    [self.path addLineToPoint:point];

    [self setNeedsDisplay];

}

- (void)drawRect:(CGRect)rect

{

    [[UIColor clearColor] setFill];

    [[UIColor redColor] setStroke];

    [self.path stroke];

}
缺点:越复杂可能会越卡,因为一移动,又将从最初开始的点开始绘制(包括离散情况下)。
比如,一开始用绿色绘制一条横线,然后抬手,用蓝色绘制一条竖线。这时,连最原始的绿色横线颜色都变成蓝色横线了。
优化:可以把 [self setNeedsDisplay] ,改成 [self setNeedsDisplayInRect:CGRectMake(point.x - 0.5, point.y-0.5, 1,1)] 。
不过理论上还是有问题,如果 当前点 和 之前的点 有重合的 rect ,也会被重新绘制,如修改颜色等操作。
2、ShapeLayer,不断更新 Shape
- (instancetype)initWithFrame:(CGRect)frame

{

    self = [super initWithFrame:frame];

    if (self) {

        self.shapeLayer = [[CAShapeLayer alloc]init];

        [self.layer addSublayer:self.shapeLayer];

        self.shapeLayer.fillColor = [UIColor clearColor].CGColor;

        self.shapeLayer.strokeColor = [UIColor blackColor].CGColor;

    }

    return self;

}

-(UIBezierPath *)path{

    if (!_path) {

        _path = [[UIBezierPath alloc]init];

    }

    return _path;

}

- (void)touchesBegan:(NSSet *)touches withEvent:(UIEvent *)event

{

    CGPoint point = [[touches anyObject] locationInView:self];

    [self.path moveToPoint:point];

}

- (void)touchesMoved:(NSSet *)touches withEvent:(UIEvent *)event

{

    CGPoint point = [[touches anyObject] locationInView:self];

    [self.path addLineToPoint:point];

    self.shapeLayer.path = self.path.CGPath;

}
优点:速度快,至少少创建一次寄宿图(drawRect),shapeLayer只有形状。
缺点:但如果绘制 线刷(离散),一个shapeLayer占一个图层,所以需要多层layer,而屏幕最多显示几百个图层。这时用 Core Graphics 绘图drawRect: ,会比较好。
后续补充:缺点,是参考以前的资料,自己试了下。离散的,也可以在同一个shapeLayer。
附录:
CGContext 方法
    //???

    CGContextGetTypeID();

    //保存之前的设置。比如当前想 更换颜色、复制+剪切一部分出来

    CGContextSaveGState(context);

    //恢复到上一个状态,和 CGContextSaveGState 成对

    CGContextRestoreGState(context);

    //缩放

    CGContextScaleCTM(context, 0.5, 0.5);

    //移动

    CGContextTranslateCTM(context, 50, 100);

    //旋转

    CGContextRotateCTM(context, 60/M_PI);

    //自定义变换(相当于 缩放、移动、旋转 都是它的一种情况)

    CGContextConcatCTM(context,transform);

    //获取transform

    CGContextGetCTM(context);

    //设置线宽

    CGContextSetLineWidth(context, 5.0);

    //设置画线的笔头

    CGContextSetLineCap(context, kCGLineCapRound);

    //设置两条线连接的转角样式

    CGContextSetLineJoin(context, kCGLineJoinRound);

    //设置两条线的连接点宽度,过长会剪切

    CGContextSetMiterLimit(context, 3.0);

    //设置虚线

    CGContextSetLineDash(context, 0, dash, 2);

    //设置弯曲的路径中的图形上下文的准确性。

    CGContextSetFlatness(context, 0.1f);

    //设置透明度

    CGContextSetAlpha(context, 1.0f);

    //设置混合模式

    CGContextSetBlendMode(context, kCGBlendModeNormal);

    //开始路径

    CGContextBeginPath(context);

    //移动到某点

    CGContextMoveToPoint(context,100,100);

    //从上一个点到当前点,绘制直线

    CGContextAddLineToPoint(context, 200, 100);

    //从上一个点到当前点,绘制贝塞尔曲线,控制点1,控制点2,终点

    CGContextAddCurveToPoint(context, 150,150,150,250,200,250);

    //从上一个点到当前点,绘制贝塞尔曲线,控制点,终点

    CGContextAddQuadCurveToPoint(context, 150, 200, 100, 250);

    //闭合路径

    CGContextClosePath(context);

    //添加矩形

    CGContextAddRect(context, rect);

    //添加多个矩形

    CGContextAddRects(context, rects, 2);

    //添加多条直线

    CGContextAddLines(context,points, 2);

    //内切圆

    CGContextAddEllipseInRect(context, rect);

    //弧

    CGContextAddArc(context, 50, 50, 3.0, 0, M_PI, YES);

    //弧?

    CGContextAddArcToPoint(context, 50, 50, 100, 100, 5.0);

    //添加路径

    CGContextAddPath(context, bezierPath.CGPath);

    //跟换路径

    CGContextReplacePathWithStrokedPath(context);

    //路径是否为空

    CGContextIsPathEmpty(context);

    //获取路径当前点

    CGContextGetPathCurrentPoint(context);

    //返回,当前路径,所需要的最小Rect。

    CGContextGetPathBoundingBox(context);

    //赋值路径

    CGContextCopyPath(context);

    //路径是否包含点,可选路径、填充。

    CGContextPathContainsPoint(context, point, kCGPathStroke);

    //绘制路径,可选路径、填充。

    CGContextDrawPath(context, kCGPathStroke);

    //填充路径

    CGContextFillPath(context);

    //奇偶填充路径

    CGContextEOFillPath(context);

    //描绘路径

    CGContextStrokePath(context);

    //填充矩形

    CGContextFillRect(context, rect);

    //填充多个矩形

    CGContextFillRects(context, rects, 2);

    //绘制矩形

    CGContextStrokeRect(context, rect);

    //绘制矩形,带宽

    CGContextStrokeRectWithWidth(context, rect, 3.0);

    //擦除矩形内的数据

    CGContextClearRect(context,rect);

    //填充内切圆

    CGContextFillEllipseInRect(context,rect);

    //绘制内切圆路径

    CGContextStrokeEllipseInRect(context, rect);

    //绘制线段

    CGContextStrokeLineSegments(context, points,2);

    //剪裁 环绕规则(按照之前绘制的路径)

    CGContextClip(context);

    //剪裁 奇偶规则

    CGContextEOClip(context);

    //剪裁 蒙版

    CGContextClipToMask(context, rect, [UIImage imageNamed:@"test"].CGImage);

    //获取剪裁的最小矩形

    CGContextGetClipBoundingBox(context);

    //剪裁 矩形

    CGContextClipToRect(context,rect);

    //剪裁 多个矩形

    CGContextClipToRects(context,rects, 2);

    //设置填充颜色

    CGContextSetFillColorWithColor(context, [UIColor redColor].CGColor);

    //设置绘制颜色

    CGContextSetStrokeColorWithColor(context, [UIColor grayColor].CGColor);
懒得测试、备注了,有空再填坑,有空再学了。。。。。。
    CGContextSetFillColorSpace(context, CGColorSpaceRef cg_nullable space);

    CGContextSetStrokeColorSpace(context, CGColorSpaceRef cg_nullable space);

    CGContextSetFillColor(context, const CGFloat * cg_nullable components);

    CGContextSetStrokeColor(context, const CGFloat * cg_nullable components);

    CGContextSetFillPattern(context, CGPatternRef cg_nullable pattern, const CGFloat * cg_nullable components)

    CGContextSetStrokePattern(context, CGPatternRef cg_nullable pattern, const CGFloat * cg_nullable components)

    CGContextSetPatternPhase(context, CGSize phase)

    CGContextSetGrayFillColor(context, CGFloat gray, CGFloat alpha)

    CGContextSetGrayStrokeColor(context, CGFloat gray, CGFloat alpha)

    CGContextSetRGBFillColor(context, CGFloat red, CGFloat green, CGFloat blue, CGFloat alpha)

    CGContextSetRGBStrokeColor(context, CGFloat red, CGFloat green, CGFloat blue, CGFloat alpha)

    CGContextSetCMYKFillColor(context, CGFloat cyan, CGFloat magenta, CGFloat yellow, CGFloat black, CGFloat alpha)

    CGContextSetCMYKStrokeColor(context, CGFloat cyan, CGFloat magenta, CGFloat yellow, CGFloat black, CGFloat alpha)

    CGContextSetRenderingIntent(context, CGColorRenderingIntent intent)

    CGContextDrawImage(context, CGRect rect, CGImageRef cg_nullable image)

    CGContextDrawTiledImage(context, CGRect rect, CGImageRef cg_nullable image)

    CGContextGetInterpolationQuality(context)

    CGContextSetInterpolationQuality(context, CGInterpolationQuality quality)

    CGContextSetShadowWithColor(context, CGSize offset, CGFloat blur, CGColorRef __nullable color)

    CGContextSetShadow(context, CGSize offset, CGFloat blur)

    CGContextDrawLinearGradient(context, CGGradientRef cg_nullable gradient, CGPoint startPoint, CGPoint endPoint, CGGradientDrawingOptions options)

    CGContextDrawRadialGradient(context, CGGradientRef cg_nullable gradient, CGPoint startCenter, CGFloat startRadius, CGPoint endCenter, CGFloat endRadius, CGGradientDrawingOptions options)

    CGContextDrawShading(context, cg_nullable CGShadingRef shading)

    CGContextSetCharacterSpacing(context, CGFloat spacing)

    CGContextSetTextPosition(context, CGFloat x, CGFloat y)

    CGContextGetTextPosition(context)

    CGContextSetTextMatrix(context, CGAffineTransform t)

    CGContextGetTextMatrix(context)

    CGContextSetTextDrawingMode(context, CGTextDrawingMode mode)

    CGContextSetFont(context, CGFontRef cg_nullable font)

    CGContextSetFontSize(context, CGFloat size)

    CGContextShowGlyphsAtPositions(context, const CGGlyph * cg_nullable glyphs, const CGPoint * cg_nullable Lpositions, size_t count)

    CGContextDrawPDFPage(context, CGPDFPageRef cg_nullable page)

    CGContextBeginPage(context, const CGRect * __nullable mediaBox)

    CGContextEndPage(context)

    contextGContextRetain(context)

    CGContextRelease(context)

    CGContextFlush(context)

    CGContextSynchronize(context)

    CGContextSetShouldAntialias(context,

    CGContextSetAllowsAntialiasing(context, bool allowsAntialiasing)

    CGContextSetShouldSmoothFonts(context, bool shouldSmoothFonts)

    CGContextSetAllowsFontSmoothing(context,

    CGContextSetShouldSubpixelPositionFonts( context, bool shouldSubpixelPositionFonts)

    CGContextSetAllowsFontSubpixelPositioning( context, bool allowsFontSubpixelPositioning)

    CGContextSetShouldSubpixelQuantizeFonts( context, bool shouldSubpixelQuantizeFonts)

    CGContextSetAllowsFontSubpixelQuantization( context, bool allowsFontSubpixelQuantization)

    CGContextBeginTransparencyLayer(context, CFDictionaryRef __nullable auxiliaryInfo)

    CGContextBeginTransparencyLayerWithRect( context, CGRect rect, CFDictionaryRef __nullable auxInfo)

    CGContextEndTransparencyLayer(context)

    CGContextGetUserSpaceToDeviceSpaceTransform(context)

    CGContextConvertPointToDeviceSpace(context,

    CGContextConvertPointToUserSpace(context,

    CGContextConvertSizeToDeviceSpace(context,

    CGContextConvertSizeToUserSpace(context, CGSize size)

    CGContextConvertRectToDeviceSpace(context,

    CGContextConvertRectToUserSpace(context,

    CGContextSelectFont(context, const char * cg_nullable name, CGFloat size, CGTextEncoding textEncoding)

    CGContextShowText(context, const char * cg_nullable string, size_t length)

    CGContextShowTextAtPoint(context, CGFloat x, CGFloat y, const char * cg_nullable string, size_t length)

    CGContextShowGlyphs(context, const CGGlyph * __nullable g, size_t count)

    CGContextShowGlyphsAtPoint(context, CGFloat x, CGFloat y, const CGGlyph * __nullable glyphs, size_t count)

    CGContextShowGlyphsWithAdvances(context, const CGGlyph * __nullable glyphs, const CGSize * __nullable advances, size_t count)

    CGContextDrawPDFDocument(context, CGRect rect, CGPDFDocumentRef cg_nullable document, int page)
iOS:绘图(18-01-25更)的更多相关文章
- iOS绘图教程 (转,拷贝以记录)
本文是<Programming iOS5>中Drawing一章的翻译,考虑到主题完整性,在翻译过程中我加入了一些书中没有涉及到的内容.希望本文能够对你有所帮助. 转自:http://www ...
- 论文第4章:iOS绘图平台的实现
面向移动设备的矢量绘图平台设计与实现 Design and Implementation of Mobile Device-oriented Vector Drawing Platform 引用本论文 ...
- iOS绘图教程
本文是<Programming iOS5>中Drawing一章的翻译,考虑到主题完整性,翻译版本中加入了一些书中未涉及到的内容.希望本文能够对你有所帮助.(本文由海水的味道翻译整理,转载请 ...
- IOS绘图
#import "ViewController.h" #import "DrawView.h" @interface ViewController () @pr ...
- iOS绘图框架CoreGraphics分析
由于CoreGraphics框架有太多的API,对于初次接触或者对该框架不是十分了解的人,在绘图时,对API的选择会感到有些迷茫,甚至会觉得iOS的图形绘制有些繁琐.因此,本文主要介绍一下iOS的绘图 ...
- Wed Jul 04 18:01:38 CST 2018 WARN: Establishing SSL connection without server's identity verification is not recommended
Wed Jul 04 18:01:38 CST 2018 WARN: Establishing SSL connection without server's identity verificatio ...
- 日本IT行业劳动力缺口达22万 在日中国留学生迎来就业好时机 2017/07/18 11:25:09
作者:倪亚敏 来源:日本新华侨报 发布时间:2017/07/18 11:25:09 据日本政府提供的数据,日本2018年应届毕业生的“求人倍率”已经达到了1.78倍.换言之,就是100名大学生 ...
- iOS绘图系统UIKit与Core Graphics
概述 iOS主要的绘图系统有UIKit,Core Graphics,Core Animation,Core Image,Open GL等,本片博文主要介绍UIKit与Core Graphics的绘图系 ...
- iOS开发优化的25个方案
写在前面 本文来自iOS Tutorial Team 的 Marcelo Fabri,他是Movile的一名 iOS 程序员.这是他的个人网站:http://www.marcelofabri.com/ ...
- iOS:动画(18-10-15更)
目录 1.UIView Animation 1-1.UIView Animation(基本使用) 1-2.UIView Animation(转场动画) 2.CATransaction(Layer版的U ...
随机推荐
- c# json数组动态字段名
根据给定的列名动态生成json数组 List<string> cols = new List<string>() { "姓名","性别" ...
- 如何让div覆盖canvas元素
第一步 请让该div和canvas同样处于同一画布,都用position:absolute; 然后设置canvas的z-index="-1",是的,你没看错 然后把要覆盖canva ...
- Windows Server 2008 R2配置JSP网站无法访问
在Windows Server 2008 R2中配置好JSP网站后,在本机可以使用 localhost访问网站,但是局域网内其机器无法访问,则需要在Windows Server 2008 R2的系统管 ...
- python完全学习笔记
dir(__builtins__) help(input) 'let\'s go' #转义字符 \ r'c:\now' #字符串前加r 自动转义 str= ''' shdiufhi s ...
- Elk and nginx and redis 干货
ELKStack ELKStack即Elasticsearch + Logstash + Kibana.日志监控和分析在保障业务稳定运行时,起到了很重要的作用.比如对nginx日志的监控分析,ngin ...
- Eclipse编码格式
来源:http://e-ant.javaeye.com/blog/177579 如果要使插件开发应用能有更好的国际化支持,能够最大程度的支持中文输出,则最好使 Java文件使用UTF-8编码.然而,E ...
- 无缓冲和带缓冲channel的区别
常规定义的channel都是默认不带缓冲的,如下代码所示 package main import ( "fmt" ) func main() { c := make(chan in ...
- Hyperledger Fabric 1.0 学习搭建 (五)--- 启动Fabric多节点集群
5.1.启动orderer节点服务 上述操作完成后,此时各节点的compose配置文件及证书验证目录都已经准备完成,可以开始尝试启动多机Fabric集群. 首先启动orderer节点,切换至order ...
- ABAP类的文档生成工具
本文介绍的工具原理和JavaDoc类似,位于software component BBPCRM 1. 在ABAP类里新建一个名为CLASS_DOCU的私有方法. 然后把所有的注释写在这个方法源代码的前 ...
- mongodb分片集群(无副本集)搭建
数据分片节点#192.168.114.26#mongo.cnfport=2001dbpath=/data/mongodb/datalogpath=/data/mongodb/log/mongodb.l ...
