利用Warensoft Stock Service编写高频交易软件
利用Warensoft Stock Service编写高频交易软件
无论是哪种交易软件,对于程序员来讲,最麻烦的就是去实现各种算法。本文以SAR算法的实现过程为例,为大家说明如何使用Warensoft Stock Service来实现高频交易软件的快速开发。
目前WarensoftStockService已经实现了C# 版本的客户端驱动,可以直接在Nuget上搜索Warensoft并安装。客户端驱动已经编译为跨平台.net standard1.6版本,可以在桌面应用(WPF,Winform)、Xamarin手机应用(WP,Android,IOS)、Web(asp.net,asp.net core)中应用,操作系统可以是Window,Android,IOS,IMAC,Linux。
下面将以Android为例(注:本Demo可以直接平移到WPF中),说明SAR指标的实现过程,其他指标计算的综合应用,在其他文章中会专门讲解。
- 软件环境说明
|
IDE |
VS2017 RC |
|
客户端 |
Android4.4 |
|
服务器环境 |
Ubuntu16 |
|
客户端运行环境 |
Xamarin.Forms |
|
客户端图形组件 |
Oxyplot |
- 建立一个Xamarin.Forms手机App
这里选择基于XAML的App,注意共享库使用PCL。
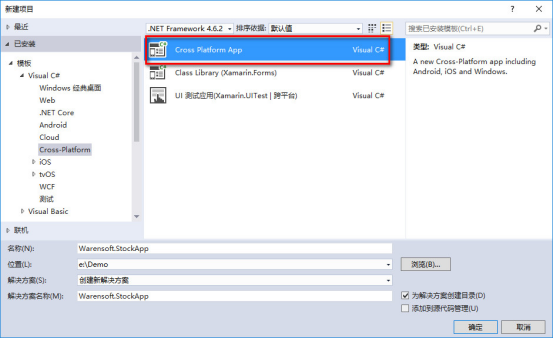
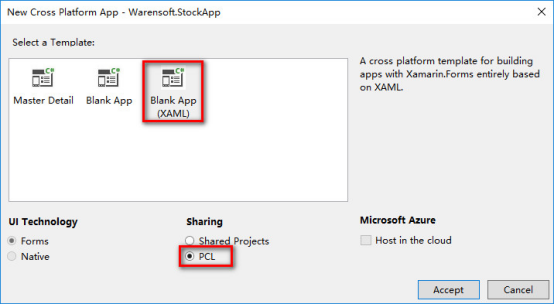
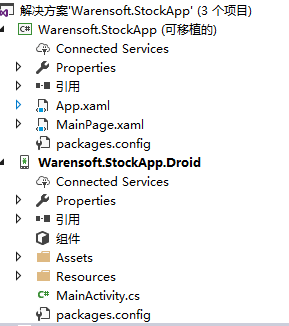
工程目录下图所示:
- 添加Nuget引用包
首先,为Warensoft.StockApp共享库添加Oxyplot引用(此处可能需要科学上网),如下图所示:
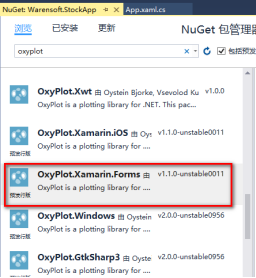
然后再分别安装Warensoft.EntLib.Common,Warensoft.EntLib.StockServiceClient,如下图所示:
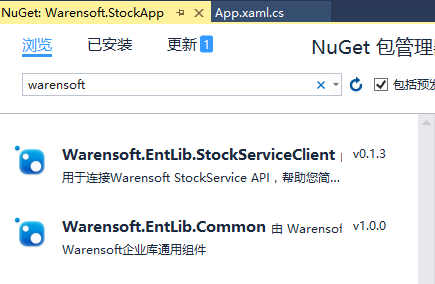
然后为Warensoft.StockApp.Droid添加OxyPlot的NuGet引用,如下所示:
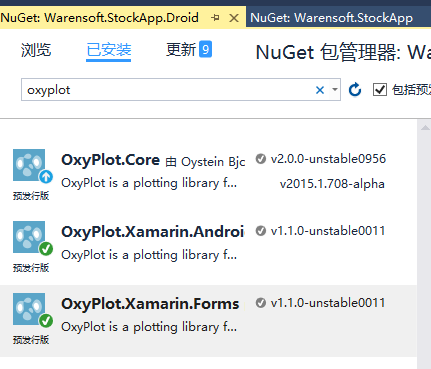
然后在Android的MainActivity中加入平台注册代码:
OxyPlot.Xamarin.Forms.Platform.Android.PlotViewRenderer.Init();
MainActivity.cs的代码如下所示:
protected override void OnCreate(Bundle bundle)

        {

            TabLayoutResource = Resource.Layout.Tabbar;

            ToolbarResource = Resource.Layout.Toolbar;

            OxyPlot.Xamarin.Forms.Platform.Android.PlotViewRenderer.Init();

            base.OnCreate(bundle);

            global::Xamarin.Forms.Forms.Init(this, bundle);

            LoadApplication(new App());

        }
- 实现主窗口
主界面的实现采用MVVM模式来实现,关于MVVM的讲解,网上应该有很多了,后面的文章中,我会把我自己的理解写出来,让大家分享。本DEMO的MVVM框架已经集成在了Warensoft.EntLib.Common中,使用起来很简单。
第一步:
编写主界面(需要了解XAML语法),并修改MainPage.xaml,如代码如下:
<?xml version="1.0" encoding="utf-8" ?>

<ContentPage xmlns="http://xamarin.com/schemas/2014/forms"

             xmlns:x="http://schemas.microsoft.com/winfx/2009/xaml"

             xmlns:local="clr-namespace:Warensoft.StockApp"

             xmlns:oxy="clr-namespace:OxyPlot.Xamarin.Forms;assembly=OxyPlot.Xamarin.Forms"

             x:Class="Warensoft.StockApp.MainPage">

    <!--

    此处要注意在头中注册OxyPlot的命名空间

    xmlns:oxy="clr-namespace:OxyPlot.Xamarin.Forms;assembly=OxyPlot.Xamarin.Forms"-->

    <Grid>

        <!--此处添加图形组件-->

        <oxy:PlotView Model="{Binding Model}" VerticalOptions="Center" HorizontalOptions="Center" />

    </Grid>

</ContentPage>
第二步:
打开MainPage.xaml.cs并为视图(图面)添加其对应的模型,代码如下(注意要引入Warensoft.EntLib.Common):
public partial class MainPage : ContentPage

    {

        public MainPage()

        {

            InitializeComponent();

            //此处注册ViewModel

            this.BindingContext = new MainPageViewModel();

        }

    }

    public class MainPageViewModel : ViewModelBase

    {

        public override Task ShowCancel(string title, string message)

        {

            throw new NotImplementedException();

        }

        public override Task<bool> ShowConfirm(string title, string message)

        {

            throw new NotImplementedException();

        }

        public override void ShowMessage(string message)

        {

            Application.Current.MainPage.DisplayAlert("提示",message,"OK");

        }

        protected override void InitBindingProperties()

        {

        }

}
第三步:
定义图像组件的模型,并为图像添加X、Y坐标轴,添加一个K线和一条直线,代码如下所示:
  public PlotModel Model

        {

            get { return this.GetProperty<PlotModel>("Model"); }

            set { this.SetProperty("Model", value); }

        }

        protected override void InitBindingProperties()

        {

            this.Model = new PlotModel();

            //添加X、Y轴

            this.Model.Axes.Add(new OxyPlot.Axes.DateTimeAxis()

            {

                Position = AxisPosition.Bottom,

                StringFormat = "HH:mm",

                MajorGridlineStyle = LineStyle.Solid,

                IntervalType = DateTimeIntervalType.Minutes,

                IntervalLength = ,

                MinorIntervalType = DateTimeIntervalType.Minutes,

                Key = "Time",

            });

            this.Model.Axes.Add(new OxyPlot.Axes.LinearAxis()

            {

                Position = AxisPosition.Right,

                MajorGridlineStyle = LineStyle.Solid,

                MinorGridlineStyle = LineStyle.Dot,

                IntervalLength = ,

                IsPanEnabled = false,

                IsZoomEnabled = false,

                TickStyle = TickStyle.Inside,

            });

            //添加K线和直线

            this.candle = new OxyPlot.Series.CandleStickSeries();

            this.line = new OxyPlot.Series.LineSeries() { Color = OxyColors.Blue };

            this.Model.Series.Add(this.candle);

            this.Model.Series.Add(this.line);

        }
第四步:
添加获取K线函数(以OKCoin为例),代码如下:
/// <summary>

        /// 读取OKCoin的15分钟K线

        /// </summary>

        /// <returns></returns>

        public async Task<List<Kline>> LoadKline()

        {

            var url = $"https://www.okcoin.cn/api/v1/kline.do?symbol=btc_cny&type=15min&size=100";

            HttpClient client = new HttpClient();

            var result = await client.GetStringAsync(url);

            dynamic k = Newtonsoft.Json.JsonConvert.DeserializeObject(result);

            List<Kline> lines = new List<Kline>();

            int index = ;

            foreach (var item in k)

            {

                List<double> d = new List<double>();

                foreach (var dd in item)

                {

                    d.Add((double)((dynamic)dd).Value);

                }

                lines.Add(new Kline() { Data = d.ToArray()});

                index++;

            }

            return lines;

        }
第五步:
添加定时刷新并绘制图像的函数,代码如下所示:
private StockServiceDriver driver;

        public async Task UpdateData()

        {

            //初始化WarensoftSocketService客户端驱动,此处使用的是测试用AppKey和SecretKey

            this.driver = new StockServiceDriver("C6651783-A3B9-4B72-8B02-A2E67A59C5A6", "6C442B3AF58D4DDA81BB03B353C0D7D8");

            await Task.Run(async()=>

            {

                while (true)

                {

                    try

                    {

                        //读取K线

                        var kline =await this.LoadKline();

                        //远程Warensoft Stock Service 分析SAR曲线

                        var sar = await this.driver.GetSAR(kline);

                        //绘图,注意办为需要更新UI,因此需要在主线程中执行更新代码

                        this.SafeInvoke(()=> {

                            //每次更新前,需要将旧数据清空

                            this.candle.Items.Clear();

                            this.line.Points.Clear();

                            foreach (var item in kline.OrderBy(k=>k.Time))

                            {

                                //注意将时间改为OxyPlot能识别的格式

                                var time = OxyPlot.Axes.DateTimeAxis.ToDouble(item.Time);

                                this.candle.Items.Add(new HighLowItem(time,item.High,item.Low,item.Open,item.Close));

                            }

                            if (sar.OperationDone)

                            {

                                foreach (var item in sar.AdditionalData.OrderBy(s=>s.DateTime))

                                {

                                    var time= OxyPlot.Axes.DateTimeAxis.ToDouble(item.DateTime);

                                    this.line.Points.Add(new DataPoint(time, item.Value));

                                }

                            }

                            //更新UI

                            this.Model.InvalidatePlot(true);

                        });

                    }

                    catch (Exception ex)

                    {

                    }

                    await Task.Delay();

                }

            });

        }
完整的ViewModel代码如下:
using System;

using System.Collections.Generic;

using System.Linq;

using System.Text;

using System.Threading.Tasks;

using Xamarin.Forms;

using Warensoft.EntLib.Common;

using Warensoft.EntLib.StockServiceClient;

using OxyPlot;

using OxyPlot.Axes;

using OxyPlot.Series;

using Warensoft.EntLib.StockServiceClient.Models;

using System.Net.Http;

namespace Warensoft.StockApp

{

    public partial class MainPage : ContentPage

    {

        public MainPage()

        {

            InitializeComponent();

            this.BindingContext = new MainPageViewModel();

        }

    }

    public class MainPageViewModel : ViewModelBase

    {

        private CandleStickSeries candle;

        private LineSeries line;

        public override Task ShowCancel(string title, string message)

        {

            throw new NotImplementedException();

        }

        public override Task<bool> ShowConfirm(string title, string message)

        {

            throw new NotImplementedException();

        }

        public override void ShowMessage(string message)

        {

            Application.Current.MainPage.DisplayAlert("提示",message,"OK");

        }

        public PlotModel Model

        {

            get { return this.GetProperty<PlotModel>("Model"); }

            set { this.SetProperty("Model", value); }

        }

        protected override void InitBindingProperties()

        {

            this.Model = new PlotModel();

            //添加X、Y轴

            this.Model.Axes.Add(new OxyPlot.Axes.DateTimeAxis()

            {

                Position = AxisPosition.Bottom,

                StringFormat = "HH:mm",

                MajorGridlineStyle = LineStyle.Solid,

                IntervalType = DateTimeIntervalType.Minutes,

                IntervalLength = ,

                MinorIntervalType = DateTimeIntervalType.Minutes,

                Key = "Time",

            });

            this.Model.Axes.Add(new OxyPlot.Axes.LinearAxis()

            {

                Position = AxisPosition.Right,

                MajorGridlineStyle = LineStyle.Solid,

                MinorGridlineStyle = LineStyle.Dot,

                IntervalLength = ,

                IsPanEnabled = false,

                IsZoomEnabled = false,

                TickStyle = TickStyle.Inside,

            });

            //添加K线和直线

            this.candle = new OxyPlot.Series.CandleStickSeries();

            this.line = new OxyPlot.Series.LineSeries() { Color = OxyColors.Blue };

            this.Model.Series.Add(this.candle);

            this.Model.Series.Add(this.line);

            this.UpdateData();

        }

        /// <summary>

        /// 读取OKCoin的15分钟K线

        /// </summary>

        /// <returns></returns>

        public async Task<List<Kline>> LoadKline()

        {

            var url = $"https://www.okcoin.cn/api/v1/kline.do?symbol=btc_cny&type=15min&size=100";

            HttpClient client = new HttpClient();

            var result = await client.GetStringAsync(url);

            dynamic k = Newtonsoft.Json.JsonConvert.DeserializeObject(result);

            List<Kline> lines = new List<Kline>();

            int index = ;

            foreach (var item in k)

            {

                List<double> d = new List<double>();

                foreach (var dd in item)

                {

                    d.Add((double)((dynamic)dd).Value);

                }

                lines.Add(new Kline() { Data = d.ToArray()});

                index++;

            }

            return lines;

        }

        private StockServiceDriver driver;

        public async Task UpdateData()

        {

            //初始化WarensoftSocketService客户端驱动,此处使用的是测试用AppKey和SecretKey

            this.driver = new StockServiceDriver("C6651783-A3B9-4B72-8B02-A2E67A59C5A6", "6C442B3AF58D4DDA81BB03B353C0D7D8");

            await Task.Run(async()=>

            {

                while (true)

                {

                    try

                    {

                        //读取K线

                        var kline =await this.LoadKline();

                        //远程Warensoft Stock Service 分析SAR曲线

                        var sar = await this.driver.GetSAR(kline);

                        //绘图,注意办为需要更新UI,因此需要在主线程中执行更新代码

                        this.SafeInvoke(()=> {

                            //每次更新前,需要将旧数据清空

                            this.candle.Items.Clear();

                            this.line.Points.Clear();

                            foreach (var item in kline.OrderBy(k=>k.Time))

                            {

                                //注意将时间改为OxyPlot能识别的格式

                                var time = OxyPlot.Axes.DateTimeAxis.ToDouble(item.Time);

                                this.candle.Items.Add(new HighLowItem(time,item.High,item.Low,item.Open,item.Close));

                            }

                            if (sar.OperationDone)

                            {

                                foreach (var item in sar.AdditionalData.OrderBy(s=>s.DateTime))

                                {

                                    var time= OxyPlot.Axes.DateTimeAxis.ToDouble(item.DateTime);

                                    this.line.Points.Add(new DataPoint(time, item.Value));

                                }

                            }

                            //更新UI

                            this.Model.InvalidatePlot(true);

                        });

                    }

                    catch (Exception ex)

                    {

                    }

                    await Task.Delay();

                }

            });

        }

    }

}
最后编译,并部署到手机上,最终运行效果如下:
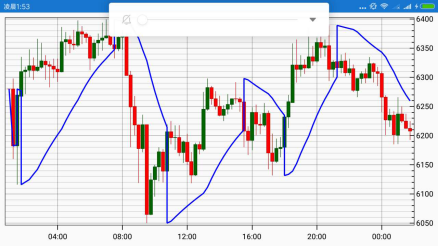
最终编译完毕的APK文件(下载)。
作者:科学家
Email:warensoft@163.com
微信:43175692
利用Warensoft Stock Service编写高频交易软件的更多相关文章
- 利用Warensoft Stock Service编写高频交易软件--DEMO
利用Warensoft Stock Service编写高频交易软件 无论是哪种交易软件,对于程序员来讲,最麻烦的就是去实现各种算法.本文以SAR算法的实现过程为例,为大家说明如何使用Warensoft ...
- 利用Warensoft Stock Service编写高频交易软件--客户端驱动接口说明
Warensoft Stock Service Api客户端接口说明 Warensoft Stock Service Api Client Reference 本项目客户端驱动源码已经发布到GitHu ...
- Warensoft Stock Service Api客户端接口说明
Warensoft Stock Service Api客户端接口说明 Warensoft Stock Service Api Client Reference 可使用环境(Available Envi ...
- 利用 Django REST framework 编写 RESTful API
利用 Django REST framework 编写 RESTful API Updateat 2015/12/3: 增加 filter 最近在玩 Django,不得不说 rest_framewor ...
- 第三百五十七节,Python分布式爬虫打造搜索引擎Scrapy精讲—利用开源的scrapy-redis编写分布式爬虫代码
第三百五十七节,Python分布式爬虫打造搜索引擎Scrapy精讲—利用开源的scrapy-redis编写分布式爬虫代码 scrapy-redis是一个可以scrapy结合redis搭建分布式爬虫的开 ...
- C++:利用如下公式,编写函数计算∏的值,直到最后一项的绝对值小于e,主程序接收从键盘输入的e,输出∏的值(保留5位小数)。 ∏/4 = 1-1/3+1/5-1/7...
利用如下公式,编写函数计算∏的值,直到最后一项的绝对值小于e,主程序接收从键盘输入的e,输出∏的值(保留5位小数). ∏/4 = 1-1/3+1/5-1/7... #include <iostr ...
- 通过利用immutability的能力编写更安全和更整洁的代码
通过利用immutability的能力编写更安全和更整洁的代码 原文:Write safer and cleaner code by leveraging the power of "Imm ...
- Android -- 利用Broadcast开启Service(转)
Broadcast和Service都是Android四大组建之一的. 这里的广播是动态的,自己注册的一个广播. 这种最典型的用法就是利用开机广播,然后再起自己的服务,也就是在Android手机中做到开 ...
- 利用Eric+Qt Designer编写倒计时时钟
[前言]前几日通过编写命令行通讯录,掌握了Python的基本语法结构,于是开始向更高水平冲击,利用Eric与Qt Designer 编写一个带界面的小程序.本次实操中也确实遇到了不少问题,通过学习也都 ...
随机推荐
- 【转】eclipse -- the project was not built due to a resource exists with a different case...
原文网址:http://blog.csdn.net/mylinx/article/details/44280563 进行编码时,工程前面莫名有个红X,正当百思不得其解时,发现在[problems]下有 ...
- 【贪心】CSU 1809 Parenthesis (2016湖南省第十二届大学生计算机程序设计竞赛)
题目链接: http://acm.csu.edu.cn/OnlineJudge/problem.php?id=1809 题目大意: 给一个长度为N(N<=105)的合法括号序列.Q(Q<= ...
- 汉洛塔递归实现的思考(C语言)
汉洛塔是古印度神话产生的智力玩具,他的玩法是,有三个柱子分别为A,B,C,A柱上面有n个盘子上面小下面大堆叠放在一起,现在要求激将A柱上的盘子全部移到C柱上面,并且一次只能移动一个盘子,必须是小盘在大 ...
- 《University Calculus》-chaper8-无穷序列和无穷级数-等比级数
前言:其实无穷序列和无穷级数和数列{an}以及我们接触微积分就给出的极限概念lim有着紧密的联系,它对于我们在具体的问题当中进行建模和数据分析有着非常重要的作用. 无穷序列: 最简单的一种说法,就是一 ...
- C++ static(施工中)
static 变量 头文件中的static会在引用该头文件的cpp中分别生成副本 //H.h #ifndef _H_H_ #define _H_H_ ; #endif //Ex_2.c #includ ...
- Java Annotation 必须掌握的特性
什么是Annotation? Annotation翻译为中文即为注解,意思就是提供除了程序本身逻辑外的额外的数据信息.Annotation对于标注的代码没有直接的影响,它不可以直接与标注的代码产生交互 ...
- hdoj 1728 逃离迷宫
逃离迷宫 Time Limit: 1000/1000 MS (Java/Others) Memory Limit: 32768/32768 K (Java/Others)Total Submis ...
- Failed to execute goal org.apache.maven.plugins:maven-clean-plugin:2.5:clean (default-clean) on project taotao-manager-web: Failed to clean project: Failed to delete \target\tomcat\logs\access_log.201
点击console右上角叉号然后再点击红色小方形terminate
- Hadoop 的子项目
Hadoop Common: 在0.20及以前的版本中,包含HDFS.MapReduce和其他项目公共内容,从0.21开始HDFS和MapReduce被分离为独立的子项目,其余内容为Hadoop Co ...
- 【protobuf进阶】读取proto实体里的extensionObject对象的方法
//设置扩展对象 ProtoBuf.Extensible.AppendValue //读取扩展对象 ProtoBuf.Extensible.GetValue 最近通过C#的TcpClient调用jav ...
