android自定义listview实现圆角
在项目中我们会经常遇到这种圆角效果,因为直角的看起来确实不那么雅观,可能大家会想到用图片实现,试想上中下要分别做三张图片,这样既会是自己的项目增大也会增加内存使用量,所以使用shape来实现不失为一种更好的实现方式。在这里先看一下shape的使用:
<?xml version="1.0" encoding="utf-8"?>

<shape xmlns:android="http://schemas.android.com/apk/res/android"

       android:shape="rectangle"

       >

      <!-- 渐变 -->

       <gradient

       android:startColor="#B5E7B8"

       android:endColor="#76D37B"

       android:angle="270"

       />

      <!-- 描边 -->

      <stroke android:width="1dip"

       android:color="@color/blue"

       />

      <!-- 实心 -->

      <solid android:color="#FFeaeaea"

       />

      <!-- 圆角 -->

       <corners

       android:bottomRightRadius="4dip"

       android:bottomLeftRadius="4dip"

       android:topLeftRadius="4dip"

       android:topRightRadius="4dip"

       />

</shape>
solid:实心,就是填充的意思
android:color指定填充的颜色
gradient:渐变
android:startColor和android:endColor分别为起始和结束颜色,ndroid:angle是渐变角度,必须为45的整数倍。
另外渐变默认的模式为android:type="linear",即线性渐变,可以指定渐变为径向渐变,android:type="radial",径向渐变需要指定半径android:gradientRadius="50"。
stroke:描边
android:width="2dp" 描边的宽度,android:color 描边的颜色。
我们还可以把描边弄成虚线的形式,设置方式为:
android:dashWidth="5dp"
android:dashGap="3dp"
其中android:dashWidth表示'-'这样一个横线的宽度,android:dashGap表示之间隔开的距离。
corners:圆角
android:radius为角的弧度,值越大角越圆。
OK,下面开始自定义listview实现圆角的例子:
首先在drawable下定义只有一项的选择器app_list_corner_round.xml:
<?xml version="1.0" encoding="utf-8"?>

<shape xmlns:android="http://schemas.android.com/apk/res/android"

       android:shape="rectangle"

       >

      <!-- 渐变 -->

       <gradient

       android:startColor="#B5E7B8"

       android:endColor="#76D37B"

       android:angle="270"

       />

      <!-- 描边 -->

      <stroke android:width="1dip"

       android:color="@color/blue"

       />

      <!-- 实心 -->

      <solid android:color="#FFeaeaea"

       />

      <!-- 圆角 -->

       <corners

       android:bottomRightRadius="4dip"

       android:bottomLeftRadius="4dip"

       android:topLeftRadius="4dip"

       android:topRightRadius="4dip"

       />

</shape>
如果是顶部第一项,则上面两个角为圆角,app_list_corner_round_top.xml:
<?xml version="1.0" encoding="utf-8"?>

<shape xmlns:android="http://schemas.android.com/apk/res/android"

       android:shape="rectangle"

       >

       <gradient

       android:startColor="#B5E7B8"

       android:endColor="#76D37B"

       android:angle="270"

       />

      <stroke android:width="1dip"

       android:color="@color/blue"

       />

      <solid android:color="#FFeaeaea"

       />

       <corners

           android:topLeftRadius="4dip"

           android:topRightRadius="4dip"

       />

</shape>
如果是底部最后一项,则下面两个角为圆角,app_list_corner_round_bottom.xml:
<?xml version="1.0" encoding="utf-8"?>

<shape xmlns:android="http://schemas.android.com/apk/res/android"

       android:shape="rectangle"

       >

       <gradient

       android:startColor="#B5E7B8"

       android:endColor="#76D37B"

       android:angle="270"

       />

      <stroke android:width="1dip"

       android:color="@color/blue"

       />

      <solid android:color="#FFeaeaea"

       />

       <corners

       android:bottomRightRadius="4dip"

       android:bottomLeftRadius="4dip"

       />

</shape>
如果是中间项,则应该不需要圆角, app_list_corner_round_center.xml:
<?xml version="1.0" encoding="utf-8"?>

<shape xmlns:android="http://schemas.android.com/apk/res/android"

       android:shape="rectangle"

       >

       <gradient

       android:startColor="#B5E7B8"

       android:endColor="#76D37B"

       android:angle="270"

       />

      <stroke android:width="1dip"

       android:color="@color/blue"

       />

      <solid android:color="#FFeaeaea"

       />

      <corners

       android:bottomRightRadius="4dip"

       android:bottomLeftRadius="4dip"

       />

</shape>
listview的背景图片大家可以使用stroke描述,这里我使用了一张9PNG的图片,因为9PNG图片拉伸不失真。
定义好了圆角的shape接下来是自定义listview的实现:
package cn.com.karl.view;

import cn.com.karl.test.R;

import android.content.Context;

import android.util.AttributeSet;

import android.view.MotionEvent;

import android.widget.AdapterView;

import android.widget.ListView;

/**

 * 圆角ListView

 */

public class CornerListView extends ListView {

    public CornerListView(Context context) {

        super(context);

    }

    public CornerListView(Context context, AttributeSet attrs, int defStyle) {

        super(context, attrs, defStyle);

    }

    public CornerListView(Context context, AttributeSet attrs) {

        super(context, attrs);

    }

    @Override

    public boolean onInterceptTouchEvent(MotionEvent ev) {

        switch (ev.getAction()) {

        case MotionEvent.ACTION_DOWN:

            int x = (int) ev.getX();

            int y = (int) ev.getY();

            int itemnum = pointToPosition(x, y);

            if (itemnum == AdapterView.INVALID_POSITION)

                break;

            else {

                if (itemnum == 0) {

                    if (itemnum == (getAdapter().getCount() - 1)) {

                        //只有一项

                        setSelector(R.drawable.app_list_corner_round);

                    } else {

                        //第一项

                        setSelector(R.drawable.app_list_corner_round_top);

                    }

                } else if (itemnum == (getAdapter().getCount() - 1))

                    //最后一项

                    setSelector(R.drawable.app_list_corner_round_bottom);

                else {

                    //中间项

                    setSelector(R.drawable.app_list_corner_round_center);

                }

            }

            break;

        case MotionEvent.ACTION_UP:

            break;

        }

        return super.onInterceptTouchEvent(ev);

    }

}
下面看一下列表布局文件setting。xml:
<?xml version="1.0" encoding="utf-8"?>

<LinearLayout xmlns:android="http://schemas.android.com/apk/res/android"

    android:layout_width="fill_parent"

    android:layout_height="fill_parent"

    android:orientation="vertical" >

    <include layout="@layout/head" />

    <cn.com.karl.view.CornerListView

        android:id="@+id/setting_list"

        android:layout_width="fill_parent"

        android:layout_height="wrap_content"

        android:layout_margin="10dip"

        android:background="@drawable/corner_list_bg"

        android:cacheColorHint="#00000000" />

</LinearLayout>
自定义Listview对应的item文件 main_tab_setting_list_item.xml
<?xml version="1.0" encoding="utf-8"?>

    <LinearLayout xmlns:android="http://schemas.android.com/apk/res/android"

        android:layout_width="fill_parent"

        android:layout_height="wrap_content">

        <RelativeLayout

            android:layout_width="fill_parent"

            android:layout_height="50dp"

            android:gravity="center_horizontal">

            <TextView

                android:id="@+id/tv_system_title"

                android:layout_width="wrap_content"

                android:layout_height="wrap_content"

                android:layout_alignParentLeft="true"

                android:layout_centerVertical="true"

                android:layout_marginLeft="10dp"

                android:text="分享"

                android:textColor="@color/black"/>

            <ImageView

                android:id="@+id/iv_system_right"

                android:layout_width="wrap_content"

                android:layout_height="wrap_content"

                android:layout_alignParentRight="true"

                android:layout_centerVertical="true"

                android:layout_marginRight="10dp"

                android:src="@drawable/arrow1" />

        </RelativeLayout>

    </LinearLayout>
最后是在activity中填充适配器:
package cn.com.karl.test;

import java.util.ArrayList;

import java.util.HashMap;

import java.util.List;

import java.util.Map;

import cn.com.karl.view.CornerListView;

import android.os.Bundle;

import android.view.View;

import android.widget.SimpleAdapter;

public class SettingActivity extends BaseActivity {

    private CornerListView cornerListView = null;

    private List<Map<String, String>> listData = null;

    private SimpleAdapter adapter = null;

    @Override

    protected void onCreate(Bundle savedInstanceState) {

        // TODO Auto-generated method stub

        super.onCreate(savedInstanceState);

        setContentView(R.layout.setting);

        cornerListView = (CornerListView)findViewById(R.id.setting_list);

        setListData();

        adapter = new SimpleAdapter(getApplicationContext(), listData, R.layout.main_tab_setting_list_item ,

                new String[]{"text"}, new int[]{R.id.tv_system_title});

                        cornerListView.setAdapter(adapter);

        initHead();

        btn_leftTop.setVisibility(View.INVISIBLE);

        tv_head.setText("设置");

    }

    /**

     * 设置列表数据

     */

    private void setListData(){

        listData = new ArrayList<Map<String,String>>();

        Map<String,String> map = new HashMap<String, String>();

        map.put("text", "分享");

        listData.add(map);

        map = new HashMap<String, String>();

        map.put("text", "检查新版本");

        listData.add(map);

        map = new HashMap<String, String>();

        map.put("text", "反馈意见");

        listData.add(map);

        map = new HashMap<String, String>();

        map.put("text", "关于我们");

        listData.add(map);

        map = new HashMap<String, String>();

        map.put("text", "支持我们,请点击这里的广告");

        listData.add(map);

    }

}
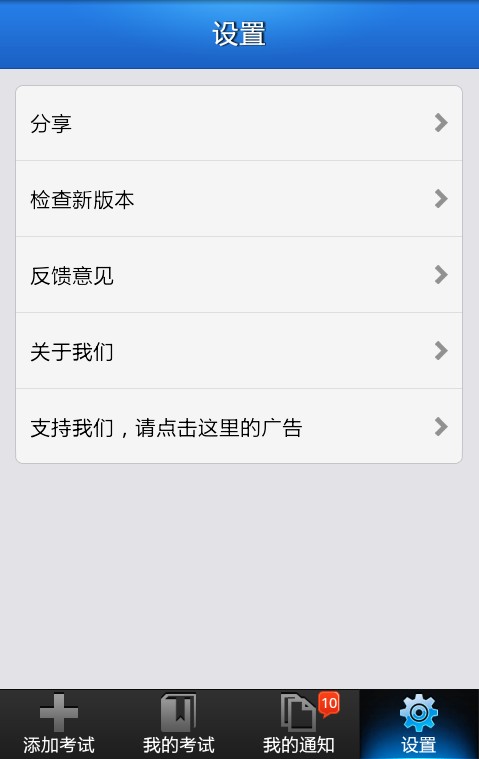
这样就完成了,虽然过程较繁杂,但是当做一个好的模板以后使用会方便很多,最后看一下实现效果和我们用图片实现的一样吗

【常用按钮style】
<?xml version="1.0" encoding="utf-8"?>

<layer-list xmlns:android="http://schemas.android.com/apk/res/android">

    <item>

        <shape>

            <gradient

                android:angle=""

                android:endColor="#d86212"

                android:startColor="#f9c468" />

            <stroke android:color="#ce5b18" android:width="1dp"/>

            <corners android:radius="5dip" />

        </shape>

    </item>

    <item>

        <selector>

            <item android:state_pressed="true">

                <shape>

                    <solid android:color="#dbdbdb" />

                    <corners android:radius="5dip" />

                </shape>

            </item>

        </selector>

    </item>

</layer-list>
android自定义listview实现圆角的更多相关文章
- Android 自定义ListView
本文讲实现一个自定义列表的Android程序,程序将实现一个使用自定义的适配器(Adapter)绑定 数据,通过contextView.setTag绑定数据有按钮的ListView. 系统显示列表(L ...
- Android 自定义 ListView 上下拉动“刷新最新”和“加载更多”歌曲列表
本文内容 环境 测试数据 项目结构 演示 参考资料 本文演示,上拉刷新最新的歌曲列表,和下拉加载更多的歌曲列表.所谓"刷新最新"和"加载更多"是指日期.演示代码 ...
- [置顶] android 自定义ListView实现动画特效
通过自定义ListView实现动画特效,被点击元素A向前移,A之前元素往后移动. 重点在于动画的实现: 具体代码如下: package com.open.widget; import java.uti ...
- Android 自定义ListView单击事件失效
因为自带的listView不能满足项目需求,通过实现自己的Adapter去继承ArrayAdapter 来实现自定义ListView的Item项目. 出现点击ListView的每一项都不会执行setO ...
- Android 自定义 ListView 显示网络上 JSON 格式歌曲列表
本文内容 环境 项目结构 演示自定义 ListView 显示网络上 JSON 歌曲列表 参考资料 本文最开始看的是一个国人翻译的文章,没有源代码可下载,根据文中提供的代码片段,自己新建的项目(比较可恶 ...
- Android 自定义 ListView 上下拉动刷新最新和加载更多
本文内容 开发环境 演示上下拉动刷新最新和加载更多 ListView 参考资料 本文演示上下拉动,刷新最新和加载更多,这个效果很常见,比如,新闻资讯类 APP,当向下拉动时,加载最新的资讯:向上拉动时 ...
- Android 自定义ListView实现底部分页刷新与顶部下拉刷新,androidlistview
在项目开发中,由于数据过大时,需要进行分页加载或下拉刷新,来缓解一次性加载的过长等待.本篇博文实例讲解通过自定义的ListView实现底部分页加载和顶部下拉刷新的效果. 其效果图: 一.ListVie ...
- Android 自定义ListView动态加载数据
我们都知道网络取数据是耗时操作,如果我们一次性请求所有数据,假如数据量不多那还可以接受,但是如果数据量特别多,那么带来的后果就是用户的愤怒(用户是很没有耐心的),所以这时候我们就需要动态的加载数据,分 ...
- android——自定义listView
都知道微信主机面 有个界面会一行一一行的聊天记录,那个效果就可以用listview来实现(当然这只是其中的一种) listView是一种比较常见的组件它用来展示列的view,它是根据数据的长度来显示数 ...
随机推荐
- asp.net mvc4 webapi Post 参数 字符串
用 mvc4中的WEBAPI, Post 到后台的参数如果为string,则直接接收不到,解决方案有两种 1.传递参数为自定义类 2.通过如下方式获取: //获取传统context var cont ...
- 批处理WMIC查看补丁情况
最近补丁比较多,需要看系统打了些啥,哪些没打的BAT: wmic qfe GET hotfixid > a.txt&(for %i in (KB3076321 KB3072604 KB3 ...
- 如何从BBC网站学习英语
- KV总结
今天没事又重新写了一遍.很多注释是自己犯糊涂后来又终于跨过去的备忘. // ImgEff.js function ImgEff(div,time){ //构造函数,需要传入参数div的id和时间 // ...
- Billboard
hdu2795:http://acm.hdu.edu.cn/showproblem.php?pid=2795 题意:给一个h*w的公告牌,h是高度,w是宽度,一个单位高度1为一行,然后会有一些公告贴上 ...
- Cortex-M0系统滴答定时器Systick详解
上图是LPC1114系统滴答定时器(SysTick)的结构图.系统滴答定时器位于Cortex-M0内核中,也就是说,不论是LPC1114,还是其他的Cortex-M0内核单片机,都有这个系统定时器.其 ...
- Content related to smartcards (and RFID/NFC)
Introduction Add your content here. ISO/IEC 7816 Contact Cards Hardware EMV payment cards Orange Cas ...
- 协程coroutine
协程(coroutine)顾名思义就是“协作的例程”(co-operative routines).跟具有操作系统概念的线程不一样,协程是在用户空间利用程序语言的语法语义就能实现逻辑上类似多任务的编程 ...
- C++中强制变换之const_cast
今天学习了一下C++中的强制转换,看了const_cast,我发现了这个转换关键字的奇怪之处,于是把它记录一下,废话不说,先看一个程序: #include <iostream> using ...
- 【转】轻量级文本编辑器,Notepad最佳替代品:Notepad++--不错
原文网址:http://www.crifan.com/files/doc/docbook/rec_soft_npp/release/htmls/npp_function_column_mode.htm ...