SpringBoot源码篇:Spring5内置tomcat实现code-based的web.xml实现
一、简介
上篇文章讲了SpingBoot诞生的历史背景和技术演进背景,并通过源码说明了SpringBoot是如何实现零配置的包括如何省去web.xml配置的原理。本文接上一篇文章,通过demo演示SpringBoot是如何内置tomcat并实现基于java配置的Servlet初始化和SpringBoot的启动流程。
二、基于java配置的web.xml实现
传统SpringMVC框架web.xml的配置内容
 <web-app>

     <!-- 初始化Spring上下文 -->

     <listener>

         <listener-class>org.springframework.web.context.ContextLoaderListener</listener-class>

     </listener>

     <!-- 指定Spring的配置文件 -->

     <context-param>

         <param-name>contextConfigLocation</param-name>

         <param-value>/WEB-INF/app-context.xml</param-value>

     </context-param>

     <!-- 初始化DispatcherServlet -->

     <servlet>

         <servlet-name>app</servlet-name>

         <servlet-class>org.springframework.web.servlet.DispatcherServlet</servlet-class>

         <init-param>

             <param-name>contextConfigLocation</param-name>

             <param-value></param-value>

         </init-param>

         <load-on-startup>1</load-on-startup>

     </servlet>

     <servlet-mapping>

         <servlet-name>app</servlet-name>

         <url-pattern>/app/*</url-pattern>

     </servlet-mapping>

 </web-app>
查看Spring官方文档https://docs.spring.io/spring/docs/5.0.14.RELEASE/spring-framework-reference/web.html#spring-web
文档中给出了如何使用java代码实现web.xml配置的example
 public class MyWebApplicationInitializer implements WebApplicationInitializer {

     @Override

     public void onStartup(ServletContext servletCxt) {

         // Load Spring web application configuration

         //通过注解的方式初始化Spring的上下文

         AnnotationConfigWebApplicationContext ac = new AnnotationConfigWebApplicationContext();

         //注册spring的配置类(替代传统项目中xml的configuration)

         ac.register(AppConfig.class);

         ac.refresh();

         // Create and register the DispatcherServlet

         //基于java代码的方式初始化DispatcherServlet

         DispatcherServlet servlet = new DispatcherServlet(ac);

         ServletRegistration.Dynamic registration = servletCxt.addServlet("app", servlet);

         registration.setLoadOnStartup(1);

         registration.addMapping("/app/*");

     }

 }
通过example可见基于java的web.xml的实现
三、代码实现简易版SpringBoot
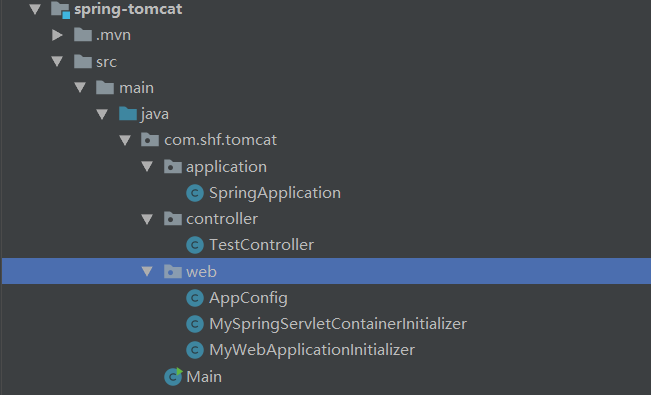
1、工程目录结构
2、pom.xml依赖
 <?xml version="1.0" encoding="UTF-8"?>

 <project xmlns="http://maven.apache.org/POM/4.0.0" xmlns:xsi="http://www.w3.org/2001/XMLSchema-instance"

          xsi:schemaLocation="http://maven.apache.org/POM/4.0.0 http://maven.apache.org/xsd/maven-4.0.0.xsd">

     <modelVersion>4.0.0</modelVersion>

     <groupId>com.shf</groupId>

     <artifactId>spring-tomcat</artifactId>

     <version>0.0.1-SNAPSHOT</version>

     <name>spring-tomcat</name>

     <description>Demo project for Spring Boot</description>

     <properties>

         <java.version>1.8</java.version>

     </properties>

     <dependencies>

         <dependency>

             <groupId>org.springframework</groupId>

             <artifactId>spring-web</artifactId>

             <version>5.0.8.RELEASE</version>

         </dependency>

         <dependency>

             <groupId>org.apache.tomcat.embed</groupId>

             <artifactId>tomcat-embed-core</artifactId>

             <version>8.5.32</version>

         </dependency>

         <dependency>

             <groupId>org.springframework</groupId>

             <artifactId>spring-context</artifactId>

             <version>5.0.8.RELEASE</version>

         </dependency>

         <dependency>

             <groupId>org.springframework</groupId>

             <artifactId>spring-webmvc</artifactId>

             <version>5.0.8.RELEASE</version>

         </dependency>

     </dependencies>

     <build>

         <plugins>

             <plugin>

                 <groupId>org.springframework.boot</groupId>

                 <artifactId>spring-boot-maven-plugin</artifactId>

             </plugin>

         </plugins>

     </build>

 </project>
3、初始化tomcat实例
 package com.shf.tomcat.application;

 import org.apache.catalina.LifecycleException;

 import org.apache.catalina.startup.Tomcat;

 import javax.servlet.ServletException;

 /**

  * 描述:初始化tomcat

  *

  * @Author shf

  * @Date 2019/5/26 14:58

  * @Version V1.0

  **/

 public class SpringApplication {

     public static void run(){

         //创建tomcat实例

         Tomcat tomcat = new Tomcat();

         //设置tomcat端口

         tomcat.setPort(8000);

         try {

             //此处随便指定一下webapp,让tomcat知道这是一个web工程

             tomcat.addWebapp("/", "D:\\");

             //启动tomcat

             tomcat.start();

             tomcat.getServer().await();

         } catch (LifecycleException e) {

             e.printStackTrace();

         } catch (ServletException e) {

             e.printStackTrace();

         }

     }

 }
4、AppConfig.java
该类主要实现Spring的配置,基于java实现spring xml的配置
 package com.shf.tomcat.web;

 import org.springframework.context.annotation.Bean;

 import org.springframework.context.annotation.ComponentScan;

 import org.springframework.context.annotation.Configuration;

 import javax.servlet.http.HttpServlet;

 /**

  * 描述:java代码实现类似于spring-context.xml的配置

  *

  * @Author shf

  * @Date 2019/5/22 21:28

  * @Version V1.0

  **/

 @Configuration

 @ComponentScan("com.shf.tomcat")

 public class AppConfig extends HttpServlet {

     @Bean

     public String string(){

         return new String("hello");

     }

 }
5、MyWebApplicationInitializer.java
值得一说,该类就是基于java的web.xml的配置
 package com.shf.tomcat.web;

 import org.springframework.web.WebApplicationInitializer;

 import org.springframework.web.context.support.AnnotationConfigWebApplicationContext;

 import org.springframework.web.servlet.DispatcherServlet;

 import javax.servlet.ServletContext;

 import javax.servlet.ServletException;

 import javax.servlet.ServletRegistration;

 /**

  * 描述:WebApplicationInitializer实现web.xml的配置

  *

  * @Author shf

  * @Date 2019/5/22 21:25

  * @Version V1.0

  **/

 public class MyWebApplicationInitializer implements WebApplicationInitializer {

     public void onStartup(ServletContext servletContext) throws ServletException {

         System.out.println("初始化 MyWebApplicationInitializer");

         //通过注解的方式初始化Spring的上下文

         AnnotationConfigWebApplicationContext ac = new AnnotationConfigWebApplicationContext();

         //注册spring的配置类(替代传统项目中xml的configuration)

         ac.register(AppConfig.class);

 //        ac.refresh();

         // Create and register the DispatcherServlet

         //基于java代码的方式初始化DispatcherServlet

         DispatcherServlet servlet = new DispatcherServlet(ac);

         ServletRegistration.Dynamic registration = servletContext.addServlet("/", servlet);

         registration.setLoadOnStartup(1);

         registration.addMapping("/*");

     }

 }
6、MySpringServletContainerInitializer.java
该类上篇文章已经讲的很清楚了
 package com.shf.tomcat.web;

 import org.springframework.core.annotation.AnnotationAwareOrderComparator;

 import org.springframework.util.ReflectionUtils;

 import org.springframework.web.WebApplicationInitializer;

 import javax.servlet.ServletContainerInitializer;

 import javax.servlet.ServletContext;

 import javax.servlet.ServletException;

 import javax.servlet.annotation.HandlesTypes;

 import java.lang.reflect.Modifier;

 import java.util.LinkedList;

 import java.util.List;

 import java.util.Set;

 @HandlesTypes(MyWebApplicationInitializer.class)

 public class MySpringServletContainerInitializer implements ServletContainerInitializer {

     public void onStartup(Set<Class<?>> webAppInitializerClasses, ServletContext servletContext) throws ServletException {

         List<WebApplicationInitializer> initializers = new LinkedList<WebApplicationInitializer>();

         if (webAppInitializerClasses != null) {

             for (Class<?> waiClass : webAppInitializerClasses) {

                 if (!waiClass.isInterface() && !Modifier.isAbstract(waiClass.getModifiers()) &&

                         WebApplicationInitializer.class.isAssignableFrom(waiClass)) {

                     try {

                         initializers.add((WebApplicationInitializer)

                                 ReflectionUtils.accessibleConstructor(waiClass).newInstance());

                     }

                     catch (Throwable ex) {

                         throw new ServletException("Failed to instantiate WebApplicationInitializer class", ex);

                     }

                 }

             }

         }

         if (initializers.isEmpty()) {

             servletContext.log("No Spring WebApplicationInitializer types detected on classpath");

             return;

         }

         servletContext.log(initializers.size() + " Spring WebApplicationInitializers detected on classpath");

         AnnotationAwareOrderComparator.sort(initializers);

         for (WebApplicationInitializer initializer : initializers) {

             initializer.onStartup(servletContext);

         }

     }

 }
7、META-INF/services/javax.servlet.ServletContainerInitializer

在该文件中配置ServletContainerInitializer的实现类

8、测试类
写一个测试类
 package com.shf.tomcat.controller;

 import org.springframework.web.bind.annotation.RequestMapping;

 import org.springframework.web.bind.annotation.RestController;

 @RestController

 public class TestController {

     @RequestMapping("/app/test")

     public String test(){

         System.out.println("--- hello ---");

         return "hello";

     }

 }
9、主类
 package com.shf.tomcat;

 import com.shf.tomcat.application.SpringApplication;

 public class Main {

     public static void main(String[] args) {

         SpringApplication.run();

     }

 }
10、测试
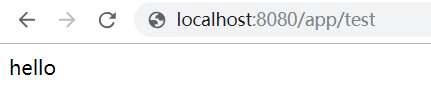
启动Main方法
浏览器访问:http://localhost:8080/app/test
四、小结
上篇文章介绍了SpringBoot是如何实现的基于java配置的web.xml。这篇文章我们通过一个demo来认识SpringBoot就是是如何内置tomcat并且实现零配置的。其实这个demo就像是一个简易版的SpringBoot的框架,基本模拟了SpringBoot的启动流程,只是差了SpringBoot最重要的能力---自动装配。
这两篇文章严格来说不应该算是SpringBoot的源码篇,但是笔者认为关于SpringBoot的发展历史、技术演进路线、及SpringBoot的嵌入式tomcat和code-based web.xml配置也是认识SpringBoot重要的一部分。
下一篇文章正式开始SpringBoot的源码阅读之旅。
SpringBoot源码篇:Spring5内置tomcat实现code-based的web.xml实现的更多相关文章
- springboot源码之(内嵌tomcat)
server---service----engine----host-----context---wrapper---servletStandardServer---StandardService-- ...
- SpringBoot源码篇:深度分析SpringBoot如何省去web.xml
一.前言 从本博文开始,正式开启Spring及SpringBoot源码分析之旅.这可能是一个漫长的过程,因为本人之前阅读源码都是很片面的,对Spring源码没有一个系统的认识.从本文开始我会持续更新, ...
- springboot学习笔记:6.内置tomcat启动和外部tomcat部署总结
springboot的web项目的启动主要分为: 一.使用内置tomcat启动 启动方式: 1.IDEA中main函数启动 2.mvn springboot-run 命令 3.java -jar XX ...
- Vue源码后记-其余内置指令(1)
把其余的内置指令也搞完吧,来一个全家桶. 案例如下: <body> <div id='app'> <div v-if="vIfIter" v-bind ...
- Vue源码后记-其余内置指令(2)
-- 指令这个讲起来还有点复杂,先把html弄上来: <body> <div id='app'> <div v-if="vIfIter" v-bind ...
- Vue源码后记-其余内置指令(3)
其实吧,写这些后记我才真正了解到vue源码的精髓,之前的跑源码跟闹着玩一样. go! 之前将AST转换成了render函数,跳出来后,由于仍是字符串,所以调用了makeFunction将其转换成了真正 ...
- 10.源码分析---SOFARPC内置链路追踪SOFATRACER是怎么做的?
SOFARPC源码解析系列: 1. 源码分析---SOFARPC可扩展的机制SPI 2. 源码分析---SOFARPC客户端服务引用 3. 源码分析---SOFARPC客户端服务调用 4. 源码分析- ...
- android studio应用修改到android源码中作为内置应用
1. 方法一:导入,编译(太麻烦,各种不兼容问题) android studio和eclipse的应用结构目录是不同的,但是在android源码中的应用基本上都是使用的eclipse目录结构(在/pa ...
- 不是springboot项目怎么使用内置tomcat
不是springboot项目怎么使用内置tomcat 解决方法: 1.pom.xml中添加以下依赖 <properties> <tomcat.version>8.5.23 ...
随机推荐
- Linux运维的第二周总结
挂载操作:mount 设备文件信息 挂载点目录:mount /dev/cdrom/mnt ; Umount /mnt 查看日志文件:日志文件保存路径: /var/log /日志重要文件信息: ...
- Kafka分区分配策略分析——重点:StickyAssignor
“ 为什么Kafka在RangeAssigor.RoundRobinAssignor的基础上,又新增了PartitionAssignor,它解决了什么问题?” 背景 用过Kafka的同学应该都知道Ka ...
- Plugin execution not covered by lifecycle configuration: org.codehaus.mojo:build-helper-maven-plugin:1.8:add-test-source (execution: add-functional-source, phase: generate-sources)
在maven项目中使用add-source时,pom.xml报如下错误: Plugin execution not covered by lifecycle configuration: org.co ...
- webpack入门指南(基于webpack v4.41.2)
2019年12月5日初稿,目前webpack已经更新到v4.41.2,本文正是基于该版本,在windows8.1操作系统下进行的demo编译,适用于想入门webpack的前端开发人员. webpack ...
- 洛谷 题解 2165 [AHOI2009]飞行棋
本蒟蒻又来发题解了, 看到这个题目,本蒟蒻直接开始推公式.. 嗯,可以通过弧长,推出弦长(l = 2 * r * cos(90 * l / (r * Π)); 然后对比各条弦长的平方和与直径的平方. ...
- python笔记02
day02笔记记录 一.今日摘要 循环.字符串格式化.运算符.编码.博客. 二.内容回顾 (一)计算机基础 计算机由硬件和软件组成.传统计算机的硬件一般有输入单元.输出单元,算数逻辑单元.控制单元及记 ...
- Java修炼——ArrayList常用的方法以及三种方式遍历集合元素。
List接口ArrayList用法详解 ArrayList常用方法: 1. List.add():添加的方法(可以添加字符串,常量,以及对象) List list=new ArrayList(); l ...
- 使用 webservice 实现 RPC 调用
WebService 介绍 Web service 是一个平台独立的,低耦合的 web 的应用程序用于开发分布式的互操作的应用程序.Web Service 技术, 能使得运行在不同机器上的不同应用无须 ...
- 2018 ACM/ICPC 南京 I题 Magic Potion
题解:最大流板题:增加两个源点,一个汇点.第一个源点到第二个源点连边,权为K,然后第一个源点再连其他点(英雄点)边权各为1,然后英雄和怪物之间按照所给连边(边权为1). 每个怪物连终点,边权为1: 参 ...
- Python必学之编译器用哪个好?你用错了吧!
学python要知道怎么用好编译器.当我们编写Python代码时,我们得到的是一个包含Python代码的以.py为扩展名的文本文件.要运行代码,就需要Python解释器去执行.py文件由于整个Pyth ...